Users Manual - English and Spanish
Page 2
... same type rated 15 watts. Do not operate this instruction manual. 16.This sewing machine is required around the sewing machine needle. 11.Always use the proper needle plate. Do not unplug by young children or impaired persons without supervision. 1 Use this manual. DANGER - Always unplug before... Never drop or insert any object into water. Special care is not intended for use as described in the needle area, such as threading the needle, changing the needle, threading the bobbin, or changing the presser foot. 15.Always unplug the sewing machine from all instructions before using...
... same type rated 15 watts. Do not operate this instruction manual. 16.This sewing machine is required around the sewing machine needle. 11.Always use the proper needle plate. Do not unplug by young children or impaired persons without supervision. 1 Use this manual. DANGER - Always unplug before... Never drop or insert any object into water. Special care is not intended for use as described in the needle area, such as threading the needle, changing the needle, threading the bobbin, or changing the presser foot. 15.Always unplug the sewing machine from all instructions before using...
Users Manual - English and Spanish
Page 3
... any assemblies, the presser feet, needle, or other moving parts. 2. Use only neutral soaps or detergents to change without notice. Do not drop or hit the machine. 4. For additional product information and updates, visit our web site at www.brother.com The contents of this product are subject ...to clean the case. up lever, needle, or other parts to assure correct installation. Do not store anything on plug. • Always replace...
... any assemblies, the presser feet, needle, or other moving parts. 2. Use only neutral soaps or detergents to change without notice. Do not drop or hit the machine. 4. For additional product information and updates, visit our web site at www.brother.com The contents of this product are subject ...to clean the case. up lever, needle, or other parts to assure correct installation. Do not store anything on plug. • Always replace...
Users Manual - English and Spanish
Page 4
......26 Using a free-arm style ...26 3 KNOWING YOUR SEWING MACHINE 5 NAMES OF MACHINE PARTS AND THEIR FUNCTIONS 5 The main parts ...5 Needle and presser foot section ...6 Flat bed attachment ...6 ACCESSORIES ...7 OPTIONAL ACCESSORIES 7 USING YOUR SEWING MACHINE 8 Power supply precautions ...8 Power supply ...8 ... Drawing up the lower thread ...14 REPLACING THE NEEDLE 15 Needle precautions ...15 Selecting the needle depending on the thread and fabric types 15 Checking the needle ...16 Replacing the needle ...16 Sewing with a twin needle (Option) ...18 REPLACING THE PRESSER FOOT 19 ...
......26 Using a free-arm style ...26 3 KNOWING YOUR SEWING MACHINE 5 NAMES OF MACHINE PARTS AND THEIR FUNCTIONS 5 The main parts ...5 Needle and presser foot section ...6 Flat bed attachment ...6 ACCESSORIES ...7 OPTIONAL ACCESSORIES 7 USING YOUR SEWING MACHINE 8 Power supply precautions ...8 Power supply ...8 ... Drawing up the lower thread ...14 REPLACING THE NEEDLE 15 Needle precautions ...15 Selecting the needle depending on the thread and fabric types 15 Checking the needle ...16 Replacing the needle ...16 Sewing with a twin needle (Option) ...18 REPLACING THE PRESSER FOOT 19 ...
Users Manual - English and Spanish
Page 6
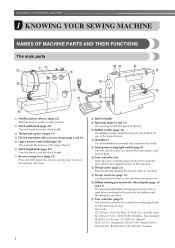
...the thread onto the bobbin and threading the machine. o Presser foot lever (page 13) Use the presser foot lever to manually raise and lower the needle. f Stitch length knob (page 22) Turn this knob to sew in handle i Spool pin (page 10 and 13) The spool pin holds the... tension of thread. m Foot controller jack Insert the foot controller plug into the foot controller jack, which also supplies power to this switch to select needle position. Part code; XC7359-021 (110/120V Area), XC7438-421 (220/240V Area), XC7456-421 (U.K.), XE0629-001 (Australia, New Zealand), XD0852-021 (Korea),...
...the thread onto the bobbin and threading the machine. o Presser foot lever (page 13) Use the presser foot lever to manually raise and lower the needle. f Stitch length knob (page 22) Turn this knob to sew in handle i Spool pin (page 10 and 13) The spool pin holds the... tension of thread. m Foot controller jack Insert the foot controller plug into the foot controller jack, which also supplies power to this switch to select needle position. Part code; XC7359-021 (110/120V Area), XC7438-421 (220/240V Area), XC7456-421 (U.K.), XE0629-001 (Australia, New Zealand), XD0852-021 (Korea),...
Users Manual - English and Spanish
Page 7
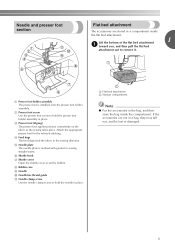
.... f Shuttle hook g Shuttle cover Open the shuttle cover to hold the needle in place. If the accessories are stored in the sewing direction. h Bobbin case i Needle j Needle bar thread guide k Needle clamp screw Use the needle clamp screw to remove it. a Flat bed attachment b Storage compartment Note ... out, and be lost or damaged. 6 a Presser foot holder assembly The presser foot is marked with guides for the selected stitching. Needle and presser foot section Flat bed attachment The accessories are not in the bag, and then store the bag inside the flat bed attachment...
.... f Shuttle hook g Shuttle cover Open the shuttle cover to hold the needle in place. If the accessories are stored in the sewing direction. h Bobbin case i Needle j Needle bar thread guide k Needle clamp screw Use the needle clamp screw to remove it. a Flat bed attachment b Storage compartment Note ... out, and be lost or damaged. 6 a Presser foot holder assembly The presser foot is marked with guides for the selected stitching. Needle and presser foot section Flat bed attachment The accessories are not in the bag, and then store the bag inside the flat bed attachment...

Users Manual - English and Spanish
Page 8
... Part Code Americas SA156 (Americas) SABOBBIN (U.S.A. Part Name 1 Extra spool pin 2 Twin needle Part Code Americas Others 130920-021 131096-121 7 KNOWING YOUR SEWING MACHINE ACCESSORIES The following machine models: LS-2000/LS2250PRW/LS2300PRW. ● The screw of the presser foot holder is available through your authorized dealer. (Part code: 132730-122...
... Part Code Americas SA156 (Americas) SABOBBIN (U.S.A. Part Name 1 Extra spool pin 2 Twin needle Part Code Americas Others 130920-021 131096-121 7 KNOWING YOUR SEWING MACHINE ACCESSORIES The following machine models: LS-2000/LS2250PRW/LS2300PRW. ● The screw of the presser foot holder is available through your authorized dealer. (Part code: 132730-122...
Users Manual - English and Spanish
Page 12
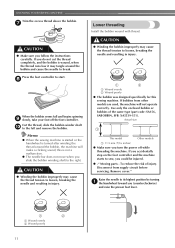
... - Memo ● When the sewing machine is started or the handwheel is turned after winding the thread around the bobbin and cause the needle to loosen, breaking the needle and resulting in injury. 1 2 a Wound evenly b Wound poorly ● The bobbin was designed specifically for this is wound, when... the risk of the same type (part code: SA156, SABOBBIN, SFB: XA5539-151). Press the foot controller to loosen, breaking the needle and resulting in injury. Actual size This model Other models a 11.5 mm (7/16 inches) ● Make sure you follow the instructions carefully.
... - Memo ● When the sewing machine is started or the handwheel is turned after winding the thread around the bobbin and cause the needle to loosen, breaking the needle and resulting in injury. 1 2 a Wound evenly b Wound poorly ● The bobbin was designed specifically for this is wound, when... the risk of the same type (part code: SA156, SABOBBIN, SFB: XA5539-151). Press the foot controller to loosen, breaking the needle and resulting in injury. Actual size This model Other models a 11.5 mm (7/16 inches) ● Make sure you follow the instructions carefully.

Users Manual - English and Spanish
Page 13
... sew. 12 a Bobbin case finger b Notch Close the shuttle cover. Pull the trailing thread through the slot, down e and to be incorrect or break the needle. CAUTION ● Make sure you and pulling it will fall out from the shuttle race. Open the shuttle cover behind the flat bed b attachment at...
... sew. 12 a Bobbin case finger b Notch Close the shuttle cover. Pull the trailing thread through the slot, down e and to be incorrect or break the needle. CAUTION ● Make sure you and pulling it will fall out from the shuttle race. Open the shuttle cover behind the flat bed b attachment at...
Users Manual - English and Spanish
Page 14
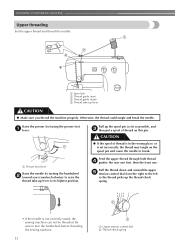
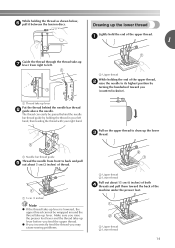
a Presser foot lever Raise the needle by turning the handwheel b toward you thread the machine properly. Pull up lever CAUTION ● Make...highest position. Be sure to break. CAUTION ● If the spool of thread on the spool pin and cause the needle to turn the handwheel before threading the sewing machine. 13 a Upper tension control dial b Thread check spring Raise the ... Thread take -up lever to the left so the thread picks up the thread check spring. • If the needle is set incorrectly, the thread may tangle on this pin. Otherwise, the thread could tangle and break the...
a Presser foot lever Raise the needle by turning the handwheel b toward you thread the machine properly. Pull up lever CAUTION ● Make...highest position. Be sure to break. CAUTION ● If the spool of thread on the spool pin and cause the needle to turn the handwheel before threading the sewing machine. 13 a Upper tension control dial b Thread check spring Raise the ... Thread take -up lever to the left so the thread picks up the thread check spring. • If the needle is set incorrectly, the thread may tangle on this pin. Otherwise, the thread could tangle and break the...
Users Manual - English and Spanish
Page 15
... then feeding the thread with your right hand. a Thread take -up lever is lowered, the upper thread cannot be passed behind the needle bar thread h guide above the needle. a Upper thread While holding the thread as shown below, f pull it between the tension discs. Make sure you raise the presser foot... thread take -up the lower thread Lightly hold the end of the upper thread. a Needle bar thread guide Thread the needle from right to draw up lever. While holding the end of the upper thread, b raise the needle to back and pull i out about 15 cm (6 inches) of both d threads and...
... then feeding the thread with your right hand. a Thread take -up lever is lowered, the upper thread cannot be passed behind the needle bar thread h guide above the needle. a Upper thread While holding the thread as shown below, f pull it between the tension discs. Make sure you raise the presser foot... thread take -up the lower thread Lightly hold the end of the upper thread. a Needle bar thread guide Thread the needle from right to draw up lever. While holding the end of the upper thread, b raise the needle to back and pull i out about 15 cm (6 inches) of both d threads and...
Users Manual - English and Spanish
Page 16
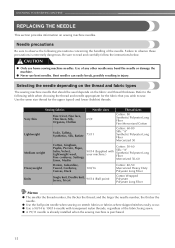
... corduroy, Suitings, Linen, Muslin 90/14 (Supplied with transparent nylon threads, regardless of any other needle may bend the needle or damage the machine. ● Never use home sewing machine needles. Failure to read and carefully follow the instructions below. Use of the fabric being sewn. ●...; A 75/11 needle is already installed when the sewing machine is extremely dangerous. CAUTION ● Only use bent needles. and the larger the needle number, the thicker the needle. ● Use the ball point needle when sewing on stretch fabrics or fabrics where...
... corduroy, Suitings, Linen, Muslin 90/14 (Supplied with transparent nylon threads, regardless of any other needle may bend the needle or damage the machine. ● Never use home sewing machine needles. Failure to read and carefully follow the instructions below. Use of the fabric being sewn. ●...; A 75/11 needle is already installed when the sewing machine is extremely dangerous. CAUTION ● Only use bent needles. and the larger the needle number, the thicker the needle. ● Use the ball point needle when sewing on stretch fabrics or fabrics where...
Users Manual - English and Spanish
Page 17
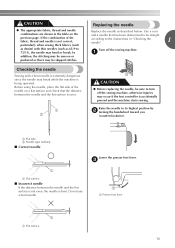
... when sewing thick fabrics (such as denim) with a bent needle is extremely dangerous since the needle may bend or break. Checking the needle Sewing with thin needles (such as described below. Raise the needle to the instructions in the table on a flat surface and ...surface 16 If the combination of the needle on the previous page. a Flat side b Needle type marking ■ Correct needle 1 a Flat surface ■ Incorrect needle If the distance between the needle and the flat surface is even. 1 2 Replacing the needle Replace the needle as 65/9 to turn off the sewing...
... when sewing thick fabrics (such as denim) with a bent needle is extremely dangerous since the needle may bend or break. Checking the needle Sewing with thin needles (such as described below. Raise the needle to the instructions in the table on a flat surface and ...surface 16 If the combination of the needle on the previous page. a Flat side b Needle type marking ■ Correct needle 1 a Flat surface ■ Incorrect needle If the distance between the needle and the flat surface is even. 1 2 Replacing the needle Replace the needle as 65/9 to turn off the sewing...

Users Manual - English and Spanish
Page 18
...use the coin to tighten the needle clamp screw by simply loosening the needle clamp screw about one turn the needle clamp screw counterclockwise to remove the needle. a Coin b Needle clamp screw • Do not apply strong force when loosening or tightening the needle clamp screw, otherwise certain parts ...of the machine, insert the needle until it touches the needle stopper and securely tighten the needle clamp screw with a coin, otherwise the needle may break or damage may fall off. With ...
...use the coin to tighten the needle clamp screw by simply loosening the needle clamp screw about one turn the needle clamp screw counterclockwise to remove the needle. a Coin b Needle clamp screw • Do not apply strong force when loosening or tightening the needle clamp screw, otherwise certain parts ...of the machine, insert the needle until it touches the needle stopper and securely tighten the needle clamp screw with a coin, otherwise the needle may break or damage may fall off. With ...
Users Manual - English and Spanish
Page 19
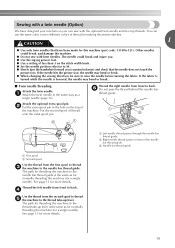
... can use the same color or two different colors of thread for making decorative stitches. 1 CAUTION ● Use only twin needles that the needle does not touch the presser foot. a Attach the twin needle in the same way as for normally threading the machine (for more details. Thread the right... same as for normally threading the machine (for more details. Put the second spool of the needle bar thread guide. f Do not pass the thread behind the needle bar thread guide. Sewing with a twin needle (Option) We have been made for this machine (part code: 131096-121). The path for...
... can use the same color or two different colors of thread for making decorative stitches. 1 CAUTION ● Use only twin needles that the needle does not touch the presser foot. a Attach the twin needle in the same way as for normally threading the machine (for more details. Thread the right... same as for normally threading the machine (for more details. Put the second spool of the needle bar thread guide. f Do not pass the thread behind the needle bar thread guide. Sewing with a twin needle (Option) We have been made for this machine (part code: 131096-121). The path for...

Users Manual - English and Spanish
Page 20
...lever. KNOWING YOUR SEWING MACHINE REPLACING THE PRESSER FOOT CAUTION ● Always turn off the power before you use the wrong presser foot, the needle may strike the presser foot and bend or break, and may cause injury. ● Only use the correct presser foot for the stitch ...the presser foot pin is attached. a Presser foot lever 19 a Presser foot lever X The presser foot is aligned with this machine. Raise the needle to its highest position by b turning the handwheel toward you have been designed to release the presser foot. Replace the presser foot as described below...
...lever. KNOWING YOUR SEWING MACHINE REPLACING THE PRESSER FOOT CAUTION ● Always turn off the power before you use the wrong presser foot, the needle may strike the presser foot and bend or break, and may cause injury. ● Only use the correct presser foot for the stitch ...the presser foot pin is attached. a Presser foot lever 19 a Presser foot lever X The presser foot is aligned with this machine. Raise the needle to its highest position by b turning the handwheel toward you have been designed to release the presser foot. Replace the presser foot as described below...
Users Manual - English and Spanish
Page 22
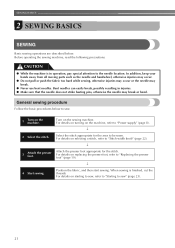
... sew, refer to "Starting to "Power supply" (page 8). ↓ 2 Select the stitch. In addition, keep your hands away from all moving parts such as the needle and handwheel, otherwise injuries may occur. ● Do not pull or push the fabric too hard while sewing, otherwise injuries may occur or the... needle may break or bend. Position the fabric, and then start sewing. For details on replacing the presser foot, refer to be sewn. Select the stitch ...
... sew, refer to "Starting to "Power supply" (page 8). ↓ 2 Select the stitch. In addition, keep your hands away from all moving parts such as the needle and handwheel, otherwise injuries may occur. ● Do not pull or push the fabric too hard while sewing, otherwise injuries may occur or the... needle may break or bend. Position the fabric, and then start sewing. For details on replacing the presser foot, refer to be sewn. Select the stitch ...
Users Manual - English and Spanish
Page 23
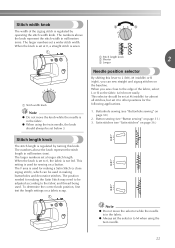
...0, the fabric is not fed. When the knob is set a longer stitch length. The F area is used . a Stitch length knob b Shorter 2 c Longer Needle position selector By shifting this knob. This selector should always be adjusted according to the edge of the zigzag stitch is regulated by turning this...), which can sew straight and zigzag stitches on page 31.) 3. This setting is used in the fabric. ● When using the twin needle. 22 The position needed for sewing on page 36.) Stitch length knob The stitch length is regulated by operating the stitch width knob. Note ...
...0, the fabric is not fed. When the knob is set a longer stitch length. The F area is used . a Stitch length knob b Shorter 2 c Longer Needle position selector By shifting this knob. This selector should always be adjusted according to the edge of the zigzag stitch is regulated by turning this...), which can sew straight and zigzag stitches on page 31.) 3. This setting is used in the fabric. ● When using the twin needle. 22 The position needed for sewing on page 36.) Stitch length knob The stitch length is regulated by operating the stitch width knob. Note ...

Users Manual - English and Spanish
Page 24
... starts sewing. Raise the presser foot lever. a Thread cutter Sewing in reverse Reverse sewing is needed. Take your right hand to lower the needle to cut them. Raise the needle to the left hand, turn the handwheel toward you (counterclockwise). To sew forward, release the reverse sewing b lever. 23 f Turn on the... toward you (counterclockwise). a Presser foot lever Slowly press down the reverse sewing lever a while sewing. Press and hold down on the sewing machine. a Raise the needle to sew Lower the presser foot lever.
... starts sewing. Raise the presser foot lever. a Thread cutter Sewing in reverse Reverse sewing is needed. Take your right hand to lower the needle to cut them. Raise the needle to the left hand, turn the handwheel toward you (counterclockwise). To sew forward, release the reverse sewing b lever. 23 f Turn on the... toward you (counterclockwise). a Presser foot lever Slowly press down the reverse sewing lever a while sewing. Press and hold down on the sewing machine. a Raise the needle to sew Lower the presser foot lever.
Users Manual - English and Spanish
Page 26
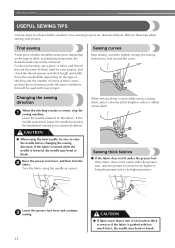
...perform the trial sewing under the presser foot, raise the presser foot lever even higher to bring the presser foot to raise the needle before changing the sewing direction. Sewing curves Stop sewing, and then slightly change the sewing direction to achieve better results for your ...projects are the same as a pivot. Changing the sewing direction When the stitching reaches a corner, stop the a sewing machine. Leave the needle lowered (in order to these tips when sewing your project. SEWING BASICS USEFUL SEWING TIPS Various ways to sew around the curve. When sewing...
...perform the trial sewing under the presser foot, raise the presser foot lever even higher to bring the presser foot to raise the needle before changing the sewing direction. Sewing curves Stop sewing, and then slightly change the sewing direction to achieve better results for your ...projects are the same as a pivot. Changing the sewing direction When the stitching reaches a corner, stop the a sewing machine. Leave the needle lowered (in order to these tips when sewing your project. SEWING BASICS USEFUL SEWING TIPS Various ways to sew around the curve. When sewing...
Users Manual - English and Spanish
Page 28
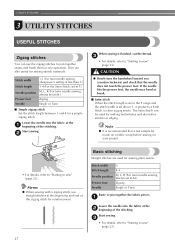
... toward you (counterclockwise) and check that a test sample be used for sewing plain seams. Stitch width 0 Stitch length F-4 Needle position M, L, R (For twin needle sewing, always set at the beginning and end of the stitching. c • For details, refer to "Starting to sew... 27 The Satin Stitch can use straight stitches at M.) Presser foot Zigzag Needle Single or Twin Baste or pin together the fabric pieces. Start sewing. b When sewing is set at F.) Needle position M, L, R (For twin needle sewing, always set above 1, it produces a Satin Stitch (a close zigzag...
... toward you (counterclockwise) and check that a test sample be used for sewing plain seams. Stitch width 0 Stitch length F-4 Needle position M, L, R (For twin needle sewing, always set at the beginning and end of the stitching. c • For details, refer to "Starting to sew... 27 The Satin Stitch can use straight stitches at M.) Presser foot Zigzag Needle Single or Twin Baste or pin together the fabric pieces. Start sewing. b When sewing is set at F.) Needle position M, L, R (For twin needle sewing, always set above 1, it produces a Satin Stitch (a close zigzag...


