
Users Manual - English
Page 8
Heirloom stitching ...114 EMBROIDERY 117 Embroidering Neatly ...118 What to prepare ...118 Embroidery step by step ...119 Attaching the Embroidery Foot 120 Attaching the embroidery foot ...120 ... Setting the fabric in the embroidery frame ...127 Attaching the Embroidery Frame 130 Attaching the embroidery frame ...130 Removing the embroidery frame ...131 Selecting Embroidery Patterns 132 Copyright information ...132 Embroidery pattern types ...132 LCD (liquid crystal display) operation ...133 Selecting alphabet characters ...136 Selecting an embroidery...
Heirloom stitching ...114 EMBROIDERY 117 Embroidering Neatly ...118 What to prepare ...118 Embroidery step by step ...119 Attaching the Embroidery Foot 120 Attaching the embroidery foot ...120 ... Setting the fabric in the embroidery frame ...127 Attaching the Embroidery Frame 130 Attaching the embroidery frame ...130 Removing the embroidery frame ...131 Selecting Embroidery Patterns 132 Copyright information ...132 Embroidery pattern types ...132 LCD (liquid crystal display) operation ...133 Selecting alphabet characters ...136 Selecting an embroidery...
Users Manual - English
Page 9
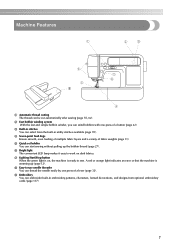
... one press of a button (page 22). e Quick-set bobbin You can select from the built-in embroidery patterns, characters, framed decorations, and designs from optional embroidery cards (page 117). 7 h Easy-to sew. c Built-in stitches You can start sewing without pulling up (page 12). f Bright light The convenient LED lamp makes it... 55, 62). A red or orange light indicates an error or that the machine is ready to -use needle threader You can embroider built-in utility stitches available (page 70).
... one press of a button (page 22). e Quick-set bobbin You can select from the built-in embroidery patterns, characters, framed decorations, and designs from optional embroidery cards (page 117). 7 h Easy-to sew. c Built-in stitches You can start sewing without pulling up (page 12). f Bright light The convenient LED lamp makes it... 55, 62). A red or orange light indicates an error or that the machine is ready to -use needle threader You can embroider built-in utility stitches available (page 70).

Users Manual - English
Page 12
Names of Machine Parts and Their Functions The names of the various parts of thread on this panel to select stitches or embroidery patterns, or check how to use the sewing machine, etc. Front view a Thread guide cover (page 24, 33) Pass the thread under this thread guide and...through the thread cutter to raise and lower the presser foot . g Embroidery unit connector slot (page 123) Plug in the connector for the selected stitch or pattern and error messages appear in the LCD. j Flat bed attachment (page 46) Remove the flat bed attachment when sewing cylindrical pieces such as sleeve cuffs...
Names of Machine Parts and Their Functions The names of the various parts of thread on this panel to select stitches or embroidery patterns, or check how to use the sewing machine, etc. Front view a Thread guide cover (page 24, 33) Pass the thread under this thread guide and...through the thread cutter to raise and lower the presser foot . g Embroidery unit connector slot (page 123) Plug in the connector for the selected stitch or pattern and error messages appear in the LCD. j Flat bed attachment (page 46) Remove the flat bed attachment when sewing cylindrical pieces such as sleeve cuffs...

Users Manual - English
Page 15
a LCD (liquid crystal display) (touch panel) Setting for the selected stitch or pattern and error messages appear in the LCD. into the sewing machine memory. i Sewing machine help key Press to get help on the LCD with your ...finger or the touch pen to perform operations. b Back key Press to return to enter alphabet character embroidery or embroidery patterns you have edited or adjusted, etc. e Memory key Press to the previous screen. h Settings key Press to "LCD (Liquid Crystal Display) Operation" (page 18). For...
a LCD (liquid crystal display) (touch panel) Setting for the selected stitch or pattern and error messages appear in the LCD. into the sewing machine memory. i Sewing machine help key Press to get help on the LCD with your ...finger or the touch pen to perform operations. b Back key Press to return to enter alphabet character embroidery or embroidery patterns you have edited or adjusted, etc. e Memory key Press to the previous screen. h Settings key Press to "LCD (Liquid Crystal Display) Operation" (page 18). For...

Users Manual - English
Page 20
... 9 3 8 4 7 5 6 a Selected stitch b Presser foot to the message displayed on . For details, refer to "Error messages" (page 159) for messages displayed on the right side of the sewing machine. GETTING READY LCD (Liquid Crystal Display) Operation Selected stitch, pattern settings and messages are explained in "Selecting an... embroidery pattern" (page 137). Viewing the LCD When the power is turned on, the LCD comes ...
... 9 3 8 4 7 5 6 a Selected stitch b Presser foot to the message displayed on . For details, refer to "Error messages" (page 159) for messages displayed on the right side of the sewing machine. GETTING READY LCD (Liquid Crystal Display) Operation Selected stitch, pattern settings and messages are explained in "Selecting an... embroidery pattern" (page 137). Viewing the LCD When the power is turned on, the LCD comes ...
Users Manual - English
Page 65
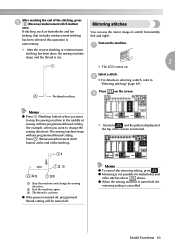
...buttonholes and bar You can sew the mirror image of the stitching, press e (Reverse/reinforcement stitch button) Mirroring stitches once. Select a stitch. The sewing machine stops without programmed thread-cutting (for buttonholes and other stitches where shows. z When the sewing machine is turned off..., press . After reaching the end of a stitch horizontally tacking, that includes reinforcement stitching (left and right). Press c on . c The thread is not possible for example, when you want to , and the pattern displayed at the end of the screen is turned...
...buttonholes and bar You can sew the mirror image of the stitching, press e (Reverse/reinforcement stitch button) Mirroring stitches once. Select a stitch. The sewing machine stops without programmed thread-cutting (for buttonholes and other stitches where shows. z When the sewing machine is turned off..., press . After reaching the end of a stitch horizontally tacking, that includes reinforcement stitching (left and right). Press c on . c The thread is not possible for example, when you want to , and the pattern displayed at the end of the screen is turned...

Users Manual - English
Page 66
...you wish to save the new settings with utility stitches. a Press . Press . e X The next time that the same straight stitch is selected, the stitch length is set to 2.0 mm. When the same stitch pattern is turned off . Set the stitch length to 2.0 mm. 64 Even if is ...in the machine. cutting, and automatic reverse/ reinforcement stitching, etc.) are not saved unless is pressed to reset the setting to save specific settings for each stitch. d • To reset the selected stitch patterns to its default, the new settings are saved, not...
...you wish to save the new settings with utility stitches. a Press . Press . e X The next time that the same straight stitch is selected, the stitch length is set to 2.0 mm. When the same stitch pattern is turned off . Set the stitch length to 2.0 mm. 64 Even if is ...in the machine. cutting, and automatic reverse/ reinforcement stitching, etc.) are not saved unless is pressed to reset the setting to save specific settings for each stitch. d • To reset the selected stitch patterns to its default, the new settings are saved, not...
Users Manual - English
Page 72
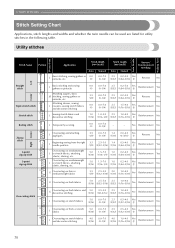
... J or stretch fabrics, attaching elastic, darning, etc. Utility stitches Twin Needle Walking Foot Presser Foot Stitch Name Pattern Application Stitch Width [mm (inch)] Auto Manual 1 J Basic stitching, sewing gathers or pintucks, etc. 0.0 (0) 0.0-7.0 (0-1/4) Stitch Length [mm (inch)] Auto Manual Reverse/ Reinforcement Stitching 2.5 0.2-5.0 Yes (3/32) (1/64-3/16) (J) Reverse No Left Straight stitch 2 J Basic stitching and sewing gathers or pintucks 0.0 (0) 0.0-7.0 (0-1/4) 2.5 0.2-5.0 Yes (3/32...
... J or stretch fabrics, attaching elastic, darning, etc. Utility stitches Twin Needle Walking Foot Presser Foot Stitch Name Pattern Application Stitch Width [mm (inch)] Auto Manual 1 J Basic stitching, sewing gathers or pintucks, etc. 0.0 (0) 0.0-7.0 (0-1/4) Stitch Length [mm (inch)] Auto Manual Reverse/ Reinforcement Stitching 2.5 0.2-5.0 Yes (3/32) (1/64-3/16) (J) Reverse No Left Straight stitch 2 J Basic stitching and sewing gathers or pintucks 0.0 (0) 0.0-7.0 (0-1/4) 2.5 0.2-5.0 Yes (3/32...
Users Manual - English
Page 73
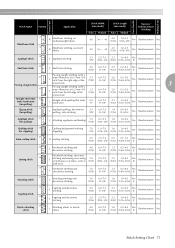
Presser Foot Twin Needle Walking Foot Stitch Name Pattern Application 17 Blind hem stitch 18 R Blind hem stitching on mediumweight fabrics R Blind hem stitching on stretch fabrics Stitch Width [mm (inch)] Stitch Length [mm (inch)] Auto Manual Auto Manual Reverse/ Reinforcement Stitching 00 3← - →3 2.0 (1/16) 1.0-3.5 (1/16-1/8) No Reinforcement No 00 3← - →3 2.0 (1/16) 1.0-3.5 (1/16-1/8) No Reinforcement No 19...
Presser Foot Twin Needle Walking Foot Stitch Name Pattern Application 17 Blind hem stitch 18 R Blind hem stitching on mediumweight fabrics R Blind hem stitching on stretch fabrics Stitch Width [mm (inch)] Stitch Length [mm (inch)] Auto Manual Auto Manual Reverse/ Reinforcement Stitching 00 3← - →3 2.0 (1/16) 1.0-3.5 (1/16-1/8) No Reinforcement No 00 3← - →3 2.0 (1/16) 1.0-3.5 (1/16-1/8) No Reinforcement No 19...
Users Manual - English
Page 74
... Twin Needle Walking Foot Stitch Name Pattern Application 35 J Decorative stitching Stitch Width [mm (inch)] Auto 4.0 (3/16) Manual 0.0-7.0 (0-1/4) Stitch Length [mm (inch)] Auto Manual Reverse/ Reinforcement Stitching 3.0 (1/8) 2.0-4.0 (1/16-3/16) No Reinforcement No 36 J Decorative stitching 4.0 (3/16) 0.0-7.0 (0-1/4) 2.5 1.0-4.0 Yes (3/32) (1/16-3/16) (J) Reinforcement No 37 J Decorative stitching 5.5 (7/32) 0.0-7.0 (0-1/4) 1.6 1.0-4.0 Yes (1/16) (1/16-3/16) (J) Reinforcement No 38 N Decorative stitching and elastic-attaching 5.0 (3/16...
... Twin Needle Walking Foot Stitch Name Pattern Application 35 J Decorative stitching Stitch Width [mm (inch)] Auto 4.0 (3/16) Manual 0.0-7.0 (0-1/4) Stitch Length [mm (inch)] Auto Manual Reverse/ Reinforcement Stitching 3.0 (1/8) 2.0-4.0 (1/16-3/16) No Reinforcement No 36 J Decorative stitching 4.0 (3/16) 0.0-7.0 (0-1/4) 2.5 1.0-4.0 Yes (3/32) (1/16-3/16) (J) Reinforcement No 37 J Decorative stitching 5.5 (7/32) 0.0-7.0 (0-1/4) 1.6 1.0-4.0 Yes (1/16) (1/16-3/16) (J) Reinforcement No 38 N Decorative stitching and elastic-attaching 5.0 (3/16...
Users Manual - English
Page 75
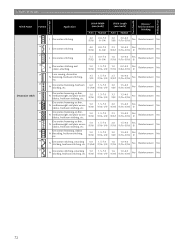
... or furry fabrics 7.0 (1/4) 3.0-7.0 (1/8-1/4) 0.5 (1/32) 0.3-1.0 (1/64-1/16) No Automatic reinforcement No 58 Darning stitch 59 60 Bar tack stitch 61 Button-sewing stitch 62 Eyelet stitch 63 A Darning mediumweight fabrics 7.0 (1/4) 2.5-7.0 (3/32-1/4) 2.0 (1/16) 0.4-2.5 (1/64-3/32) No Automatic reinforcement No... Foot Twin Needle Walking Foot Stitch Name Pattern Application 48 A Horizontal buttonholes on thin and mediumweight fabrics Stitch Width [mm (inch)] Stitch Length [mm (inch)] Auto Manual Auto Manual Reverse/ Reinforcement Stitching 5.0 (3/16) 3.0-5.0 (1/8-3/16...
... or furry fabrics 7.0 (1/4) 3.0-7.0 (1/8-1/4) 0.5 (1/32) 0.3-1.0 (1/64-1/16) No Automatic reinforcement No 58 Darning stitch 59 60 Bar tack stitch 61 Button-sewing stitch 62 Eyelet stitch 63 A Darning mediumweight fabrics 7.0 (1/4) 2.5-7.0 (3/32-1/4) 2.0 (1/16) 0.4-2.5 (1/64-3/32) No Automatic reinforcement No... Foot Twin Needle Walking Foot Stitch Name Pattern Application 48 A Horizontal buttonholes on thin and mediumweight fabrics Stitch Width [mm (inch)] Stitch Length [mm (inch)] Auto Manual Auto Manual Reverse/ Reinforcement Stitching 5.0 (3/16) 3.0-5.0 (1/8-3/16...
Users Manual - English
Page 76
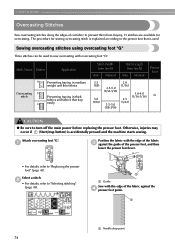
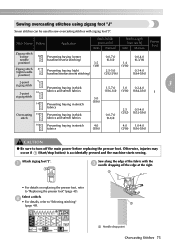
... the edge of the fabric c against the d presser foot guide. The procedure for overcasting. Sewing overcasting stitches using overcasting foot "G" Three stitches can be used . Select a stitch. a a Guide Sew with overcasting foot "G". Stitch Name Pattern Application 11 Overcasting 12 stitch 13 Preventing fraying in medium weight and thin fabrics Preventing fraying in thick fabrics and fabrics...
... the edge of the fabric c against the d presser foot guide. The procedure for overcasting. Sewing overcasting stitches using overcasting foot "G" Three stitches can be used . Select a stitch. a a Guide Sew with overcasting foot "G". Stitch Name Pattern Application 11 Overcasting 12 stitch 13 Preventing fraying in medium weight and thin fabrics Preventing fraying in thick fabrics and fabrics...
Users Manual - English
Page 77
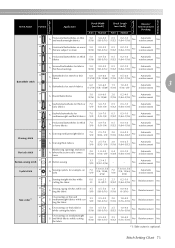
Stitch Name Pattern Application Stitch Width [mm (inch)] Auto Manual Stitch Length [mm (inch)] Auto Manual Presser Foot Zigzag stitch (center 7 needle position) Zigzag stitch 8 (right needle position) Preventing fraying (center baseline/reverse stitching) 3.5 (1/8) Preventing fraying (right baseline/reinforcement stitching) 0.0-7.0 (0-1/4) 2.5-5.0 (3/32-3/16) 1.4 (1/16) 0.0-4.0 (0-3/16) 0.3-4.0 (1/64-3/16) 2-point 9 zigzag stitch...J Sew along the edge of the fabric with zigzag foot "J". Select a stitch. Attach zigzag foot "J". a • For details on replacing the presser ...
Stitch Name Pattern Application Stitch Width [mm (inch)] Auto Manual Stitch Length [mm (inch)] Auto Manual Presser Foot Zigzag stitch (center 7 needle position) Zigzag stitch 8 (right needle position) Preventing fraying (center baseline/reverse stitching) 3.5 (1/8) Preventing fraying (right baseline/reinforcement stitching) 0.0-7.0 (0-1/4) 2.5-5.0 (3/32-3/16) 1.4 (1/16) 0.0-4.0 (0-3/16) 0.3-4.0 (1/64-3/16) 2-point 9 zigzag stitch...J Sew along the edge of the fabric with zigzag foot "J". Select a stitch. Attach zigzag foot "J". a • For details on replacing the presser ...

Users Manual - English
Page 78
... • For details on replacing the presser foot, refer to turn off . Five stitches can be used to sew overcasting stitches with the notch in the presser foot holder, and then slowly lower the presser foot lever. Stitch Name Pattern Application 63 64 65 Side cutter 66 67 Sewing straight... stitches while cutting the fabric Sewing zigzag stitches while cutting the fabric Preventing fraying in thin and mediumweight fabrics while cutting the...
... • For details on replacing the presser foot, refer to turn off . Five stitches can be used to sew overcasting stitches with the notch in the presser foot holder, and then slowly lower the presser foot lever. Stitch Name Pattern Application 63 64 65 Side cutter 66 67 Sewing straight... stitches while cutting the fabric Sewing zigzag stitches while cutting the fabric Preventing fraying in thin and mediumweight fabrics while cutting the...
Users Manual - English
Page 80
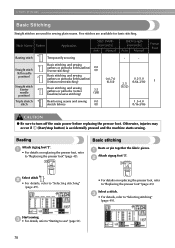
... pintucks (center baseline/reverse stitching) 3.5 (1/8) (3/32) Triple stretch 4 stitch Reinforcing seams and sewing 0.0 stretch fabrics (0) 1.5-4.0 (1/16-3/16) CAUTION ● Be sure to "Replacing the presser foot" (page 43). c • For details, refer to "Starting to sew" (page 51). 78 Stitch Name Pattern Application 6 Basting stitch Temporarily securing Stitch Width [mm (inch)] Auto Manual Stitch Length [mm (inch...
... pintucks (center baseline/reverse stitching) 3.5 (1/8) (3/32) Triple stretch 4 stitch Reinforcing seams and sewing 0.0 stretch fabrics (0) 1.5-4.0 (1/16-3/16) CAUTION ● Be sure to "Replacing the presser foot" (page 43). c • For details, refer to "Starting to sew" (page 51). 78 Stitch Name Pattern Application 6 Basting stitch Temporarily securing Stitch Width [mm (inch)] Auto Manual Stitch Length [mm (inch...

Users Manual - English
Page 82
...) is accidentally pressed and the machine starts sewing. Memo z When the size of the fabric, and then baste it . Stitch Name Pattern Application 17 Blind hem stitch 18 Blind hem stitching on mediumweight fabrics Blind hem stitching on the fabric about 5 mm c (3/16 inch) from the side> a Wrong side of fabric b Right side of fabric...
...) is accidentally pressed and the machine starts sewing. Memo z When the size of the fabric, and then baste it . Stitch Name Pattern Application 17 Blind hem stitch 18 Blind hem stitching on mediumweight fabrics Blind hem stitching on the fabric about 5 mm c (3/16 inch) from the side> a Wrong side of fabric b Right side of fabric...
Users Manual - English
Page 85
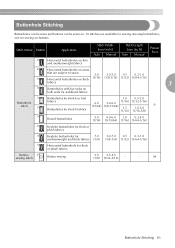
...Stitching 83 Stitch Name Pattern Application 48 Horizontal buttonholes on thin and mediumweight fabrics Stitch Width [mm (inch)] Auto Manual Stitch Length [mm (inch)] Auto Manual Presser Foot 49 Horizontal buttonholes on buttons. Buttonhole Stitching Buttonholes can be sewn and buttons can be sewn on. 10 stitches...16) (1/8-3/16) (1/32) (1/64-1/16) fabrics 3 51 Buttonholes with bar tacks on both ends for stabilized fabrics 52 Buttonhole stitch 53 Buttonholes for stretch or knit 1.0 0.5-2.0 fabrics Buttonholes for stretch fabrics 6.0 3.0-6.0 (15/64) (1/8-15/64) (1/16) ...
...Stitching 83 Stitch Name Pattern Application 48 Horizontal buttonholes on thin and mediumweight fabrics Stitch Width [mm (inch)] Auto Manual Stitch Length [mm (inch)] Auto Manual Presser Foot 49 Horizontal buttonholes on buttons. Buttonhole Stitching Buttonholes can be sewn and buttons can be sewn on. 10 stitches...16) (1/8-3/16) (1/32) (1/64-1/16) fabrics 3 51 Buttonholes with bar tacks on both ends for stabilized fabrics 52 Buttonhole stitch 53 Buttonholes for stretch or knit 1.0 0.5-2.0 fabrics Buttonholes for stretch fabrics 6.0 3.0-6.0 (15/64) (1/8-15/64) (1/16) ...
Users Manual - English
Page 102
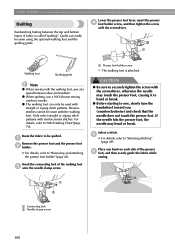
... Sandwiching batting between slow and medium. a Walking foot Quilting guide Note z When sewing with straight or zigzag stitch patterns. Only select straight or zigzag stitch patterns with the screwdriver. For details, refer to "Selecting stitching" (page 49). Place one hand on each side of fabric is attached. Lower the presser foot lever, insert the presser...
... Sandwiching batting between slow and medium. a Walking foot Quilting guide Note z When sewing with straight or zigzag stitch patterns. Only select straight or zigzag stitch patterns with the screwdriver. For details, refer to "Selecting stitching" (page 49). Place one hand on each side of fabric is attached. Lower the presser foot lever, insert the presser...
Users Manual - English
Page 110
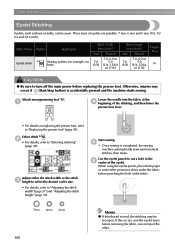
... the eyelet punch to "Adjusting the stitch width" (page 57) and "Adjusting the stitch length" (page 59). Attach monogramming foot "N". Stitch Name Eyelet stitch Pattern Application 62 Sewing eyelets, for example, on belts Stitch Width [mm (inch)] Auto Manual 7.0, 6.0 or 7.0 5.0 (1/4) (1/4, 15/64 or 3/16) Stitch Length [mm (inch)] Auto Manual...center of the eyelet. If this occurs, sew the eyelet twice before replacing the pressor foot. Adjust either the stitch width or the stitch c length to select the desired eyelet size. • For details, refer to cut a hole in the...
... the eyelet punch to "Adjusting the stitch width" (page 57) and "Adjusting the stitch length" (page 59). Attach monogramming foot "N". Stitch Name Eyelet stitch Pattern Application 62 Sewing eyelets, for example, on belts Stitch Width [mm (inch)] Auto Manual 7.0, 6.0 or 7.0 5.0 (1/4) (1/4, 15/64 or 3/16) Stitch Length [mm (inch)] Auto Manual...center of the eyelet. If this occurs, sew the eyelet twice before replacing the pressor foot. Adjust either the stitch width or the stitch c length to select the desired eyelet size. • For details, refer to cut a hole in the...
Users Manual - English
Page 162
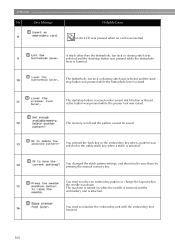
... was pressed while the presser foot was raised. 12 The memory is full and the pattern cannot be saved. 13 You pressed the back key or the embroidery key when a pattern was selected or the utility stitch key when a stitch is turned on the LCD was pressed when no card was down. APPENDIX No... with the embroidery foot lowered. 160 You tried to save them by pressing the manual memory key. The machine is selected. 14 You changed the stitch pattern settings, and then tried to select an embroidery pattern or change the layout when 15 the needle was inserted.
... was pressed while the presser foot was raised. 12 The memory is full and the pattern cannot be saved. 13 You pressed the back key or the embroidery key when a pattern was selected or the utility stitch key when a stitch is turned on the LCD was pressed when no card was down. APPENDIX No... with the embroidery foot lowered. 160 You tried to save them by pressing the manual memory key. The machine is selected. 14 You changed the stitch pattern settings, and then tried to select an embroidery pattern or change the layout when 15 the needle was inserted.


