

Users Manual - English
Page 1
Computerized Embroidery and Sewing Machine Operation Manual Product Code 885-V31/V33 GETTING READY SEWING BASICS UTILITY STITCHES EMBROIDERY APPENDIX
Computerized Embroidery and Sewing Machine Operation Manual Product Code 885-V31/V33 GETTING READY SEWING BASICS UTILITY STITCHES EMBROIDERY APPENDIX

Users Manual - English
Page 3
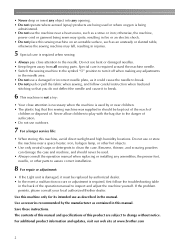
... be sure to persons. 2 Always unplug the machine from the build up of lint, dust, and loose cloth. • Do not store objects on the unit. Lifting the sewing machine by its handle. Keep ventilation openings of the sewing machine and foot control free from the electrical outlet when...for the correct operation of the various functions. Important Safety Instructions Please read the "Important Safety Instructions", and then study this embroidery and sewing machine. To reduce the risk of burns, fire, electric shock, or injury to carry it has been dropped or damaged, or water is...
... be sure to persons. 2 Always unplug the machine from the build up of lint, dust, and loose cloth. • Do not store objects on the unit. Lifting the sewing machine by its handle. Keep ventilation openings of the sewing machine and foot control free from the electrical outlet when...for the correct operation of the various functions. Important Safety Instructions Please read the "Important Safety Instructions", and then study this embroidery and sewing machine. To reduce the risk of burns, fire, electric shock, or injury to carry it has been dropped or damaged, or water is...
Users Manual - English
Page 4
For additional product information and updates, visit our web site at www.brother.com 2 Do not use or store the machine near children. • The plastic bag that you do not deflect the needle and cause it off when making any assemblies, the ...replaced by authorized dealer. • In the event a malfunction occurs or adjustment is required, first follow careful instruction when freehand stitching so that this sewing machine on an unstable surface, such as a stove or iron; Use accessories recommended by or near a space heater, iron, halogen lamp, or other parts...
For additional product information and updates, visit our web site at www.brother.com 2 Do not use or store the machine near children. • The plastic bag that you do not deflect the needle and cause it off when making any assemblies, the ...replaced by authorized dealer. • In the event a malfunction occurs or adjustment is required, first follow careful instruction when freehand stitching so that this sewing machine on an unstable surface, such as a stove or iron; Use accessories recommended by or near a space heater, iron, halogen lamp, or other parts...
Users Manual - English
Page 5
... by young children, and assistance may be required if used by ASTA to obtain the correct lead. FOR USERS IN AUSTRALIA AND NEW ZEALAND This sewing machine is not suitable for the plug supplied with a disability. 3 carrying the mark, rating as marked on plug. • Always replace the fuse cover...
... by young children, and assistance may be required if used by ASTA to obtain the correct lead. FOR USERS IN AUSTRALIA AND NEW ZEALAND This sewing machine is not suitable for the plug supplied with a disability. 3 carrying the mark, rating as marked on plug. • Always replace the fuse cover...

Users Manual - English
Page 12
...page 23, 32) Place a spool of thread on this panel to select stitches or embroidery patterns, or check how to learn the names of the sewing machine and their functions are described below. d Bobbin winder (page 22) Use the bobbin winder when winding the bobbin. h Presser foot lever (page 50... this dial. f Operation panel (page 13) Use the keys on the spool pin. Names of Machine Parts and Their Functions The names of the various parts of the machine parts. Before using the sewing machine, carefully read these buttons to thread the needle. l Needle threader lever (page 35) Use the ...
...page 23, 32) Place a spool of thread on this panel to select stitches or embroidery patterns, or check how to learn the names of the sewing machine and their functions are described below. d Bobbin winder (page 22) Use the bobbin winder when winding the bobbin. h Presser foot lever (page 50... this dial. f Operation panel (page 13) Use the keys on the spool pin. Names of Machine Parts and Their Functions The names of the various parts of the machine parts. Before using the sewing machine, carefully read these buttons to thread the needle. l Needle threader lever (page 35) Use the ...

Users Manual - English
Page 13
... Pass the thread through the needle bar thread guide. Do not cover the air vent while the sewing machine is installed onto the presser foot holder. Attach the appropriate presser foot for sewing straight seams. e Needle plate cover (page 152) Remove the needle plate cover to be exchanged. ...through the thread guide disk when using the needle threader to sew one stitch. g Feed dogs (page 88) The feed dogs feed the fabric in the sewing direction. a Handle Carry the sewing machine by its handle when transporting the machine. Memo z Refer to pages 10 through 13 while you ...
... Pass the thread through the needle bar thread guide. Do not cover the air vent while the sewing machine is installed onto the presser foot holder. Attach the appropriate presser foot for sewing straight seams. e Needle plate cover (page 152) Remove the needle plate cover to be exchanged. ...through the thread guide disk when using the needle threader to sew one stitch. g Feed dogs (page 88) The feed dogs feed the fabric in the sewing direction. a Handle Carry the sewing machine by its handle when transporting the machine. Memo z Refer to pages 10 through 13 while you ...
Users Manual - English
Page 14
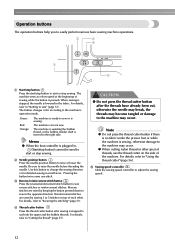
... the bobbin thread, or the bobbin winder shaft is lowered in , (Start/stop button to easily perform various basic sewing machine operations. Reverse stitches are sewn by keeping the button pressed down to cut , otherwise the needle may break, the ...Reinforcement stitches are sewn by sewing 3 to the machine may occur. For details, refer to the machine may occur. e Sewing speed controller Slide the sewing speed controller to sew" (page 51). For details, refer to "Starting to adjust the sewing speed. 12 Green: Red: Orange: The machine is sewing. b Needle position button ...
... the bobbin thread, or the bobbin winder shaft is lowered in , (Start/stop button to easily perform various basic sewing machine operations. Reverse stitches are sewn by keeping the button pressed down to cut , otherwise the needle may break, the ...Reinforcement stitches are sewn by sewing 3 to the machine may occur. For details, refer to the machine may occur. e Sewing speed controller Slide the sewing speed controller to sew" (page 51). For details, refer to "Starting to adjust the sewing speed. 12 Green: Red: Orange: The machine is sewing. b Needle position button ...

Users Manual - English
Page 15
...or adjusted, etc. d Next page key Displays the next page when there are items that are not displayed on using the sewing machine. g Embroidery key Press this key to sew embroidery. e Memory key Press to the previous screen. h Settings key Press to "LCD (Liquid Crystal Display) Operation" (...For details, refer to set the needle stop position, the buzzer sound, and more. into the sewing machine memory. f Utility stitch key Press this key to select a utility stitch. i Sewing machine help key Press to perform operations. Operation panel The front operation panel has an LCD (liquid ...
...or adjusted, etc. d Next page key Displays the next page when there are items that are not displayed on using the sewing machine. g Embroidery key Press this key to sew embroidery. e Memory key Press to the previous screen. h Settings key Press to "LCD (Liquid Crystal Display) Operation" (...For details, refer to set the needle stop position, the buzzer sound, and more. into the sewing machine memory. f Utility stitch key Press this key to select a utility stitch. i Sewing machine help key Press to perform operations. Operation panel The front operation panel has an LCD (liquid ...
Users Manual - English
Page 18
... not touch the plug with many other power sources may result. ● When unplugging the machine, always turn the sewing machine on the cord. If the cord or plug is damaged, take the machine to your authorized dealer for repairs before continuing use extension cords or multi-plug adapters with wet...cord to observe the following circumstances: • When you are firmly inserted into the electrical outlet and the power supply jack on the machine. ● Do not insert the plug on the power cord are away from the outlet. Electric shock may result in the following precautions...
... not touch the plug with many other power sources may result. ● When unplugging the machine, always turn the sewing machine on the cord. If the cord or plug is damaged, take the machine to your authorized dealer for repairs before continuing use extension cords or multi-plug adapters with wet...cord to observe the following circumstances: • When you are firmly inserted into the electrical outlet and the power supply jack on the machine. ● Do not insert the plug on the power cord are away from the outlet. Electric shock may result in the following precautions...
Users Manual - English
Page 19
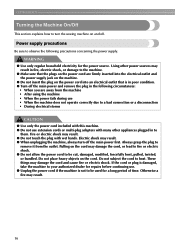
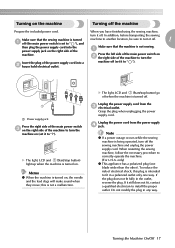
...only one blade wider than the other). Note z If a power outage occurs while the sewing machine is turned on the right side of the Make sure that the sewing machine is turned machine to another location, be sure to turn it to install the proper outlet. To reduce the...cord. X The light, LCD and (Start/stop button) light up when the machine is turned on the machine Turning off . Turning on . a machine. When restarting the sewing machine, follow the necessary procedure to turn the machine on b the right side of the power supply cord into the power supply jack...
...only one blade wider than the other). Note z If a power outage occurs while the sewing machine is turned on the right side of the Make sure that the sewing machine is turned machine to another location, be sure to turn it to install the proper outlet. To reduce the...cord. X The light, LCD and (Start/stop button) light up when the machine is turned on the machine Turning off . Turning on . a machine. When restarting the sewing machine, follow the necessary procedure to turn the machine on b the right side of the power supply cord into the power supply jack...

Users Manual - English
Page 20
...front of stitches contained i Horizontal mirror image j Automatic thread cutting k Automatic reverse/reinforcement l Single/twin needle sewing and needle stop position Memo z A different screen is displayed when the embroidery unit is attached. Change the screen...4 7 5 6 a Selected stitch b Presser foot to be used c Stitches d Stitch settings and twin needle sewing e Stitch width f Stitch length g Number of the selected stitch h Number of the sewing machine. z Refer to "Operation panel" (page 13). GETTING READY LCD (Liquid Crystal Display) Operation Selected stitch, pattern ...
...front of stitches contained i Horizontal mirror image j Automatic thread cutting k Automatic reverse/reinforcement l Single/twin needle sewing and needle stop position Memo z A different screen is displayed when the embroidery unit is attached. Change the screen...4 7 5 6 a Selected stitch b Presser foot to be used c Stitches d Stitch settings and twin needle sewing e Stitch width f Stitch length g Number of the selected stitch h Number of the sewing machine. z Refer to "Operation panel" (page 13). GETTING READY LCD (Liquid Crystal Display) Operation Selected stitch, pattern ...
Users Manual - English
Page 21
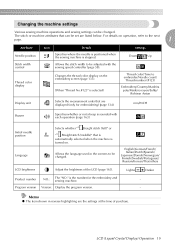
... needle position Language Selects whether "1 Straight stitch (left)" or "3 Straight stitch (middle)" that are displayed (only for the embroidery and sewing machine. - Lighter Darker Product number NO.: The "NO." is turned on the embroidery screen (page 133). Program version Version: Display the ...Needle position Stitch width control Thread color display Icon Details Settings Specifies where the needle is positioned when the sewing machine is sounded with the sewing speed controller (page 58). Allows the language used in reverse highlighting are listed below. mm/INCH Buzzer...
... needle position Language Selects whether "1 Straight stitch (left)" or "3 Straight stitch (middle)" that are displayed (only for the embroidery and sewing machine. - Lighter Darker Product number NO.: The "NO." is turned on the embroidery screen (page 133). Program version Version: Display the ...Needle position Stitch width control Thread color display Icon Details Settings Specifies where the needle is positioned when the sewing machine is sounded with the sewing speed controller (page 58). Allows the language used in reverse highlighting are listed below. mm/INCH Buzzer...

Users Manual - English
Page 22
...page key). • The following screens show their default settings. a The highlighted display is the individual number for the sewing machine. Press b panel. (Settings key) on the sewing machine. Memo z "NO" is the initial setting. z "VERSION" is the program version which is turned off. 20 ...When settings are saved even if the power is installed in the sewing machine. X The initial stitch screen appears again. z Settings that are changed are complete, press d (Back key). GETTING READY Turn on...
...page key). • The following screens show their default settings. a The highlighted display is the individual number for the sewing machine. Press b panel. (Settings key) on the sewing machine. Memo z "NO" is the initial setting. z "VERSION" is the program version which is turned off. 20 ...When settings are saved even if the power is installed in the sewing machine. X The initial stitch screen appears again. z Settings that are changed are complete, press d (Back key). GETTING READY Turn on...

Users Manual - English
Page 23
... screen appears. X The initial stitch screen appears again. X The sewing machine help key) on the sewing machine. LCD (Liquid Crystal Display) Operation 21 Turn on b the display panel. c a b cd After you return to the d next page. Press the item to the item 1 selection screen. Checking machine operating Press (Next page key) to switch to the...
... screen appears. X The initial stitch screen appears again. X The sewing machine help key) on the sewing machine. LCD (Liquid Crystal Display) Operation 21 Turn on b the display panel. c a b cd After you return to the d next page. Press the item to the item 1 selection screen. Checking machine operating Press (Next page key) to switch to the...
Users Manual - English
Page 24
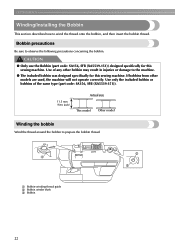
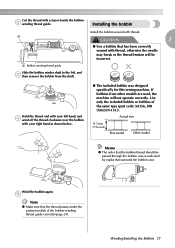
.... b a c a Bobbin-winding thread guide b Bobbin winder shaft c Bobbin 22 CAUTION ● Only use the Bobbin (part code: SA156, SFB (XA5539-151)) designed specifically for this sewing machine. Bobbin precautions Be sure to prepare the bobbin thread. Use only the included bobbin or bobbins of any other models are used, the... the thread around the bobbin to observe the following precautions concerning the bobbin. GETTING READY Winding/Installing the Bobbin This section describes how to the machine. ● The included bobbin was designed specifically for this sewing machine.
.... b a c a Bobbin-winding thread guide b Bobbin winder shaft c Bobbin 22 CAUTION ● Only use the Bobbin (part code: SA156, SFB (XA5539-151)) designed specifically for this sewing machine. Bobbin precautions Be sure to prepare the bobbin thread. Use only the included bobbin or bobbins of any other models are used, the... the thread around the bobbin to observe the following precautions concerning the bobbin. GETTING READY Winding/Installing the Bobbin This section describes how to the machine. ● The included bobbin was designed specifically for this sewing machine.
Users Manual - English
Page 25
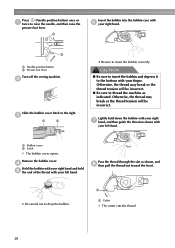
... be damaged. ● Three spool cap sizes are available, allowing you to the right as shown, with the rounded side on the sewing machine. a Place the spool of thread for the spool being used , the thread may catch on the slit in orange. a b a Notch b Bobbin winder shaft spring Slide ... original position. Turn on the left. Note z If the spool is not positioned correctly, the thread may become tangled around the spool pin or the machine may become tangled around the spool pin.
... be damaged. ● Three spool cap sizes are available, allowing you to the right as shown, with the rounded side on the sewing machine. a Place the spool of thread for the spool being used , the thread may catch on the slit in orange. a b a Notch b Bobbin winder shaft spring Slide ... original position. Turn on the left. Note z If the spool is not positioned correctly, the thread may become tangled around the spool pin or the machine may become tangled around the spool pin.
Users Manual - English
Page 27
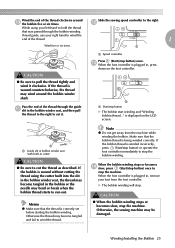
...press down on the LCD screen. Memo z Make sure that was passed through the guide k slit in , remove your right hand to stop the machine. When the foot controller is winded incorrectly, press (Start/stop button) or operate the foot controller immediately to wind the end of the thread. 1... the bobbin. Make sure that the bobbin thread is wound without cutting the thread using your left hand to run out. Otherwise, the sewing machine may wind around j the bobbin five or six times. Winding/Installing the Bobbin 25 Otherwise the thread may become tangled in the bobbin ...
...press down on the LCD screen. Memo z Make sure that was passed through the guide k slit in , remove your right hand to stop the machine. When the foot controller is winded incorrectly, press (Start/stop button) or operate the foot controller immediately to wind the end of the thread. 1... the bobbin. Make sure that the bobbin thread is wound without cutting the thread using your left hand to run out. Otherwise, the sewing machine may wind around j the bobbin five or six times. Winding/Installing the Bobbin 25 Otherwise the thread may become tangled in the bobbin ...
Users Manual - English
Page 28
... of the bobbinwinding thread guide correctly, the thread may be damaged; Memo z When the sewing machine is started or the handwheel is turned after winding the bobbin, the machine will not move. (Sewing is set to stop button 26 It may result in , remove your foot from the ... make a clicking sound; Memo z If the bobbin winder shaft is impossible.) Slide the sewing speed controller back to its p original position. a a Screw of the bobbin winder presser, otherwise the machine may become tangled under the bobbin winder seat. GETTING READY Cut the thread with scissors, ...
... of the bobbinwinding thread guide correctly, the thread may be damaged; Memo z When the sewing machine is started or the handwheel is turned after winding the bobbin, the machine will not move. (Sewing is set to stop button 26 It may result in , remove your foot from the ... make a clicking sound; Memo z If the bobbin winder shaft is impossible.) Slide the sewing speed controller back to its p original position. a a Screw of the bobbin winder presser, otherwise the machine may become tangled under the bobbin winder seat. GETTING READY Cut the thread with scissors, ...
Users Manual - English
Page 29
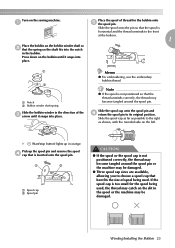
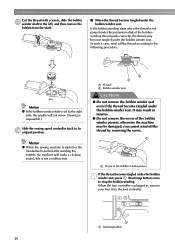
Cut the thread with your left , and c then remove the bobbin from other models are used, the machine will be passed through the bobbin case is indicated by marks that has been correctly wound with thread. Wind the bobbin again. a Bobbin-winding thread... bobbin thread should be incorrect. Hold the thread end with your right hand as shown below. ● The included bobbin was designed specifically for this sewing machine. Winding/Installing the Bobbin 27 e Note z Make sure that the thread passes under the pretension disk of the same type (part code: SA156, SFB (XA5539...
Cut the thread with your left , and c then remove the bobbin from other models are used, the machine will be passed through the bobbin case is indicated by marks that has been correctly wound with thread. Wind the bobbin again. a Bobbin-winding thread... bobbin thread should be incorrect. Hold the thread end with your right hand as shown below. ● The included bobbin was designed specifically for this sewing machine. Winding/Installing the Bobbin 27 e Note z Make sure that the thread passes under the pretension disk of the same type (part code: SA156, SFB (XA5539...
Users Manual - English
Page 30
... finger. Pass the thread through the slot as shown, and h then pull the thread out toward the front. • Be careful not to thread the machine as shown with your right hand. d Hold the bobbin with your right hand and hold down the bobbin with your right g hand, and then guide...
... finger. Pass the thread through the slot as shown, and h then pull the thread out toward the front. • Be careful not to thread the machine as shown with your right hand. d Hold the bobbin with your right hand and hold down the bobbin with your right g hand, and then guide...


