

Users Manual - English
Page 1
Computerized Embroidery and Sewing Machine Operation Manual Product Code 885-V31/V33 GETTING READY SEWING BASICS UTILITY STITCHES EMBROIDERY APPENDIX
Computerized Embroidery and Sewing Machine Operation Manual Product Code 885-V31/V33 GETTING READY SEWING BASICS UTILITY STITCHES EMBROIDERY APPENDIX

Users Manual - English
Page 3
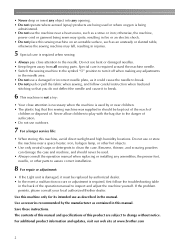
...an extension cord. • Always unplug your work area clear: • Never operate the machine with any user servicing adjustments mentioned in this manual for the correct operation of burns, fire, electric shock, or injury to persons. 2 Always unplug the machine from the electrical outlet when removing ...the machine falling, which could cause injuries. • When lifting the sewing machine, be careful not to use if you for purchasing this manual, store it where it by its handle. Plug the machine directly into the electrical outlet. WARNING - To reduce the risk of the various ...
...an extension cord. • Always unplug your work area clear: • Never operate the machine with any user servicing adjustments mentioned in this manual for the correct operation of burns, fire, electric shock, or injury to persons. 2 Always unplug the machine from the electrical outlet when removing ...the machine falling, which could cause injuries. • When lifting the sewing machine, be careful not to use if you for purchasing this manual, store it where it by its handle. Plug the machine directly into the electrical outlet. WARNING - To reduce the risk of the various ...
Users Manual - English
Page 4
.... • Use only neutral soaps or detergents to clean the case. If the problem persists, please consult your local authorized Brother dealer. The contents of this manual and specifications of this product are being used or where oxygen is being sewn may fall, resulting in the back of the ...operation manual to inspect and adjust the machine yourself. For additional product information and updates, visit our web site at www.brother.com 2 Special care is required around the machine needle. • Switch the sewing ...
.... • Use only neutral soaps or detergents to clean the case. If the problem persists, please consult your local authorized Brother dealer. The contents of this manual and specifications of this product are being used or where oxygen is being sewn may fall, resulting in the back of the ...operation manual to inspect and adjust the machine yourself. For additional product information and updates, visit our web site at www.brother.com 2 Special care is required around the machine needle. • Switch the sewing ...
Users Manual - English
Page 11
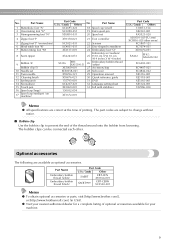
... Code U.S.A. / Canada Other SAEBT EBT-CEN X81164-001 SAEBT999 EBT-CEBN XC5520-001 Memo z To obtain optional accessories or parts, visit [http://www.brother.com/], or [http://www.brothermall.com] (in USA). Part Name 1 Buttonhole foot "A" 2 Overcasting foot "G" 3 Monogramming foot "N" Part Code U.S.A....cm X W 10 cm (H 4 inches X W 4 inches) 26 Embroidery bobbin thread (white) 27 Accessory bag 28 Soft cover 29 Operation manual 30 Quick reference guide 31 DVD 32 Language setting sheet 33 Felt with stabilizer XE1372-001 Part Code U.S.A. / Canada Others 130013-154 XE2241-001 ...
... Code U.S.A. / Canada Other SAEBT EBT-CEN X81164-001 SAEBT999 EBT-CEBN XC5520-001 Memo z To obtain optional accessories or parts, visit [http://www.brother.com/], or [http://www.brothermall.com] (in USA). Part Name 1 Buttonhole foot "A" 2 Overcasting foot "G" 3 Monogramming foot "N" Part Code U.S.A....cm X W 10 cm (H 4 inches X W 4 inches) 26 Embroidery bobbin thread (white) 27 Accessory bag 28 Soft cover 29 Operation manual 30 Quick reference guide 31 DVD 32 Language setting sheet 33 Felt with stabilizer XE1372-001 Part Code U.S.A. / Canada Others 130013-154 XE2241-001 ...

Users Manual - English
Page 23
... appears. Press the item to be referred on the LCD. Memo z For details on . c a b cd After you return to the corresponding page in this Operation Manual. a X The LCD comes on each topic, refer to the previous page. LCD (Liquid Crystal Display) Operation 21 Checking machine operating Press (Next page key) to...
... appears. Press the item to be referred on the LCD. Memo z For details on . c a b cd After you return to the corresponding page in this Operation Manual. a X The LCD comes on each topic, refer to the previous page. LCD (Liquid Crystal Display) Operation 21 Checking machine operating Press (Next page key) to...
Users Manual - English
Page 33
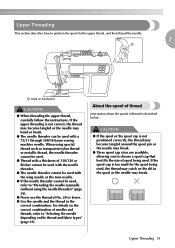
... the spool for the spool being used. Upper Threading 31 For details on the correct combination of needles and threads, refer to "Threading the needle manually (without using special thread such as transparent nylon thread or metallic thread, the needle threader cannot be used. ● Thread with a thickness of 130/120...
... the spool for the spool being used. Upper Threading 31 For details on the correct combination of needles and threads, refer to "Threading the needle manually (without using special thread such as transparent nylon thread or metallic thread, the needle threader cannot be used. ● Thread with a thickness of 130/120...
Users Manual - English
Page 38
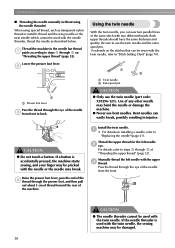
... any other needle may bend the needle or damage the machine. ● Never use the twin needle (part code: X59296-121). Install the twin needle. Manually thread the left needle b eye. If the needle threader is accidentally pressed, the machine starts sewing, and your finger may break. Both upper threads should... on "Threading the upper thread" (page 32). Thread the machine to the needle bar thread a guide according to back. GETTING READY ■ Threading the needle manually (without using the needle threader) When using special thread, such as described below.
... any other needle may bend the needle or damage the machine. ● Never use the twin needle (part code: X59296-121). Install the twin needle. Manually thread the left needle b eye. If the needle threader is accidentally pressed, the machine starts sewing, and your finger may break. Both upper threads should... on "Threading the upper thread" (page 32). Thread the machine to the needle bar thread a guide according to back. GETTING READY ■ Threading the needle manually (without using the needle threader) When using special thread, such as described below.

Users Manual - English
Page 39
... 33). If the needle threader is used with the twin needle, the sewing machine may be sure to steps g through the needle f bar thread guide, manually thread the right needle. Thread the upper thread for the right side in e the same way that the thread winds off from the front of...
... 33). If the needle threader is used with the twin needle, the sewing machine may be sure to steps g through the needle f bar thread guide, manually thread the right needle. Thread the upper thread for the right side in e the same way that the thread winds off from the front of...
Users Manual - English
Page 72
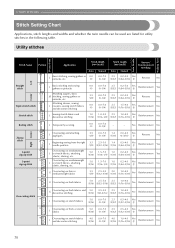
..., darning, etc. Utility stitches Twin Needle Walking Foot Presser Foot Stitch Name Pattern Application Stitch Width [mm (inch)] Auto Manual 1 J Basic stitching, sewing gathers or pintucks, etc. 0.0 (0) 0.0-7.0 (0-1/4) Stitch Length [mm (inch)] Auto Manual Reverse/ Reinforcement Stitching 2.5 0.2-5.0 Yes (3/32) (1/64-3/16) (J) Reverse No Left Straight stitch 2 J Basic stitching and sewing gathers or pintucks...
..., darning, etc. Utility stitches Twin Needle Walking Foot Presser Foot Stitch Name Pattern Application Stitch Width [mm (inch)] Auto Manual 1 J Basic stitching, sewing gathers or pintucks, etc. 0.0 (0) 0.0-7.0 (0-1/4) Stitch Length [mm (inch)] Auto Manual Reverse/ Reinforcement Stitching 2.5 0.2-5.0 Yes (3/32) (1/64-3/16) (J) Reverse No Left Straight stitch 2 J Basic stitching and sewing gathers or pintucks...
Users Manual - English
Page 73
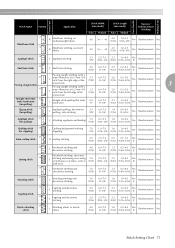
... Blind hem stitch 18 R Blind hem stitching on mediumweight fabrics R Blind hem stitching on stretch fabrics Stitch Width [mm (inch)] Stitch Length [mm (inch)] Auto Manual Auto Manual Reverse/ Reinforcement Stitching 00 3← - →3 2.0 (1/16) 1.0-3.5 (1/16-1/8) No Reinforcement No 00 3← - →3 2.0 (1/16) 1.0-3.5 (1/16-1/8) No Reinforcement No 19 Appliqué stitch J Appliqu...
... Blind hem stitch 18 R Blind hem stitching on mediumweight fabrics R Blind hem stitching on stretch fabrics Stitch Width [mm (inch)] Stitch Length [mm (inch)] Auto Manual Auto Manual Reverse/ Reinforcement Stitching 00 3← - →3 2.0 (1/16) 1.0-3.5 (1/16-1/8) No Reinforcement No 00 3← - →3 2.0 (1/16) 1.0-3.5 (1/16-1/8) No Reinforcement No 19 Appliqué stitch J Appliqu...
Users Manual - English
Page 74
UTILITY STITCHES Presser Foot Twin Needle Walking Foot Stitch Name Pattern Application 35 J Decorative stitching Stitch Width [mm (inch)] Auto 4.0 (3/16) Manual 0.0-7.0 (0-1/4) Stitch Length [mm (inch)] Auto Manual Reverse/ Reinforcement Stitching 3.0 (1/8) 2.0-4.0 (1/16-3/16) No Reinforcement No 36 J Decorative stitching 4.0 (3/16) 0.0-7.0 (0-1/4) 2.5 1.0-4.0 Yes (3/32) (1/16-3/16) (J) Reinforcement No 37 J Decorative stitching 5.5 (7/32) 0.0-7.0 (0-1/4) 1.6 1.0-4.0 Yes (1/16) (1/16...
UTILITY STITCHES Presser Foot Twin Needle Walking Foot Stitch Name Pattern Application 35 J Decorative stitching Stitch Width [mm (inch)] Auto 4.0 (3/16) Manual 0.0-7.0 (0-1/4) Stitch Length [mm (inch)] Auto Manual Reverse/ Reinforcement Stitching 3.0 (1/8) 2.0-4.0 (1/16-3/16) No Reinforcement No 36 J Decorative stitching 4.0 (3/16) 0.0-7.0 (0-1/4) 2.5 1.0-4.0 Yes (3/32) (1/16-3/16) (J) Reinforcement No 37 J Decorative stitching 5.5 (7/32) 0.0-7.0 (0-1/4) 1.6 1.0-4.0 Yes (1/16) (1/16...
Users Manual - English
Page 75
... Twin Needle Walking Foot Stitch Name Pattern Application 48 A Horizontal buttonholes on thin and mediumweight fabrics Stitch Width [mm (inch)] Stitch Length [mm (inch)] Auto Manual Auto Manual Reverse/ Reinforcement Stitching 5.0 (3/16) 3.0-5.0 (1/8-3/16) 0.5 (1/32) 0.2-1.0 (1/64-1/16) No Automatic reinforcement No 49 A Horizontal buttonholes on areas that are subject to strain 5.0 (3/16) 3.0-5.0 (1/8-3/16...
... Twin Needle Walking Foot Stitch Name Pattern Application 48 A Horizontal buttonholes on thin and mediumweight fabrics Stitch Width [mm (inch)] Stitch Length [mm (inch)] Auto Manual Auto Manual Reverse/ Reinforcement Stitching 5.0 (3/16) 3.0-5.0 (1/8-3/16) 0.5 (1/32) 0.2-1.0 (1/64-1/16) No Automatic reinforcement No 49 A Horizontal buttonholes on areas that are subject to strain 5.0 (3/16) 3.0-5.0 (1/8-3/16...
Users Manual - English
Page 76
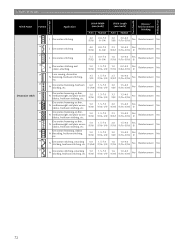
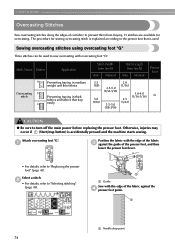
..." (page 43). The procedure for sewing overcasting stitch is explained according to the presser foot that fray easily Stitch Width [mm (inch)] Auto Manual Stitch Length [mm (inch)] Auto Manual Presser Foot 3.5 2.0 (1/8) (1/16) 2.5-5.0 (3/32-3/16) 1.0-4.0 (1/16-3/16) G 5.0 2.5 (3/16) (3/32) 3.5-5.0 (1/8-3/16) CAUTION ● Be sure to prevent them from fraying. 15 stitches are...
..." (page 43). The procedure for sewing overcasting stitch is explained according to the presser foot that fray easily Stitch Width [mm (inch)] Auto Manual Stitch Length [mm (inch)] Auto Manual Presser Foot 3.5 2.0 (1/8) (1/16) 2.5-5.0 (3/32-3/16) 1.0-4.0 (1/16-3/16) G 5.0 2.5 (3/16) (3/32) 3.5-5.0 (1/8-3/16) CAUTION ● Be sure to prevent them from fraying. 15 stitches are...
Users Manual - English
Page 77
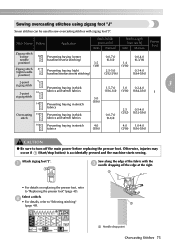
... "J" Seven stitches can be used to "Replacing the presser foot" (page 43). Select a stitch. Stitch Name Pattern Application Stitch Width [mm (inch)] Auto Manual Stitch Length [mm (inch)] Auto Manual Presser Foot Zigzag stitch (center 7 needle position) Zigzag stitch 8 (right needle position) Preventing fraying (center baseline/reverse stitching) 3.5 (1/8) Preventing fraying (right baseline...
... "J" Seven stitches can be used to "Replacing the presser foot" (page 43). Select a stitch. Stitch Name Pattern Application Stitch Width [mm (inch)] Auto Manual Stitch Length [mm (inch)] Auto Manual Presser Foot Zigzag stitch (center 7 needle position) Zigzag stitch 8 (right needle position) Preventing fraying (center baseline/reverse stitching) 3.5 (1/8) Preventing fraying (right baseline...

Users Manual - English
Page 78
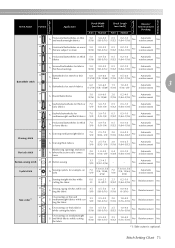
...cut off the main power before replacing the pressor foot. Remove the presser foot. Note z Thread the needle manually when using the side cutter, or only attach the side cutter after threading the needle using the optional side cutter... fork of the fabric is attached. a b a a Notch in thick fabrics while cutting the fabric Stitch Width [mm (inch)] Auto Manual 0.0 0.0-2.5 (0) (0-3/32) 3.5 (1/8) 3.5-5.0 (1/8-3/16) 5.0 (3/16) Stitch Length [mm (inch)] Auto Manual 2.5 0.2-5.0 (3/32) (1/64-3/16) Presser Foot 1.4 0.0-4.0 (1/16) (0-3/16) 2.0 (1/16) S 2.5 (3/32) 1.0-4.0 (1/16-3/16...
...cut off the main power before replacing the pressor foot. Remove the presser foot. Note z Thread the needle manually when using the side cutter, or only attach the side cutter after threading the needle using the optional side cutter... fork of the fabric is attached. a b a a Notch in thick fabrics while cutting the fabric Stitch Width [mm (inch)] Auto Manual 0.0 0.0-2.5 (0) (0-3/32) 3.5 (1/8) 3.5-5.0 (1/8-3/16) 5.0 (3/16) Stitch Length [mm (inch)] Auto Manual 2.5 0.2-5.0 (3/32) (1/64-3/16) Presser Foot 1.4 0.0-4.0 (1/16) (0-3/16) 2.0 (1/16) S 2.5 (3/32) 1.0-4.0 (1/16-3/16...
Users Manual - English
Page 80
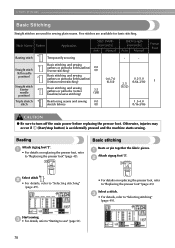
... seams. Five stitches are available for basic stitching. Select a stitch. Stitch Name Pattern Application 6 Basting stitch Temporarily securing Stitch Width [mm (inch)] Auto Manual Stitch Length [mm (inch)] Auto Manual - - c • For details, refer to "Selecting stitching" (page 49). J Basic stitching Baste or pin together the fabric pieces. Otherwise, injuries may occur...
... seams. Five stitches are available for basic stitching. Select a stitch. Stitch Name Pattern Application 6 Basting stitch Temporarily securing Stitch Width [mm (inch)] Auto Manual Stitch Length [mm (inch)] Auto Manual - - c • For details, refer to "Selecting stitching" (page 49). J Basic stitching Baste or pin together the fabric pieces. Otherwise, injuries may occur...

Users Manual - English
Page 82
... Application 17 Blind hem stitch 18 Blind hem stitching on mediumweight fabrics Blind hem stitching on stretch fabrics Stitch Width [mm (inch)] Auto Manual Stitch Length [mm (inch)] Auto Manual Presser Foot 00 3← - →3 2.0 (1/16) 1.0-3.5 (1/16-1/8) R CAUTION ● Be sure to mark on the fabric about 5 mm c (3/16 inch) from the...
... Application 17 Blind hem stitch 18 Blind hem stitching on mediumweight fabrics Blind hem stitching on stretch fabrics Stitch Width [mm (inch)] Auto Manual Stitch Length [mm (inch)] Auto Manual Presser Foot 00 3← - →3 2.0 (1/16) 1.0-3.5 (1/16-1/8) R CAUTION ● Be sure to mark on the fabric about 5 mm c (3/16 inch) from the...
Users Manual - English
Page 85
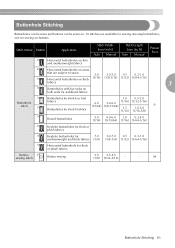
... stitch Button sewing 3.5 2.5-4.5 (1/8) (3/32-3/16) - - M Buttonhole Stitching 83 Stitch Name Pattern Application 48 Horizontal buttonholes on thin and mediumweight fabrics Stitch Width [mm (inch)] Auto Manual Stitch Length [mm (inch)] Auto Manual Presser Foot 49 Horizontal buttonholes on buttons.
... stitch Button sewing 3.5 2.5-4.5 (1/8) (3/32-3/16) - - M Buttonhole Stitching 83 Stitch Name Pattern Application 48 Horizontal buttonholes on thin and mediumweight fabrics Stitch Width [mm (inch)] Auto Manual Stitch Length [mm (inch)] Auto Manual Presser Foot 49 Horizontal buttonholes on buttons.

Users Manual - English
Page 92
... pressor foot. Stitch Name Pattern Application Straight stitch (center 3 needle position) Attaching zippers Sewing concealed seams and pintucks Stitch Width [mm (inch)] Auto Manual Stitch Length [mm (inch)] Auto Manual Presser Foot 3.5 0.0-7.0 2.5 0.2-5.0 (1/8) (0-1/4) (3/32) (1/64-3/16) I CAUTION ● Be sure to the c edge of fabric There are many methods for inserting a centered zipper...
... pressor foot. Stitch Name Pattern Application Straight stitch (center 3 needle position) Attaching zippers Sewing concealed seams and pintucks Stitch Width [mm (inch)] Auto Manual Stitch Length [mm (inch)] Auto Manual Presser Foot 3.5 0.0-7.0 2.5 0.2-5.0 (1/8) (0-1/4) (3/32) (1/64-3/16) I CAUTION ● Be sure to the c edge of fabric There are many methods for inserting a centered zipper...

Users Manual - English
Page 97
... sure to "Selecting stitching" (page 49). c • For details on replacing the presser foot, refer to stretch fabrics Stitch Width [mm (inch)] Auto Manual 0.0 0.0-7.0 (0) (0-1/4) Stitch Length [mm (inch)] Auto Manual Presser Foot 2.5 1.5-4.0 (3/32) (1/16-3/16) 1.0 1.0-3.0 2.5 1.0-4.0 (1/16) (1/16-1/8) (3/32) (1/16-3/16) J 5.0 1.5-7.0 (3/16) (1/16-1/4) 3 1.0 0.2-4.0 (1/16) (1/64-3/16) 4.0 0.0-7.0 (3/16) (0-1/4) Observe the corresponding precautions when performing...
... sure to "Selecting stitching" (page 49). c • For details on replacing the presser foot, refer to stretch fabrics Stitch Width [mm (inch)] Auto Manual 0.0 0.0-7.0 (0) (0-1/4) Stitch Length [mm (inch)] Auto Manual Presser Foot 2.5 1.5-4.0 (3/32) (1/16-3/16) 1.0 1.0-3.0 2.5 1.0-4.0 (1/16) (1/16-1/8) (3/32) (1/16-3/16) J 5.0 1.5-7.0 (3/16) (1/16-1/4) 3 1.0 0.2-4.0 (1/16) (1/64-3/16) 4.0 0.0-7.0 (3/16) (0-1/4) Observe the corresponding precautions when performing...


