

Accessory Catalog
Page 4
Position the presser foot over the long feed dogs on the edge of zipper/piping, avoiding the non-flat parts of the presser foot and slide the presser foot so that the needle fits on the opening on the presser foot and select a straight stitch (...-8200 and PC-8500 sewing machines. Use these utility presser feet and accessories to add a professional finish to your sewing projects. SA161 All Brother home-use sewing machines www.brother.com Check the needle does not hit the presser foot, and then tighten the clamp screw with just right pressure. 1. Screw on...
Position the presser foot over the long feed dogs on the edge of zipper/piping, avoiding the non-flat parts of the presser foot and slide the presser foot so that the needle fits on the opening on the presser foot and select a straight stitch (...-8200 and PC-8500 sewing machines. Use these utility presser feet and accessories to add a professional finish to your sewing projects. SA161 All Brother home-use sewing machines www.brother.com Check the needle does not hit the presser foot, and then tighten the clamp screw with just right pressure. 1. Screw on...

Accessory Catalog
Page 6
... sheer and very lightweight fabrics. 1. Lower the presser foot so that the foot guide is Project Book (See page 53 for details.) www.brother.com Position the edge of the fabric. Raise the needle and the presser foot. 4. Increase upper thread tension. 2. Continue to sew to ...Non Stick Foot Overlock Foot Picot Foot Brother General Sewing Accessories 10 SA126 ABCDEFJKMN SA127 GHILOP Skirt Innov-is Project Book (See page 50 for consistent feeding with fabrics such as leather, vinyl and other novelty fabrics. Lower the needle into the curled part of the fabric. 4. Select a ...
... sheer and very lightweight fabrics. 1. Lower the presser foot so that the foot guide is Project Book (See page 53 for details.) www.brother.com Position the edge of the fabric. Raise the needle and the presser foot. 4. Increase upper thread tension. 2. Continue to sew to ...Non Stick Foot Overlock Foot Picot Foot Brother General Sewing Accessories 10 SA126 ABCDEFJKMN SA127 GHILOP Skirt Innov-is Project Book (See page 50 for consistent feeding with fabrics such as leather, vinyl and other novelty fabrics. Lower the needle into the curled part of the fabric. 4. Select a ...
Users Manual - English
Page 3
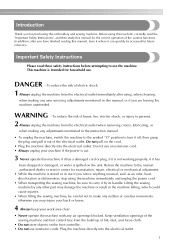
... or careless movements, otherwise you may injure your back or knees. 4 Always keep your work area clear: • Never operate the machine with any other part may damage the machine or result in use the machine. DANGER - Lifting the sewing machine by its handle. Keep ventilation openings of the sewing machine...
... or careless movements, otherwise you may injure your back or knees. 4 Always keep your work area clear: • Never operate the machine with any other part may damage the machine or result in use the machine. DANGER - Lifting the sewing machine by its handle. Keep ventilation openings of the sewing machine...
Users Manual - English
Page 4
...consult your local authorized Brother dealer. Use this machine, avoid direct sunlight and high humidity locations. Do not use bent or damaged needles. • Keep fingers away from all moving parts. Do not use or store the machine near a space heater, iron, halogen lamp, or other parts to assure correct ... a toy: • Your close attention to the danger of this manual. For additional product information and updates, visit our web site at www.brother.com 2 • Never drop or insert any object into any opening. • Do not operate where aerosol (spray) products are subject to...
...consult your local authorized Brother dealer. Use this machine, avoid direct sunlight and high humidity locations. Do not use bent or damaged needles. • Keep fingers away from all moving parts. Do not use or store the machine near a space heater, iron, halogen lamp, or other parts to assure correct ... a toy: • Your close attention to the danger of this manual. For additional product information and updates, visit our web site at www.brother.com 2 • Never drop or insert any object into any opening. • Do not operate where aerosol (spray) products are subject to...

Users Manual - English
Page 6
Contents Introduction ...1 Important Safety Instructions 1 Machine Features ...7 Accessories ...8 Included accessories ...8 Optional accessories ...9 Names of Machine Parts and Their Functions 10 Front view...10 Needle and presser foot section ...11 Right-side/rear view ...11 Operation buttons ...12 Operation panel ...13 GETTING ...
Contents Introduction ...1 Important Safety Instructions 1 Machine Features ...7 Accessories ...8 Included accessories ...8 Optional accessories ...9 Names of Machine Parts and Their Functions 10 Front view...10 Needle and presser foot section ...11 Right-side/rear view ...11 Operation buttons ...12 Operation panel ...13 GETTING ...

Users Manual - English
Page 10
... 885-V31/V32/V33.The product code is mentioned on the side of the presser foot holder is missing or damaged, contact your authorized dealer. (Part code: 132730-122) 1. 2. 3. 4. 5. 6. 7. 8. 9. 10.*1 11. 12. 13. 14. 15. 16. 17. 18. 19. 20. 21. 22. 23. 24. 25. 26. 27.*2 28.*2 29. 30. 31...
... 885-V31/V32/V33.The product code is mentioned on the side of the presser foot holder is missing or damaged, contact your authorized dealer. (Part code: 132730-122) 1. 2. 3. 4. 5. 6. 7. 8. 9. 10.*1 11. 12. 13. 14. 15. 16. 17. 18. 19. 20. 21. 22. 23. 24. 25. 26. 27.*2 28.*2 29. 30. 31...
Users Manual - English
Page 11
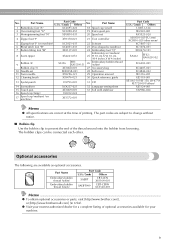
...X81164-001 SAEBT999 EBT-CEBN XC5520-001 Memo z To obtain optional accessories or parts, visit [http://www.brother.com/], or [http://www.brothermall.com] (in USA). Part Name 1 Buttonhole foot "A" 2 Overcasting foot "G" 3 Monogramming foot "N" Part Code U.S.A. / Canada Others XC2691-023 XC3098-051 XD0810-031 No. The... bobbin clips can be connected each other areas) XC1807-121 XC1074-051 XD0474-151 SA432 EF62: XA6628-102 XC6283-001 XC4487-021 XC4842-022 XE3116-201 XE3118-001 XE3365-101(SE-350, LB-6770...
...X81164-001 SAEBT999 EBT-CEBN XC5520-001 Memo z To obtain optional accessories or parts, visit [http://www.brother.com/], or [http://www.brothermall.com] (in USA). Part Name 1 Buttonhole foot "A" 2 Overcasting foot "G" 3 Monogramming foot "N" Part Code U.S.A. / Canada Others XC2691-023 XC3098-051 XD0810-031 No. The... bobbin clips can be connected each other areas) XC1807-121 XC1074-051 XD0474-151 SA432 EF62: XA6628-102 XC6283-001 XC4487-021 XC4842-022 XE3116-201 XE3118-001 XE3365-101(SE-350, LB-6770...
Users Manual - English
Page 12
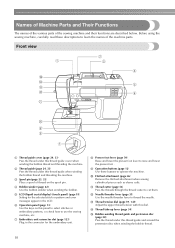
..., 145) Adjust the upper thread tension with this panel to select stitches or embroidery patterns, or check how to learn the names of the machine parts. Before using the sewing machine, carefully read these buttons to raise and lower the presser foot . f Operation panel (page 13) Use the keys on...) Pass the thread under this thread guide and around the pretension disc when winding the bobbin thread. 10 Names of Machine Parts and Their Functions The names of the various parts of thread on this dial. c Spool pin (page 23, 32) Place a spool of the sewing machine and their functions ...
..., 145) Adjust the upper thread tension with this panel to select stitches or embroidery patterns, or check how to learn the names of the machine parts. Before using the sewing machine, carefully read these buttons to raise and lower the presser foot . f Operation panel (page 13) Use the keys on...) Pass the thread under this thread guide and around the pretension disc when winding the bobbin thread. 10 Names of Machine Parts and Their Functions The names of the various parts of thread on this dial. c Spool pin (page 23, 32) Place a spool of the sewing machine and their functions ...

Users Manual - English
Page 24
GETTING READY Winding/Installing the Bobbin This section describes how to prepare the bobbin thread. CAUTION ● Only use the Bobbin (part code: SA156, SFB (XA5539-151)) designed specifically for this sewing machine. If bobbins from other bobbin may result in injuries or damage to ...bobbin. Use only the included bobbin or bobbins of any other models are used, the machine will not operate correctly. Use of the same type (part code: SA156, SFB (XA5539-151)). 11.5 mm (7/16 inch) Actual size This model Other model Winding the bobbin Wind the thread around the bobbin...
GETTING READY Winding/Installing the Bobbin This section describes how to prepare the bobbin thread. CAUTION ● Only use the Bobbin (part code: SA156, SFB (XA5539-151)) designed specifically for this sewing machine. If bobbins from other bobbin may result in injuries or damage to ...bobbin. Use only the included bobbin or bobbins of any other models are used, the machine will not operate correctly. Use of the same type (part code: SA156, SFB (XA5539-151)). 11.5 mm (7/16 inch) Actual size This model Other model Winding the bobbin Wind the thread around the bobbin...

Users Manual - English
Page 29
... by marks that the bobbin thread should be incorrect. a CAUTION 1 ● Use a bobbin that the thread passes under the pretension disk of the same type (part code: SA156, SFB (XA5539-151)). Use only the included bobbin or bobbins of the bobbin-winding thread guide correctly (page 24). Installing the bobbin Install...
... by marks that the bobbin thread should be incorrect. a CAUTION 1 ● Use a bobbin that the thread passes under the pretension disk of the same type (part code: SA156, SFB (XA5539-151)). Use only the included bobbin or bobbins of the bobbin-winding thread guide correctly (page 24). Installing the bobbin Install...

Users Manual - English
Page 38
... your finger may be used with the needle or the needle may bend the needle or damage the machine. ● Never use the twin needle (part code: X59296-121). GETTING READY ■ Threading the needle manually (without using the needle threader) When using special thread, such as described below.
... your finger may be used with the needle or the needle may bend the needle or damage the machine. ● Never use the twin needle (part code: X59296-121). GETTING READY ■ Threading the needle manually (without using the needle threader) When using special thread, such as described below.

Users Manual - English
Page 43
... replacing the needle, be damaged. a Screwdriver b Needle clamp screw • Do not apply a strong force when loosening or tightening the needle clamp screw, otherwise certain parts of the machine, insert the needle until it touches the needle stopper. Replacing the needle Use the screwdriver and a needle that has been determined to...
... replacing the needle, be damaged. a Screwdriver b Needle clamp screw • Do not apply a strong force when loosening or tightening the needle clamp screw, otherwise certain parts of the machine, insert the needle until it touches the needle stopper. Replacing the needle Use the screwdriver and a needle that has been determined to...

Users Manual - English
Page 48
Remove the flat bed attachment. Slide the part that you have finished free-arm sewing, c install the flat bed attachment back in its original position. 46 a a a Flat bed attachment X With the flat bed attachment removed, freearm sewing is possible. a a Arm When you wish to sew cylindrical pieces such as sleeve cuffs and pant legs. Free-arm sewing Removing the flat bed attachment allows for free-arm sewing, making it easier to sew onto the b arm, and then sew from the top. GETTING READY Sewing Cylindrical Pieces Free-arm sewing makes sewing cylindrical pieces easy.
Remove the flat bed attachment. Slide the part that you have finished free-arm sewing, c install the flat bed attachment back in its original position. 46 a a a Flat bed attachment X With the flat bed attachment removed, freearm sewing is possible. a a Arm When you wish to sew cylindrical pieces such as sleeve cuffs and pant legs. Free-arm sewing Removing the flat bed attachment allows for free-arm sewing, making it easier to sew onto the b arm, and then sew from the top. GETTING READY Sewing Cylindrical Pieces Free-arm sewing makes sewing cylindrical pieces easy.
Users Manual - English
Page 50
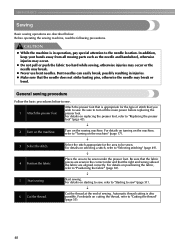
... stitching" (page 49). ↓ 4 Position the fabric. SEWING BASICS Sewing Basic sewing operations are aligned correctly. In addition, keep your hands away from all moving parts such as the needle and handwheel, otherwise injuries may occur. z Never use bent needles. For details on the machine" (page 17). ↓ 3 Select the stitch...
... stitching" (page 49). ↓ 4 Position the fabric. SEWING BASICS Sewing Basic sewing operations are aligned correctly. In addition, keep your hands away from all moving parts such as the needle and handwheel, otherwise injuries may occur. z Never use bent needles. For details on the machine" (page 17). ↓ 3 Select the stitch...

Users Manual - English
Page 83
... sew onto the i arm, make h free-arm sewing possible. • For details on replacing the presser foot, refer to "Selecting stitching" (page 49). Slide the part that the fabric feeds correctly, and then start sewing. d 2 4 3 1 1 Remove the flat bed attachment and make sure that you change the needle drop point, raise...
... sew onto the i arm, make h free-arm sewing possible. • For details on replacing the presser foot, refer to "Selecting stitching" (page 49). Slide the part that the fabric feeds correctly, and then start sewing. d 2 4 3 1 1 Remove the flat bed attachment and make sure that you change the needle drop point, raise...

Users Manual - English
Page 86
The names of parts of buttonhole foot "A", which is about 28 mm (1-1/8 inches) (diameter + thickness of the button). UTILITY STITCHES Buttonhole sewing The maximum buttonhole length is used for ...
The names of parts of buttonhole foot "A", which is about 28 mm (1-1/8 inches) (diameter + thickness of the button). UTILITY STITCHES Buttonhole sewing The maximum buttonhole length is used for ...

Users Manual - English
Page 89
... fabrics, use the seam ripper in the illustration. ■ Changing the density of the stitching Adjust the stitch length. Hook the gimp thread onto the part of a buttonhole foot "A" shown in any slack. b 3 Memo z For details, refer to remove any other way than how it .
... fabrics, use the seam ripper in the illustration. ■ Changing the density of the stitching Adjust the stitch length. Hook the gimp thread onto the part of a buttonhole foot "A" shown in any slack. b 3 Memo z For details, refer to remove any other way than how it .

Users Manual - English
Page 128
... embroidery frame. Attaching a stabilizer material to the fabric Prepare stabilizer material that is stretched on thin materials like towels. To obtain optional accessories or parts, visit [http://www.brother.com/], or [http:// www.brothermall.com] (in the embroidery frame without using stabilizers with adhesive, place b the adhesive surface of the stabilizer material...
... embroidery frame. Attaching a stabilizer material to the fabric Prepare stabilizer material that is stretched on thin materials like towels. To obtain optional accessories or parts, visit [http://www.brother.com/], or [http:// www.brothermall.com] (in the embroidery frame without using stabilizers with adhesive, place b the adhesive surface of the stabilizer material...

Users Manual - English
Page 133
... accidentally pressed, the machine starts sewing, and your finger may be pricked with the needle or the needle may break. 4 a Needle position button Press the part of the embroidery frame holder c in the figure to the left side, and raise the embroidery frame. 1 a Press here to raise the needle. Attaching the...
... accidentally pressed, the machine starts sewing, and your finger may be pricked with the needle or the needle may break. 4 a Needle position button Press the part of the embroidery frame holder c in the figure to the left side, and raise the embroidery frame. 1 a Press here to raise the needle. Attaching the...

Users Manual - English
Page 141
Prepare embroidery thread of color d Current color part e Next color part • Refer to "Threading the upper thread" (page 32). The pattern may break or bend. ● Do not let hands or objects hit the carriage ...
Prepare embroidery thread of color d Current color part e Next color part • Refer to "Threading the upper thread" (page 32). The pattern may break or bend. ● Do not let hands or objects hit the carriage ...

