
Users Manual - English
Page 1
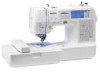
Computerized Embroidery and Sewing Machine Operation Manual Product Code 885-V31/V33 GETTING READY SEWING BASICS UTILITY STITCHES EMBROIDERY APPENDIX
Computerized Embroidery and Sewing Machine Operation Manual Product Code 885-V31/V33 GETTING READY SEWING BASICS UTILITY STITCHES EMBROIDERY APPENDIX

Users Manual - English
Page 3
... clear: • Never operate the machine with any air openings blocked. Do not use extension cords. Keep ventilation openings of the sewing machine and foot control free from the build up of electric shock 1 Always unplug the machine from the electrical outlet when removing covers...handle. Important Safety Instructions Please read the "Important Safety Instructions", and then study this manual, or if you have finished reading this embroidery and sewing machine. In addition, after using, when cleaning, when making any other part may injure your back or knees. 4 Always keep your...
... clear: • Never operate the machine with any air openings blocked. Do not use extension cords. Keep ventilation openings of the sewing machine and foot control free from the build up of electric shock 1 Always unplug the machine from the electrical outlet when removing covers...handle. Important Safety Instructions Please read the "Important Safety Instructions", and then study this manual, or if you have finished reading this embroidery and sewing machine. In addition, after using, when cleaning, when making any other part may injure your back or knees. 4 Always keep your...
Users Manual - English
Page 9
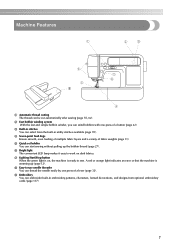
...the green light is on dark fabrics. h Easy-to-use needle threader You can start sewing without pulling up (page 12). Machine Features 9 a Automatic thread cutting The thread can embroider built-in embroidery patterns, characters, framed decorations, and designs from the built-in stitches You can wind ...multiple fabric layers and a variety of fabric weights (page 11). f Bright light The convenient LED lamp makes it easy to sew. i Embroidery You can be cut automatically after sewing (page 55, 62). A red or orange light indicates an error or that the machine is ready to work on , the...
...the green light is on dark fabrics. h Easy-to-use needle threader You can start sewing without pulling up (page 12). Machine Features 9 a Automatic thread cutting The thread can embroider built-in embroidery patterns, characters, framed decorations, and designs from the built-in stitches You can wind ...multiple fabric layers and a variety of fabric weights (page 11). f Bright light The convenient LED lamp makes it easy to sew. i Embroidery You can be cut automatically after sewing (page 55, 62). A red or orange light indicates an error or that the machine is ready to work on , the...

Users Manual - English
Page 12
.... e LCD (liquid crystal display) (touch panel) (page 18) Setting for the embroidery unit. j Flat bed attachment (page 46) Remove the flat bed attachment when sewing cylindrical pieces such as sleeve cuffs. g Embroidery unit connector slot (page 123) Plug in the connector for the selected stitch or pattern...LCD. c Spool pin (page 23, 32) Place a spool of thread on this panel to select stitches or embroidery patterns, or check how to learn the names of the sewing machine and their functions are described below. k Thread cutter (page 56) Pass the threads through the thread cutter...
.... e LCD (liquid crystal display) (touch panel) (page 18) Setting for the embroidery unit. j Flat bed attachment (page 46) Remove the flat bed attachment when sewing cylindrical pieces such as sleeve cuffs. g Embroidery unit connector slot (page 123) Plug in the connector for the selected stitch or pattern...LCD. c Spool pin (page 23, 32) Place a spool of thread on this panel to select stitches or embroidery patterns, or check how to learn the names of the sewing machine and their functions are described below. k Thread cutter (page 56) Pass the threads through the thread cutter...

Users Manual - English
Page 13
... (page 138) Insert the embroidery card. Do not cover the air vent while the sewing machine is installed onto the presser foot holder. h Drop feed lever (page 88) Use the drop feed lever to sew one stitch. f Bobbin cover/bobbin case (page 28) Remove the bobbin cover, and then insert the bobbin into... by its handle when transporting the machine. g Power supply jack (page 17) Insert the plug on the fabric as the sewing takes place. h Presser foot (page 43, 50) The presser foot applies pressure consistently on the power supply cord into the power supply jack. b Handwheel (page ...
... (page 138) Insert the embroidery card. Do not cover the air vent while the sewing machine is installed onto the presser foot holder. h Drop feed lever (page 88) Use the drop feed lever to sew one stitch. f Bobbin cover/bobbin case (page 28) Remove the bobbin cover, and then insert the bobbin into... by its handle when transporting the machine. g Power supply jack (page 17) Insert the plug on the fabric as the sewing takes place. h Presser foot (page 43, 50) The presser foot applies pressure consistently on the power supply cord into the power supply jack. b Handwheel (page ...

Users Manual - English
Page 15
... perform operations. a LCD (liquid crystal display) (touch panel) Setting for the selected stitch or pattern and error messages appear in the LCD. g Embroidery key Press this key to sew embroidery. f Utility stitch key Press this key to select a utility stitch. Touch the keys displayed on the LCD with your finger or the touch...
... perform operations. a LCD (liquid crystal display) (touch panel) Setting for the selected stitch or pattern and error messages appear in the LCD. g Embroidery key Press this key to sew embroidery. f Utility stitch key Press this key to select a utility stitch. Touch the keys displayed on the LCD with your finger or the touch...

Users Manual - English
Page 20
... crystal display) on the front of stitches contained i Horizontal mirror image j Automatic thread cutting k Automatic reverse/reinforcement l Single/twin needle sewing and needle stop position Memo z A different screen is displayed when the embroidery unit is displayed. 1 l k 2 0 9 3 8 4 7 5 6 a Selected stitch b Presser foot to the message displayed on . Change the screen on the LCD using...
... crystal display) on the front of stitches contained i Horizontal mirror image j Automatic thread cutting k Automatic reverse/reinforcement l Single/twin needle sewing and needle stop position Memo z A different screen is displayed when the embroidery unit is displayed. 1 l k 2 0 9 3 8 4 7 5 6 a Selected stitch b Presser foot to the message displayed on . Change the screen on the LCD using...
Users Manual - English
Page 21
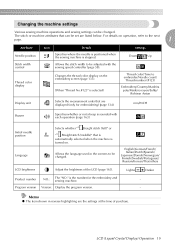
... Memo z The item shown in the screens to embroider/Needle count/ Thread number (#123) (When "Thread No.#123" is selected) Embroidery/Country/Madeira poly/Madeira rayon/Sulky/ Robison Anton Display unit Selects the measurement units that are listed below. Down Up Allows the stitch width...Language Selects whether "1 Straight stitch (left)" or "3 Straight stitch (middle)" that can be set are displayed (only for the embroidery and sewing machine. - For details on the embroidery screen (page 133). LCD (Liquid Crystal Display) Operation 19 Changing the machine settings Various...
... Memo z The item shown in the screens to embroider/Needle count/ Thread number (#123) (When "Thread No.#123" is selected) Embroidery/Country/Madeira poly/Madeira rayon/Sulky/ Robison Anton Display unit Selects the measurement units that are listed below. Down Up Allows the stitch width...Language Selects whether "1 Straight stitch (left)" or "3 Straight stitch (middle)" that can be set are displayed (only for the embroidery and sewing machine. - For details on the embroidery screen (page 133). LCD (Liquid Crystal Display) Operation 19 Changing the machine settings Various...

Users Manual - English
Page 23
... (Back key) to return to be referred on b the display panel. bobbin winding / setting bobbin thread / needle replacement / embroidery unit attachment / Example: Upper threading embroidery frame attachment / embroidery foot attachment / presser foot replacement on . X The sewing machine help key) on the LCD display for the selected topic appears. Press the item to the item...
... (Back key) to return to be referred on b the display panel. bobbin winding / setting bobbin thread / needle replacement / embroidery unit attachment / Example: Upper threading embroidery frame attachment / embroidery foot attachment / presser foot replacement on . X The sewing machine help key) on the LCD display for the selected topic appears. Press the item to the item...
Users Manual - English
Page 25
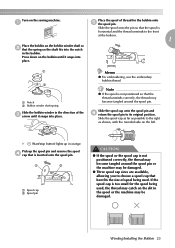
... available, allowing you to the front at the bottom. 1 Place the bobbin on the bobbin until it snaps into place. Memo z For embroidering, use the embroidery bobbin thread. Slide the spool onto the pin so that the spool is not positioned correctly, the thread may become tangled around the spool pin... the notch in the direction of the c arrow until it snaps into place. Pick up in the spool or the machine may catch on the sewing machine.
... available, allowing you to the front at the bottom. 1 Place the bobbin on the bobbin until it snaps into place. Memo z For embroidering, use the embroidery bobbin thread. Slide the spool onto the pin so that the spool is not positioned correctly, the thread may become tangled around the spool pin... the notch in the direction of the c arrow until it snaps into place. Pick up in the spool or the machine may catch on the sewing machine.
Users Manual - English
Page 42
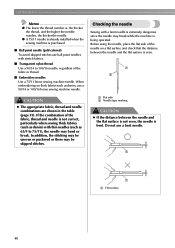
... needle combinations are shown in the table (page 39). In addition, the stitching may be skipped stitches. z A 75/11 needle is already installed when the sewing machine is , the thicker the thread, and the higher the needle number, the thicker the needle. Do not use a bent needle. GETTING READY Memo z ... is even. If the combination of the needle on thick fabrics such as 65/9 to 100/16 needle, regardless of the fabric or thread. ■ Embroidery needles Use a 75/11 home sewing machine needle. Checking the needle Sewing with a bent needle is bent. a a a Flat surface 40
... needle combinations are shown in the table (page 39). In addition, the stitching may be skipped stitches. z A 75/11 needle is already installed when the sewing machine is , the thicker the thread, and the higher the needle number, the thicker the needle. Do not use a bent needle. GETTING READY Memo z ... is even. If the combination of the needle on thick fabrics such as 65/9 to 100/16 needle, regardless of the fabric or thread. ■ Embroidery needles Use a 75/11 home sewing machine needle. Checking the needle Sewing with a bent needle is bent. a a a Flat surface 40
Users Manual - English
Page 45
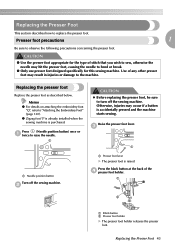
... foot. CAUTION ● Use the presser foot appropriate for this sewing machine. Use of stitch that you wish to sew, otherwise the needle may hit the presser foot, causing the needle to "Attaching the Embroidery Foot" (page 120). Replacing the presser foot Replace the presser ...foot as described below. a CAUTION z Before replacing the presser foot, be sure to raise the needle. z Zigzag foot "J" is already installed when the sewing machine is raised. Press (Needle...
... foot. CAUTION ● Use the presser foot appropriate for this sewing machine. Use of stitch that you wish to sew, otherwise the needle may hit the presser foot, causing the needle to "Attaching the Embroidery Foot" (page 120). Replacing the presser foot Replace the presser ...foot as described below. a CAUTION z Before replacing the presser foot, be sure to raise the needle. z Zigzag foot "J" is already installed when the sewing machine is raised. Press (Needle...
Users Manual - English
Page 47
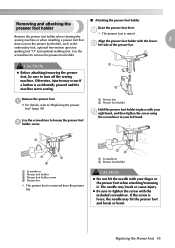
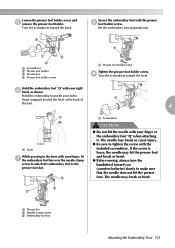
.... z Be sure to loosen the presser foot b holder screw. Remove the presser foot holder when cleaning the sewing machine or when installing a presser foot that Align the presser foot holder with the included screwdriver. embroidery foot, optional free-motion open toe quilting foot "O" and optional walking foot. Use the screwdriver to tighten...
.... z Be sure to loosen the presser foot b holder screw. Remove the presser foot holder when cleaning the sewing machine or when installing a presser foot that Align the presser foot holder with the included screwdriver. embroidery foot, optional free-motion open toe quilting foot "O" and optional walking foot. Use the screwdriver to tighten...
Users Manual - English
Page 120
.... CAUTION ● Since ball point needles (gold colored) are needles for embroidery. Note z Always use stabilizer when sewing embroidery projects, especially when embroidering on thick fabrics such as pattern stitching and stretch fabrics, be sure to the embroidery unit, and use the embroidery bobbin thread. z When embroidering on thin materials like organdy and fabrics with...
.... CAUTION ● Since ball point needles (gold colored) are needles for embroidery. Note z Always use stabilizer when sewing embroidery projects, especially when embroidering on thick fabrics such as pattern stitching and stretch fabrics, be sure to the embroidery unit, and use the embroidery bobbin thread. z When embroidering on thin materials like organdy and fabrics with...
Users Manual - English
Page 122
... may occur if a button is at the top position. Press and hold the black button on the handwheel is accidentally pressed and the machine starts sewing. Have the included embroidery foot "Q" and a screwdriver ready. If the wrong presser foot is raised. Check the handwheel mark is at the top. Turn off the...
... may occur if a button is at the top position. Press and hold the black button on the handwheel is accidentally pressed and the machine starts sewing. Have the included embroidery foot "Q" and a screwdriver ready. If the wrong presser foot is raised. Check the handwheel mark is at the top. Turn off the...
Users Manual - English
Page 123
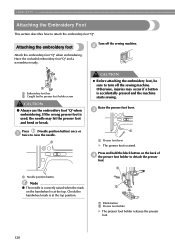
Hold the embroidery foot "Q" with the presser h foot holder screw. The needle may hit the presser foot and break or bend. ● Before sewing, always turn the handwheel toward you (counterclockwise) slowly to make sure that the needle does not hit the presser foot. Loosen ...the presser foot holder screw and e remove the presser foot holder. Hold the embroidery foot with your index a finger wrapped ...
Hold the embroidery foot "Q" with the presser h foot holder screw. The needle may hit the presser foot and break or bend. ● Before sewing, always turn the handwheel toward you (counterclockwise) slowly to make sure that the needle does not hit the presser foot. Loosen ...the presser foot holder screw and e remove the presser foot holder. Hold the embroidery foot with your index a finger wrapped ...
Users Manual - English
Page 124
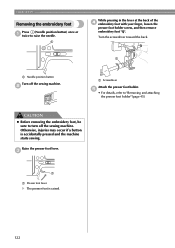
... presser foot holder. e • For details, refer to raise the needle. c a a Presser foot lever X The presser foot is accidentally pressed and the machine starts sewing. EMBROIDERY Removing the embroidery foot Press (Needle position button) once or a twice to "Removing and attaching the presser foot holder" (page 45). Raise the presser foot lever. a While...
... presser foot holder. e • For details, refer to raise the needle. c a a Presser foot lever X The presser foot is accidentally pressed and the machine starts sewing. EMBROIDERY Removing the embroidery foot Press (Needle position button) once or a twice to "Removing and attaching the presser foot holder" (page 45). Raise the presser foot lever. a While...

Users Manual - English
Page 128
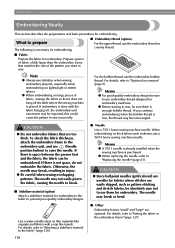
...recommend the optional stabilizer material for embroidery to the fabric to prevent poor quality embroidery designs. To obtain optional accessories or parts, visit [http://www.brother.com/], or [http:// www.brothermall.com] (in the embroidery frame without using stabilizers with adhesive...embroider without attaching the stabilizer. 126 Use a water soluble sheet on an embroidery frame. CAUTION ● Always use stabilizer material when sewing embroidery projects. Attach a stabilizer material for embroidery. Furthermore, the pattern may break or bend if you are using a ...
...recommend the optional stabilizer material for embroidery to the fabric to prevent poor quality embroidery designs. To obtain optional accessories or parts, visit [http://www.brother.com/], or [http:// www.brothermall.com] (in the embroidery frame without using stabilizers with adhesive...embroider without attaching the stabilizer. 126 Use a water soluble sheet on an embroidery frame. CAUTION ● Always use stabilizer material when sewing embroidery projects. Attach a stabilizer material for embroidery. Furthermore, the pattern may break or bend if you are using a ...

Accessory Catalog
Page 3
... Sewing & Embroidery Combination Machines The ultimate in sewing, quilting, embroidery and even crafting capability! Perfect for which the shown accessory is 80, 40 Sewing Machines Quality results are specified to the following pages to explore the exciting world of sewing and embroidery. E CS6000i/T, HS2000, HS1000, BC1000, EX660, CS100T, ES2000, CE4000 Lightweight Sewing Machines Choose from the extensive Brother Embroidery Library. * Brother embroidery...
... Sewing & Embroidery Combination Machines The ultimate in sewing, quilting, embroidery and even crafting capability! Perfect for which the shown accessory is 80, 40 Sewing Machines Quality results are specified to the following pages to explore the exciting world of sewing and embroidery. E CS6000i/T, HS2000, HS1000, BC1000, EX660, CS100T, ES2000, CE4000 Lightweight Sewing Machines Choose from the extensive Brother Embroidery Library. * Brother embroidery...

Accessory Catalog
Page 33
... Free-Standing Ten Spool Thread Stand Ten Spool Thread Stand Embroidery Machine Hoops Brother Embroidery Accessories 64 For all embroidery and sewing/embroidery machines. The spool pins can easily be used thread colors. For all models: SA503 Free-Standing Ten Spool Thread Stand You ... machine. Place your threads in place on to your machine to accommodate a variety of thread on this stand that conveniently sits behind your next embroidery, quilting or sewing project. Some hoops can set up to 10 spools of spool sizes. For Quattro™ 6000D: • Extra-large: 300 x 200...
... Free-Standing Ten Spool Thread Stand Ten Spool Thread Stand Embroidery Machine Hoops Brother Embroidery Accessories 64 For all embroidery and sewing/embroidery machines. The spool pins can easily be used thread colors. For all models: SA503 Free-Standing Ten Spool Thread Stand You ... machine. Place your threads in place on to your machine to accommodate a variety of thread on this stand that conveniently sits behind your next embroidery, quilting or sewing project. Some hoops can set up to 10 spools of spool sizes. For Quattro™ 6000D: • Extra-large: 300 x 200...


