Users Manual - English and Spanish
Page 2
WARNING - Do not use bent or damaged needles. 1 Lifting the machine by any other part may damage the machine or result in the machine falling, which could cause injuries. • When lifting the ... using , when cleaning, when making any user servicing adjustments mentioned in injuries. 5 Special care is required when sewing: • Always pay close attention to the needle. Do not use an extension cord. • Always unplug your work area clear: • Never operate the machine with any object into the electrical outlet...
WARNING - Do not use bent or damaged needles. 1 Lifting the machine by any other part may damage the machine or result in the machine falling, which could cause injuries. • When lifting the ... using , when cleaning, when making any user servicing adjustments mentioned in injuries. 5 Special care is required when sewing: • Always pay close attention to the needle. Do not use an extension cord. • Always unplug your work area clear: • Never operate the machine with any object into the electrical outlet...
Users Manual - English and Spanish
Page 3
... without supervision. 2 Use accessories recommended by a person responsible for their safety. For additional product information, visit our web site at www.brother.com SAVE THESE INSTRUCTIONS This machine is intended for household use or store the machine near a space heater, iron, halogen lamp, or...cause the needle to ensure that this machine was supplied in this manual. Special care is required, first follow careful instruction when freehand stitching so that you do not play with the appliance. If the problem persists, please consult your local authorized Brother dealer. ...
... without supervision. 2 Use accessories recommended by a person responsible for their safety. For additional product information, visit our web site at www.brother.com SAVE THESE INSTRUCTIONS This machine is intended for household use or store the machine near a space heater, iron, halogen lamp, or...cause the needle to ensure that this machine was supplied in this manual. Special care is required, first follow careful instruction when freehand stitching so that you do not play with the appliance. If the problem persists, please consult your local authorized Brother dealer. ...
Users Manual - English and Spanish
Page 4
...MAIN PARTS 5 Flat bed attachment 5 USING YOUR SEWING MACHINE 6 Connecting plugs 6 Main power and sewing light switch 7 Foot controller 7 Checking the needle 7 Replacing the needle 7 Changing the presser foot 8 THE CONTROLS 9 Pattern selection dial 9 Patterns and stitch names 9 Reverse sewing lever 10 THREADING THE MACHINE 11 ... with a quick-set bobbin 14 Upper threading 15 Drawing up the lower thread 17 FABRIC, THREAD, AND NEEDLE COMBINATIONS 18 2. Never use a fuse approved by ASTA to obtain the correct lead. CONTENTS IMPORTANT SAFETY INSTRUCTIONS 1 1.
...MAIN PARTS 5 Flat bed attachment 5 USING YOUR SEWING MACHINE 6 Connecting plugs 6 Main power and sewing light switch 7 Foot controller 7 Checking the needle 7 Replacing the needle 7 Changing the presser foot 8 THE CONTROLS 9 Pattern selection dial 9 Patterns and stitch names 9 Reverse sewing lever 10 THREADING THE MACHINE 11 ... with a quick-set bobbin 14 Upper threading 15 Drawing up the lower thread 17 FABRIC, THREAD, AND NEEDLE COMBINATIONS 18 2. Never use a fuse approved by ASTA to obtain the correct lead. CONTENTS IMPORTANT SAFETY INSTRUCTIONS 1 1.
Users Manual - English and Spanish
Page 5
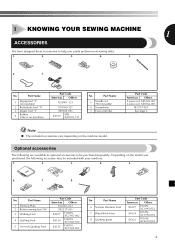
... Foot 7 Blind Stitch Foot 8 Quilting guide Part Code Americas Others SA127 F003N: XC1945-052 SA134 F018N: XC1976-052 SA132 F016N: XC2215-052 4 Part Name 5 Needle set (90/14 needle) 6 Screwdriver 7 Foot controller Part Code Americas Others 3-piece set: XE5328-001 2-piece set: XE7064-001 XF3557-001 See page 5 Note ● The included...
... Foot 7 Blind Stitch Foot 8 Quilting guide Part Code Americas Others SA127 F003N: XC1945-052 SA134 F018N: XC1976-052 SA132 F016N: XC2215-052 4 Part Name 5 Needle set (90/14 needle) 6 Screwdriver 7 Foot controller Part Code Americas Others 3-piece set: XE5328-001 2-piece set: XE7064-001 XF3557-001 See page 5 Note ● The included...
Users Manual - English and Spanish
Page 6
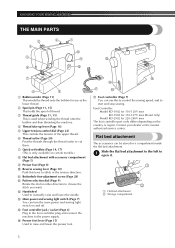
... only) Model KD-2902 for use this lever to stitch in the foot controller plug and connect the machine to manually raise and lower the needle.
... only) Model KD-2902 for use this lever to stitch in the foot controller plug and connect the machine to manually raise and lower the needle.
Users Manual - English and Spanish
Page 8
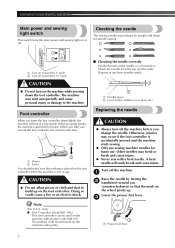
... and cause injury. ● Never sew with product code 888-X55. Lower the presser foot lever. 3 1 1 Presser foot lever 7 Checking the needle The sewing needle must always be used on or off the foot controller, the machine will stop. 1 2 1 Slower 2 Faster You should make sure that the mark... not in use . Otherwise, injuries may start unexpectedly and cause personal injury or damage to build up . Turn off the machine. 1 Raise the needle by turning the 2 handwheel toward the 'O' mark) CAUTION ● Do not turn off (toward you press the foot controller down the foot controller....
... and cause injury. ● Never sew with product code 888-X55. Lower the presser foot lever. 3 1 1 Presser foot lever 7 Checking the needle The sewing needle must always be used on or off the foot controller, the machine will stop. 1 2 1 Slower 2 Faster You should make sure that the mark... not in use . Otherwise, injuries may start unexpectedly and cause personal injury or damage to build up . Turn off the machine. 1 Raise the needle by turning the 2 handwheel toward the 'O' mark) CAUTION ● Do not turn off (toward you press the foot controller down the foot controller....
Users Manual - English and Spanish
Page 9
... foot by turning the 2 handwheel toward the 5 back of the needle toward you insert the needle until it touches the needle stopper. Next, tighten the needle clamp using a screwdriver. 2 3 1 1 Use a screwdriver 2 Needle stopper 3 Needle CAUTION ● Make sure you (counterclockwise) so that have been... into the hole in line with the slot on the controller, the machine will have chosen. With the flat side of the machine, insert the needle until it | button at the back of vertically downward. | the presser foot | holder to release the | presser foot. | | | 1 or 1 | ...
... foot by turning the 2 handwheel toward the 5 back of the needle toward you insert the needle until it touches the needle stopper. Next, tighten the needle clamp using a screwdriver. 2 3 1 1 Use a screwdriver 2 Needle stopper 3 Needle CAUTION ● Make sure you (counterclockwise) so that have been... into the hole in line with the slot on the controller, the machine will have chosen. With the flat side of the machine, insert the needle until it | button at the back of vertically downward. | the presser foot | holder to release the | presser foot. | | | 1 or 1 | ...
Users Manual - English and Spanish
Page 10
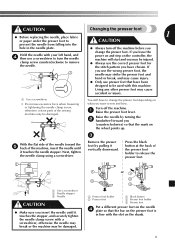
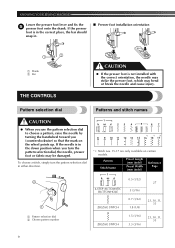
... ZIGZAG STITCH 1.5 (1/16) 3.3 (3/16) 23, 30, 31, 33 9 To choose a stitch, simply turn the pattern selection dial, the needle, presser foot or fabric may bend or break the needle and cause injury. KNOWING YOUR SEWING MACHINE Lower the presser foot lever and fix the 5 presser foot onto the shank. If... the needle is not installed with the correct orientation, the needle may strike the presser foot, which may be damaged. If the presser foot is in the correct place, the ...
... ZIGZAG STITCH 1.5 (1/16) 3.3 (3/16) 23, 30, 31, 33 9 To choose a stitch, simply turn the pattern selection dial, the needle, presser foot or fabric may bend or break the needle and cause injury. KNOWING YOUR SEWING MACHINE Lower the presser foot lever and fix the 5 presser foot onto the shank. If... the needle is not installed with the correct orientation, the needle may strike the presser foot, which may be damaged. If the presser foot is in the correct place, the ...
Users Manual - English and Spanish
Page 11
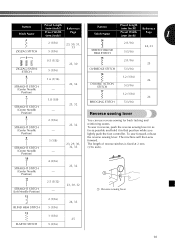
... 10 The length of reverse stitches is fixed at 2 mm (1/16 inch). 10 4 (3/16) 23, 32 STRAIGHT STITCH (Center Needle - To sew forward, release the reverse sewing lever. The machine will then sew forward. Pattern Stitch Name Preset Length (mm (inch))... (1/16) 5 (3/16) 24, 33 5 0.5 (1/32) 23, 30 15 2 (1/16) 25 ZIGZAG (SATIN) STITCH 6 STRAIGHT STITCH (Center Needle Position) 7 STRAIGHT STITCH (Center Needle Position) 8 STRAIGHT STITCH (Center Needle Position) 9 STRAIGHT STITCH (Center Needle Position) 5 (3/16) 1.6 (1/16) - 1.8 (1/8) - 2 (1/16) - 3 (1/8) - 23, 32 23, 32 23, 32 23, ...
... 10 The length of reverse stitches is fixed at 2 mm (1/16 inch). 10 4 (3/16) 23, 32 STRAIGHT STITCH (Center Needle - To sew forward, release the reverse sewing lever. The machine will then sew forward. Pattern Stitch Name Preset Length (mm (inch))... (1/16) 5 (3/16) 24, 33 5 0.5 (1/32) 23, 30 15 2 (1/16) 25 ZIGZAG (SATIN) STITCH 6 STRAIGHT STITCH (Center Needle Position) 7 STRAIGHT STITCH (Center Needle Position) 8 STRAIGHT STITCH (Center Needle Position) 9 STRAIGHT STITCH (Center Needle Position) 5 (3/16) 1.6 (1/16) - 1.8 (1/8) - 2 (1/16) - 3 (1/8) - 23, 32 23, 32 23, 32 23, ...
Users Manual - English and Spanish
Page 13
... to the right. If you do not cut the excess thread completely before winding the bobbin, when the thread runs low it may break the needle. 1 2 1 Wound evenly 2 Wound poorly 12 Then stop the machine. Turn on the machine. 5 CAUTION ● Do not turn on the machine while pressing down the...around the bobbin, the machine will make a clicking sound; Note ● When the sewing machine is started or the handwheel is not a malfunction. ● The needle bar does not move when you slide the bobbin winder shaft to the left and remove the bobbin. Pass the end of the thread through...
... to the right. If you do not cut the excess thread completely before winding the bobbin, when the thread runs low it may break the needle. 1 2 1 Wound evenly 2 Wound poorly 12 Then stop the machine. Turn on the machine. 5 CAUTION ● Do not turn on the machine while pressing down the...around the bobbin, the machine will make a clicking sound; Note ● When the sewing machine is started or the handwheel is not a malfunction. ● The needle bar does not move when you slide the bobbin winder shaft to the left and remove the bobbin. Pass the end of the thread through...
Users Manual - English and Spanish
Page 14
... sliding it may cause the thread tension to be injured. CAUTION ● Make sure you could be incorrect or break the needle. 13 1 2 1 Groove 2 Projection • Make sure that the end of the thread comes out from the cover toward the rear of the machine (as shown. &#...
... sliding it may cause the thread tension to be injured. CAUTION ● Make sure you could be incorrect or break the needle. 13 1 2 1 Groove 2 Projection • Make sure that the end of the thread comes out from the cover toward the rear of the machine (as shown. &#...
Users Manual - English and Spanish
Page 16
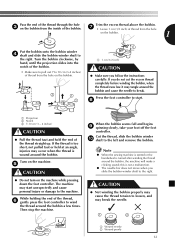
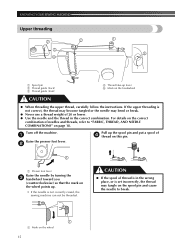
... of thread is in the correct combination. CAUTION ● If the spool of 4 thread on this pin. 1 1 Presser foot lever Raise the needle by turning the 3 handwheel toward you (counterclockwise) so that the mark on the wheel points up lever 5 Mark on the handwheel CAUTION ● .... KNOWING YOUR SEWING MACHINE Upper threading 2 2 3 4 1 5 1 Spool pin 2 Thread guide (back) 3 Thread guide (front) 4 Thread take-up . • If the needle is not correctly raised, the sewing machine can not be threaded. If the upper threading is not correct, the thread may become tangled or the...
... of thread is in the correct combination. CAUTION ● If the spool of 4 thread on this pin. 1 1 Presser foot lever Raise the needle by turning the 3 handwheel toward you (counterclockwise) so that the mark on the wheel points up lever 5 Mark on the handwheel CAUTION ● .... KNOWING YOUR SEWING MACHINE Upper threading 2 2 3 4 1 5 1 Spool pin 2 Thread guide (back) 3 Thread guide (front) 4 Thread take-up . • If the needle is not correctly raised, the sewing machine can not be threaded. If the upper threading is not correct, the thread may become tangled or the...
Users Manual - English and Spanish
Page 17
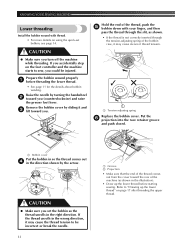
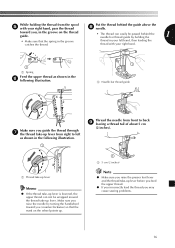
...take -up lever. toward you (counterclockwise) so that the spring in the following illustration. 1 Thread the needle from the spool 5 with your right hand, pass the thread Put the thread behind the needle bar thread guide by holding the thread from front to back 9 leaving a thread tail of about 5 cm... upper thread can easily be wrapped around the thread take -up lever from right to left as shown in the 6 following illustration. 1 4 2 1 1 Needle bar thread guide 53 Make sure you may cause sewing problems. 16 thread in your left hand, then feeding the thread with your right hand...
...take -up lever. toward you (counterclockwise) so that the spring in the following illustration. 1 Thread the needle from the spool 5 with your right hand, pass the thread Put the thread behind the needle bar thread guide by holding the thread from front to back 9 leaving a thread tail of about 5 cm... upper thread can easily be wrapped around the thread take -up lever from right to left as shown in the 6 following illustration. 1 4 2 1 1 Needle bar thread guide 53 Make sure you may cause sewing problems. 16 thread in your left hand, then feeding the thread with your right hand...
Users Manual - English and Spanish
Page 18
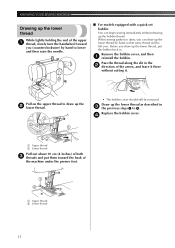
... the back of the machine under the presser foot. 1 2 1 Upper thread 2 Lower thread 17 Pull on the upper thread to lower and then raise the needle. ■ For models equipped with a quick-set bobbin You can begin sewing immediately without cutting it there without drawing up the bobbin thread. Before you...
... the back of the machine under the presser foot. 1 2 1 Upper thread 2 Lower thread 17 Pull on the upper thread to lower and then raise the needle. ■ For models equipped with a quick-set bobbin You can begin sewing immediately without cutting it there without drawing up the bobbin thread. Before you...
Users Manual - English and Spanish
Page 19
...wrong combination, such as a substitute. ■ Transparent nylon thread Use a 90/14 to skip stitches. 18 FABRIC, THREAD, AND NEEDLE COMBINATIONS 1 Fabric Type/Application Medium weight fabrics Thin fabrics Broadcloth Taffeta Flannel, Gabardine Lawn Georgette Challis, Satin Thick fabrics Denim Corduroy Tweed ... ● The lower the thread number, the thicker the thread; and the higher the needle number, the thicker the needle. ■ Ball point needle Use the ball point needle when sewing on stretch fabrics or fabrics where skipped stitches easily occur. CAUTION ● Make...
...wrong combination, such as a substitute. ■ Transparent nylon thread Use a 90/14 to skip stitches. 18 FABRIC, THREAD, AND NEEDLE COMBINATIONS 1 Fabric Type/Application Medium weight fabrics Thin fabrics Broadcloth Taffeta Flannel, Gabardine Lawn Georgette Challis, Satin Thick fabrics Denim Corduroy Tweed ... ● The lower the thread number, the thicker the thread; and the higher the needle number, the thicker the needle. ■ Ball point needle Use the ball point needle when sewing on stretch fabrics or fabrics where skipped stitches easily occur. CAUTION ● Make...
Users Manual - English and Spanish
Page 20
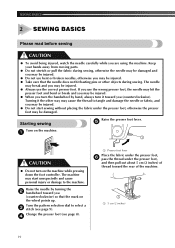
... dial to the machine. SEWING BASICS 2 SEWING BASICS Please read before sewing CAUTION ● To avoid being injured, watch the needle carefully while you (counterclockwise). Raise the needle by turning the 2 handwheel toward you may be injured. ● When you turn the handwheel by hand, always turn on...without placing the fabric under the presser foot, and then pull out about 5 cm (2 inches) of the machine. 1 1 5 cm (2 inches) 19 The needle may break and you may be injured. ● Take care that the mark on the machine. 1 1 CAUTION ● Do not turn it the other ...
... dial to the machine. SEWING BASICS 2 SEWING BASICS Please read before sewing CAUTION ● To avoid being injured, watch the needle carefully while you (counterclockwise). Raise the needle by turning the 2 handwheel toward you may be injured. ● When you turn the handwheel by hand, always turn on...without placing the fabric under the presser foot, and then pull out about 5 cm (2 inches) of the machine. 1 1 5 cm (2 inches) 19 The needle may break and you may be injured. ● Take care that the mark on the machine. 1 1 CAUTION ● Do not turn it the other ...
Users Manual - English and Spanish
Page 21
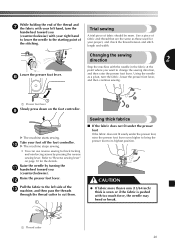
... break. 1 Thread cutter 20 CAUTION ● If fabric more than 6 mm (15/64 inch) thick is sewn or if the fabric is pushed with the needle in the fabric at the point where you want to change the sewing direction, and then raise the presser foot lever. Use a piece of fabric... can use reverse sewing for your right hand to lower the needle to "Reverse sewing lever" on the foot controller. 9 X The machine starts sewing. Raise the needle by pressing the reverse sewing lever. Raise the presser foot lever. Using the needle as those used for back tacking and reinforcing seams by turning ...
... break. 1 Thread cutter 20 CAUTION ● If fabric more than 6 mm (15/64 inch) thick is sewn or if the fabric is pushed with the needle in the fabric at the point where you want to change the sewing direction, and then raise the presser foot lever. Use a piece of fabric... can use reverse sewing for your right hand to lower the needle to "Reverse sewing lever" on the foot controller. 9 X The machine starts sewing. Raise the needle by pressing the reverse sewing lever. Raise the presser foot lever. Using the needle as those used for back tacking and reinforcing seams by turning ...
Users Manual - English and Spanish
Page 24
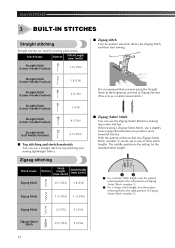
...-IN STITCHES 3 BUILT-IN STITCHES Straight stitching Straight stitches are used for sewing plain seams. Stitch Name Pattern Stitch Length [mm (inch)] Straight Stitch 6 (Center Needle Position) 1.6 (1/16) ■ Zigzag stitch Turn the pattern selection dial to the right position of Zigzag (Satin) Stitch (number 5). 4 Zigzag Stitch 2 (1/16) 5 (3/16) Zigzag (Satin...
...-IN STITCHES 3 BUILT-IN STITCHES Straight stitching Straight stitches are used for sewing plain seams. Stitch Name Pattern Stitch Length [mm (inch)] Straight Stitch 6 (Center Needle Position) 1.6 (1/16) ■ Zigzag stitch Turn the pattern selection dial to the right position of Zigzag (Satin) Stitch (number 5). 4 Zigzag Stitch 2 (1/16) 5 (3/16) Zigzag (Satin...
Users Manual - English and Spanish
Page 26
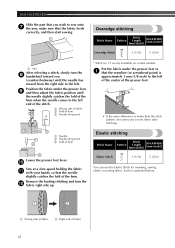
...1 (1/16) 5 (3/16) You can use the Elastic Stitch for mending, sewing elastic or joining fabric. Position the fabric under the presser foot so 1 that the needle slightly catches the fold of the hem. Remove the basting stitching and turn the 8 handwheel toward you wish to sew onto 7 the arm, make sure...up. * Stitch no. 15 is only available on certain models. Each is explained below. 1 2 1 Wrong side of fabric 2 Right side of the hem when the needle comes to the left of the center of the presser foot. • If the seam allowance is wider than the stitch pattern, trim away any...
...1 (1/16) 5 (3/16) You can use the Elastic Stitch for mending, sewing elastic or joining fabric. Position the fabric under the presser foot so 1 that the needle slightly catches the fold of the hem. Remove the basting stitching and turn the 8 handwheel toward you wish to sew onto 7 the arm, make sure...up. * Stitch no. 15 is only available on certain models. Each is explained below. 1 2 1 Wrong side of fabric 2 Right side of the hem when the needle comes to the left of the center of the presser foot. • If the seam allowance is wider than the stitch pattern, trim away any...
Users Manual - English and Spanish
Page 28
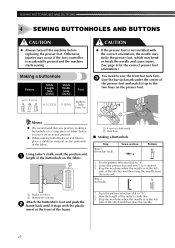
... AND BUTTONS 4 SEWING BUTTONHOLES AND BUTTONS CAUTION ● Always turn off the machine before you try it stops with the correct orientation, the needle may strike the presser foot, which may occur if the foot controller is not installed with the plastic insert at the front of chalk mark... 2 Red lines ■ Making a Buttonhole Step Step 1 (Front bar tack) Sewn section Pattern 1. Otherwise, injuries may bend or break the needle and cause injury. (See page 8 for the correct presser foot orientation.) You need to sew the front bar tack first. 3 Line the bar tack mark...
... AND BUTTONS 4 SEWING BUTTONHOLES AND BUTTONS CAUTION ● Always turn off the machine before you try it stops with the correct orientation, the needle may strike the presser foot, which may occur if the foot controller is not installed with the plastic insert at the front of chalk mark... 2 Red lines ■ Making a Buttonhole Step Step 1 (Front bar tack) Sewn section Pattern 1. Otherwise, injuries may bend or break the needle and cause injury. (See page 8 for the correct presser foot orientation.) You need to sew the front bar tack first. 3 Line the bar tack mark...


