
Users Manual - English
Page 6
... authorized Brother dealer. When storing this product and also design of the operation manual to inspect and adjust the machine yourself. If the problem persists, please consult your eye on the foot controller. 4. Do not touch the handwheel, thread take-up, needle, or other parts • A power failure occurs during use extension cords. Do not store anything on the needle while sewing. For additional product information and updates, visit...
... authorized Brother dealer. When storing this product and also design of the operation manual to inspect and adjust the machine yourself. If the problem persists, please consult your eye on the foot controller. 4. Do not touch the handwheel, thread take-up, needle, or other parts • A power failure occurs during use extension cords. Do not store anything on the needle while sewing. For additional product information and updates, visit...

Users Manual - English
Page 10
... 9 Using the Machine Setting Mode Key 12 Using the Machine Operation Mode Key 17 Using the Pattern Explanation Key 18 LOWER THREADING 19 Winding the Bobbin 19 Setting the Bobbin 22 Pulling Up the Bobbin Thread 23 UPPER THREADING 25 Threading Using the "Automatic Threading" Button 25 Threading Manually 27 Using the Twin Needle Mode 29 Using Threads that Unwind Quickly 31 CHANGING THE PRESSER FOOT 32 Removing the Presser Foot 32 Attaching the Presser Foot 32 Attaching the Walking Foot 33 CHANGING THE NEEDLE 34 Chapter 2 Sewing Basics 37 SEWING 38 Sewing a Stitch 38 Sewing...
... 9 Using the Machine Setting Mode Key 12 Using the Machine Operation Mode Key 17 Using the Pattern Explanation Key 18 LOWER THREADING 19 Winding the Bobbin 19 Setting the Bobbin 22 Pulling Up the Bobbin Thread 23 UPPER THREADING 25 Threading Using the "Automatic Threading" Button 25 Threading Manually 27 Using the Twin Needle Mode 29 Using Threads that Unwind Quickly 31 CHANGING THE PRESSER FOOT 32 Removing the Presser Foot 32 Attaching the Presser Foot 32 Attaching the Walking Foot 33 CHANGING THE NEEDLE 34 Chapter 2 Sewing Basics 37 SEWING 38 Sewing a Stitch 38 Sewing...

Users Manual - English
Page 11
... Bobbin Case (with no marking) ...... 211 ADJUSTING THE SCREEN 212 MAKING EMBROIDERY ADJUSTMENTS .........154 Adjusting Thread Tension 154 Using the Automatic Thread Cutting Function (END COLOR TRIM 155 Using the Thread Trimming Function (JUMP STITCH TRIM) 155 Adjusting the Embroidery Speed 156 Changing the Thread Color Display 157 Changing the Embroidery Frame Display 158 REVISING THE PATTERN 159 Screen Visibility is Low 212 Touch Panel is Malfunctioning 212 TROUBLESHOOTING 214 ERROR MESSAGES 217 3 SPECIFICATIONS 223 UPGRADING YOUR MACHINE'S SOFTWARE...
... Bobbin Case (with no marking) ...... 211 ADJUSTING THE SCREEN 212 MAKING EMBROIDERY ADJUSTMENTS .........154 Adjusting Thread Tension 154 Using the Automatic Thread Cutting Function (END COLOR TRIM 155 Using the Thread Trimming Function (JUMP STITCH TRIM) 155 Adjusting the Embroidery Speed 156 Changing the Thread Color Display 157 Changing the Embroidery Frame Display 158 REVISING THE PATTERN 159 Screen Visibility is Low 212 Touch Panel is Malfunctioning 212 TROUBLESHOOTING 214 ERROR MESSAGES 217 3 SPECIFICATIONS 223 UPGRADING YOUR MACHINE'S SOFTWARE...
Users Manual - English
Page 13
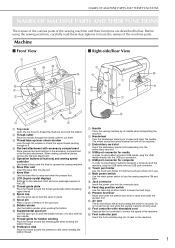
... parts of the machine parts. b Thread cutter Pass the threads through in use. e Operation buttons (6 buttons) and sewing speed controller Use these descriptions to raise and lower the needle. h Jack connector Insert the power cord into the USB port connector. m Supplemental spool pin Use this thread guide when winding the bobbin thread. f Touch pen holder Use the touch pen holder to USB media, plug the USB media directly into the connector jack. i Feed dog position switch Use the feed dog position switch to raise and lower the presser foot. h l a Handle Carry the sewing machine...
... parts of the machine parts. b Thread cutter Pass the threads through in use. e Operation buttons (6 buttons) and sewing speed controller Use these descriptions to raise and lower the needle. h Jack connector Insert the power cord into the USB port connector. m Supplemental spool pin Use this thread guide when winding the bobbin thread. f Touch pen holder Use the touch pen holder to USB media, plug the USB media directly into the connector jack. i Feed dog position switch Use the feed dog position switch to raise and lower the presser foot. h l a Handle Carry the sewing machine...

Users Manual - English
Page 14
...the embroidery frame is marked with the embroidery unit attached. c Feed dog position switch Use the feed dog position switch to raise and lower the feed dogs while the embroidery unit is located at right when embroidering. • You can also sew utility/decorative stitches with guides to help sew straight seams. i Presser foot holder screw Use the presser foot holder screw to set in place. h Needle plate The needle plate is set the bobbin. c Feed dogs The feed dogs feed the fabric in place. g Needle bar thread guides Pass the upper thread through the two needle bar thread guides...
...the embroidery frame is marked with the embroidery unit attached. c Feed dog position switch Use the feed dog position switch to raise and lower the feed dogs while the embroidery unit is located at right when embroidering. • You can also sew utility/decorative stitches with guides to help sew straight seams. i Presser foot holder screw Use the presser foot holder screw to set in place. h Needle plate The needle plate is set the bobbin. c Feed dogs The feed dogs feed the fabric in place. g Needle bar thread guides Pass the upper thread through the two needle bar thread guides...

Users Manual - English
Page 15
...To open the accessory compartment. Operation Buttons NAMES OF MACHINE PARTS AND THEIR FUNCTIONS Included Accessories Pull the top of the flat bed attachment to raise or lower the needle position. f Sewing Speed controller Use this button to adjust the sewing speed. g "Automatic Threading" button Use this controller to automatically thread the needle. Otherwise, the needle may break, the threads may occur. e "Presser Foot Lifter" button Press this button to the machine's operation mode. b "Reverse/Reinforcement Stitch" button Use this button to lower the presser foot and...
...To open the accessory compartment. Operation Buttons NAMES OF MACHINE PARTS AND THEIR FUNCTIONS Included Accessories Pull the top of the flat bed attachment to raise or lower the needle position. f Sewing Speed controller Use this button to adjust the sewing speed. g "Automatic Threading" button Use this controller to automatically thread the needle. Otherwise, the needle may break, the threads may occur. e "Presser Foot Lifter" button Press this button to the machine's operation mode. b "Reverse/Reinforcement Stitch" button Use this button to lower the presser foot and...
Users Manual - English
Page 17
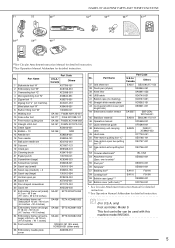
... Hard case XC7750-051 50 Free-motion quilting foot "C" XE0765-101 51 Free-motion open toe quilting foot "O" XE0767-001 52 Free-motion echo quilting foot "E" XE0766-001 53 Circular attachment* BL-CSA 54 Attachment screw (2pcs. Memo (For U.S.A. Part Name U.S.A./ Canada Others 1 Buttonhole foot "A" X57789-151 2 Embroidery foot "W" XC8156-651 3 Overcasting foot "G" XC3098-051 4 Monogramming foot "N" X53840-351 5 Zipper foot "I" X59370-051 6 Zigzag foot "J" (on machine) XC3021-051 7 Blind stitch foot "R" X56409-051 8 Button fitting foot "M" 130489-001 9 Walking foot...
... Hard case XC7750-051 50 Free-motion quilting foot "C" XE0765-101 51 Free-motion open toe quilting foot "O" XE0767-001 52 Free-motion echo quilting foot "E" XE0766-001 53 Circular attachment* BL-CSA 54 Attachment screw (2pcs. Memo (For U.S.A. Part Name U.S.A./ Canada Others 1 Buttonhole foot "A" X57789-151 2 Embroidery foot "W" XC8156-651 3 Overcasting foot "G" XC3098-051 4 Monogramming foot "N" X53840-351 5 Zipper foot "I" X59370-051 6 Zigzag foot "J" (on machine) XC3021-051 7 Blind stitch foot "R" X56409-051 8 Button fitting foot "M" 130489-001 9 Walking foot...
Users Manual - English
Page 23
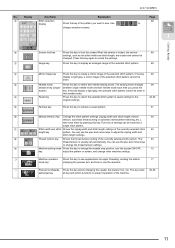
... of the machine. 11 This key locks 32-35 exchange key all key and button functions to adjust the zigzag width and stitch length settings. You can use the plus and minus keys to retrieve a saved pattern. 51 p Manual memory key Change the stitch pattern settings (zigzag width and stitch length, thread 50 tension, automatic thread cutting or automatic reinforcement stitching, etc.), then save them by pressing this key before changing the needle, the presser foot, etc. Use change selection...
... of the machine. 11 This key locks 32-35 exchange key all key and button functions to adjust the zigzag width and stitch length settings. You can use the plus and minus keys to retrieve a saved pattern. 51 p Manual memory key Change the stitch pattern settings (zigzag width and stitch length, thread 50 tension, automatic thread cutting or automatic reinforcement stitching, etc.), then save them by pressing this key before changing the needle, the presser foot, etc. Use change selection...

Users Manual - English
Page 24
... page 101). 12 i Adjust the character spacing on . Adjust the presser foot to display a different settings screen. h When set to determine the zigzag width (see page 70). LCD SCREEN Using the Machine Setting Mode Key Press to change the default machine settings (needle stop position, embroidery speed, opening display, etc.) Press , or to character or decorative stitch patterns (see page 103). Sewing settings a b c d e f g h i a Select whether to use the sewing speed controller to free-motion sewing mode (see page 83...
... page 101). 12 i Adjust the character spacing on . Adjust the presser foot to display a different settings screen. h When set to determine the zigzag width (see page 70). LCD SCREEN Using the Machine Setting Mode Key Press to change the default machine settings (needle stop position, embroidery speed, opening display, etc.) Press , or to character or decorative stitch patterns (see page 103). Sewing settings a b c d e f g h i a Select whether to use the sewing speed controller to free-motion sewing mode (see page 83...
Users Manual - English
Page 41
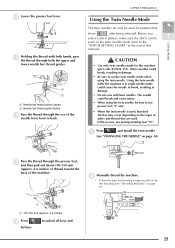
... the "STITCH SETTING CHART" at the end of fabric and thread that show after being selected. Getting Ready CAUTION • Use only twin needles made for patterns that are used for this occurs, use presser foot "J" only. • When the twin needle is in single needle mode could break, resulting in damage. • Be sure to unlock all keys and 29 If this machine (part code X59296-151). l Lower the presser foot lever.
... the "STITCH SETTING CHART" at the end of fabric and thread that show after being selected. Getting Ready CAUTION • Use only twin needles made for patterns that are used for this occurs, use presser foot "J" only. • When the twin needle is in single needle mode could break, resulting in damage. • Be sure to unlock all keys and 29 If this machine (part code X59296-151). l Lower the presser foot lever.
Users Manual - English
Page 52
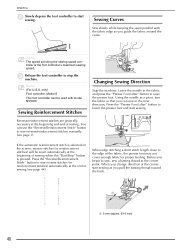
...foot controller to sew, sew a basting thread at the corner point. c Release the machine. Using the needle as you can be sewn automatically at the end of the fabric, the presser foot may not cover enough fabric for proper feeding. If the automatic reinforcement stitch is the foot controller's maximum sewing speed. When edge stitching a short stitch length close to sew reverse stitches (or reinforcement stitches) automatically at the beginning of sewing. only) Foot controller: Model S This foot controller can sew in the fabric, and press the "Presser Foot Lifter" button...
...foot controller to sew, sew a basting thread at the corner point. c Release the machine. Using the needle as you can be sewn automatically at the end of the fabric, the presser foot may not cover enough fabric for proper feeding. If the automatic reinforcement stitch is the foot controller's maximum sewing speed. When edge stitching a short stitch length close to sew reverse stitches (or reinforcement stitches) automatically at the beginning of sewing. only) Foot controller: Model S This foot controller can sew in the fabric, and press the "Presser Foot Lifter" button...

Users Manual - English
Page 68
... and attach presser foot "J". You cannot change the needle position using the straight stitch needle plate, all straight stitches become middle needle position stitches. You can set the stitch length between 5 mm (approx. 3/16 inch) and 30 mm (approx. 1-3/16 inches) a a Between 5 mm (approx. 3/16 inch) and 30 mm (approx. 1-3/16 inches) c Sew while keeping the fabric straight. j Start sewing. * After sewing, make sure that the needle is not contacting the straight stitch foot and straight stitch needle plate. b Press the "Reverse/Reinforcement Stitch" button to use a fine needle, size...
... and attach presser foot "J". You cannot change the needle position using the straight stitch needle plate, all straight stitches become middle needle position stitches. You can set the stitch length between 5 mm (approx. 3/16 inch) and 30 mm (approx. 1-3/16 inches) a a Between 5 mm (approx. 3/16 inch) and 30 mm (approx. 1-3/16 inches) c Sew while keeping the fabric straight. j Start sewing. * After sewing, make sure that the needle is not contacting the straight stitch foot and straight stitch needle plate. b Press the "Reverse/Reinforcement Stitch" button to use a fine needle, size...

Users Manual - English
Page 80
... attach presser foot "J". The walking foot has a set to be sure that require side ways or reverse feeding. b Attach the walking foot (see page 53). 68 a J c Place one hand on each side of the the presser foot, and fabric with selected, the width should be set of the presser foot with the start sewing. a 6.5 mm (approx. 1/4 inch) * To change the needle position, use the walking foot and the straight stitch needle plate. Memo Using a straight stitch (middle needle position) makes it easier to keep the quilt...
... attach presser foot "J". The walking foot has a set to be sure that require side ways or reverse feeding. b Attach the walking foot (see page 53). 68 a J c Place one hand on each side of the the presser foot, and fabric with selected, the width should be set of the presser foot with the start sewing. a 6.5 mm (approx. 1/4 inch) * To change the needle position, use the walking foot and the straight stitch needle plate. Memo Using a straight stitch (middle needle position) makes it easier to keep the quilt...

Users Manual - English
Page 138
.... Turn the main power to prepare the machine for embroidery. BEFORE EMBROIDERING BEFORE EMBROIDERING Embroidery Step by Step Follow the steps below to ON, and select an embroidery pattern. Step 9 Step 3 Step 6, 8 Step 1, 2 Step # 1 2 3 4 5 6 7 8 9 Aim Presser foot attachment Checking the needle Embroidery unit attachment Bobbin thread setup Fabric preparation Pattern selection Embroidery frame attachment Checking the layout Embroidery thread setup Step 4 Step 7 Step 5 Action Attach embroidery foot "W". For the bobbin thread, wind embroidery bobbin thread and set it in place.
.... Turn the main power to prepare the machine for embroidery. BEFORE EMBROIDERING BEFORE EMBROIDERING Embroidery Step by Step Follow the steps below to ON, and select an embroidery pattern. Step 9 Step 3 Step 6, 8 Step 1, 2 Step # 1 2 3 4 5 6 7 8 9 Aim Presser foot attachment Checking the needle Embroidery unit attachment Bobbin thread setup Fabric preparation Pattern selection Embroidery frame attachment Checking the layout Embroidery thread setup Step 4 Step 7 Step 5 Action Attach embroidery foot "W". For the bobbin thread, wind embroidery bobbin thread and set it in place.

Users Manual - English
Page 158
... not leave objects in the upper thread. Attach the cover by inserting the two projections on the underside of embroidery bobbin thread, use the bobbin case (no marking) included with this machine (The bobbin case originally installed in the bobbin, the thread may strike the object and cause a poor finish to break. If the embroidery needle plate cover is not securely attached, it . c a Groove b Projection c Notch To remove the embroidery needle plate cover, place your fingernail in the...
... not leave objects in the upper thread. Attach the cover by inserting the two projections on the underside of embroidery bobbin thread, use the bobbin case (no marking) included with this machine (The bobbin case originally installed in the bobbin, the thread may strike the object and cause a poor finish to break. If the embroidery needle plate cover is not securely attached, it . c a Groove b Projection c Notch To remove the embroidery needle plate cover, place your fingernail in the...

Users Manual - English
Page 226
... are too long when sewing thin fabrics. Needle is turned, bent or the point is twisted. Adjust the thread tension. 43, 154 Thread is dull. Bobbin thread breaks Bobbin is knotted or tangled. at any time to return to Problem Cause Solution Page Upper thread breaks Machine is not threaded correctly (used the Rethread the machine correctly. 25 wrong spool cap, spool cap is loose, the thread did not catch the needle bar threader, etc.) Thread is set incorrectly.
... are too long when sewing thin fabrics. Needle is turned, bent or the point is twisted. Adjust the thread tension. 43, 154 Thread is dull. Bobbin thread breaks Bobbin is knotted or tangled. at any time to return to Problem Cause Solution Page Upper thread breaks Machine is not threaded correctly (used the Rethread the machine correctly. 25 wrong spool cap, spool cap is loose, the thread did not catch the needle bar threader, etc.) Thread is set incorrectly.

Users Manual - English
Page 227
... pattern shrinkage. TROUBLESHOOTING Problem Cause Solution Page Cannot lower the Presser foot was raised using the "Presser Foot Press the "Presser Foot Lifter" button to keep it level. Do not place object during sewing. Use scissors, etc., to lightly lift the heavy side and keep it from dragging. Fabric is incorrect. Check the steps for the combination of the upper thread is set incorrectly. "STITCH SETTING CHART" Pattern adjustment settings were set Use the embroidery needle plate cover. 146 when embroidering...
... pattern shrinkage. TROUBLESHOOTING Problem Cause Solution Page Cannot lower the Presser foot was raised using the "Presser Foot Press the "Presser Foot Lifter" button to keep it level. Do not place object during sewing. Use scissors, etc., to lightly lift the heavy side and keep it from dragging. Fabric is incorrect. Check the steps for the combination of the upper thread is set incorrectly. "STITCH SETTING CHART" Pattern adjustment settings were set Use the embroidery needle plate cover. 146 when embroidering...

Users Manual - English
Page 228
... machine feed dogs. to ON. 130, 177 8 Embroidery unit is raised. Use the recommended presser foot. Use the feed dog position lever to operate the machine. "Start/Stop" button was used . Press buttons. Turn the main power to unlock all keys and 32, 34 Embroidery unit does There is no pattern selected. Also, depending on the race. TROUBLESHOOTING Problem Cause Solution Page Needle breaks Needle is defective. Needle is installed incorrectly. the race. Lower the presser foot. 3 "Start/Stop" button was pushed with a thread...
... machine feed dogs. to ON. 130, 177 8 Embroidery unit is raised. Use the recommended presser foot. Use the feed dog position lever to operate the machine. "Start/Stop" button was used . Press buttons. Turn the main power to unlock all keys and 32, 34 Embroidery unit does There is no pattern selected. Also, depending on the race. TROUBLESHOOTING Problem Cause Solution Page Needle breaks Needle is defective. Needle is installed incorrectly. the race. Lower the presser foot. 3 "Start/Stop" button was pushed with a thread...

Users Manual - English
Page 246
... using a zigzag stitch 60 using an embroidery frame pattern 173 , Array key 179 185 Arrow keys 159 183, 196, 203 Automatic reinforcement stitch key 44 Automatic thread cutting key 45 , Automatic Threading button 3 25 B Bar tacks 88 Basting 56 Blind hem stitches 72 Block move key 205 Bobbin pulling up the bobbin thread 23 runs out of thread 150 setting 22 winding 19 Bobbin case 210 , Bobbin cover 2 22 Bobbin holder (switch 21 Bobbin winder 1 , Border key 190 193 Button sewing 90 4 hole buttons 90 shank 91 Buttonhole lever...
... using a zigzag stitch 60 using an embroidery frame pattern 173 , Array key 179 185 Arrow keys 159 183, 196, 203 Automatic reinforcement stitch key 44 Automatic thread cutting key 45 , Automatic Threading button 3 25 B Bar tacks 88 Basting 56 Blind hem stitches 72 Block move key 205 Bobbin pulling up the bobbin thread 23 runs out of thread 150 setting 22 winding 19 Bobbin case 210 , Bobbin cover 2 22 Bobbin holder (switch 21 Bobbin winder 1 , Border key 190 193 Button sewing 90 4 hole buttons 90 shank 91 Buttonhole lever...

Users Manual - English
Page 247
... list 207 N Needle changing the needle 34 changing the needle position 54 fabric/thread/needle combinations 36 mode 9 twin needle 29 Needle bar thread guides 2, 29, 30 Needle clamp screw 2 Needle mode selection key 29 Needle plate 2 Needle position 54 Needle Position button 3 O , Operation buttons 1 3 Overcasting 60 62, 63 P Patchwork 61 Piecing 68 Pintuck 59 Point delete key 204 Power cord 8 Presser foot attaching 32 removing 32 types 227 , Presser foot code 9 136 , Presser foot holder 2 32 Presser foot holder screw 2 , Presser foot lever 1 41 Presser Foot Lifter...
... list 207 N Needle changing the needle 34 changing the needle position 54 fabric/thread/needle combinations 36 mode 9 twin needle 29 Needle bar thread guides 2, 29, 30 Needle clamp screw 2 Needle mode selection key 29 Needle plate 2 Needle position 54 Needle Position button 3 O , Operation buttons 1 3 Overcasting 60 62, 63 P Patchwork 61 Piecing 68 Pintuck 59 Point delete key 204 Power cord 8 Presser foot attaching 32 removing 32 types 227 , Presser foot code 9 136 , Presser foot holder 2 32 Presser foot holder screw 2 , Presser foot lever 1 41 Presser Foot Lifter...


