

Users Manual - English
Page 16
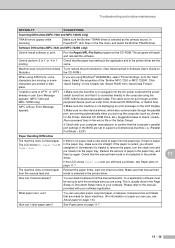
... machine 11-6 Transferring faxes to your PC (MFC-7220 and MFC-7225N only) ..........11-6 Document jams 11-7 Document was not inserted or fed properly, or was too long 11-7 Paper jams 11-7 Paper is jammed inside the drum unit and toner cartridge assembly....11-10 xiv about the interface cable 10-2 Industry ... messages 11-1 Checking if the machine has faxes in the United States only 10-1 Federal Communications Commission (FCC) Declaration of the machine 11-9 Paper is jammed inside the machine 11-7 Paper is jammed at the back of Conformity (USA only 10-2 Important 10-2 Important -
... machine 11-6 Transferring faxes to your PC (MFC-7220 and MFC-7225N only) ..........11-6 Document jams 11-7 Document was not inserted or fed properly, or was too long 11-7 Paper jams 11-7 Paper is jammed inside the drum unit and toner cartridge assembly....11-10 xiv about the interface cable 10-2 Industry ... messages 11-1 Checking if the machine has faxes in the United States only 10-1 Federal Communications Commission (FCC) Declaration of the machine 11-9 Paper is jammed inside the machine 11-7 Paper is jammed at the back of Conformity (USA only 10-2 Important 10-2 Important -
Users Manual - English
Page 27
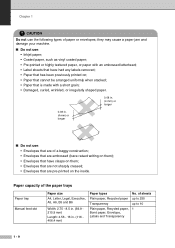
... . (4 mm) or longer ■ Do not use the following types of paper or envelopes; they may cause a paper jam and damage your machine. ■ Do not use: • Inkjet paper; • Coated paper, such as vinyl coated paper; • Pre-printed or highly textured paper, or paper with an embossed letterhead; • Label sheets that have had any...
... . (4 mm) or longer ■ Do not use the following types of paper or envelopes; they may cause a paper jam and damage your machine. ■ Do not use: • Inkjet paper; • Coated paper, such as vinyl coated paper; • Pre-printed or highly textured paper, or paper with an embossed letterhead; • Label sheets that have had any...
Users Manual - English
Page 28
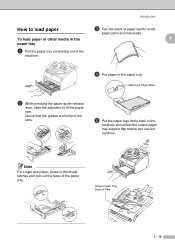
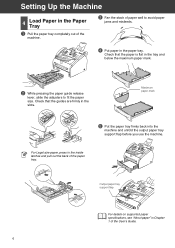
... out the back of the machine. 4 Put paper in the paper tray. Output Paper Tray Support Flap 1 - 10 Maximum Paper Mark 2 While pressing the paper guide release lever, slide the adjusters to avoid paper jams and mis-feeds. 1 1 Pull the paper tray completely out of the paper tray. Note For Legal size paper, press in the machine and unfold the...
... out the back of the machine. 4 Put paper in the paper tray. Output Paper Tray Support Flap 1 - 10 Maximum Paper Mark 2 While pressing the paper guide release lever, slide the adjusters to avoid paper jams and mis-feeds. 1 1 Pull the paper tray completely out of the paper tray. Note For Legal size paper, press in the machine and unfold the...
Users Manual - English
Page 29
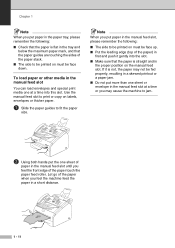
... manual feed slot, please remember the following : ■ Check that the paper is flat in the tray and below the maximum paper mark, and that the paper is not, the paper may not be fed properly, resulting in a skewed printout or a paper jam. ■ Do not put more than one sheet or envelope in a ...short distance. 1 - 11 If it gently into this slot. To load paper or other media in ...
... manual feed slot, please remember the following : ■ Check that the paper is flat in the tray and below the maximum paper mark, and that the paper is not, the paper may not be fed properly, resulting in a skewed printout or a paper jam. ■ Do not put more than one sheet or envelope in a ...short distance. 1 - 11 If it gently into this slot. To load paper or other media in ...
Users Manual - English
Page 35
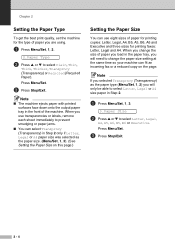
... fit an incoming fax or a reduced copy on this page.) Setting the Paper Size You can use transparencies or labels, remove each sheet immediately to prevent smudging or paper jams. ■ You can select Transprncy (Transparency) in Step 2. 1 Press Menu/Set, 1, 3. 3.Paper Size 2 Press ▲ or ▼ to select Plain, Thin, Thick, Thicker, Transprncy...
... fit an incoming fax or a reduced copy on this page.) Setting the Paper Size You can use transparencies or labels, remove each sheet immediately to prevent smudging or paper jams. ■ You can select Transprncy (Transparency) in Step 2. 1 Press Menu/Set, 1, 3. 3.Paper Size 2 Press ▲ or ▼ to select Plain, Thin, Thick, Thicker, Transprncy...
Users Manual - English
Page 92
...in progress) Press Start to send or copy the scanned pages. -OR- Replacing the toner cartridge (TN-350) on the CD-ROM.) (FAX-2820 and FAX-2920 only) For details regarding print resolution and printer memory, please see Advanced tab in the Software User's Guide on page The toner... near the end of Memory The machine's memory is jammed in the back of the (See Paper jams on page 11-7.) of Memory message on page 8-7.) (Printing operation in the paper tray (See Paper jams on page 11-7.) machine. Clear the faxes from the solutions.brother.com Web site. -OR- assembly is not installed ...
...in progress) Press Start to send or copy the scanned pages. -OR- Replacing the toner cartridge (TN-350) on the CD-ROM.) (FAX-2820 and FAX-2920 only) For details regarding print resolution and printer memory, please see Advanced tab in the Software User's Guide on page The toner... near the end of Memory The machine's memory is jammed in the back of the (See Paper jams on page 11-7.) of Memory message on page 8-7.) (Printing operation in the paper tray (See Paper jams on page 11-7.) machine. Clear the faxes from the solutions.brother.com Web site. -OR- assembly is not installed ...

Users Manual - English
Page 95
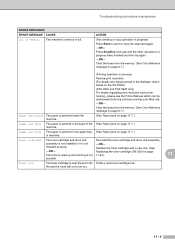
... After you open the front cover or back cover of the machine. Press Stop/Exit. 11 - 7 Paper jams To clear paper jams, please follow the steps below. Paper is jammed, follow the steps in the following diagram. 2 Carefully pull the jammed document toward the front of the machine, never touch the shaded parts shown in this section...
... After you open the front cover or back cover of the machine. Press Stop/Exit. 11 - 7 Paper jams To clear paper jams, please follow the steps below. Paper is jammed, follow the steps in the following diagram. 2 Carefully pull the jammed document toward the front of the machine, never touch the shaded parts shown in this section...
Users Manual - English
Page 96
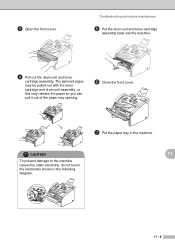
CAUTION 11 To prevent damage to the machine caused by static electricity, do not touch the electrodes shown in the machine. Troubleshooting and routine maintenance 5 Put the drum unit and toner cartridge assembly back into the machine. 4 Pull out the drum unit and toner cartridge assembly. The jammed paper may be pulled out with the toner cartridge and drum unit assembly, or this may release the paper so you can pull it out of the paper tray opening. 6 Close the front cover. 7 Put the paper tray in the following diagram. 11 - 8 3 Open the front cover.
CAUTION 11 To prevent damage to the machine caused by static electricity, do not touch the electrodes shown in the machine. Troubleshooting and routine maintenance 5 Put the drum unit and toner cartridge assembly back into the machine. 4 Pull out the drum unit and toner cartridge assembly. The jammed paper may be pulled out with the toner cartridge and drum unit assembly, or this may release the paper so you can pull it out of the paper tray opening. 6 Close the front cover. 7 Put the paper tray in the following diagram. 11 - 8 3 Open the front cover.
Users Manual - English
Page 97
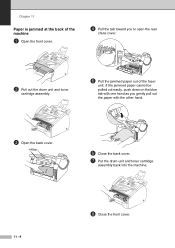
Chapter 11 Paper is jammed at the back of the machine 1 Open the front cover. 4 Pull the tab toward you gently pull out the paper with the other hand. 3 Open the back cover. 6 Close the back cover. 7 Put the drum unit and toner cartridge assembly back into the machine. 11 - 9 8 Close the front cover. If the jammed paper cannot be pulled out easily, push down on the blue tab with one hand as you to open the rear chute cover. 2 Pull out the drum unit and toner cartridge assembly. 5 Pull the jammed paper out of the fuser unit.
Chapter 11 Paper is jammed at the back of the machine 1 Open the front cover. 4 Pull the tab toward you gently pull out the paper with the other hand. 3 Open the back cover. 6 Close the back cover. 7 Put the drum unit and toner cartridge assembly back into the machine. 11 - 9 8 Close the front cover. If the jammed paper cannot be pulled out easily, push down on the blue tab with one hand as you to open the rear chute cover. 2 Pull out the drum unit and toner cartridge assembly. 5 Pull the jammed paper out of the fuser unit.
Users Manual - English
Page 98
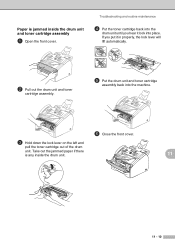
.... 6 Close the front cover. 3 Hold down the lock lever on the left and pull the toner cartridge out of the drum unit. Take out the jammed paper if there is jammed inside the drum unit. 11 11 - 10 Paper is any inside the drum unit and toner cartridge assembly 1 Open the front cover.
.... 6 Close the front cover. 3 Hold down the lock lever on the left and pull the toner cartridge out of the drum unit. Take out the jammed paper if there is jammed inside the drum unit. 11 11 - 10 Paper is any inside the drum unit and toner cartridge assembly 1 Open the front cover.
Users Manual - English
Page 102
... the computer using Windows® 98/98SE/Me, select 'Printer Settings' from the manual feed slot. See Paper jams on the 'Details' tab. Cannot perform '2 in 1' or '4 in the File menu and select the Brother TWAIN driver. Machine does not print from Adobe Illustrator When using ATM fonts, some characters are missing or...
... the computer using Windows® 98/98SE/Me, select 'Printer Settings' from the manual feed slot. See Paper jams on the 'Details' tab. Cannot perform '2 in 1' or '4 in the File menu and select the Brother TWAIN driver. Machine does not print from Adobe Illustrator When using ATM fonts, some characters are missing or...
Users Manual - English
Page 153
...-7 L LCD (liquid crystal display B-1, B-2 Help List 7-2 M Macintosh® See Software User's Guide on the CD-ROM. paper jams 11-7 quality 1-8, 2-4, 11-16 report 7-2 resolution S-5 specifications S-5 Programming your pager number .........6-1 Paper 1-8, S-3 Size 2-4 size of Memory message 3-4 P Paging 6-2 programming your machine B-1, B-2 Q Quick-Dial Access codes and credit card numbers setting up 5-4 Broadcasting 3-7 using Groups 3-7 Group...
...-7 L LCD (liquid crystal display B-1, B-2 Help List 7-2 M Macintosh® See Software User's Guide on the CD-ROM. paper jams 11-7 quality 1-8, 2-4, 11-16 report 7-2 resolution S-5 specifications S-5 Programming your pager number .........6-1 Paper 1-8, S-3 Size 2-4 size of Memory message 3-4 P Paging 6-2 programming your machine B-1, B-2 Q Quick-Dial Access codes and credit card numbers setting up 5-4 Broadcasting 3-7 using Groups 3-7 Group...
Users Manual - English
Page 154
... A-6 receive mode 4-1 recording OGM A-7 with two-line jack A-8 Text, entering B-11 special characters B-11 Toner cartridge replacing 11-24 Troubleshooting 11-1 document jam 11-7 error messages on the CD-ROM. Index One-Touch dial changing 5-2 setting up 5-1 using 3-1 Search 3-2 Speed-Dial changing 5-2 setting up 5-2 ...'s Guide on LCD 11-1 if you are having difficulty incoming calls 11-12 paper handling 11-14 paper jam 11-7 phone line 11-20 printer difficulties 11-13 printing 11-11, 11-13 paper jam 11-7 Two-line phone system A-7 V Volume, setting 2-5 beeper 2-5 handset...
... A-6 receive mode 4-1 recording OGM A-7 with two-line jack A-8 Text, entering B-11 special characters B-11 Toner cartridge replacing 11-24 Troubleshooting 11-1 document jam 11-7 error messages on the CD-ROM. Index One-Touch dial changing 5-2 setting up 5-1 using 3-1 Search 3-2 Speed-Dial changing 5-2 setting up 5-2 ...'s Guide on LCD 11-1 if you are having difficulty incoming calls 11-12 paper handling 11-14 paper jam 11-7 phone line 11-20 printer difficulties 11-13 printing 11-11, 11-13 paper jam 11-7 Two-line phone system A-7 V Volume, setting 2-5 beeper 2-5 handset...
Quick Setup Guide - English
Page 6
... the User's Guide. 6 Check that the paper is flat in the tray and below the maximum paper mark. 2 While pressing the paper guide release lever, slide the adjusters to avoid paper jams and misfeeds. 4 Put paper in the paper tray. Setting Up the Machine 4 Load Paper in the Paper Tray 1 Pull the paper tray completely out of the machine. 3 Fan...
... the User's Guide. 6 Check that the paper is flat in the tray and below the maximum paper mark. 2 While pressing the paper guide release lever, slide the adjusters to avoid paper jams and misfeeds. 4 Put paper in the paper tray. Setting Up the Machine 4 Load Paper in the Paper Tray 1 Pull the paper tray completely out of the machine. 3 Fan...


