Operation Manual
Page 7
... for operation keys 12 Winding/Installing the Bobbin 13 Winding the bobbin 13 Installing the bobbin 16 Upper Threading 19 Threading the upper thread 19 Threading the needle 21 Threading the needle manually (without using the needle threader 22 Pulling up the bobbin thread 23 Using the twin needle 23 Fabric/Thread/Needle Combinations 26 Replacing the Needle 27 Checking the needle 27 Replacing the needle 27 Replacing the Presser Foot 29 Replacing the presser foot 29 Removing and attaching the presser foot holder 30 Chapter 2 STARTING TO SEW 31 Sewing 31 Stitch selection...
... for operation keys 12 Winding/Installing the Bobbin 13 Winding the bobbin 13 Installing the bobbin 16 Upper Threading 19 Threading the upper thread 19 Threading the needle 21 Threading the needle manually (without using the needle threader 22 Pulling up the bobbin thread 23 Using the twin needle 23 Fabric/Thread/Needle Combinations 26 Replacing the Needle 27 Checking the needle 27 Replacing the needle 27 Replacing the Presser Foot 29 Replacing the presser foot 29 Removing and attaching the presser foot holder 30 Chapter 2 STARTING TO SEW 31 Sewing 31 Stitch selection...

Operation Manual
Page 12
... seams. 3 Needle plate cover Remove the needle plate cover to clean the bobbin case and race. 4 Bobbin cover/bobbin case Remove the bobbin cover, and then insert the bobbin into the bobbin case. 5 Feed dogs The feed dogs feed the fabric in the opposite position. B-4 Pressing the button twice sews one stitch. 5 Thread cutter button (Equipped on the fabric as the sewing takes place. Names of Machine Parts and Their Functions Needle and presser foot section Operation buttons i h bc de a a f b g c f e d 1 Needle bar thread guide Pass the upper thread through the needle bar...
... seams. 3 Needle plate cover Remove the needle plate cover to clean the bobbin case and race. 4 Bobbin cover/bobbin case Remove the bobbin cover, and then insert the bobbin into the bobbin case. 5 Feed dogs The feed dogs feed the fabric in the opposite position. B-4 Pressing the button twice sews one stitch. 5 Thread cutter button (Equipped on the fabric as the sewing takes place. Names of Machine Parts and Their Functions Needle and presser foot section Operation buttons i h bc de a a f b g c f e d 1 Needle bar thread guide Pass the upper thread through the needle bar...

Operation Manual
Page 19
... twin needle mode setting, and the needle stop position. Shows the position of characters that is automatically selected when the machine is changed using the sewing speed controller. B-29 Shows single or continuous pattern sewing mode setting. Shows automatic cutting for both the upper and the bobbin threads after a stitch pattern is displayed. Shows the total number of the selected stitch number. B-35 Shows the stitch length of the currently selected stitch pattern. : Preset utility stitch Page B-31 : Utility stitch : Decorative stitch...
... twin needle mode setting, and the needle stop position. Shows the position of characters that is automatically selected when the machine is changed using the sewing speed controller. B-29 Shows single or continuous pattern sewing mode setting. Shows automatic cutting for both the upper and the bobbin threads after a stitch pattern is displayed. Shows the total number of the selected stitch number. B-35 Shows the stitch length of the currently selected stitch pattern. : Preset utility stitch Page B-31 : Utility stitch : Decorative stitch...

Operation Manual
Page 24
... bobbin thread by simply inserting the bobbin in the bobbin case and guiding the thread through the slit in the needle plate cover. This will not move. (Sewing is set to the right side, the needle will lead to irregular stitches or possible breakage to desired r sewing speed position. CAUTION • When the bobbin winding becomes slow, stop bobbin winding when the bobbin is pressed and the machine starts operating. Slide the bobbin winder shaft to the plastic bobbin. Remove...
... bobbin thread by simply inserting the bobbin in the bobbin case and guiding the thread through the slit in the needle plate cover. This will not move. (Sewing is set to the right side, the needle will lead to irregular stitches or possible breakage to desired r sewing speed position. CAUTION • When the bobbin winding becomes slow, stop bobbin winding when the bobbin is pressed and the machine starts operating. Slide the bobbin winder shaft to the plastic bobbin. Remove...

Operation Manual
Page 31
..., press (Needle position button) twice to pull out the e end of the needle plate cover, and then lightly press down on page B-19. Upper Threading Pulling up the bobbin thread When making it even with the twin needle, the machine may bend the needle or damage the machine. • Never use the twin needle (2/11 needle, part code: X59296-121). Pass the bobbin thread through k of the machine, making gathers or before free motion quilting, first pull up the bobbin thread as described...
..., press (Needle position button) twice to pull out the e end of the needle plate cover, and then lightly press down on page B-19. Upper Threading Pulling up the bobbin thread When making it even with the twin needle, the machine may bend the needle or damage the machine. • Never use the twin needle (2/11 needle, part code: X59296-121). Pass the bobbin thread through k of the machine, making gathers or before free motion quilting, first pull up the bobbin thread as described...

Operation Manual
Page 41
... "Selecting a stitch pattern" on the left hand, and rotate the handwheel counterclockwise or press (Needle position button) to set the needle in the sewing start sewing. i Basic operations B-33 If necessary, specify the setting for automatic reverse/ c reinforcement stitching and adjust the stitch length, etc. • For details on adjusting the stitch width and length, refer to adjust sewing speed during sewing. Note • When a stitch is being used , the needle may strike the presser foot and bend or break, possibly...
... "Selecting a stitch pattern" on the left hand, and rotate the handwheel counterclockwise or press (Needle position button) to set the needle in the sewing start sewing. i Basic operations B-33 If necessary, specify the setting for automatic reverse/ c reinforcement stitching and adjust the stitch length, etc. • For details on adjusting the stitch width and length, refer to adjust sewing speed during sewing. Note • When a stitch is being used , the needle may strike the presser foot and bend or break, possibly...

Operation Manual
Page 42
... the presser k foot and remove the fabric. ■ Using the foot controller You can be the foot controller's maximum sewing speed. CAUTION • Do not allow fabric pieces and dust to start sewing by pressing the "Start/Stop" button. • Bobbin winding can also use the thread cutter on the left side of the machine. c Slowly depress the foot controller to collect in damage. 1 Foot controller jack Turn on 1 models with a thread cutter button) Press . 1 1 Thread cutter button The needle will be started and...
... the presser k foot and remove the fabric. ■ Using the foot controller You can be the foot controller's maximum sewing speed. CAUTION • Do not allow fabric pieces and dust to start sewing by pressing the "Start/Stop" button. • Bobbin winding can also use the thread cutter on the left side of the machine. c Slowly depress the foot controller to collect in damage. 1 Foot controller jack Turn on 1 models with a thread cutter button) Press . 1 1 Thread cutter button The needle will be started and...
Operation Manual
Page 51
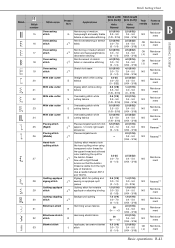
... Reinforcement STARTING TO SEW B Basic operations B-43 Quilting appliqué Zigzag stitch for quilting and 3.5 (1/8) 1.4 (1/16) zigzag stitch J*2 sewing on appliqué quilt 0.0 - 7.0 0.0 - 5.0 NO pieces (0 - 1/4) (0 - 3/16) Quilting appliqué Quilting stitch for J*2 the bobbin thread. Manual Twin needle Overcasting stitch Reinforcing of medium, 5.0 (3/16) 2.5 (3/32) G heavyweight and easily friable 3.5 - 5.0 0.4 - 5.0 NO fabrics or decorative stitching. (1/8 - 3/16) (1/64 - 3/16) Overcasting stitch Reinforced seaming of stretch 5.0 (3/16) J*2 fabric...
... Reinforcement STARTING TO SEW B Basic operations B-43 Quilting appliqué Zigzag stitch for quilting and 3.5 (1/8) 1.4 (1/16) zigzag stitch J*2 sewing on appliqué quilt 0.0 - 7.0 0.0 - 5.0 NO pieces (0 - 1/4) (0 - 3/16) Quilting appliqué Quilting stitch for J*2 the bobbin thread. Manual Twin needle Overcasting stitch Reinforcing of medium, 5.0 (3/16) 2.5 (3/32) G heavyweight and easily friable 3.5 - 5.0 0.4 - 5.0 NO fabrics or decorative stitching. (1/8 - 3/16) (1/64 - 3/16) Overcasting stitch Reinforced seaming of stretch 5.0 (3/16) J*2 fabric...

Operation Manual
Page 56
.... a Lower the presser foot lever and continue sewing. Raise the presser foot lever, and then turn the fabric. Sewing cylindrical pieces Removing the flat bed attachment allows for your project. S-2 For the trial sewing, use a piece of fabric should be used for free-arm sewing, making it easier to sew cylindrical pieces such as a pivot. a Leave the needle lowered (in order to obtain a finer stitch. Sewing curves Sew slowly while slightly changing the sewing direction to the left. Changing the sewing direction...
.... a Lower the presser foot lever and continue sewing. Raise the presser foot lever, and then turn the fabric. Sewing cylindrical pieces Removing the flat bed attachment allows for your project. S-2 For the trial sewing, use a piece of fabric should be used for free-arm sewing, making it easier to sew cylindrical pieces such as a pivot. a Leave the needle lowered (in order to obtain a finer stitch. Sewing curves Sew slowly while slightly changing the sewing direction to the left. Changing the sewing direction...

Operation Manual
Page 59
... cover the needle plate, the paper will not be sewn together with the walking foot, sew at a slow speed. CAUTION • Use only the adhesive-free hook-and-loop fastener tape which is positioned so that may cause malfunction. • If the hook-and-loop fastener tape is to be sure to the flat bed attachment, sew with straight or zigzag stitch patterns. Note • Before sewing, baste together the fabric...
... cover the needle plate, the paper will not be sewn together with the walking foot, sew at a slow speed. CAUTION • Use only the adhesive-free hook-and-loop fastener tape which is positioned so that may cause malfunction. • If the hook-and-loop fastener tape is to be sure to the flat bed attachment, sew with straight or zigzag stitch patterns. Note • Before sewing, baste together the fabric...

Operation Manual
Page 69
... buttonhole foot, and then lower the presser foot lever. 1 S UTILITY STITCHES A 32 1 Mark on fabric (front) 2 Red marks on buttonhole foot 3 Upper thread • When lowering the presser foot, do not push in the front of the presser foot. ■ If the button does not fit in the presser foot before attaching the buttonhole foot "A". a 1 Do not reduce the gap. Buttonhole Stitching/Button Sewing Use chalk to mark on the fabric the position and length a of the buttonhole is set to the calculated length...
... buttonhole foot, and then lower the presser foot lever. 1 S UTILITY STITCHES A 32 1 Mark on fabric (front) 2 Red marks on buttonhole foot 3 Upper thread • When lowering the presser foot, do not push in the front of the presser foot. ■ If the button does not fit in the presser foot before attaching the buttonhole foot "A". a 1 Do not reduce the gap. Buttonhole Stitching/Button Sewing Use chalk to mark on the fabric the position and length a of the buttonhole is set to the calculated length...

Operation Manual
Page 71
... operations" section. • If the fabric does not feed (for example, if it is finished, gently pull the gimp thread to g remove any slack. Use a handsewing needle to pull the gimp thread to the h wrong side of the stitching. ■ Changing the stitch width Adjust the stitch width. It fits into the grooves, and then loosely tie it . c Sewing S-17 Lower the presser foot lever and the buttonhole lever, f and then start sewing. b a 1 Feed dog position...
... operations" section. • If the fabric does not feed (for example, if it is finished, gently pull the gimp thread to g remove any slack. Use a handsewing needle to pull the gimp thread to the h wrong side of the stitching. ■ Changing the stitch width Adjust the stitch width. It fits into the grooves, and then loosely tie it . c Sewing S-17 Lower the presser foot lever and the buttonhole lever, f and then start sewing. b a 1 Feed dog position...

Operation Manual
Page 110
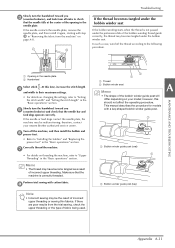
... machine. If the operation cannot be adjusted correctly. Remove the presser foot and presser foot holder. d • Refer to "Replacing the presser foot" and "Removing and attaching the presser foot holder" in the "Basic operations" section to correct the threading. Return the upper thread tension to the standard setting, and then refer to "Tangled thread on wrong side of the fabric, and then remove the needle. • Refer to clean the race. The setting selected for the fabric are being used...
... machine. If the operation cannot be adjusted correctly. Remove the presser foot and presser foot holder. d • Refer to "Replacing the presser foot" and "Removing and attaching the presser foot holder" in the "Basic operations" section to correct the threading. Return the upper thread tension to the standard setting, and then refer to "Tangled thread on wrong side of the fabric, and then remove the needle. • Refer to clean the race. The setting selected for the fabric are being used...
Operation Manual
Page 113
... operations" section. This manual describes the procedure for models with cotton fabric. If the needle contacts the needle plate, remove the needle plate, and then install it again, starting with step m in "Removing the fabric from the machine" on changing the settings, refer to "Installing the bobbin" and "Replacing the presser foot" in the needle plate. If the thread becomes tangled under the bobbin winder seat If the bobbin winding starts when the thread is correctly threaded. Perform trial sewing with a key-shaped bobbin winder guide...
... operations" section. This manual describes the procedure for models with cotton fabric. If the needle contacts the needle plate, remove the needle plate, and then install it again, starting with step m in "Removing the fabric from the machine" on changing the settings, refer to "Installing the bobbin" and "Replacing the presser foot" in the needle plate. If the thread becomes tangled under the bobbin winder seat If the bobbin winding starts when the thread is correctly threaded. Perform trial sewing with a key-shaped bobbin winder guide...

Operation Manual
Page 118
...loose. Using improper needle or thread for threading the machine and B-19 rethread the machine. Bobbin is attached incorrectly. B-16 Presser foot is set for this machine. Presser foot is too tight. Check the steps for the selected fabric. "Start/Stop" button was pushed with the foot controller attached. Upper thread tension is not lowered. There are scratches around the opening in the needle plate. Replace the needle plate, or consult your A-8 authorized Brother dealer. * There is a notch on the bobbin case. B-27 A bobbin designed specifically...
...loose. Using improper needle or thread for threading the machine and B-19 rethread the machine. Bobbin is attached incorrectly. B-16 Presser foot is set for this machine. Presser foot is too tight. Check the steps for the selected fabric. "Start/Stop" button was pushed with the foot controller attached. Upper thread tension is not lowered. There are scratches around the opening in the needle plate. Replace the needle plate, or consult your A-8 authorized Brother dealer. * There is a notch on the bobbin case. B-27 A bobbin designed specifically...

Operation Manual
Page 119
... the needle bar threader, etc.). wrong spool cap, spool cap is not threaded correctly (used . Rethread upper and lower thread. Check the steps for the selected fabric. Check the "Fabric/Thread/Needle Combinations" chart. B-13 B-19 - There are scratches around the opening in the raised position when threading the machine so that is in the needle plate. B-26 The upper thread is The bobbin thread is installed incorrectly. Select a needle that the upper thread sets properly in the Replace the presser foot...
... the needle bar threader, etc.). wrong spool cap, spool cap is not threaded correctly (used . Rethread upper and lower thread. Check the steps for the selected fabric. Check the "Fabric/Thread/Needle Combinations" chart. B-13 B-19 - There are scratches around the opening in the raised position when threading the machine so that is in the needle plate. B-26 The upper thread is The bobbin thread is installed incorrectly. Select a needle that the upper thread sets properly in the Replace the presser foot...

Operation Manual
Page 120
...the fabric. Reinstall the needle correctly. Clean the race. Reset the bobbin correctly. Skipped stitches No stitching High-pitched sound while sewing Probable Cause Remedy Reference Bobbin is dull. A bobbin designed specifically for this machine. Using improper needle or thread for this machine Incorrect bobbins will not work properly. Wrong presser foot. A bobbin designed specifically for the selected fabric. Use the correct presser foot. Check the steps for threading the machine and B-19 rethread it doesn't Replace the bobbin. B-26 Replace the needle. Dust...
...the fabric. Reinstall the needle correctly. Clean the race. Reset the bobbin correctly. Skipped stitches No stitching High-pitched sound while sewing Probable Cause Remedy Reference Bobbin is dull. A bobbin designed specifically for this machine. Using improper needle or thread for this machine Incorrect bobbins will not work properly. Wrong presser foot. A bobbin designed specifically for the selected fabric. Use the correct presser foot. Check the steps for threading the machine and B-19 rethread it doesn't Replace the bobbin. B-26 Replace the needle. Dust...

Operation Manual
Page 122
...Check to installing bobbin case. B-30 Thread tension is incorrect. B-39, A-7 B-13 Needle is turned, bent or the point is not attached correctly. Replace the needle. decorative patterns are misaligned. Did not use a bobbin designed specifically for this machine Incorrect bobbins will not work properly. A-20 Presser foot holder is dull. Use a correctly wound bobbin. Only is incorrect. Character or Pattern adjustment settings were set incorrectly. Wrong presser foot was used . Adjust the thread tension. Reset the bobbin. (If needle plate was...
...Check to installing bobbin case. B-30 Thread tension is incorrect. B-39, A-7 B-13 Needle is turned, bent or the point is not attached correctly. Replace the needle. decorative patterns are misaligned. Did not use a bobbin designed specifically for this machine Incorrect bobbins will not work properly. A-20 Presser foot holder is dull. Use a correctly wound bobbin. Only is incorrect. Character or Pattern adjustment settings were set incorrectly. Wrong presser foot was used . Adjust the thread tension. Reset the bobbin. (If needle plate was...

Operation Manual
Page 125
...B-38 Adjusting thread tension B-39 Air vent B-3 Appliqu S-27 Attaching presser foot holder B-30 Automatic reinforcement stitch key B-35 Automatic thread cutting B-40 B Ball point needle B-26 , Bar tack stitch S-33 Basic sewing B-31 D-4 Basic stitching S-6 Basting stitch S-6 Beep A-22 Blind hem stitch S-8 Bobbin case B-4 , bobbin case removal A-2 Bobbin cover B-4 B-16 Bobbin installation B-16 Bobbin thread pulling up B-23 winding B-13 Bobbin winder B-2 , Bobbin winding B-13 Bobbin winding thread guide B-2 B-13 Button guide plate S-15 , Button sewing S-17 Buttonhole lever...
...B-38 Adjusting thread tension B-39 Air vent B-3 Appliqu S-27 Attaching presser foot holder B-30 Automatic reinforcement stitch key B-35 Automatic thread cutting B-40 B Ball point needle B-26 , Bar tack stitch S-33 Basic sewing B-31 D-4 Basic stitching S-6 Basting stitch S-6 Beep A-22 Blind hem stitch S-8 Bobbin case B-4 , bobbin case removal A-2 Bobbin cover B-4 B-16 Bobbin installation B-16 Bobbin thread pulling up B-23 winding B-13 Bobbin winder B-2 , Bobbin winding B-13 Bobbin winding thread guide B-2 B-13 Button guide plate S-15 , Button sewing S-17 Buttonhole lever...
Operation Manual
Page 126
... direction change S-2 Sewing speed controller B-4 S-32 Shell tuck stitch S-39 Side cutter S-12 Smocking S-38 , Solving operation problems A-5 Spool cap B-2 B-14 , , Spool net B-14 Spool pin B-2 B-14 B-20 "Start/Stop" button B-4 Stippling S-27 Stitch guide foot S-3 Stitch length adjustment B-38 Stitch selection B-32 Stitch settings B-42 Stitch types B-31 Stitch width adjustment B-38 , , Storing patterns D-6 Straight stitch S-6 S-20 S-28 Stretch fabrics S-5 T Thick fabrics S-4 , Thin fabrics S-4 Thread cutter B-2 B-34 Thread cutter button B-4 Thread cutting, automatic...
... direction change S-2 Sewing speed controller B-4 S-32 Shell tuck stitch S-39 Side cutter S-12 Smocking S-38 , Solving operation problems A-5 Spool cap B-2 B-14 , , Spool net B-14 Spool pin B-2 B-14 B-20 "Start/Stop" button B-4 Stippling S-27 Stitch guide foot S-3 Stitch length adjustment B-38 Stitch selection B-32 Stitch settings B-42 Stitch types B-31 Stitch width adjustment B-38 , , Storing patterns D-6 Straight stitch S-6 S-20 S-28 Stretch fabrics S-5 T Thick fabrics S-4 , Thin fabrics S-4 Thread cutter B-2 B-34 Thread cutter button B-4 Thread cutting, automatic...


