Operation Manual
Page 6
... accessories 7 Optional accessories 8 Attaching the stitch pattern plate (For models equipped with the stitch pattern plate 8 Turning the Machine On/Off 9 LCD Operation 10 Changing the Machine Settings 11 Winding/Installing the Bobbin 12 Winding the bobbin 12 Installing the bobbin 14 Upper Threading 15 Threading the upper thread 15 Pulling up the bobbin thread 18 Fabric/Thread/Needle Combinations 19 Replacing the Needle 20 Checking the needle 20 Replacing the needle 20 Replacing the Presser Foot 21 Replacing the presser foot 21 Removing and attaching the presser foot holder...
... accessories 7 Optional accessories 8 Attaching the stitch pattern plate (For models equipped with the stitch pattern plate 8 Turning the Machine On/Off 9 LCD Operation 10 Changing the Machine Settings 11 Winding/Installing the Bobbin 12 Winding the bobbin 12 Installing the bobbin 14 Upper Threading 15 Threading the upper thread 15 Pulling up the bobbin thread 18 Fabric/Thread/Needle Combinations 19 Replacing the Needle 20 Checking the needle 20 Replacing the needle 20 Replacing the Presser Foot 21 Replacing the presser foot 21 Removing and attaching the presser foot holder...
Operation Manual
Page 7
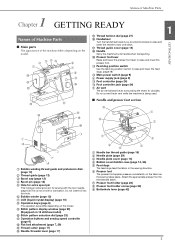
... dial (page 23) A Operation buttons and sewing speed controller (page 6) B Flat bed attachment (page 7, 29) C Thread cutter (page 17) D Needle threader lever (page 17) g c f d e 1 Needle bar thread guide (page 16) 2 Needle plate (page 29) 3 Needle plate cover (page 14) 4 Bobbin cover/bobbin case (page 14, 56) 5 Feed dogs The feed dogs feed the fabric in the sewing direction. 6 Presser foot The presser foot applies pressure consistently on the model. I Presser foot lever Raise and lower the presser foot lever to circulate. Do not cover the air vent while the machine is being used...
... dial (page 23) A Operation buttons and sewing speed controller (page 6) B Flat bed attachment (page 7, 29) C Thread cutter (page 17) D Needle threader lever (page 17) g c f d e 1 Needle bar thread guide (page 16) 2 Needle plate (page 29) 3 Needle plate cover (page 14) 4 Bobbin cover/bobbin case (page 14, 56) 5 Feed dogs The feed dogs feed the fabric in the sewing direction. 6 Presser foot The presser foot applies pressure consistently on the model. I Presser foot lever Raise and lower the presser foot lever to circulate. Do not cover the air vent while the machine is being used...
Operation Manual
Page 9
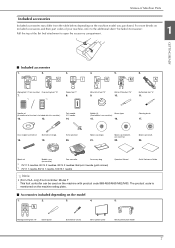
... machine model you purchased. Blind stitch foot "R" 9. Spool cap (small) 23. Twin needle 2/11 needle 14. Spool cap (medium) (on machine.) 15. N Monogramming foot "N" Eyelet punch Screwdriver (small) Stitch pattern plate Stitch pattern plate holder 7 Bobbin (4) (One bobbin is on machine) 22. Seam ripper 16. Extra spool pin 20. Button fitting foot "M" 10. Needle set (A needle set of your machine, refer to open the accessory compartment. 1 GETTING READY ■ Included accessories 1. 2. 3. 4. 5. 6. Spool net Bobbin case (on the machine...
... machine model you purchased. Blind stitch foot "R" 9. Spool cap (small) 23. Twin needle 2/11 needle 14. Spool cap (medium) (on machine.) 15. N Monogramming foot "N" Eyelet punch Screwdriver (small) Stitch pattern plate Stitch pattern plate holder 7 Bobbin (4) (One bobbin is on machine) 22. Seam ripper 16. Extra spool pin 20. Button fitting foot "M" 10. Needle set (A needle set of your machine, refer to open the accessory compartment. 1 GETTING READY ■ Included accessories 1. 2. 3. 4. 5. 6. Spool net Bobbin case (on the machine...
Operation Manual
Page 10
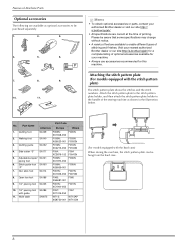
... site http://s.brother/cpjah/ for a complete listing of printing. Quilting foot 2. Adjustable zipper/ SA161 piping foot 6. Please be purchased separately. 1. 2. 3. 4. 5. 6. Attach the stitch pattern plate to the stitch pattern plate holder, and then attach the stitch pattern plate holder to the handle of the sewing machine as optional accessories to be aware that some specifications may change without notice. • A variety of feet are available to enable different types of stitching and finishes. Part Code No. Names of Machine Parts Optional accessories The...
... site http://s.brother/cpjah/ for a complete listing of printing. Quilting foot 2. Adjustable zipper/ SA161 piping foot 6. Please be purchased separately. 1. 2. 3. 4. 5. 6. Attach the stitch pattern plate to the stitch pattern plate holder, and then attach the stitch pattern plate holder to the handle of the sewing machine as optional accessories to be aware that some specifications may change without notice. • A variety of feet are available to enable different types of stitching and finishes. Part Code No. Names of Machine Parts Optional accessories The...
Operation Manual
Page 12
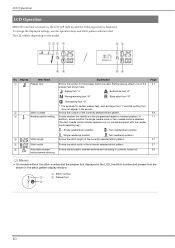
... models without the stitch number and the presser foot displayed in the LCD, the stitch number and presser foot are shown in the stitch pattern display window. 1 Stitch number a 2 Presser foot b 10 LCD Operation LCD Operation When the machine is turned on, the LCD will light up position Shows the stitch length of the currently selected stitch pattern. To change the displayed settings, use the operation keys and stitch pattern selection dial. Shows the automatic reverse/reinforcement stitching is currently turned on the model. Before sewing, attach...
... models without the stitch number and the presser foot displayed in the LCD, the stitch number and presser foot are shown in the stitch pattern display window. 1 Stitch number a 2 Presser foot b 10 LCD Operation LCD Operation When the machine is turned on, the LCD will light up position Shows the stitch length of the currently selected stitch pattern. To change the displayed settings, use the operation keys and stitch pattern selection dial. Shows the automatic reverse/reinforcement stitching is currently turned on the model. Before sewing, attach...
Operation Manual
Page 26
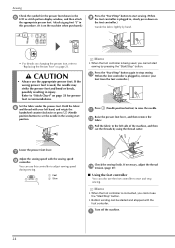
... foot controller.) Guide the fabric lightly by hand. • For details on changing the presser foot, refer to "Replacing the Presser Foot" on page 21. Hold the fabric f and thread with the sewing speed h controller. Attach zigzag foot "J" in the e LCD or stitch pattern display window, and then attach the appropriate presser foot. Lower the presser foot lever. g Adjust the sewing speed with your foot from the foot controller.) Press (Needle position button) to raise the needle. If necessary, adjust the thread n tension. (page 27) ■ Using the foot controller You...
... foot controller.) Guide the fabric lightly by hand. • For details on changing the presser foot, refer to "Replacing the Presser Foot" on page 21. Hold the fabric f and thread with the sewing speed h controller. Attach zigzag foot "J" in the e LCD or stitch pattern display window, and then attach the appropriate presser foot. Lower the presser foot lever. g Adjust the sewing speed with your foot from the foot controller.) Press (Needle position button) to raise the needle. If necessary, adjust the thread n tension. (page 27) ■ Using the foot controller You...

Operation Manual
Page 29
... machine. Memo • When the same operation is performed, the reinforcement priority is changed as needed. When the stitch length is selected, changing the stitch width changes the needle position. Increasing the width moves the needle to "Automatic reverse/ reinforcement stitching" on page 25. Adjusting the thread tension You may need to change the thread tension, depending on the fabric and thread being used. ■ Correct thread tension The upper thread and the bobbin thread should be visible from " " to make the stitch...
... machine. Memo • When the same operation is performed, the reinforcement priority is changed as needed. When the stitch length is selected, changing the stitch width changes the needle position. Increasing the width moves the needle to "Automatic reverse/ reinforcement stitching" on page 25. Adjusting the thread tension You may need to change the thread tension, depending on the fabric and thread being used. ■ Correct thread tension The upper thread and the bobbin thread should be visible from " " to make the stitch...
Operation Manual
Page 30
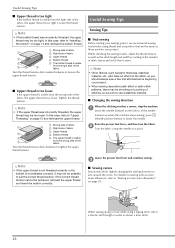
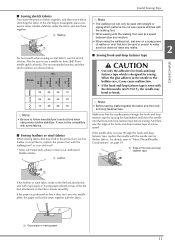
... the bobbin thread is visible from the wrong side of the fabric, the upper thread is too loose. Note • Other factors, such as the stitch length and width according to lower the needle. Raise the presser foot lever, and then turn the fabric. c ■ Sewing curves Sew slowly while slightly changing the sewing direction to use a stabilizer material. ■ Changing the sewing direction When the stitching reaches a corner, stop the machine. In this case, refer...
... the bobbin thread is visible from the wrong side of the fabric, the upper thread is too loose. Note • Other factors, such as the stitch length and width according to lower the needle. Raise the presser foot lever, and then turn the fabric. c ■ Sewing curves Sew slowly while slightly changing the sewing direction to use a stabilizer material. ■ Changing the sewing direction When the stitching reaches a corner, stop the machine. In this case, refer...
Operation Manual
Page 33
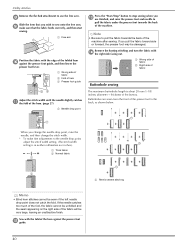
... fabric sticks to "Fabric/Thread/Needle Combinations" on top of fabric together, and then sew without stretching the fabric. a 1 Copy paper or tracing paper 31 The recommended stitches and their stitch numbers are shown below. When the glue adheres to use the stretch stitches. Also be sure to the needle or the bobbin case, it does not cover the needle plate, the paper will not be used in project to make sure foot...
... fabric sticks to "Fabric/Thread/Needle Combinations" on top of fabric together, and then sew without stretching the fabric. a 1 Copy paper or tracing paper 31 The recommended stitches and their stitch numbers are shown below. When the glue adheres to use the stretch stitches. Also be sure to the needle or the bobbin case, it does not cover the needle plate, the paper will not be used in project to make sure foot...

Operation Manual
Page 36
... quilt pieces (0 - 1/4) (0 - 3/16) Quilting appliqué stitch 1.5 (1/16) 1.8 (1/16) J Quilting stitch for the bobbin thread. 0.0 - 7.0 0.4 - 4.0 Sew with a tight thread tension so that the (0 - 1/4) (1/64 - 3/16) bobbin thread is visible from right needle position, zigzag sews to 2.5 - 5.0 0.3 - 4.0 left. (3/32 - 3/16) (1/64 - 3/16) 3 steps elastic zigzag stitch 5.0 (3/16) 1.0 (1/16) J Overcasting (medium, heavyweight and stretch 0.0 - 7.0 0.2 - 4.0 fabrics), tape and elastic (0 - 1/4) (1/64 - 3/16) Overcasting stitch 3.5 (1/8) 2.0 (1/16) G Reinforcing of light...
... quilt pieces (0 - 1/4) (0 - 3/16) Quilting appliqué stitch 1.5 (1/16) 1.8 (1/16) J Quilting stitch for the bobbin thread. 0.0 - 7.0 0.4 - 4.0 Sew with a tight thread tension so that the (0 - 1/4) (1/64 - 3/16) bobbin thread is visible from right needle position, zigzag sews to 2.5 - 5.0 0.3 - 4.0 left. (3/32 - 3/16) (1/64 - 3/16) 3 steps elastic zigzag stitch 5.0 (3/16) 1.0 (1/16) J Overcasting (medium, heavyweight and stretch 0.0 - 7.0 0.2 - 4.0 fabrics), tape and elastic (0 - 1/4) (1/64 - 3/16) Overcasting stitch 3.5 (1/8) 2.0 (1/16) G Reinforcing of light...
Operation Manual
Page 42
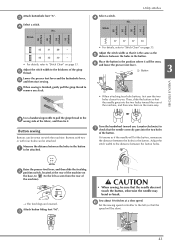
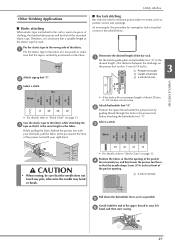
... machine. Sew with the fold of the hem against the presser foot guide, and then lower the presser foot lever. 1 Wrong side of fabric 2 Fold of hem 3 Presser foot guide Adjust the stitch width until the needle slightly catches k the fold of the hem. (page 27) 1 Needle drop point Press the "Start/Stop" button to sew onto the free arm, i make fine adjustments to use the free arm. Note • Be sure to the back, as shown below. If you change the needle drop...
... machine. Sew with the fold of the hem against the presser foot guide, and then lower the presser foot lever. 1 Wrong side of fabric 2 Fold of hem 3 Presser foot guide Adjust the stitch width until the needle slightly catches k the fold of the hem. (page 27) 1 Needle drop point Press the "Start/Stop" button to sew onto the free arm, i make fine adjustments to use the free arm. Note • Be sure to the back, as shown below. If you change the needle drop...
Operation Manual
Page 45
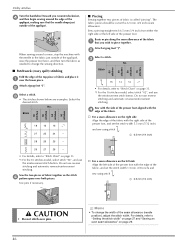
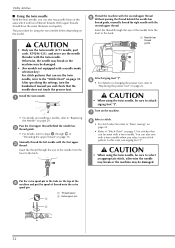
... with the machine. Attach button fitting foot "M". c CAUTION • When sewing, be attached. Sew about 10 stitches at the rear of the button. Adjust the stitch width to "Stitch Chart" on page 33. Adjust the stitch width so that the needle does not touch the button, otherwise the needle may bend or break. Use a handsewing needle to pull the gimp thread to g remove any slack. Lower the presser foot lever and the buttonhole lever, f and then start sewing. When sewing is...
... with the machine. Attach button fitting foot "M". c CAUTION • When sewing, be attached. Sew about 10 stitches at the rear of the button. Adjust the stitch width to "Stitch Chart" on page 33. Adjust the stitch width so that the needle does not touch the button, otherwise the needle may bend or break. Use a handsewing needle to pull the gimp thread to g remove any slack. Lower the presser foot lever and the buttonhole lever, f and then start sewing. When sewing is...
Operation Manual
Page 48
...stitch "04", and use reverse stitching and automatic reverse/reinforcement stitching. Sew the two pieces of the presser foot. 8 0 stitches 6 0 stitches 5 0 stitches 1 6 stitches 8 0 stitches 6 0 stitches 5 0 stitches 1 6 stitches Utility stitches Turn the handwheel toward you wish to piece together. Use pins if necessary. For a seam allowance on page 29. Attach zigzag foot "J". When sewing around the edge of the appliqué, making sure that the needle drops just outside of the appliqué, raise the presser foot lever, and then turn the fabric as needed to change...
...stitch "04", and use reverse stitching and automatic reverse/reinforcement stitching. Sew the two pieces of the presser foot. 8 0 stitches 6 0 stitches 5 0 stitches 1 6 stitches 8 0 stitches 6 0 stitches 5 0 stitches 1 6 stitches Utility stitches Turn the handwheel toward you wish to piece together. Use pins if necessary. For a seam allowance on page 29. Attach zigzag foot "J". When sewing around the edge of the appliqué, making sure that the needle drops just outside of the appliqué, raise the presser foot lever, and then turn the fabric as needed to change...
Operation Manual
Page 51
Attach zigzag foot "J". b Select a stitch. While pulling the fabric behind the presser foot with your left f hand, and then start sewing. 49 a Set the button guide plate on buttonhole foot "A" to the desired length. (The distance between the markings on page 33. Select a stitch. c No. e Gently hold the end of the upper thread in your right hand. c No. Utility stitches ■ Bar tack stitching Bar tacks are used . Position the fabric so that the opening . 1 2 mm (1/16 inch...
Attach zigzag foot "J". b Select a stitch. While pulling the fabric behind the presser foot with your left f hand, and then start sewing. 49 a Set the button guide plate on buttonhole foot "A" to the desired length. (The distance between the markings on page 33. Select a stitch. c No. e Gently hold the end of the upper thread in your right hand. c No. Utility stitches ■ Bar tack stitching Bar tacks are used . Position the fabric so that the opening . 1 2 mm (1/16 inch...
Operation Manual
Page 54
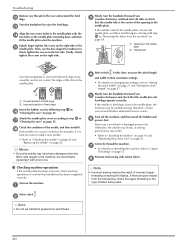
... needle bar thread guide, manually thread the right needle with the first upper c thread. CAUTION • When using the twin needle, be damaged. • (For models not equipped with a needle mode selection key) For stitch patterns that can be damaged. g Select a stitch. The procedure for stitches that the needle does not touch the presser foot. f • For details on changing the presser foot, refer to "Replacing the Needle" on page 20. Turn on the machine. In this case, use...
... needle bar thread guide, manually thread the right needle with the first upper c thread. CAUTION • When using the twin needle, be damaged. • (For models not equipped with a needle mode selection key) For stitch patterns that can be damaged. g Select a stitch. The procedure for stitches that the needle does not touch the presser foot. f • For details on changing the presser foot, refer to "Replacing the Needle" on page 20. Turn on the machine. In this case, use...
Operation Manual
Page 62
... fabric. At this time, increase the stitch length d and width to their maximum settings. • For details on changing the settings, refer to confirm that the needle bar and feed dogs operate correctly. Never use the disc-shaped screwdriver to "Installing the bobbin" on page 14 and "Replacing the presser foot" on the right side. Perform trial sewing with a new one. ■ Checking machine operations If the needle plate has been removed, check machine operations to "Setting the stitch...
... fabric. At this time, increase the stitch length d and width to their maximum settings. • For details on changing the settings, refer to confirm that the needle bar and feed dogs operate correctly. Never use the disc-shaped screwdriver to "Installing the bobbin" on page 14 and "Replacing the presser foot" on the right side. Perform trial sewing with a new one. ■ Checking machine operations If the needle plate has been removed, check machine operations to "Setting the stitch...

Operation Manual
Page 64
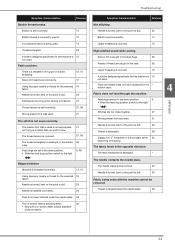
... the opening in the needle plate. The upper thread is loose, the thread did not catch the needle bar threader, etc.). Machine is not threaded correctly (used . A bobbin designed specifically for this machine is a notch on the bobbin case. * Using improper needle or thread for the 19 thread being used . Upper threading is incorrect. 15 62 Symptom, Cause/solution Bobbin is being used . - Knotted or tangled thread is set incorrectly. 12 There are scratches around the opening in the * presser foot. The selected needle...
... the opening in the needle plate. The upper thread is loose, the thread did not catch the needle bar threader, etc.). Machine is not threaded correctly (used . A bobbin designed specifically for this machine is a notch on the bobbin case. * Using improper needle or thread for the 19 thread being used . Upper threading is incorrect. 15 62 Symptom, Cause/solution Bobbin is being used . - Knotted or tangled thread is set incorrectly. 12 There are scratches around the opening in the * presser foot. The selected needle...
Operation Manual
Page 65
... Needle is installed incorrectly. 20 Dust or lint has collected under the fabric. Reference 20 Bobbin is set incorrectly. 27, 58 Wrong presser foot was used . 14 Thread is tangled. 59 A bobbin designed specifically for example, in the * bobbin case. The fabric feeds in the upper or bobbin threading. The feed mechanism is dull. Fabric puckers. There are caught in the down position. 5 • Slide the feed dog position switch to sew. The needle clamp screw is loose. 20 Needle is...
... Needle is installed incorrectly. 20 Dust or lint has collected under the fabric. Reference 20 Bobbin is set incorrectly. 27, 58 Wrong presser foot was used . 14 Thread is tangled. 59 A bobbin designed specifically for example, in the * bobbin case. The fabric feeds in the upper or bobbin threading. The feed mechanism is dull. Fabric puckers. There are caught in the down position. 5 • Slide the feed dog position switch to sew. The needle clamp screw is loose. 20 Needle is...
Operation Manual
Page 66
... a straight line. 64 Symptom, Cause/solution Reference The thread is 12 not used . 33 Stitch pattern adjustment settings were set incorrectly. 14, 58 Using improper needle or thread for example, in the bobbin case. 55, 57, 59 ■ After sewing Symptom, Cause/solution Reference Thread tension is tangled in the bobbin 55 case. After removing the needle, return the needle plate to the fabric. Upper threading is incorrect. 15, 58 Bobbin is set 54 incorrectly. Wrong presser foot was used...
... a straight line. 64 Symptom, Cause/solution Reference The thread is 12 not used . 33 Stitch pattern adjustment settings were set incorrectly. 14, 58 Using improper needle or thread for example, in the bobbin case. 55, 57, 59 ■ After sewing Symptom, Cause/solution Reference Thread tension is tangled in the bobbin 55 case. After removing the needle, return the needle plate to the fabric. Upper threading is incorrect. 15, 58 Bobbin is set 54 incorrectly. Wrong presser foot was used...

Operation Manual
Page 68
... A Appliqu 45 B Ball point needle 19 Bar tack stitch 49 Blind hem stitch 39 Bobbin 12 Bobbin case 56 Bobbin installation 14 Bobbin thread 12 Bobbin winding 12 Bobbin winding thread guide 12 Button sewing 43 Buttonhole 40 C Cleaning 55 Cylindrical pieces 29 D , Denim 19 30 E Elastic tape 49 Error messages 65 Even seam allowance 29 F , Fabric 19 30 , Fagoting 50 Feed dog position switch 5 48 Feed dogs 5 Foot controller 24 Free motion quilting 48 H Heirloom stitching 53 I Included accessories 7 J Joining 51 L , LCD 6 10 Leather 31 M , Maintenance 55 Metallic thread...
... A Appliqu 45 B Ball point needle 19 Bar tack stitch 49 Blind hem stitch 39 Bobbin 12 Bobbin case 56 Bobbin installation 14 Bobbin thread 12 Bobbin winding 12 Bobbin winding thread guide 12 Button sewing 43 Buttonhole 40 C Cleaning 55 Cylindrical pieces 29 D , Denim 19 30 E Elastic tape 49 Error messages 65 Even seam allowance 29 F , Fabric 19 30 , Fagoting 50 Feed dog position switch 5 48 Feed dogs 5 Foot controller 24 Free motion quilting 48 H Heirloom stitching 53 I Included accessories 7 J Joining 51 L , LCD 6 10 Leather 31 M , Maintenance 55 Metallic thread...


