Operation Manual
Page 1
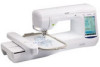
Operation Manual Embroidery Machine Product Code: 882-D80/D82 Be sure to read this document nearby for future reference. We recommend that you keep this document before using the machine.
Operation Manual Embroidery Machine Product Code: 882-D80/D82 Be sure to read this document nearby for future reference. We recommend that you keep this document before using the machine.
Operation Manual
Page 2
... and on any theory of liability, whether in contract, strict liability, or tort (including negligence or otherwise) arising in this manual are property of International Business Machines Corporation. SD is a registered trademark or a trademark of their respective companies. IBM is a registered trademark or a..., this list of conditions and the following disclaimer in the documentation and/or other brands and product names mentioned in this manual has a Software License Agreement specific to its proprietary programs. All other materials provided with the distribution. • The name...
... and on any theory of liability, whether in contract, strict liability, or tort (including negligence or otherwise) arising in this manual are property of International Business Machines Corporation. SD is a registered trademark or a trademark of their respective companies. IBM is a registered trademark or a..., this list of conditions and the following disclaimer in the documentation and/or other brands and product names mentioned in this manual has a Software License Agreement specific to its proprietary programs. All other materials provided with the distribution. • The name...
Operation Manual
Page 3
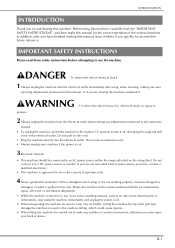
... plug and pull it out of the electrical outlet. IMPORTANT SAFETY INSTRUCTIONS Please read the "IMPORTANT SAFETY INSTRUCTIONS", and then study this manual for the correct operation of the various functions. Do not pull on the unit. To reduce the risk of burns, fire, electrical...electrical shock 1 Always unplug the machine from the electrical outlet when making any sudden or careless movements, otherwise you have finished reading this manual, store it where it can quickly be accessed for future reference. Lifting the machine by its handle. INTRODUCTION INTRODUCTION Thank you have ...
... plug and pull it out of the electrical outlet. IMPORTANT SAFETY INSTRUCTIONS Please read the "IMPORTANT SAFETY INSTRUCTIONS", and then study this manual for the correct operation of the various functions. Do not pull on the unit. To reduce the risk of burns, fire, electrical...electrical shock 1 Always unplug the machine from the electrical outlet when making any sudden or careless movements, otherwise you have finished reading this manual, store it where it can quickly be accessed for future reference. Lifting the machine by its handle. INTRODUCTION INTRODUCTION Thank you have ...
Operation Manual
Page 4
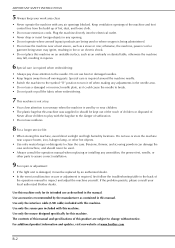
... and machine, and should be used. • Always consult the operation manual when replacing or installing any adjustments in the manual. For additional product information and updates, visit our website at www.brother.com B-2 Use only the mouse designed specifically for its intended use as... needle area. • Do not use extension cords. IMPORTANT SAFETY INSTRUCTIONS 5 Always keep your local authorized Brother dealer. Never allow children to the needle. The contents of this manual. Keep ventilation openings of lint, dust, and loose cloth. • Do not use a damaged or ...
... and machine, and should be used. • Always consult the operation manual when replacing or installing any adjustments in the manual. For additional product information and updates, visit our website at www.brother.com B-2 Use only the mouse designed specifically for its intended use as... needle area. • Do not use extension cords. IMPORTANT SAFETY INSTRUCTIONS 5 Always keep your local authorized Brother dealer. Never allow children to the needle. The contents of this manual. Keep ventilation openings of lint, dust, and loose cloth. • Do not use a damaged or ...
Operation Manual
Page 14
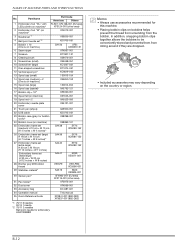
...W 7 inches) SA440 EF76: XC8482-152 Embroidery frame set (extra large) H 30 cm × W 20 cm (H 12 inches × W 8 inches) SA447 EF92: XE5071-001 28 Brother poly #90 bobbin thread EBT-PE EBT-PEN: XC5996-001 29 Stabilizer material* SA519 BM3: XE0806-001 30 Sensor pen* XF4992-001 (EU area) XF3116...-001 (other area) 31 Pen holder* XF2973-001 32 Dust cover XF4569-001 33 Accessory bag XC4487-021 34 Operation manual This manual 35 Quick Reference Guide XF3841-001 (882-D80) XF3637-001 (882-D82) *1 75/11 3 needles 90/14 1 needle *2 75/11 2 needles ...
...W 7 inches) SA440 EF76: XC8482-152 Embroidery frame set (extra large) H 30 cm × W 20 cm (H 12 inches × W 8 inches) SA447 EF92: XE5071-001 28 Brother poly #90 bobbin thread EBT-PE EBT-PEN: XC5996-001 29 Stabilizer material* SA519 BM3: XE0806-001 30 Sensor pen* XF4992-001 (EU area) XF3116...-001 (other area) 31 Pen holder* XF2973-001 32 Dust cover XF4569-001 33 Accessory bag XC4487-021 34 Operation manual This manual 35 Quick Reference Guide XF3841-001 (882-D80) XF3637-001 (882-D82) *1 75/11 3 needles 90/14 1 needle *2 75/11 2 needles ...
Operation Manual
Page 43
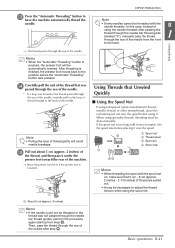
...threader after step i. Then, pass the thread through the eye of the needle after passing the thread through the needle bar thread guide (marked "6"), manually pass the thread 1 through the eye of thread gently will be necessary to have the machine automatically thread the needle. Getting Ready The thread...of thread are pulled out. • It may be automatically lowered. a About 5 cm (approx. 2 inches) Memo • If the needle could not be done manually. UPPER THREADING m Press the "Automatic Threading" button to adjust the thread tension when using it.
...threader after step i. Then, pass the thread through the eye of the needle after passing the thread through the needle bar thread guide (marked "6"), manually pass the thread 1 through the eye of thread gently will be necessary to have the machine automatically thread the needle. Getting Ready The thread...of thread are pulled out. • It may be automatically lowered. a About 5 cm (approx. 2 inches) Memo • If the needle could not be done manually. UPPER THREADING m Press the "Automatic Threading" button to adjust the thread tension when using it.
Operation Manual
Page 51
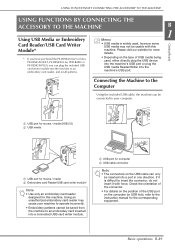
... TO THE MACHINE B 1 Using USB Media or Embroidery Memo Getting Ready Card Reader/USB Card Writer Module* • USB media is difficult to the instruction manual for this machine. Check the orientation of the connector. • For details on the position of USB media being used , however some USB media may...
... TO THE MACHINE B 1 Using USB Media or Embroidery Memo Getting Ready Card Reader/USB Card Writer Module* • USB media is difficult to the instruction manual for this machine. Check the orientation of the connector. • For details on the position of USB media being used , however some USB media may...

Operation Manual
Page 52
... TO THE MACHINE Using a USB Mouse The USB mouse, connected to the machine, can be used , it may not perform as described in this Operation Manual. ■ Changing Pages Rotate the mouse wheel to switch through the tabs of operations in the opening screen. ■ Clicking a Key When the mouse is...
... TO THE MACHINE Using a USB Mouse The USB mouse, connected to the machine, can be used , it may not perform as described in this Operation Manual. ■ Changing Pages Rotate the mouse wheel to switch through the tabs of operations in the opening screen. ■ Clicking a Key When the mouse is...
Operation Manual
Page 111
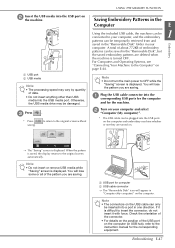
c Press * Press saving. . Check the orientation of the connector. • For details on the position of embroidery patterns can only be connected to the instruction manual for the corresponding equipment. to return to the original screen without Saving Embroidery Patterns in the Computer E Using the included USB cable, the machine can ...
c Press * Press saving. . Check the orientation of the connector. • For details on the position of embroidery patterns can only be connected to the instruction manual for the corresponding equipment. to return to the original screen without Saving Embroidery Patterns in the Computer E Using the included USB cable, the machine can ...
Operation Manual
Page 117
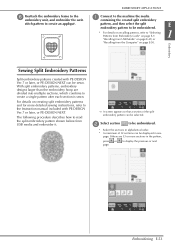
... detailed sewing instructions, refer to create a single pattern after each section is sewn. If there are divided into multiple sections, which combine to the Instruction manual included with PE-DESIGN Ver.7 or later, or PE-DESIGN NEXT can be selected. Embroidering E-53 EMBROIDERY APPLICATIONS a Connect to the machine the media containing...
... detailed sewing instructions, refer to create a single pattern after each section is sewn. If there are divided into multiple sections, which combine to the Instruction manual included with PE-DESIGN Ver.7 or later, or PE-DESIGN NEXT can be selected. Embroidering E-53 EMBROIDERY APPLICATIONS a Connect to the machine the media containing...
Operation Manual
Page 139
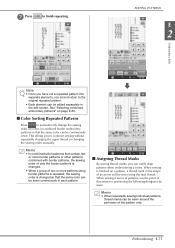
... is finished on page E-82. ■ Color Sorting Repeated Patterns Press to continue sewing without repeatedly changing the upper thread or changing the sewing order manually. Memo • In combined stitch patterns that contain two or more border patterns or other patterns combined with border patterns, the sewing order of only...
... is finished on page E-82. ■ Color Sorting Repeated Patterns Press to continue sewing without repeatedly changing the upper thread or changing the sewing order manually. Memo • In combined stitch patterns that contain two or more border patterns or other patterns combined with border patterns, the sewing order of only...
Operation Manual
Page 171
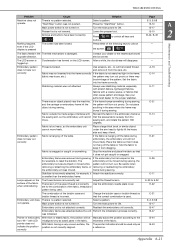
... to E-32 E-22 E-21 E-3, E-58 B-17 B-47 B-47 B-44 B-43 Maintenance and Troubleshooting A 2 Appendix A-21 Press either of the upper thread is moved during sewing. Manually adjust the position according to reset the bobbin). After a while, the cloudiness will be used only as a reference. Place a large thick book or similar object...
... to E-32 E-22 E-21 E-3, E-58 B-17 B-47 B-47 B-44 B-43 Maintenance and Troubleshooting A 2 Appendix A-21 Press either of the upper thread is moved during sewing. Manually adjust the position according to reset the bobbin). After a while, the cloudiness will be used only as a reference. Place a large thick book or similar object...
Installation Guide for Premium Pack I Optional accessories
Page 4
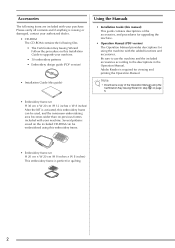
... on this Installation Guide to upgrade your machine. • 30 embroidery patterns • Embroidery design guide (PDF version) • Installation Guide (this guide) Using the Manuals • Installation Guide (this embroidery frame. • Embroidery frame set H 20 cm × W 20 cm (H 8 inches × W 8 inches) This... patterns saved on the included CD-ROM can be embroidered using the Certification Key Issuing Wizard in the Operation Manual. Accessories The following files. • The Certification Key Issuing Wizard Follow the procedure on previous frames included with your ...
... on this Installation Guide to upgrade your machine. • 30 embroidery patterns • Embroidery design guide (PDF version) • Installation Guide (this guide) Using the Manuals • Installation Guide (this embroidery frame. • Embroidery frame set H 20 cm × W 20 cm (H 8 inches × W 8 inches) This... patterns saved on the included CD-ROM can be embroidered using the Certification Key Issuing Wizard in the Operation Manual. Accessories The following files. • The Certification Key Issuing Wizard Follow the procedure on previous frames included with your ...
Installation Guide for Premium Pack I Optional accessories
Page 7
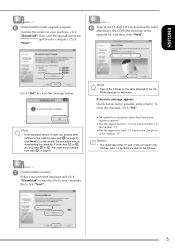
..., then click "Next". 5 Click "Next". Note • If the displayed version or later has already been installed in the CD key on page 9. g Download the manual. To close the message below list for machines. Follow step h to l, and skip step m to your preferred language and click "Download" to save the upgrade...
..., then click "Next". 5 Click "Next". Note • If the displayed version or later has already been installed in the CD key on page 9. g Download the manual. To close the message below list for machines. Follow step h to l, and skip step m to your preferred language and click "Download" to save the upgrade...

Installation Guide for Premium Pack I Optional accessories
Page 12
... " in step k, and then press . Please refer to attain the Certification Key. 10 Note • For details of the upgraded functions, see the Operation Manual (PDF version) downloaded using the Certification Key Issuing Wizard. Note • If the following screen appears. Turn off the sewing machine and then turn on... again. y Confirm that there is lost, repeat steps b through l to page 5 for Operation Manual download information. • If the Certification Key is a check mark beside "KIT I " has been successfully certified.
... " in step k, and then press . Please refer to attain the Certification Key. 10 Note • For details of the upgraded functions, see the Operation Manual (PDF version) downloaded using the Certification Key Issuing Wizard. Note • If the following screen appears. Turn off the sewing machine and then turn on... again. y Confirm that there is lost, repeat steps b through l to page 5 for Operation Manual download information. • If the Certification Key is a check mark beside "KIT I " has been successfully certified.
Operation Manual for Premium Pack I Optional accessories
Page 1
Upgrade KIT 1 Operation Manual Be sure to read this document nearby for future reference. We recommend that you keep this document before using the machine.
Upgrade KIT 1 Operation Manual Be sure to read this document nearby for future reference. We recommend that you keep this document before using the machine.

Operation Manual for Premium Pack I Optional accessories
Page 2
... (approx. 8 inches × 8 inches) and 30 cm × 20 cm (approx. 12 inches × 8 inches) can then be used as outlined in this upgrade Operation Manual. After the KIT I 2 Selecting a frame that matches the pattern size 2 Previewing the Completed Pattern 2 Changing the "Embroidery Frame Display 3 Adding Line Returns to the procedure.... 12 inches × 8 inches), and the "extra large embroidery frame" indicated in the Installation Guide. The machine can be used . The screen illustrations in this manual may differ from actual ones shown on the CD-ROM. -
... (approx. 8 inches × 8 inches) and 30 cm × 20 cm (approx. 12 inches × 8 inches) can then be used as outlined in this upgrade Operation Manual. After the KIT I 2 Selecting a frame that matches the pattern size 2 Previewing the Completed Pattern 2 Changing the "Embroidery Frame Display 3 Adding Line Returns to the procedure.... 12 inches × 8 inches), and the "extra large embroidery frame" indicated in the Installation Guide. The machine can be used . The screen illustrations in this manual may differ from actual ones shown on the CD-ROM. -
Operation Manual for Premium Pack I Optional accessories
Page 5
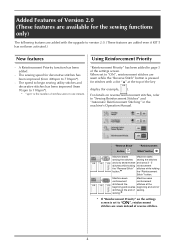
... begin sewing utility stitches and decorative stitches has been improved (from 400spm to 110spm*). * "spm" is the number of stitches sewn in the machine's Operation Manual. The sewing speed for decorative stitches has been improved (from 70spm to 710spm*). - "Reverse Stitch" "Reinforcement button Stitch" button + Machine starts Machine starts sewing the...
... begin sewing utility stitches and decorative stitches has been improved (from 400spm to 110spm*). * "spm" is the number of stitches sewn in the machine's Operation Manual. The sewing speed for decorative stitches has been improved (from 70spm to 710spm*). - "Reverse Stitch" "Reinforcement button Stitch" button + Machine starts Machine starts sewing the...


