Operation Manual
Page 4
... break. • Do not push or pull the fabric when embroidering. 7 This machine is required, first follow the troubleshooting table in this manual and specifications of the operation manual to clean the case. If the problem persists, please consult your work area clear: • Never operate the machine with the bag due to change without notice. Keep ventilation openings of the machine and foot control free from all moving parts. Do not use the machine...
... break. • Do not push or pull the fabric when embroidering. 7 This machine is required, first follow the troubleshooting table in this manual and specifications of the operation manual to clean the case. If the problem persists, please consult your work area clear: • Never operate the machine with the bag due to change without notice. Keep ventilation openings of the machine and foot control free from all moving parts. Do not use the machine...
Operation Manual
Page 8
... MACHINE PARTS AND THEIR FUNCTIONS 8 Machine 8 Needle and Presser Foot Section 9 Embroidery Unit 9 Operation Buttons 10 Included Accessories 11 Options 13 B Basic operations Chapter1 Getting Ready 16 TURNING THE MACHINE ON/OFF 17 Setting Your Machine for the First Time 18 LCD SCREEN 20 Using the Machine Setting Mode Key 22 Using the Machine Help Key 29 LOWER THREADING 31 Winding the Bobbin 31 Setting the Bobbin 36 UPPER THREADING 38 Upper Threading 38 Using Threads that Unwind Quickly 41 CHANGING THE EMBROIDERY FOOT 42 Removing the Embroidery Foot 42 Attaching...
... MACHINE PARTS AND THEIR FUNCTIONS 8 Machine 8 Needle and Presser Foot Section 9 Embroidery Unit 9 Operation Buttons 10 Included Accessories 11 Options 13 B Basic operations Chapter1 Getting Ready 16 TURNING THE MACHINE ON/OFF 17 Setting Your Machine for the First Time 18 LCD SCREEN 20 Using the Machine Setting Mode Key 22 Using the Machine Help Key 29 LOWER THREADING 31 Winding the Bobbin 31 Setting the Bobbin 36 UPPER THREADING 38 Upper Threading 38 Using Threads that Unwind Quickly 41 CHANGING THE EMBROIDERY FOOT 42 Removing the Embroidery Foot 42 Attaching...
Operation Manual
Page 9
... Basting Embroidery 84 USING THE MEMORY FUNCTION 85 A Appendix Chapter1 How to Create Bobbin Work 2 ABOUT BOBBIN WORK 3 PREPARING FOR BOBBIN WORK 3 Required Materials 3 Upper Threading 4 Preparing the Bobbin Thread 4 CREATING BOBBIN WORK 8 Selecting the Pattern 8 Start Embroidering 10 ADJUSTING THE THREAD TENSION 12 TROUBLESHOOTING 13 Chapter2 Maintenance and Troubleshooting 14 CARE AND MAINTENANCE 15 Restrictions on oiling 15 Precautions on storing the machine 15 Cleaning the LCD Screen 15 Cleaning the Machine Casing 15 Cleaning the Race 15 Cleaning the Cutter in the Bobbin...
... Basting Embroidery 84 USING THE MEMORY FUNCTION 85 A Appendix Chapter1 How to Create Bobbin Work 2 ABOUT BOBBIN WORK 3 PREPARING FOR BOBBIN WORK 3 Required Materials 3 Upper Threading 4 Preparing the Bobbin Thread 4 CREATING BOBBIN WORK 8 Selecting the Pattern 8 Start Embroidering 10 ADJUSTING THE THREAD TENSION 12 TROUBLESHOOTING 13 Chapter2 Maintenance and Troubleshooting 14 CARE AND MAINTENANCE 15 Restrictions on oiling 15 Precautions on storing the machine 15 Cleaning the LCD Screen 15 Cleaning the Machine Casing 15 Cleaning the Race 15 Cleaning the Cutter in the Bobbin...
Operation Manual
Page 10
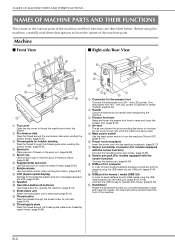
... thread guide plate when threading upper thread. (page B-38) a Connector for bobbin winding Pass the thread through the thread cutter to raise and lower the needle. c Presser foot lever Raise and lower the presser foot lever to raise and lower the presser foot. (page B-42) d Air vent The air vent allows the air surrounding the motor to learn the names of the machine. Machine ■ Front View ■ Right-side/Rear View a Top cover Open the top cover to operate...
... thread guide plate when threading upper thread. (page B-38) a Connector for bobbin winding Pass the thread through the thread cutter to raise and lower the needle. c Presser foot lever Raise and lower the presser foot lever to raise and lower the presser foot. (page B-42) d Air vent The air vent allows the air surrounding the motor to learn the names of the machine. Machine ■ Front View ■ Right-side/Rear View a Top cover Open the top cover to operate...
Operation Manual
Page 14
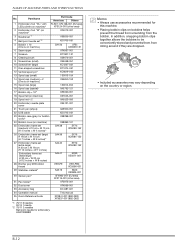
...) 130012-054 16 Spool cap (special) XA5752-121 17 Bobbin clip × 10* XE3060-001 18 Spool felt (on machine) X57045-051 19 Spool net × 2 XA5523-050 20 Embroidery needle plate cover XE5131-001 21 Touch pen (stylus) XA9940-051 22 USB cable XD0745-051 23 Bobbin case (gray, for bobbin work)* XE8298-001 24 Bobbin cover (on machine) XE8992-101 25 Embroidery frame set (medium) H 10 cm...
...) 130012-054 16 Spool cap (special) XA5752-121 17 Bobbin clip × 10* XE3060-001 18 Spool felt (on machine) X57045-051 19 Spool net × 2 XA5523-050 20 Embroidery needle plate cover XE5131-001 21 Touch pen (stylus) XA9940-051 22 USB cable XD0745-051 23 Bobbin case (gray, for bobbin work)* XE8298-001 24 Bobbin cover (on machine) XE8992-101 25 Embroidery frame set (medium) H 10 cm...
Operation Manual
Page 24
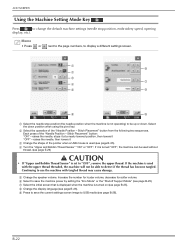
...; If "Upper and Bobbin Thread Sensor" is not operating) to display a different settings screen. Stitch Placement" button: "ON" - raises the needle, stops it at a nearly lowered position, then lowers it c Change the shape of the pointer when a USB mouse is used without thread. (see page B-26). If the machine is turned on (see page B-25). a f b c g d e h i i a Select the needle stop position, embroidery speed, opening display, etc.). Select the down . Stitch Placement" button from the...
...; If "Upper and Bobbin Thread Sensor" is not operating) to display a different settings screen. Stitch Placement" button: "ON" - raises the needle, stops it at a nearly lowered position, then lowers it c Change the shape of the pointer when a USB mouse is used without thread. (see page B-26). If the machine is turned on (see page B-25). a f b c g d e h i i a Select the needle stop position, embroidery speed, opening display, etc.). Select the down . Stitch Placement" button from the...
Operation Manual
Page 36
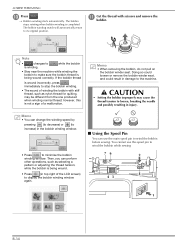
... a pattern or adjusting the thread tension, while the bobbin is being wound correctly. LOWER THREADING j Press . Bobbin winding starts automatically. You cannot use the main spool pin to loosen, breaking the needle and possibly resulting in the bobbin winding window. • Press to wind the bobbin while sewing. The bobbin stops rotating when bobbin winding is not a sign of the LCD screen) to display the bobbin winding window again. ■ Using the Spool Pin You can change the winding speed by...
... a pattern or adjusting the thread tension, while the bobbin is being wound correctly. LOWER THREADING j Press . Bobbin winding starts automatically. You cannot use the main spool pin to loosen, breaking the needle and possibly resulting in the bobbin winding window. • Press to wind the bobbin while sewing. The bobbin stops rotating when bobbin winding is not a sign of the LCD screen) to display the bobbin winding window again. ■ Using the Spool Pin You can change the winding speed by...
Operation Manual
Page 38
... the Setting the Bobbin Press in the LCD, otherwise injuries may break or the thread tension will not operate correctly. a Press and then to stop the bobbin winding. SA156 is pressed and the machine starts sewing. e Wind the bobbin again. LOWER THREADING a If the thread becomes tangled under the bobbin winder seat, press once to lock the keys and raise the presser foot. d Cut the thread near the bobbin winder seat...
... the Setting the Bobbin Press in the LCD, otherwise injuries may break or the thread tension will not operate correctly. a Press and then to stop the bobbin winding. SA156 is pressed and the machine starts sewing. e Wind the bobbin again. LOWER THREADING a If the thread becomes tangled under the bobbin winder seat, press once to lock the keys and raise the presser foot. d Cut the thread near the bobbin winder seat...
Operation Manual
Page 66
... Turning Off the Power 28 MAKING EMBROIDERY ADJUSTMENTS 30 Adjusting Thread Tension 30 ■ Correct Thread Tension 30 ■ Upper Thread is Too Tight 30 ■ Upper Thread is Too Loose 30 Adjusting the Bobbin Case (with No Color on screen 20 SEWING AN EMBROIDERY PATTERN 21 Embroidery Attractive Finishes 21 ■ Embroidery Needle Plate Cover 22 Sewing Embroidery Patterns 22 Sewing Embroidery Patterns Which Use Appliqu 23 ADJUSTMENTS DURING THE EMBROIDERY PROCESS 26 If the Bobbin Runs Out of Thread 26 If the Thread Breaks During Sewing 27 Restarting...
... Turning Off the Power 28 MAKING EMBROIDERY ADJUSTMENTS 30 Adjusting Thread Tension 30 ■ Correct Thread Tension 30 ■ Upper Thread is Too Tight 30 ■ Upper Thread is Too Loose 30 Adjusting the Bobbin Case (with No Color on screen 20 SEWING AN EMBROIDERY PATTERN 21 Embroidery Attractive Finishes 21 ■ Embroidery Needle Plate Cover 22 Sewing Embroidery Patterns 22 Sewing Embroidery Patterns Which Use Appliqu 23 ADJUSTMENTS DURING THE EMBROIDERY PROCESS 26 If the Bobbin Runs Out of Thread 26 If the Thread Breaks During Sewing 27 Restarting...
Operation Manual
Page 86
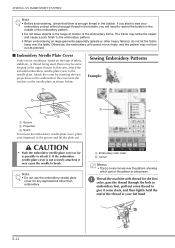
... the fabric hang over the pattern, showing which part of fabric, stabilizer, or thread being sewn. Note • Do not use the embroidery needle plate cover for the first color, pass the thread through the hole in embroidery foot, pull out some thread to the embroidery pattern. • When embroidering on the type of the pattern is enough thread in the bobbin. In this case, attach the included embroidery needle plate cover to break. SEWING AN EMBROIDERY PATTERN Note • Before embroidering, check...
... the fabric hang over the pattern, showing which part of fabric, stabilizer, or thread being sewn. Note • Do not use the embroidery needle plate cover for the first color, pass the thread through the hole in embroidery foot, pull out some thread to the embroidery pattern. • When embroidering on the type of the pattern is enough thread in the bobbin. In this case, attach the included embroidery needle plate cover to break. SEWING AN EMBROIDERY PATTERN Note • Before embroidering, check...
Operation Manual
Page 152
... the Pattern 8 Start Embroidering 10 ADJUSTING THE THREAD TENSION 12 ■ Adjusting the upper thread tension 12 ■ Adjusting the tension of the bobbin thread 12 TROUBLESHOOTING 13 ■ The thread was accidentally cut automatically and the bobbin thread is not applied to Create Bobbin Work Included accessories vary depending on the tension spring of the bobbin case 13 ABOUT BOBBIN WORK 3 PREPARING FOR BOBBIN WORK 3 Required Materials 3 ■ Bobbin case and bobbin cover (option 3 ■ Lower thread 3 ■ Upper thread 4 ■ Needle 4 ■ Embroidery foot...
... the Pattern 8 Start Embroidering 10 ADJUSTING THE THREAD TENSION 12 ■ Adjusting the upper thread tension 12 ■ Adjusting the tension of the bobbin thread 12 TROUBLESHOOTING 13 ■ The thread was accidentally cut automatically and the bobbin thread is not applied to Create Bobbin Work Included accessories vary depending on the tension spring of the bobbin case 13 ABOUT BOBBIN WORK 3 PREPARING FOR BOBBIN WORK 3 Required Materials 3 ■ Bobbin case and bobbin cover (option 3 ■ Lower thread 3 ■ Upper thread 4 ■ Needle 4 ■ Embroidery foot...
Operation Manual
Page 158
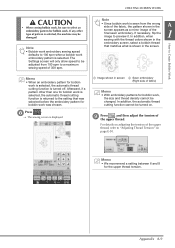
... possible to the "Quick Reference Guide" included with the machine. e Press . The carriage will move to a maximum of 350 spm. a "B" mark Regardless of the setting that had been selected, the automatic thread cutting function is turned off. When a bobbin work embroidery is selected the embroidery sewing speed can only be used for normal embroidering. • Recommended default setting for pattern. Note • The...
... possible to the "Quick Reference Guide" included with the machine. e Press . The carriage will move to a maximum of 350 spm. a "B" mark Regardless of the setting that had been selected, the automatic thread cutting function is turned off. When a bobbin work embroidery is selected the embroidery sewing speed can only be used for normal embroidering. • Recommended default setting for pattern. Note • The...
Operation Manual
Page 159
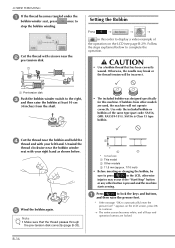
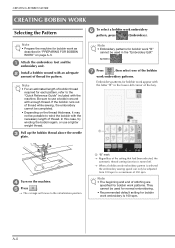
... then the upper thread. Memo • We recommend a setting between 6 and 8 for the upper thread tension. CREATING BOBBIN WORK How to Create Bobbin Work CAUTION • When sewing bobbin work, be sure to select an embroidery pattern for bobbin work , the size and thread density cannot be changed. Note • Since bobbin work was selected before the embroidery pattern for bobbin work is displayed. If necessary, flip the image to a maximum sewing speed of fabric) Memo • With embroidery patterns for bobbin work .
... then the upper thread. Memo • We recommend a setting between 6 and 8 for the upper thread tension. CREATING BOBBIN WORK How to Create Bobbin Work CAUTION • When sewing bobbin work, be sure to select an embroidery pattern for bobbin work , the size and thread density cannot be changed. Note • Since bobbin work was selected before the embroidery pattern for bobbin work is displayed. If necessary, flip the image to a maximum sewing speed of fabric) Memo • With embroidery patterns for bobbin work .
Operation Manual
Page 161
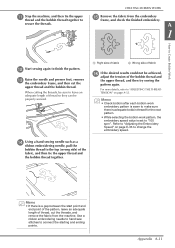
... presser foot, remove the embroidery frame, and then cut the threads, and remove the fabric from the embroidery frame, and check the finished embroidery. Memo • If there is set to "100 spm". A 1 How to Create Bobbin Work l Start sewing again to connect the starting and ending points. Use a ribbon embroidering needle to hand sew stitches to finish the pattern. Refer to change the embroidery speed. Appendix A-11 For more details, refer to "ADJUSTING THE THREAD TENSION...
... presser foot, remove the embroidery frame, and then cut the threads, and remove the fabric from the embroidery frame, and check the finished embroidery. Memo • If there is set to "100 spm". A 1 How to Create Bobbin Work l Start sewing again to connect the starting and ending points. Use a ribbon embroidering needle to hand sew stitches to finish the pattern. Refer to change the embroidery speed. Appendix A-11 For more details, refer to "ADJUSTING THE THREAD TENSION...
Operation Manual
Page 169
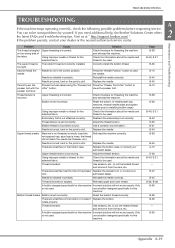
...is installed incorrectly. use a bobbin designed specifically for this machine Incorrect bobbins will not work properly. A bobbin designed specifically for this machine. B-42 B-45 B-36, B-38 B-36 B-36 B-36 - If you need additional help, the Brother Solutions Center offers the latest FAQs and troubleshooting tips. Problem Cause Solution The thread is not in the presser Replace the presser foot, or consult your foot. Replace the needle. Cannot lower the presser foot with the presser foot lever Presser foot was removed, reinstall needle plate and tighten screws...
...is installed incorrectly. use a bobbin designed specifically for this machine Incorrect bobbins will not work properly. A bobbin designed specifically for this machine. B-42 B-45 B-36, B-38 B-36 B-36 B-36 - If you need additional help, the Brother Solutions Center offers the latest FAQs and troubleshooting tips. Problem Cause Solution The thread is not in the presser Replace the presser foot, or consult your foot. Replace the needle. Cannot lower the presser foot with the presser foot lever Presser foot was removed, reinstall needle plate and tighten screws...
Operation Manual
Page 170
... the thread through the bobbin winding thread guide. Tighten the needle clamp screw. Bobbin spins slowly. Dust or lint has collected under the needle plate. Reinstall the needle correctly. Fabric is pulled during sewing. Replace the needle. Stabilizer is not attached to be used . Replace the needle. TROUBLESHOOTING Problem Cause Solution Bobbin thread does The thread is not passed through the bobbin not wind neatly on the bobbin case. the bobbin 5 or 6 times clockwise. Needle is dull. Securely tighten the screw of the embroidery foot...
... the thread through the bobbin winding thread guide. Tighten the needle clamp screw. Bobbin spins slowly. Dust or lint has collected under the needle plate. Reinstall the needle correctly. Fabric is pulled during sewing. Replace the needle. Stabilizer is not attached to be used . Replace the needle. TROUBLESHOOTING Problem Cause Solution Bobbin thread does The thread is not passed through the bobbin not wind neatly on the bobbin case. the bobbin 5 or 6 times clockwise. Needle is dull. Securely tighten the screw of the embroidery foot...
Operation Manual
Page 171
... book or similar object under the arm head to lightly lift the heavy side and keep it Attach the stabilizer correctly. is fogged up. The tension of the fabric, thread and pattern being used. set . Embroidery unit is incorrectly Use the embroidery needle plate cover. Manually adjust the position according to the thickness of the following keys to keep it during sewing, the pattern will not move freely. Press the "Start/Stop" button...
... book or similar object under the arm head to lightly lift the heavy side and keep it Attach the stabilizer correctly. is fogged up. The tension of the fabric, thread and pattern being used. set . Embroidery unit is incorrectly Use the embroidery needle plate cover. Manually adjust the position according to the thickness of the following keys to keep it during sewing, the pattern will not move freely. Press the "Start/Stop" button...
Operation Manual
Page 172
... embroidery frame is not attached when you press in the embroidery screen. (see page B-28) Lower the presser foot lever. Failed to rethread the machine. In this case, delete a file from what is done, the machine will make fine adjustments after making the selection. Also, depending on the LCD. ERROR MESSAGES If the machine is not properly set and the "Start/Stop" button is pressed, or if the operation...
... embroidery frame is not attached when you press in the embroidery screen. (see page B-28) Lower the presser foot lever. Failed to rethread the machine. In this case, delete a file from what is done, the machine will make fine adjustments after making the selection. Also, depending on the LCD. ERROR MESSAGES If the machine is not properly set and the "Start/Stop" button is pressed, or if the operation...
Operation Manual
Page 178
... E-3 E-58 , sewing E-21 using an embroidery frame pattern E-51 , Array key E-60 E-64 , Arrow keys E-36 E-81 , Automatic Threading button B-10 B-38 B Ball point needle 75/11 E-33 Bobbin runs out of thread E-26 setting B-36 winding B-31 Bobbin case bobbin case E-21 cleaning A-15 , Bobbin clip B-12 Bobbin cover B-9 B-37 Bobbin holder (switch B-33 Bobbin winder B-8 , Bobbin work A-2 Border key E-72 E-76 C Calibrating the sensor pen B-56 Character spacing key E-64 Cleaning LCD screen A-15 machine casing A-15...
... E-3 E-58 , sewing E-21 using an embroidery frame pattern E-51 , Array key E-60 E-64 , Arrow keys E-36 E-81 , Automatic Threading button B-10 B-38 B Ball point needle 75/11 E-33 Bobbin runs out of thread E-26 setting B-36 winding B-31 Bobbin case bobbin case E-21 cleaning A-15 , Bobbin clip B-12 Bobbin cover B-9 B-37 Bobbin holder (switch B-33 Bobbin winder B-8 , Bobbin work A-2 Border key E-72 E-76 C Calibrating the sensor pen B-56 Character spacing key E-64 Cleaning LCD screen A-15 machine casing A-15...
Operation Manual
Page 179
... color key E-40 E-66 N Needle changing the needle B-45 mode B-20 Needle bar thread guides B-9 Needle clamp screw B-9 Needle plate B-9 Needle Position button B-10 O , Operation buttons B-8 B-10 P Power cord B-18 Power cord receptacle B-8 Presser foot attaching B-42 removing B-42 Presser foot code E-9 Presser foot lever B-8 Presser Foot Lifter button B-10 , Presser foot/Needle exchange key B-42 B-45 , , Pre-tension disk B-8 B-33 B-35 R Race A-15 Repeated patterns E-72 Retrieving computer E-50 embroidery patterns E-48 machine's memory E-48 , USB media E-49 Rotate key E-38...
... color key E-40 E-66 N Needle changing the needle B-45 mode B-20 Needle bar thread guides B-9 Needle clamp screw B-9 Needle plate B-9 Needle Position button B-10 O , Operation buttons B-8 B-10 P Power cord B-18 Power cord receptacle B-8 Presser foot attaching B-42 removing B-42 Presser foot code E-9 Presser foot lever B-8 Presser Foot Lifter button B-10 , Presser foot/Needle exchange key B-42 B-45 , , Pre-tension disk B-8 B-33 B-35 R Race A-15 Repeated patterns E-72 Retrieving computer E-50 embroidery patterns E-48 machine's memory E-48 , USB media E-49 Rotate key E-38...


