Users Manual - English
Page 2
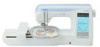
This manual describes the procedures for Free-Motion Sewing ...12 ADJUSTING THE THREAD TENSION...13 Adjusting the Upper Thread Tension ...13 Adjusting the Tension of the Bobbin ... sewing bobbin work. BEFORE YOU START Thank you for sewing (utility stitches, decorative stitches or free-motion sewing). The images and patterns used in this manual are for illustration purposes and may differ from the actual items. This is a kit used for machine embroidering. This kit cannot be used for choosing...
This manual describes the procedures for Free-Motion Sewing ...12 ADJUSTING THE THREAD TENSION...13 Adjusting the Upper Thread Tension ...13 Adjusting the Tension of the Bobbin ... sewing bobbin work. BEFORE YOU START Thank you for sewing (utility stitches, decorative stitches or free-motion sewing). The images and patterns used in this manual are for illustration purposes and may differ from the actual items. This is a kit used for machine embroidering. This kit cannot be used for choosing...

Users Manual - English
Page 3
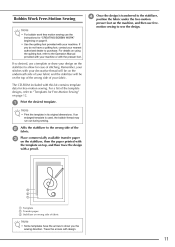
... sewing INCLUDED ACCESSORIES 1. 2. 3. 4. The bobbin cover with a shape different than that included with tabs (*See Note.) Screwdriver (small) (X55468-051) CD-ROM (Contains the Operation Manual and the Templates for freemotion sewing.) (USA/CANADA: XE9382-001, Other areas: XE9501-001) Note • Two bobbin covers may be fed through the sewing...
... sewing INCLUDED ACCESSORIES 1. 2. 3. 4. The bobbin cover with a shape different than that included with tabs (*See Note.) Screwdriver (small) (X55468-051) CD-ROM (Contains the Operation Manual and the Templates for freemotion sewing.) (USA/CANADA: XE9382-001, Other areas: XE9501-001) Note • Two bobbin covers may be fed through the sewing...
Users Manual - English
Page 8
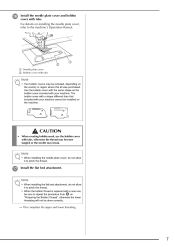
... correctly. → This completes the upper and lower threading. 7 Note • When installing the flat bed attachment, do not allow it to the machine's Operation Manual. p Install the needle plate cover and bobbin cover with tabs Note • Two bobbin covers may break. a Needle plate cover b Bobbin cover with tabs. Note...
... correctly. → This completes the upper and lower threading. 7 Note • When installing the flat bed attachment, do not allow it to the machine's Operation Manual. p Install the needle plate cover and bobbin cover with tabs Note • Two bobbin covers may break. a Needle plate cover b Bobbin cover with tabs. Note...

Users Manual - English
Page 10
... of the stitching area, stop the machine. i j Turn on , the thread may become tangled or the needle may not be possible to the machine's Operation Manual. • Depending on the fabric, bunched stitches may be difficult to pull the bobbin thread up to the machine's Operation... Manual. Memo • For best results, select a longer stitch length and a wider stitch width. For details on adjusting the stitch length and stitch width, refer to ...
... of the stitching area, stop the machine. i j Turn on , the thread may become tangled or the needle may not be possible to the machine's Operation Manual. • Depending on the fabric, bunched stitches may be difficult to pull the bobbin thread up to the machine's Operation... Manual. Memo • For best results, select a longer stitch length and a wider stitch width. For details on adjusting the stitch length and stitch width, refer to ...
Users Manual - English
Page 12
... 12. For details on the top of the wrong side of stitching. Remember, your fabric. For a list of the template designs, refer to the Operation Manual provided with your machine or with your decorative thread will be on the underneath side of your fabric and the stabilizer will be on using...
... 12. For details on the top of the wrong side of stitching. Remember, your fabric. For a list of the template designs, refer to the Operation Manual provided with your machine or with your decorative thread will be on the underneath side of your fabric and the stabilizer will be on using...
Users Manual - English
Page 14
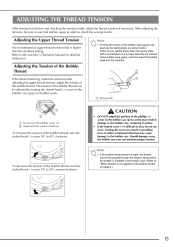
... thread tension is tight, the thread cannot be sure to sew trial stitches again in either (rotational) direction may cause damage to the machine's Operation Manual for bobbin work. Refer to the bobbin case. The tension of the bobbin thread can be achieved after adjusting the upper thread tension, adjust the...
... thread tension is tight, the thread cannot be sure to sew trial stitches again in either (rotational) direction may cause damage to the machine's Operation Manual for bobbin work. Refer to the bobbin case. The tension of the bobbin thread can be achieved after adjusting the upper thread tension, adjust the...

Users Manual - English
Page 2
... symbol " " position which represents off, then remove plug from outlet. 9. Young children should never be left unattended while plugged in the instruction manual. 16. Never operate this machine. 18. Never operate the machine with this machine if it has a damaged cord or plug, if it has...foot, and the like. 15. Do not use the proper needle plate. To unplug, grasp the plug, not the cord. 10. Use this manual. 3. Always unplug the machine from the electrical outlet immediately after using . Close attention is necessary when the machine is damaged, it to persons: 1....
... symbol " " position which represents off, then remove plug from outlet. 9. Young children should never be left unattended while plugged in the instruction manual. 16. Never operate this machine. 18. Never operate the machine with this machine if it has a damaged cord or plug, if it has...foot, and the like. 15. Do not use the proper needle plate. To unplug, grasp the plug, not the cord. 10. Use this manual. 3. Always unplug the machine from the electrical outlet immediately after using . Close attention is necessary when the machine is damaged, it to persons: 1....

Users Manual - English
Page 5
For a longer service life 1. For additional product information and updates, visit our web site at www.brother.com The contents of this manual and specifications of the operation manual to clean the case. Remember to change without notice. 4 When storing this product are subject to turn...use or store the machine near a space heater, iron, halogen lamp, or other parts to keep your local authorized Brother dealer. Always consult the operation manual when replacing or installing any other moving parts. 2. To fully enjoy all the features incorporated, we suggest that you study...
For a longer service life 1. For additional product information and updates, visit our web site at www.brother.com The contents of this manual and specifications of the operation manual to clean the case. Remember to change without notice. 4 When storing this product are subject to turn...use or store the machine near a space heater, iron, halogen lamp, or other parts to keep your local authorized Brother dealer. Always consult the operation manual when replacing or installing any other moving parts. 2. To fully enjoy all the features incorporated, we suggest that you study...

Users Manual - English
Page 6
... function, refer to the index (P.197) and the table of contents to find the section of the manual to refer to. 5 Perform the operations while comparing the screens in blue. HOW TO USE THIS MANUAL Chapters 1 and 2 describe to the first-time user the initial operations for using the various stitches. Chapter...
... function, refer to the index (P.197) and the table of contents to find the section of the manual to refer to. 5 Perform the operations while comparing the screens in blue. HOW TO USE THIS MANUAL Chapters 1 and 2 describe to the first-time user the initial operations for using the various stitches. Chapter...

Users Manual - English
Page 14
... recommended for this machine. • The screw for the presser foot holder is available through your authorized dealer (part code: XA4813-051). • This operation manual and the foot controller can be stored in the machine's hard case. 13 NAMES OF MACHINE PARTS AND THEIR FUNCTIONS Part Code No. Part Name... page 131) 38 Embroidery bobbin thread 39 Stabilizer material XD0745-051 XC8167-151 SA-EBT SA519 EBT-CEN: X81164-001 BM3:X81175-101 40 Operation Manual XD0550-051 41 Quick Reference Guide XD0556-051 42 Hard case XC9640-051 Memo (For U.S.A.
... recommended for this machine. • The screw for the presser foot holder is available through your authorized dealer (part code: XA4813-051). • This operation manual and the foot controller can be stored in the machine's hard case. 13 NAMES OF MACHINE PARTS AND THEIR FUNCTIONS Part Code No. Part Name... page 131) 38 Embroidery bobbin thread 39 Stabilizer material XD0745-051 XC8167-151 SA-EBT SA519 EBT-CEN: X81164-001 BM3:X81175-101 40 Operation Manual XD0550-051 41 Quick Reference Guide XD0556-051 42 Hard case XC9640-051 Memo (For U.S.A.
Users Manual - English
Page 20
... the selected 1 stitch pattern. Each time this key is pressed, the setting switches between that you select this key to change the pattern selection screen. q Manual memory key Change the stitch pattern settings (zigzag width and stitch length, thread tension, 49 automatic thread cutting or automatic reinforcement stitching, etc.), then save...
... the selected 1 stitch pattern. Each time this key is pressed, the setting switches between that you select this key to change the pattern selection screen. q Manual memory key Change the stitch pattern settings (zigzag width and stitch length, thread tension, 49 automatic thread cutting or automatic reinforcement stitching, etc.), then save...
Users Manual - English
Page 23
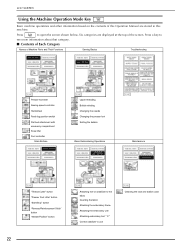
.... Press a key to see more information about that category. ■ Contents of Each Category Names of the screen. Six categories are stored in this Operation Manual are displayed at the top of Machine Parts and Their Functions Sewing Basics Troubleshooting Presser foot lever Sewing speed controller Handwheel Feed dog position switch...
.... Press a key to see more information about that category. ■ Contents of Each Category Names of the screen. Six categories are stored in this Operation Manual are displayed at the top of Machine Parts and Their Functions Sewing Basics Troubleshooting Presser foot lever Sewing speed controller Handwheel Feed dog position switch...

Users Manual - English
Page 31
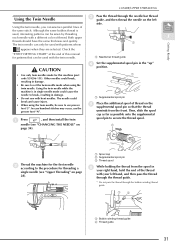
... thread, and then pass it under the presser foot toward the rear of thread after passing the thread through the needle bar thread guide (marked "6"), manually pass the thread through the eye of the needle. Note • If the needle threader lever is lowered quickly, the needle may be threaded. b o Pull...
... thread, and then pass it under the presser foot toward the rear of thread after passing the thread through the needle bar thread guide (marked "6"), manually pass the thread through the eye of the needle. Note • If the needle threader lever is lowered quickly, the needle may be threaded. b o Pull...
Users Manual - English
Page 32
... the end of the same stitch. Then, slide the spool cap as far as possible onto the supplemental spool pin to the procedure for this manual for patterns that the thread unwinds from the spool in the "up" position. a Press , and then install the twin needle (see "Upper Threading" on page...
... the end of the same stitch. Then, slide the spool cap as far as possible onto the supplemental spool pin to the procedure for this manual for patterns that the thread unwinds from the spool in the "up" position. a Press , and then install the twin needle (see "Upper Threading" on page...

Users Manual - English
Page 33
Manually pass the thread through the eye of the thread with the twin needle, raise the needle from the fabric, raise the presser foot lever, and ...
Manually pass the thread through the eye of the thread with the twin needle, raise the needle from the fabric, raise the presser foot lever, and ...

Users Manual - English
Page 43
... upper thread tension are automatically set. Adjusting the Stitch Width The stitch width (zigzag width) can change any of the settings as described in this manual). • If a stitch setting is changed (See the "STITCH SETTING CHART" at the end of this section. Memo If the foot controller is connected, the...
... upper thread tension are automatically set. Adjusting the Stitch Width The stitch width (zigzag width) can change any of the settings as described in this manual). • If a stitch setting is changed (See the "STITCH SETTING CHART" at the end of this section. Memo If the foot controller is connected, the...

Users Manual - English
Page 50
... be used later, press after a stitch (buttonholes, multi-directional sewing patterns, etc.) is selected, a mirror image of the appropriate presser foot. A mirror image of this manual. ■ Using the Mirror Image Key Press so that they can be created. Memo The default stitch length is 2.5 mm. 3 b Set the stitch length to...
... be used later, press after a stitch (buttonholes, multi-directional sewing patterns, etc.) is selected, a mirror image of the appropriate presser foot. A mirror image of this manual. ■ Using the Mirror Image Key Press so that they can be created. Memo The default stitch length is 2.5 mm. 3 b Set the stitch length to...

Users Manual - English
Page 52
... on the key indicates that reinforcement stitches are sewn when the "Reverse/ Reinforcement Stitch" button is pressed. 51 Manual Stitch length [mm (inch.)] Auto. Reinforcement stitch is sewn while 3.5 0.0 - 7.0 2.5 0.2 - 5.0 ...0.0 (0) 0.0 - 7.0 (0 - 1/4) 20.0 5.0 - 30.0 (3/4) (3/16 - 1-3/16) NO . Stitch Key Stitch Name Presser Foot Applications Stitch width [mm (inch.)] Auto. Manual Twin needle Straight stitch (Left) General sewing, gather, pintuck, etc. Reverse stitch is sewn 0.0 0.0 - 7.0 2.5 0.2 - 5.0 OK while pressing "Reverse/ (0) (0 - 1/4) (3/32) ...
... on the key indicates that reinforcement stitches are sewn when the "Reverse/ Reinforcement Stitch" button is pressed. 51 Manual Stitch length [mm (inch.)] Auto. Reinforcement stitch is sewn while 3.5 0.0 - 7.0 2.5 0.2 - 5.0 ...0.0 (0) 0.0 - 7.0 (0 - 1/4) 20.0 5.0 - 30.0 (3/4) (3/16 - 1-3/16) NO . Stitch Key Stitch Name Presser Foot Applications Stitch width [mm (inch.)] Auto. Manual Twin needle Straight stitch (Left) General sewing, gather, pintuck, etc. Reverse stitch is sewn 0.0 0.0 - 7.0 2.5 0.2 - 5.0 OK while pressing "Reverse/ (0) (0 - 1/4) (3/32) ...

Users Manual - English
Page 57
... stitch (Middle) Zigzag stitch (Middle) Zigzag stitch (Right) Presser Foot Applications For overcasting, mending. Start from left . Stitch Width [mm (inch)] Auto Manual 3.5 (1/8) 0.0 - 7.0 (0 - 1/4) 3.5 (1/8) 0.0 - 7.0 (0 - 1/4) 3.5 2.5 - 5.0 (1/8) (3/32 - 3/16) Stitch Length [mm (inch)] Auto Manual 1.4 0.0 - 4.0 (1/16) (0 - 3/16) 1.4 0.0 - 4.0 (1/16) (0 - 3/16) 1.4 0.3 - 4.0 (1/16) (1/64 - 3/16) Zigzag stitch (Left) Start from right needle position, zigzag sew at left needle position...
... stitch (Middle) Zigzag stitch (Middle) Zigzag stitch (Right) Presser Foot Applications For overcasting, mending. Start from left . Stitch Width [mm (inch)] Auto Manual 3.5 (1/8) 0.0 - 7.0 (0 - 1/4) 3.5 (1/8) 0.0 - 7.0 (0 - 1/4) 3.5 2.5 - 5.0 (1/8) (3/32 - 3/16) Stitch Length [mm (inch)] Auto Manual 1.4 0.0 - 4.0 (1/16) (0 - 3/16) 1.4 0.0 - 4.0 (1/16) (0 - 3/16) 1.4 0.3 - 4.0 (1/16) (1/64 - 3/16) Zigzag stitch (Left) Start from right needle position, zigzag sew at left needle position...

Users Manual - English
Page 58
... Utility Stitches Stitch Key Stitch Name 2 step elastic zigzag 3 step elastic zigzag Presser Foot Applications Stitch Width [mm (inch)] Auto Manual Overcasting (medium weight and stretch fabrics), tape and elastic 5.0 1.5 - 7.0 (3/16) (1/16 - 1/4) Overcasting (medium, heavyweight ...and stretch fabrics), 5.0 tape and elastic (3/16) 1.5 - 7.0 (1/16 - 1/4) Stitch Length [mm (inch)] Auto Manual 1.0 0.2 - 4.0 (1/16) (1/64 - 1/16) 1.0 0.2 - 4.0 (1/16) (1/64 - 1/16) Twin Needle OK ( J ) OK ( J ) a Select a stitch,...
... Utility Stitches Stitch Key Stitch Name 2 step elastic zigzag 3 step elastic zigzag Presser Foot Applications Stitch Width [mm (inch)] Auto Manual Overcasting (medium weight and stretch fabrics), tape and elastic 5.0 1.5 - 7.0 (3/16) (1/16 - 1/4) Overcasting (medium, heavyweight ...and stretch fabrics), 5.0 tape and elastic (3/16) 1.5 - 7.0 (1/16 - 1/4) Stitch Length [mm (inch)] Auto Manual 1.0 0.2 - 4.0 (1/16) (1/64 - 1/16) 1.0 0.2 - 4.0 (1/16) (1/64 - 1/16) Twin Needle OK ( J ) OK ( J ) a Select a stitch,...


