

Accessory Catalog
Page 3
... SA accessory number. It gives you to use, unique cassette based threading system, these compact and mid-sized sewing machines. This machine is 80, 40 Sewing Machines Quality results are easily created from a variety of sewing and embroidery. D Innov-is not only incredibly sophisticated and innovative but powerful sewing and quilting machines. E CS6000i/T, HS2000, HS1000, BC1000, EX660, CS100T, ES2000, CE4000 Lightweight Sewing Machines Choose from these models allow creative expression. SA accessory number Models for...
... SA accessory number. It gives you to use, unique cassette based threading system, these compact and mid-sized sewing machines. This machine is 80, 40 Sewing Machines Quality results are easily created from a variety of sewing and embroidery. D Innov-is not only incredibly sophisticated and innovative but powerful sewing and quilting machines. E CS6000i/T, HS2000, HS1000, BC1000, EX660, CS100T, ES2000, CE4000 Lightweight Sewing Machines Choose from these models allow creative expression. SA accessory number Models for...

Accessory Catalog
Page 12
....) Brother Embellishment Feet Open Toe Foot 22 Pearls and Sequins Foot Metal type SA146 IP Open Toe Foot Provides better visibility in groove of appliqué, sewing curves, topstitching, etc. Works best on your fabric. 3. Place the fabric to be gathered into the slit in size. Place threaded beads in the needle area. Requires Low Shank Adapter for clothing as well as knits. 1. Adjust the upper thread tension. 2. Girl's Dress Innov-is Project Book...
....) Brother Embellishment Feet Open Toe Foot 22 Pearls and Sequins Foot Metal type SA146 IP Open Toe Foot Provides better visibility in groove of appliqué, sewing curves, topstitching, etc. Works best on your fabric. 3. Place the fabric to be gathered into the slit in size. Place threaded beads in the needle area. Requires Low Shank Adapter for clothing as well as knits. 1. Adjust the upper thread tension. 2. Girl's Dress Innov-is Project Book...

Accessory Catalog
Page 13
... the needle to slide the fabric from left into gathers or tucks. Sew slowly for details.) Brother Embellishment Feet Pin Tuck Foot 24 Ruffler Foot Pin Tuck Foot This presser foot has 7 grooves and produces perfect pin tucks and corded pin tucks using a twin needle on the lower portion of stitch length, tuck setting and depth setting. 2. www.brother.com Adjust the amount of tuck or gather by placing the completed row in the center position. 3. A specially designed bobbin cover is...
... the needle to slide the fabric from left into gathers or tucks. Sew slowly for details.) Brother Embellishment Feet Pin Tuck Foot 24 Ruffler Foot Pin Tuck Foot This presser foot has 7 grooves and produces perfect pin tucks and corded pin tucks using a twin needle on the lower portion of stitch length, tuck setting and depth setting. 2. www.brother.com Adjust the amount of tuck or gather by placing the completed row in the center position. 3. A specially designed bobbin cover is...

Accessory Catalog
Page 15
... Shank Adapter for straight stitch. 3. When quilting is needed. 1. Set the machine to guide the fabric. 4. Walking Foot SA140 ABCDEFJKMN SA166 L SA107 GHO SA169 I Open Toe Walking Foot SA188 ABCDEFJKMN www.brother.com While starting to sew, press the needle position button twice to pull the bobbin thread to sew uniform stitches roughly 1/16" - 3/32" (2.0 - 2.5 mm) in place while stitches are free to straight stitch. 3. Begin to sew moving the fabric at the same pace as the machine's lower feed dogs to sew such as zigzag stitch. 5. Use...
... Shank Adapter for straight stitch. 3. When quilting is needed. 1. Set the machine to guide the fabric. 4. Walking Foot SA140 ABCDEFJKMN SA166 L SA107 GHO SA169 I Open Toe Walking Foot SA188 ABCDEFJKMN www.brother.com While starting to sew, press the needle position button twice to pull the bobbin thread to sew uniform stitches roughly 1/16" - 3/32" (2.0 - 2.5 mm) in place while stitches are free to straight stitch. 3. Begin to sew moving the fabric at the same pace as the machine's lower feed dogs to sew such as zigzag stitch. 5. Use...

Accessory Catalog
Page 17
... designs vertically or horizontally. Used in conjunction with the built-in software in our new QuattroTM 6000D. The border frame lifts open to allow you to easily slide your new machine you superior stitch quality when stitching over differing fabric thicknesses. - Automatic Height Adjuster™ (AHA) feature adjusts the presser foot pressure automatically and continuously to your top of items. - Drag and drop embroidery pattern positioning. - Includes three new free-motion presser feet: Free-motion quilting foot "C" for details.) www.brother...
... designs vertically or horizontally. Used in conjunction with the built-in software in our new QuattroTM 6000D. The border frame lifts open to allow you to easily slide your new machine you superior stitch quality when stitching over differing fabric thicknesses. - Automatic Height Adjuster™ (AHA) feature adjusts the presser foot pressure automatically and continuously to your top of items. - Drag and drop embroidery pattern positioning. - Includes three new free-motion presser feet: Free-motion quilting foot "C" for details.) www.brother...

Accessory Catalog
Page 33
...; Regular: 100 x 100 mm (approx. 4 x 4 inches) SA412 • Small: 60 x 60 mm (approx. 2-1/2 x 2-1/2 inches) SA411 www.brother.com Some hoops can be removed to accommodate a variety of spool sizes. Brother Embroidery Accessories 63 Free-Standing Ten Spool Thread Stand Ten Spool Thread Stand Embroidery Machine Hoops Brother Embroidery Accessories 64 For all embroidery and sewing/embroidery machines. For Quattro™ 6000D: • Extra-large: 300 x 200 mm (approx. 12 x 8 inches) SA447 • Extra...
...; Regular: 100 x 100 mm (approx. 4 x 4 inches) SA412 • Small: 60 x 60 mm (approx. 2-1/2 x 2-1/2 inches) SA411 www.brother.com Some hoops can be removed to accommodate a variety of spool sizes. Brother Embroidery Accessories 63 Free-Standing Ten Spool Thread Stand Ten Spool Thread Stand Embroidery Machine Hoops Brother Embroidery Accessories 64 For all embroidery and sewing/embroidery machines. For Quattro™ 6000D: • Extra-large: 300 x 200 mm (approx. 12 x 8 inches) SA447 • Extra...

Accessory Catalog
Page 34
....brother.com Consult your instruction manual for advice on a wide range of the proper stabilizer helps to provide a good foundation as well as a useful and decorative wooden thread rack that no stabilizer remains after the embroidery is completed. Dependable thread delivery through machine tensions. Brother Embroidery Accessories PacesetterTM Polyester Threads 65 Brother Country Yarn Embroidery Threads Metallic Threads For the best embroidery results, use these embroidery threads especially designed for Brother sewing and embroidering machines. 61 Color Thread Set...
....brother.com Consult your instruction manual for advice on a wide range of the proper stabilizer helps to provide a good foundation as well as a useful and decorative wooden thread rack that no stabilizer remains after the embroidery is completed. Dependable thread delivery through machine tensions. Brother Embroidery Accessories PacesetterTM Polyester Threads 65 Brother Country Yarn Embroidery Threads Metallic Threads For the best embroidery results, use these embroidery threads especially designed for Brother sewing and embroidering machines. 61 Color Thread Set...

Accessory Catalog
Page 40
... machine. 2. Sew. Insert the tab on the bias tape attachment into the guide. 4. Open the seams. 4. Attaching 12 mm (approx. 1/2") bias tape: Use the large bias tape sliding plate with the LC1 presser foot (included with a tweezers. Fold fabric and set it is easily set through the holder). 4. Align the fabric joint and the groove of fabric pointed so that it into the front cover slot. 3. SA224CV SA221CV Hemming Set Finishes hems...
... machine. 2. Sew. Insert the tab on the bias tape attachment into the guide. 4. Open the seams. 4. Attaching 12 mm (approx. 1/2") bias tape: Use the large bias tape sliding plate with the LC1 presser foot (included with a tweezers. Fold fabric and set it is easily set through the holder). 4. Align the fabric joint and the groove of fabric pointed so that it into the front cover slot. 3. SA224CV SA221CV Hemming Set Finishes hems...

Users Manual - English
Page 6
... threader 33 Using the twin needle ...33 Pulling up the bobbin thread...36 Replacing the Needle ...37 Needle precautions ...37 Needle types and their uses...38 Checking the needle ...39 Replacing the needle...39 Replacing the Presser Foot 41 Presser foot precautions ...41 Replacing the presser foot ...41 Removing the presser foot holder ...43 Using the optional walking foot ...44 Sewing Cylindrical or Large Pieces 46 Stitching cylindrical pieces...46 Sewing large pieces of fabric ...46 SEWING BASICS 49 Sewing ...50 General sewing procedure ...50 Positioning the fabric ...51 Starting...
... threader 33 Using the twin needle ...33 Pulling up the bobbin thread...36 Replacing the Needle ...37 Needle precautions ...37 Needle types and their uses...38 Checking the needle ...39 Replacing the needle...39 Replacing the Presser Foot 41 Presser foot precautions ...41 Replacing the presser foot ...41 Removing the presser foot holder ...43 Using the optional walking foot ...44 Sewing Cylindrical or Large Pieces 46 Stitching cylindrical pieces...46 Sewing large pieces of fabric ...46 SEWING BASICS 49 Sewing ...50 General sewing procedure ...50 Positioning the fabric ...51 Starting...
Users Manual - English
Page 7
... stitches using the optional side cutter 73 Basic Stitching ...75 Basic stitching ...75 Blind Hem Stitching ...77 Buttonhole Stitching/Button Sewing 79 Buttonhole sewing ...80 Button sewing ...84 Zipper Insertion...86 Inserting a centered zipper ...86 Inserting a side zipper ...88 Sewing Stretch Fabrics and Elastic Tape 91 Stretch stitching...91 Elastic attaching ...91 Appliqué, Patchwork and Quilt Stitching 93 Appliqué stitching ...94 Patchwork (crazy quilt) stitching ...95 Piecing ...95 Quilting ...96 Free-motion quilting...97 Satin stitching using the sewing speed controller...
... stitches using the optional side cutter 73 Basic Stitching ...75 Basic stitching ...75 Blind Hem Stitching ...77 Buttonhole Stitching/Button Sewing 79 Buttonhole sewing ...80 Button sewing ...84 Zipper Insertion...86 Inserting a centered zipper ...86 Inserting a side zipper ...88 Sewing Stretch Fabrics and Elastic Tape 91 Stretch stitching...91 Elastic attaching ...91 Appliqué, Patchwork and Quilt Stitching 93 Appliqué stitching ...94 Patchwork (crazy quilt) stitching ...95 Piecing ...95 Quilting ...96 Free-motion quilting...97 Satin stitching using the sewing speed controller...
Users Manual - English
Page 10
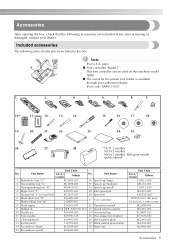
.... Accessories After opening the box, check that the following items should also be used on machine) XC3021-051 20 Spool net 6 Blind stitch foot "R" 7 Button fitting foot "M" X56409-051 130489-001 21 Foot controller 8 Seam ripper X54243-051 22 Operation manual 9 Bobbin (4) SA156 SFB (XA5539-151) 23 Quick reference guide 10 Needle set X58358-021 24 Accessory bag 11 Twin needle X59296-121 25 Disc-shaped screwdriver 12 Cleaning brush X59476-021 26 Stitch pattern plate 13...
.... Accessories After opening the box, check that the following items should also be used on machine) XC3021-051 20 Spool net 6 Blind stitch foot "R" 7 Button fitting foot "M" X56409-051 130489-001 21 Foot controller 8 Seam ripper X54243-051 22 Operation manual 9 Bobbin (4) SA156 SFB (XA5539-151) 23 Quick reference guide 10 Needle set X58358-021 24 Accessory bag 11 Twin needle X59296-121 25 Disc-shaped screwdriver 12 Cleaning brush X59476-021 26 Stitch pattern plate 13...
Users Manual - English
Page 12
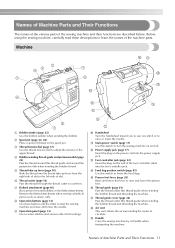
... thread on the power cord into the foot controller jack. m Foot controller jack (page 52) Insert the plug on and off. d Bobbin-winding thread guide and pretension disk (page 22) Pass the thread around this thread guide when winding the bobbin thread and threading the machine. Before using the sewing machine, carefully read these buttons and the slider to cut them. Machine a Bobbin winder (page 22) Use the bobbin winder when winding the bobbin. c Thread tension dial (page 57) Use the thread tension dial to raise and lower the presser foot. g Flatbed attachment...
... thread on the power cord into the foot controller jack. m Foot controller jack (page 52) Insert the plug on and off. d Bobbin-winding thread guide and pretension disk (page 22) Pass the thread around this thread guide when winding the bobbin thread and threading the machine. Before using the sewing machine, carefully read these buttons and the slider to cut them. Machine a Bobbin winder (page 22) Use the bobbin winder when winding the bobbin. c Thread tension dial (page 57) Use the thread tension dial to raise and lower the presser foot. g Flatbed attachment...
Users Manual - English
Page 13
... Use the needle clamp screw to clean the bobbin case and race. When sewing is stopped, the needle is marked with guides to thread the needle. b Reverse/reinforcement stitch button Press the reverse/reinforcement stitch button to insert the bobbin into the fabric. i Bobbin cover/race Remove the bobbin cover to sew reverse stitches or reinforcement stitches. For details, refer to "Starting to hold the needle in place. d Presser foot holder screw Use the presser foot holder screw to sew" (page 52). g Feed dogs The feed dogs feed the fabric. The machine sews at a low speed...
... Use the needle clamp screw to clean the bobbin case and race. When sewing is stopped, the needle is marked with guides to thread the needle. b Reverse/reinforcement stitch button Press the reverse/reinforcement stitch button to insert the bobbin into the fabric. i Bobbin cover/race Remove the bobbin cover to sew reverse stitches or reinforcement stitches. For details, refer to "Starting to hold the needle in place. d Presser foot holder screw Use the presser foot holder screw to sew" (page 52). g Feed dogs The feed dogs feed the fabric. The machine sews at a low speed...

Users Manual - English
Page 16
...22 Winding the bobbin 22 Installing the bobbin 26 Upper Threading ...28 Threading the upper thread 28 Threading the needle 31 Threading the needle manually (without using the needle threader 33 Using the twin needle 33 Pulling up the bobbin thread 36 Replacing the Needle 37 Needle precautions 37 Needle types and their uses 38 Checking the needle 39 Replacing the needle 39 Replacing the Presser Foot 41 Presser foot precautions 41 Replacing the presser foot 41 Removing the presser foot holder 43 Using the optional walking foot 44 Sewing Cylindrical or Large Pieces 46 Stitching...
...22 Winding the bobbin 22 Installing the bobbin 26 Upper Threading ...28 Threading the upper thread 28 Threading the needle 31 Threading the needle manually (without using the needle threader 33 Using the twin needle 33 Pulling up the bobbin thread 36 Replacing the Needle 37 Needle precautions 37 Needle types and their uses 38 Checking the needle 39 Replacing the needle 39 Replacing the Presser Foot 41 Presser foot precautions 41 Replacing the presser foot 41 Removing the presser foot holder 43 Using the optional walking foot 44 Sewing Cylindrical or Large Pieces 46 Stitching...
Users Manual - English
Page 27
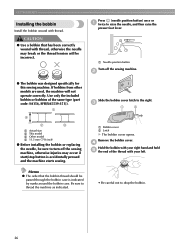
... the same type (part code: SA156, SFB(XA5539-151)). 1 4 2 3 a Actual size b This model c Other model d 11.5 mm (7/16 inch) ● Before installing the bobbin or replacing the needle, be passed through the bobbin case is accidentally pressed and the machine starts sewing. d Hold the bobbin with thread. Be sure to thread the machine as indicated. • Be careful not to raise the needle, and then raise the presser foot lever. Slide the bobbin cover latch...
... the same type (part code: SA156, SFB(XA5539-151)). 1 4 2 3 a Actual size b This model c Other model d 11.5 mm (7/16 inch) ● Before installing the bobbin or replacing the needle, be passed through the bobbin case is accidentally pressed and the machine starts sewing. d Hold the bobbin with thread. Be sure to thread the machine as indicated. • Be careful not to raise the needle, and then raise the presser foot lever. Slide the bobbin cover latch...
Users Manual - English
Page 59
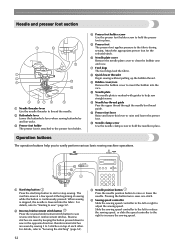
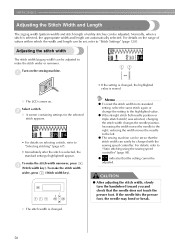
... same stitch again or change the setting to the left needle position or triple stretch stitch) was selected, changing the stitch width changes the needle position. a - + • If the setting is changed with the sewing speed controller. SEWING BASICS Adjusting the Stitch Width and Length The zigzag width (pattern width) and stitch length of values within which the width and length can be adjusted to make the stitch wider or narrower. If the needle hits the presser foot, the needle may bend or break...
... same stitch again or change the setting to the left needle position or triple stretch stitch) was selected, changing the stitch width changes the needle position. a - + • If the setting is changed with the sewing speed controller. SEWING BASICS Adjusting the Stitch Width and Length The zigzag width (pattern width) and stitch length of values within which the width and length can be adjusted to make the stitch wider or narrower. If the needle hits the presser foot, the needle may bend or break...

Users Manual - English
Page 85
... button. g Raise the presser foot lever, and then slide the b drop feed lever, located at the rear of the machine on the base, to (to the distance between the holes in the same way. d • For details, refer to "Replacing the presser foot" (page 41). c Select stitch 53 . Attach button fitting foot "M". a a a Button X The button is the same as seen from the rear of the machine) X The feed dogs are lowered. Adjust the stitch...
... button. g Raise the presser foot lever, and then slide the b drop feed lever, located at the rear of the machine on the base, to (to the distance between the holes in the same way. d • For details, refer to "Replacing the presser foot" (page 41). c Select stitch 53 . Attach button fitting foot "M". a a a Button X The button is the same as seen from the rear of the machine) X The feed dogs are lowered. Adjust the stitch...
Users Manual - English
Page 129
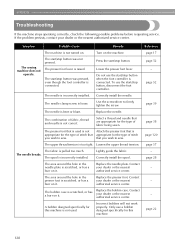
... authorized service center. A bobbin designed specifically for this machine. Only use a bobbin designed specifically for the type of fabric being sewn. Turn on . The start/stop button was not pressed. Select a thread and needle that you wish to sew. The upper thread tension is raised. Loosen the upper thread tension. Replace the needle plate. Reference page 17 page 52 - page 28 - - - Symptom Probable Cause Remedy The machine is connected. The presser foot lever is too tight. Lower the presser foot lever. Replace the bobbin case. page...
... authorized service center. A bobbin designed specifically for this machine. Only use a bobbin designed specifically for the type of fabric being sewn. Turn on . The start/stop button was not pressed. Select a thread and needle that you wish to sew. The upper thread tension is raised. Loosen the upper thread tension. Replace the needle plate. Reference page 17 page 52 - page 28 - - - Symptom Probable Cause Remedy The machine is connected. The presser foot lever is too tight. Lower the presser foot lever. Replace the bobbin case. page...
Users Manual - English
Page 132
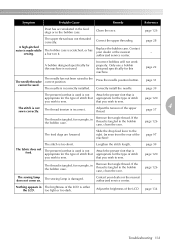
... Troubleshooting 131 Slide the drop feed lever to the correct position. too light or too dark. A bobbin designed specifically for the type of the machine) page 97 The fabric does not feed. Press the needle position button. that you wish to sew. Remove the tangle thread. If the thread is either the LCD. Nothing appears in The brightness of stitch that appropriate for this machine. The upper thread was not threaded correctly. Incorrect bobbins will not work...
... Troubleshooting 131 Slide the drop feed lever to the correct position. too light or too dark. A bobbin designed specifically for the type of the machine) page 97 The fabric does not feed. Press the needle position button. that you wish to sew. Remove the tangle thread. If the thread is either the LCD. Nothing appears in The brightness of stitch that appropriate for this machine. The upper thread was not threaded correctly. Incorrect bobbins will not work...
Users Manual - English
Page 138
... 23, 29 spool net 9 spool pin 11, 23, 29 , start/stop button 12 52 starting to sew 52 stitch guide foot 10 stitch length 59 stitch length keys 13 stitch mode 66 stitch pattern plate 9 stitch settings 120 stitch width 58 controlling 98 stitch width keys 13 straight stitch 120 , stretch fabrics 63 91 T thick fabrics 62 thin fabrics 63 thread cutter 11 thread guide 11 thread guide cover 11 thread take-up lever 11 thread tension 57 thread tension adjustment 57 , thread tension dial 11 57 trial sewing 62 triple stretch stitch 100 troubleshooting 128 twin needle 9, 33, 40...
... 23, 29 spool net 9 spool pin 11, 23, 29 , start/stop button 12 52 starting to sew 52 stitch guide foot 10 stitch length 59 stitch length keys 13 stitch mode 66 stitch pattern plate 9 stitch settings 120 stitch width 58 controlling 98 stitch width keys 13 straight stitch 120 , stretch fabrics 63 91 T thick fabrics 62 thin fabrics 63 thread cutter 11 thread guide 11 thread guide cover 11 thread take-up lever 11 thread tension 57 thread tension adjustment 57 , thread tension dial 11 57 trial sewing 62 triple stretch stitch 100 troubleshooting 128 twin needle 9, 33, 40...


