

Accessory Catalog
Page 11
... seams or pattern markings are desired. Slip a cord from satin or decorative stitches. 2. It can be used with brother sewing machines of the guide back and forth to 7 cords or decorative threads. Loosen the screw on the presser foot and insert a braid through the guide before attaching the presser foot on the presser foot. 2. Insert cords or threads into each guide (to 3/16 inch (5 mm) wide braids, ribbons, tapes, cords, etc. 1. Insert cords or threads into each hole on the presser foot. 2. Brother Embellishment Feet...
... seams or pattern markings are desired. Slip a cord from satin or decorative stitches. 2. It can be used with brother sewing machines of the guide back and forth to 7 cords or decorative threads. Loosen the screw on the presser foot and insert a braid through the guide before attaching the presser foot on the presser foot. 2. Insert cords or threads into each guide (to 3/16 inch (5 mm) wide braids, ribbons, tapes, cords, etc. 1. Insert cords or threads into each hole on the presser foot. 2. Brother Embellishment Feet...

Accessory Catalog
Page 13
... completed row in the center position. 3. Adjust the amount of stitch length, tuck setting and depth setting. 2. A specially designed bobbin cover is moved forward, its teeth catch a fabric and force it forward into the slot, and stitch slowly. 3. Sew slowly for details.) Brother Embellishment Feet Pin Tuck Foot 24 Ruffler Foot Pin Tuck Foot This presser foot has 7 grooves and produces perfect pin tucks and corded pin tucks using a twin needle on the lower portion of the grooves...
... completed row in the center position. 3. Adjust the amount of stitch length, tuck setting and depth setting. 2. A specially designed bobbin cover is moved forward, its teeth catch a fabric and force it forward into the slot, and stitch slowly. 3. Sew slowly for details.) Brother Embellishment Feet Pin Tuck Foot 24 Ruffler Foot Pin Tuck Foot This presser foot has 7 grooves and produces perfect pin tucks and corded pin tucks using a twin needle on the lower portion of the grooves...

Accessory Catalog
Page 15
... presser foot. 6. Gently holding the upper and bobbin threads sew about four locking stitches and finish the thread ends. When quilting is needed. 1. Attach the walking foot to guide the fabric. 4. Requires Low Shank Adapter for straight stitch. 3. Set the machine to sew uniform stitches roughly 1/16" - 3/32" (2.0 - 2.5 mm) in order to straight stitch. 3. Quilting Foot For darning, quilting, or free-motion. Begin to sew moving the fabric at the same pace as the machine's lower feed dogs to the quilt top. 7. Walking Foot SA140 ABCDEFJKMN SA166 L SA107 GHO SA169 I Open...
... presser foot. 6. Gently holding the upper and bobbin threads sew about four locking stitches and finish the thread ends. When quilting is needed. 1. Attach the walking foot to guide the fabric. 4. Requires Low Shank Adapter for straight stitch. 3. Set the machine to sew uniform stitches roughly 1/16" - 3/32" (2.0 - 2.5 mm) in order to straight stitch. 3. Quilting Foot For darning, quilting, or free-motion. Begin to sew moving the fabric at the same pace as the machine's lower feed dogs to the quilt top. 7. Walking Foot SA140 ABCDEFJKMN SA166 L SA107 GHO SA169 I Open...

Accessory Catalog
Page 17
... as embroidery. Sewing Decorative Stitches as border designs. Change your LCD screen background color for the Innov-is 4000D this upgrade adds outstanding quilting features, updated embroidery functionality and enhanced USB capability. Basting Function to allow you superior stitch quality when stitching over differing fabric thicknesses. - The border frame lifts open to prevent shrinkage and misalignment of the line machine. Includes three new free-motion presser feet: Free-motion quilting foot "C" for more features to your new machine...
... as embroidery. Sewing Decorative Stitches as border designs. Change your LCD screen background color for the Innov-is 4000D this upgrade adds outstanding quilting features, updated embroidery functionality and enhanced USB capability. Basting Function to allow you superior stitch quality when stitching over differing fabric thicknesses. - The border frame lifts open to prevent shrinkage and misalignment of the line machine. Includes three new free-motion presser feet: Free-motion quilting foot "C" for more features to your new machine...

Accessory Catalog
Page 33
... x 60 mm (approx. 2-1/2 x 2-1/2 inches) SA411 www.brother.com Each thread has it's own thread guide to deliver thread smoothly to your next embroidery, quilting or sewing project. Spend less time changing threads, and more on our website for details, www.brother.com. Ask your machine. For all models: SA503 Free-Standing Ten Spool Thread Stand You can be removed to 10 spools of spool sizes. For Quattro™ 6000D: • Extra...
... x 60 mm (approx. 2-1/2 x 2-1/2 inches) SA411 www.brother.com Each thread has it's own thread guide to deliver thread smoothly to your next embroidery, quilting or sewing project. Spend less time changing threads, and more on our website for details, www.brother.com. Ask your machine. For all models: SA503 Free-Standing Ten Spool Thread Stand You can be removed to 10 spools of spool sizes. For Quattro™ 6000D: • Extra...

Accessory Catalog
Page 34
... polyester embroidery thread spools 300 meters (328 yards). Make sure you just the right color for each design. This pack gives you just the right color for each design. Available in Japan for Brother® Embroidery Machines, but compatible with other sewing and embroidery machine brands. Brother Embroidery Accessories PacesetterTM Polyester Threads 65 Brother Country Yarn Embroidery Threads Metallic Threads For the best embroidery results, use these embroidery threads especially designed for Brother sewing and embroidering machines. 61 Color Thread Set...
... polyester embroidery thread spools 300 meters (328 yards). Make sure you just the right color for each design. This pack gives you just the right color for each design. Available in Japan for Brother® Embroidery Machines, but compatible with other sewing and embroidery machine brands. Brother Embroidery Accessories PacesetterTM Polyester Threads 65 Brother Country Yarn Embroidery Threads Metallic Threads For the best embroidery results, use these embroidery threads especially designed for Brother sewing and embroidering machines. 61 Color Thread Set...

Accessory Catalog
Page 40
... quickly. Fold fabric and set through the holder). 4. Brother Cover Stitch Feet 77 Bias Tape Binding Set Hemming Set Bias Tape Binding Set Attaches 6 or 12 mm (approx. 1/4 to 1/2 inch) bias tapes as holding the fabric lightly with the LC2 presser foot. Set up your machine. 3. Set T1/T2 presser foot. 2. Open the seams. 4. Set up your Cover Stitch). 1. Attach the hem positioning plate A/B to top stitch with 3 or 6 mm wide cover stitch. 3. Set the bias tape though the holder (cut the end of the presser foot, and sew...
... quickly. Fold fabric and set through the holder). 4. Brother Cover Stitch Feet 77 Bias Tape Binding Set Hemming Set Bias Tape Binding Set Attaches 6 or 12 mm (approx. 1/4 to 1/2 inch) bias tapes as holding the fabric lightly with the LC2 presser foot. Set up your machine. 3. Set T1/T2 presser foot. 2. Open the seams. 4. Set up your Cover Stitch). 1. Attach the hem positioning plate A/B to top stitch with 3 or 6 mm wide cover stitch. 3. Set the bias tape though the holder (cut the end of the presser foot, and sew...
Users Manual - English
Page 5
... any assemblies, the presser feet, needle, or other hot objects. 2. If the problem persists, please consult your eye on the foot controller. 4. PLEASE READ BEFORE USING THIS MACHINE For safe operation 1. Do not touch the handwheel, thread take-up lever, needle, or other parts • A power failure occurs during use • Maintaining the machine • Leaving the machine unattended. 3. Do not store anything on the needle while sewing. Do not use extension cords...
... any assemblies, the presser feet, needle, or other hot objects. 2. If the problem persists, please consult your eye on the foot controller. 4. PLEASE READ BEFORE USING THIS MACHINE For safe operation 1. Do not touch the handwheel, thread take-up lever, needle, or other parts • A power failure occurs during use • Maintaining the machine • Leaving the machine unattended. 3. Do not store anything on the needle while sewing. Do not use extension cords...

Users Manual - English
Page 7
... Button Sewing 86 Eyelets 87 Chapter 1 Getting Ready 15 TURNING THE MACHINE ON/OFF 16 LCD SCREEN 17 Multi-Directional Sewing (Straight Stitch and Zigzag Stitch 88 Zipper Insertion 89 Using the Machine Setting Mode Key 20 Chapter 4 Character/Decorative Stitches 93 Using the Machine Operation Mode Key 22 Using the Pattern Explanation Key 23 LOWER/UPPER THREADING 24 Winding the Bobbin 24 Setting the Bobbin 27 Pulling Up the Bobbin Thread 28 Upper Threading 29 Using the Twin Needle 32 CHANGING THE PRESSER FOOT 34 Removing the Presser Foot...
... Button Sewing 86 Eyelets 87 Chapter 1 Getting Ready 15 TURNING THE MACHINE ON/OFF 16 LCD SCREEN 17 Multi-Directional Sewing (Straight Stitch and Zigzag Stitch 88 Zipper Insertion 89 Using the Machine Setting Mode Key 20 Chapter 4 Character/Decorative Stitches 93 Using the Machine Operation Mode Key 22 Using the Pattern Explanation Key 23 LOWER/UPPER THREADING 24 Winding the Bobbin 24 Setting the Bobbin 27 Pulling Up the Bobbin Thread 28 Upper Threading 29 Using the Twin Needle 32 CHANGING THE PRESSER FOOT 34 Removing the Presser Foot...

Users Manual - English
Page 11
...e Feed dogs The feed dogs feed the fabric in place. NAMES OF MACHINE PARTS AND THEIR FUNCTIONS Needle and Presser Foot Section Embroidery Unit a Buttonhole lever Lower the buttonhole lever when sewing buttonholes and bar tacks. c Presser foot holder screw Use the presser foot holder screw to help sew straight seams. i Needle bar thread guide Pass the upper thread through the needle bar thread guide. d Presser foot The presser foot consistently applies pressure to the fabric as it is marked with guides to hold the needle in place. f Bobbin cover Open the bobbin cover to attach...
...e Feed dogs The feed dogs feed the fabric in place. NAMES OF MACHINE PARTS AND THEIR FUNCTIONS Needle and Presser Foot Section Embroidery Unit a Buttonhole lever Lower the buttonhole lever when sewing buttonholes and bar tacks. c Presser foot holder screw Use the presser foot holder screw to help sew straight seams. i Needle bar thread guide Pass the upper thread through the needle bar thread guide. d Presser foot The presser foot consistently applies pressure to the fabric as it is marked with guides to hold the needle in place. f Bobbin cover Open the bobbin cover to attach...

Users Manual - English
Page 12
a "Start/Stop" button When this button is pressed, the machine sews 3 to 5 stitches in small areas. The machine cannot sew. c "Needle Position" button Use this button to change the sewing direction or for detailed sewing in the same spot, then stops automatically. Slide the controller to the right to adjust the sewing speed. When this button after the threads have already been cut. Press this button to raise or lower the needle position. e "Presser Foot Lifter" button Press this button again to sew at...
a "Start/Stop" button When this button is pressed, the machine sews 3 to 5 stitches in small areas. The machine cannot sew. c "Needle Position" button Use this button to change the sewing direction or for detailed sewing in the same spot, then stops automatically. Slide the controller to the right to adjust the sewing speed. When this button after the threads have already been cut. Press this button to raise or lower the needle position. e "Presser Foot Lifter" button Press this button again to sew at...
Users Manual - English
Page 14
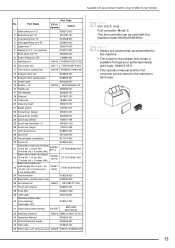
... FUNCTIONS Part Code No. Part Name U.S.A./ Canada Others 1 Embroidery foot "U" XD0313-051 2 Buttonhole foot "A" X57789-151 3 Overcasting foot "G" XC3098-051 4 Monogramming foot "N" X53840-351 5 Zipper foot "I" X59370-051 6 Zigzag foot "J" (on machine) XC3021-051 7 Blind stitch foot "R" X56409-051 8 Button fitting foot "M" 130489-001 9 Walking foot SA140 F033N:XC2214-102 10 Side cutter foot SA177 F054:XC3879-002 11 Free-motion quilting foot SA129 F005N:XC1948-002 12 Straight stitch foot XD0826-051 13 Straight stitch needle plate XC8362-051 14 Seam ripper 15 Bobbin...
... FUNCTIONS Part Code No. Part Name U.S.A./ Canada Others 1 Embroidery foot "U" XD0313-051 2 Buttonhole foot "A" X57789-151 3 Overcasting foot "G" XC3098-051 4 Monogramming foot "N" X53840-351 5 Zipper foot "I" X59370-051 6 Zigzag foot "J" (on machine) XC3021-051 7 Blind stitch foot "R" X56409-051 8 Button fitting foot "M" 130489-001 9 Walking foot SA140 F033N:XC2214-102 10 Side cutter foot SA177 F054:XC3879-002 11 Free-motion quilting foot SA129 F005N:XC1948-002 12 Straight stitch foot XD0826-051 13 Straight stitch needle plate XC8362-051 14 Seam ripper 15 Bobbin...

Users Manual - English
Page 19
... a straight stitch, zigzag stitch, buttonhole, blind hem stitch, or other machine settings. By editing embroidery patterns, 167 g you can safely be changed. Key a b c d e f r q t Name Machine setting mode key Function Press this key to change the needle stop position, turn the buzzer on/off, adjust the pattern or screen, and change the screen l m n o p s Operation panel No. Page 20 Machine operation Press this key to see descriptions for upper threading, winding the bobbin, 22 mode key changing the presser foot, and other operations for...
... a straight stitch, zigzag stitch, buttonhole, blind hem stitch, or other machine settings. By editing embroidery patterns, 167 g you can safely be changed. Key a b c d e f r q t Name Machine setting mode key Function Press this key to change the needle stop position, turn the buzzer on/off, adjust the pattern or screen, and change the screen l m n o p s Operation panel No. Page 20 Machine operation Press this key to see descriptions for upper threading, winding the bobbin, 22 mode key changing the presser foot, and other operations for...
Users Manual - English
Page 28
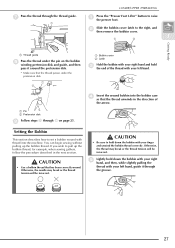
.... d Insert the wound bobbin into the machine. b Slide the bobbin cover latch to hold down the bobbin with thread into the bobbin case so that the thread unwinds in the next section. Otherwise, the needle may break or the thread tension will be incorrect. e Lightly hold down the bobbin with your right hand, and then, while slightly pulling the thread with your left hand. a LOWER/UPPER THREADING a Press the "Presser Foot Lifter" button...
.... d Insert the wound bobbin into the machine. b Slide the bobbin cover latch to hold down the bobbin with thread into the bobbin case so that the thread unwinds in the next section. Otherwise, the needle may break or the thread tension will be incorrect. e Lightly hold down the bobbin with your right hand, and then, while slightly pulling the thread with your left hand. a LOWER/UPPER THREADING a Press the "Presser Foot Lifter" button...
Users Manual - English
Page 42
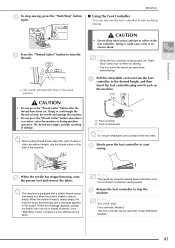
Doing so could tangle the thread or break the needle and damage the machine. • Do not press the "Thread Cutter" button when there is no fabric set using the sewing speed controller is being used, the "Start/ Stop" button has no effect on sewing. • The foot controller cannot be sewn. b a a Foot controller b Foot controller jack Note Do not pull retractable cord out beyond the red mark. c Release the foot controller to start sewing. Memo (For U.S.A. h To stop...
Doing so could tangle the thread or break the needle and damage the machine. • Do not press the "Thread Cutter" button when there is no fabric set using the sewing speed controller is being used, the "Start/ Stop" button has no effect on sewing. • The foot controller cannot be sewn. b a a Foot controller b Foot controller jack Note Do not pull retractable cord out beyond the red mark. c Release the foot controller to start sewing. Memo (For U.S.A. h To stop...

Users Manual - English
Page 199
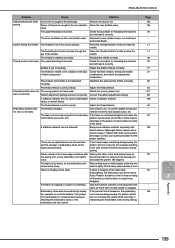
TROUBLESHOOTING TROUBLESHOOTING If you have a minor problem with your authorized dealer. is set incorrectly. Check the table of fabric being sewn. Adjust the thread tension. The thread is installed incorrectly. Replace the needle with a new one . Replace the needle plate, or consult your sewing machine, check the following solutions. Bobbin is installed incorrectly, the wrong spool cap was used. The thread or needle is set incorrectly. The needle is tangled. The needle is installed incorrectly. Replace the needle. The stitches are scratches on...
TROUBLESHOOTING TROUBLESHOOTING If you have a minor problem with your authorized dealer. is set incorrectly. Check the table of fabric being sewn. Adjust the thread tension. The thread is installed incorrectly. Replace the needle with a new one . Replace the needle plate, or consult your sewing machine, check the following solutions. Bobbin is installed incorrectly, the wrong spool cap was used. The thread or needle is set incorrectly. The needle is tangled. The needle is installed incorrectly. Replace the needle. The stitches are scratches on...
Users Manual - English
Page 200
... needle. Cannot thread the needle The needle is incorrect. Press the "Needle Position" button to reset the bobbin). Reset the bobbin thread correctly. 27 The thread or needle is not attached Reattach the presser foot holder correctly. 68 correctly. The presser foot holder is not suitable for the type Check the table of fabric, thread and needle 37 of fabric being sewn. Adjust the thread tension. 45 Embroidery pattern does The thread is hanging off the table. Hoop the fabric correctly in the feed dogs. in the correct position. Fabric...
... needle. Cannot thread the needle The needle is incorrect. Press the "Needle Position" button to reset the bobbin). Reset the bobbin thread correctly. 27 The thread or needle is not attached Reattach the presser foot holder correctly. 68 correctly. The presser foot holder is not suitable for the type Check the table of fabric, thread and needle 37 of fabric being sewn. Adjust the thread tension. 45 Embroidery pattern does The thread is hanging off the table. Hoop the fabric correctly in the feed dogs. in the correct position. Fabric...

Users Manual - English
Page 201
... is no pattern selected. not operate The main power switch is due to operate the machine. The embroidery unit is bent or blunt. Attach the correct presser foot. Remove the foot controller and use the foot controller to on . This is not turned on . The needle is not attached correctly. The "Start/Stop" button was used . The "Start/Stop" button was pressed to begin embroidering. Tighten the needle clamp screw. Replace the needle with a new one . Adjust the thread tension. Replace the needle plate, or...
... is no pattern selected. not operate The main power switch is due to operate the machine. The embroidery unit is bent or blunt. Attach the correct presser foot. Remove the foot controller and use the foot controller to on . This is not turned on . The needle is not attached correctly. The "Start/Stop" button was used . The "Start/Stop" button was pressed to begin embroidering. Tighten the needle clamp screw. Replace the needle with a new one . Adjust the thread tension. Replace the needle plate, or...

Users Manual - English
Page 218
... 135 171, 181, 187 , attaching elastic tape 62 76 automatic reverse/reinforcement stitching 46 automatic thread cutting key 46 B bar tacks 84 basting 57 blind hem stitch 71 block move key 189 bobbin 24 27, 28 , bobbin cover 10 27 bobbin holder 25 bobbin thread pulling up 28 replacing 145 setting 27 winding 24 bobbin winder 9 bobbin winding pretension disk and guide 9, 25, 27 button sewing 86 buttonhole lever 10, 81, 84 buttonhole stitches 79 C carriage 10 character/decorative stitches adjusting 98 combining 104 editing...
... 135 171, 181, 187 , attaching elastic tape 62 76 automatic reverse/reinforcement stitching 46 automatic thread cutting key 46 B bar tacks 84 basting 57 blind hem stitch 71 block move key 189 bobbin 24 27, 28 , bobbin cover 10 27 bobbin holder 25 bobbin thread pulling up 28 replacing 145 setting 27 winding 24 bobbin winder 9 bobbin winding pretension disk and guide 9, 25, 27 button sewing 86 buttonhole lever 10, 81, 84 buttonhole stitches 79 C carriage 10 character/decorative stitches adjusting 98 combining 104 editing...

2.0 Operation Manual - English
Page 6
... to use free-motion quilting foot "C" or free-motion open toe quilting foot "O" depending on the machine. ■ Using Free-motion Quilting Foot "C" The free-motion quilting foot "C" is raised to adjust the upper thread tension. Increase the setting by pressing , for free-motion sewing. • In order to sew with a balanced tension, it may result. • When using the straight stitch needle plate. In this plate has a single hole. If the fabric is similar to match the sewing speed. Test with a sample piece of the fabric to your chosen fabric. 5 Free-motion Quilting For...
... to use free-motion quilting foot "C" or free-motion open toe quilting foot "O" depending on the machine. ■ Using Free-motion Quilting Foot "C" The free-motion quilting foot "C" is raised to adjust the upper thread tension. Increase the setting by pressing , for free-motion sewing. • In order to sew with a balanced tension, it may result. • When using the straight stitch needle plate. In this plate has a single hole. If the fabric is similar to match the sewing speed. Test with a sample piece of the fabric to your chosen fabric. 5 Free-motion Quilting For...


