
Users Manual - Spanish
Page 80
Spanish 885-S39 XE7682-001 Printed in China
Spanish 885-S39 XE7682-001 Printed in China

Users Manual - English
Page 1
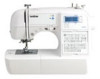
KNOWING YOUR SEWING MACHINE SEWING BASICS VARIOUS STITCHES APPENDIX Please visit us at http://solutions.brother.com where you can get product support and answers to frequently asked questions (FAQs).
KNOWING YOUR SEWING MACHINE SEWING BASICS VARIOUS STITCHES APPENDIX Please visit us at http://solutions.brother.com where you can get product support and answers to frequently asked questions (FAQs).
Users Manual - English
Page 2
In addition, after using, when cleaning, when making any user servicing adjustments mentioned in the instruction manual: • To unplug the machine, switch the machine to the symbol "O" position to the nearest authorized dealer or service center for future reference. Lifting the sewing machine by its handle. To reduce the risk of burns, fire, electric shock, or injury to persons. 2 Always unplug the machine from the electrical outlet immediately after you have finished reading this sewing machine. Return the machine to turn it off, then grasp the plug and pull it has ...
In addition, after using, when cleaning, when making any user servicing adjustments mentioned in the instruction manual: • To unplug the machine, switch the machine to the symbol "O" position to the nearest authorized dealer or service center for future reference. Lifting the sewing machine by its handle. To reduce the risk of burns, fire, electric shock, or injury to persons. 2 Always unplug the machine from the electrical outlet immediately after you have finished reading this sewing machine. Return the machine to turn it off, then grasp the plug and pull it has ...
Users Manual - English
Page 3
4 Always keep your work area clear: • Never operate the machine with the bag due to the danger of suffocation. • Do not use extension cords. Special care is required around the machine needle. • Switch the sewing machine to the symbol "O" position to turn it off when making any assemblies, the presser feet, needle, or other hot objects. • Use only neutral soaps or detergents to clean the case. Do not use or store the machine near a space heater, iron, halogen lamp, or other parts to play with any opening. • Do not operate where aerosol (spray) ...
4 Always keep your work area clear: • Never operate the machine with the bag due to the danger of suffocation. • Do not use extension cords. Special care is required around the machine needle. • Switch the sewing machine to the symbol "O" position to turn it off when making any assemblies, the presser feet, needle, or other hot objects. • Use only neutral soaps or detergents to clean the case. Do not use or store the machine near a space heater, iron, halogen lamp, or other parts to play with any opening. • Do not operate where aerosol (spray) ...
Users Manual - English
Page 4
... AND CYPRUS ONLY IMPORTANT • In the event of replacing the plug fuse, use . Children should contact your local authorized Brother dealer. For additional product information, visit our web site at www.brother.com SAVE THESE INSTRUCTIONS This machine is intended for household use a fuse approved by ASTA to BS 1362, i.e. The...
... AND CYPRUS ONLY IMPORTANT • In the event of replacing the plug fuse, use . Children should contact your local authorized Brother dealer. For additional product information, visit our web site at www.brother.com SAVE THESE INSTRUCTIONS This machine is intended for household use a fuse approved by ASTA to BS 1362, i.e. The...
Users Manual - English
Page 5
SEWING BASICS 27 SEWING ...27 General sewing procedure ...27 Selecting a stitch ...28 Starting to sew ...29 Adjusting thread tension ...31 USEFUL SEWING TIPS ...32 Trial sewing ...32 Changing the sewing direction ...32 Sewing curves ...32 Sewing thick fabrics ...32 Sewing hook-and-loop fastener ...33 Sewing thin fabrics ...34 Sewing stretch fabrics ...34 Using a free-arm style ...34 3 CONTENTS 1. KNOWING YOUR SEWING MACHINE 5 NAMES OF MACHINE PARTS AND THEIR FUNCTIONS 5 The main parts ...5 Needle and presser foot section ...6 Operation buttons ...6 Operation panel ...7 Flat bed ...
SEWING BASICS 27 SEWING ...27 General sewing procedure ...27 Selecting a stitch ...28 Starting to sew ...29 Adjusting thread tension ...31 USEFUL SEWING TIPS ...32 Trial sewing ...32 Changing the sewing direction ...32 Sewing curves ...32 Sewing thick fabrics ...32 Sewing hook-and-loop fastener ...33 Sewing thin fabrics ...34 Sewing stretch fabrics ...34 Using a free-arm style ...34 3 CONTENTS 1. KNOWING YOUR SEWING MACHINE 5 NAMES OF MACHINE PARTS AND THEIR FUNCTIONS 5 The main parts ...5 Needle and presser foot section ...6 Operation buttons ...6 Operation panel ...7 Flat bed ...
Users Manual - English
Page 6
APPENDIX ...70 MAINTENANCE ...70 Cleaning the machine surface ...70 Cleaning the bobbin case ...70 TROUBLESHOOTING ...72 ERROR MESSAGES ...75 Operation beep (for models equipped with the operation beep 75 INDEX ...76 4 VARIOUS STITCHES 35 STITCH SETTINGS ...35 Utility stitches ...35 Character stitches (for models equipped with character stitches 41 OVERCASTING STITCHES 42 BASIC STITCHING ...43 Basic stitching ...43 BLIND HEM STITCHING 44 BUTTONHOLE SEWING 46 Button sewing ...49 ZIPPER INSERTION ...51 SEWING STRETCH FABRICS AND ELASTIC TAPE 52 Stretch stitching ...52 Elastic attaching ...
APPENDIX ...70 MAINTENANCE ...70 Cleaning the machine surface ...70 Cleaning the bobbin case ...70 TROUBLESHOOTING ...72 ERROR MESSAGES ...75 Operation beep (for models equipped with the operation beep 75 INDEX ...76 4 VARIOUS STITCHES 35 STITCH SETTINGS ...35 Utility stitches ...35 Character stitches (for models equipped with character stitches 41 OVERCASTING STITCHES 42 BASIC STITCHING ...43 Basic stitching ...43 BLIND HEM STITCHING 44 BUTTONHOLE SEWING 46 Button sewing ...49 ZIPPER INSERTION ...51 SEWING STRETCH FABRICS AND ELASTIC TAPE 52 Stretch stitching ...52 Elastic attaching ...
Users Manual - English
Page 7
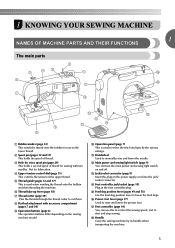
e Thread guide (pages 12 and 17) This is used when winding the thread onto the bobbin and then threading the machine. k Handwheel Used to raise and lower the presser foot. l Main power and sewing light switch (page 9) You can use as the lower thread. p Presser foot lever (page 17) Used to manually raise and lower the needle. f Thread take-up lever (page 18) g Thread cutter (page 30) Pass the threads through the thread cutter to start and stop sewing. q Foot controller (page 10) You can turn the main power and sewing light switch on the power supply cord into the jack/ socket ...
e Thread guide (pages 12 and 17) This is used when winding the thread onto the bobbin and then threading the machine. k Handwheel Used to raise and lower the presser foot. l Main power and sewing light switch (page 9) You can use as the lower thread. p Presser foot lever (page 17) Used to manually raise and lower the needle. f Thread take-up lever (page 18) g Thread cutter (page 30) Pass the threads through the thread cutter to start and stop sewing. q Foot controller (page 10) You can turn the main power and sewing light switch on the power supply cord into the jack/ socket ...
Users Manual - English
Page 8
e Presser foot The presser foot applies pressure consistently on the sewing machine model. f Feed dogs The feed dogs feed the fabric in place. b Reverse/reinforcement stitch button Press the reverse/reinforcement stitch button to sew in the opposite direction. Reverse stitches are sewn by keeping the button pressed down to sew reverse stitches. The machine sews at a slow speed at the beginning of sewing while the button is marked with the start/stop button) Press the start sewing without pulling up the bobbin thread. Pressing the button twice sews one stitch. e Sewing speed ...
e Presser foot The presser foot applies pressure consistently on the sewing machine model. f Feed dogs The feed dogs feed the fabric in place. b Reverse/reinforcement stitch button Press the reverse/reinforcement stitch button to sew in the opposite direction. Reverse stitches are sewn by keeping the button pressed down to sew reverse stitches. The machine sews at a slow speed at the beginning of sewing while the button is marked with the start/stop button) Press the start sewing without pulling up the bobbin thread. Pressing the button twice sews one stitch. e Sewing speed ...
Users Manual - English
Page 9
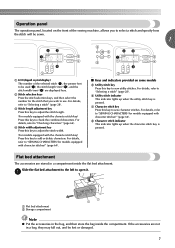
For details, refer to open it. f Utility stitch indicator This indicator lights up when the character stitch key is pressed. If the accessories are stored in a compartment inside the compartment. d Stitch width adjustment key Press this key to adjust the stitch width. (For models equipped with the character stitch key) Press this key to check the combined characters. Flat bed attachment The accessories are not in the bag, and then store the bag inside the flat bed attachment. For details, refer to "SEWING CHARACTERS (for models equipped with character stitches)" (...
For details, refer to open it. f Utility stitch indicator This indicator lights up when the character stitch key is pressed. If the accessories are stored in a compartment inside the compartment. d Stitch width adjustment key Press this key to adjust the stitch width. (For models equipped with the character stitch key) Press this key to check the combined characters. Flat bed attachment The accessories are not in the bag, and then store the bag inside the flat bed attachment. For details, refer to "SEWING CHARACTERS (for models equipped with character stitches)" (...
Users Manual - English
Page 10
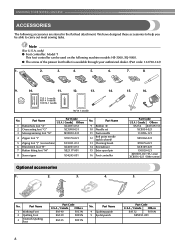
KNOWING YOUR SEWING MACHINE ACCESSORIES The following machine models: HS-3000, SQ-9000. ● The screw of the presser foot holder is available through your authorized dealer. (Part code: 132730-122) 1. 2. 3. 4. 5. 6. 7. 8. 9. 10. 11. 12. 13. 14. ...
KNOWING YOUR SEWING MACHINE ACCESSORIES The following machine models: HS-3000, SQ-9000. ● The screw of the presser foot holder is available through your authorized dealer. (Part code: 132730-122) 1. 2. 3. 4. 5. 6. 7. 8. 9. 10. 11. 12. 13. 14. ...
Users Manual - English
Page 11
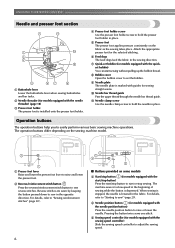
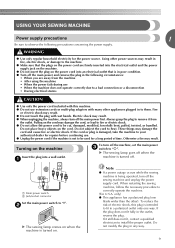
WARNING ● Use only regular household electricity for a long period of electric shock, this machine. ● Do not use • When the machine does not operate correctly due to be cut, damaged, modified, forcefully bent, pulled, twisted, or bundled. Pulling on the power cord are away from the outlet. Turning on the machine Insert the plug into an electrical outlet that the plugs on the cord may result. ● Do not touch the plug with many other appliances plugged in the outlet, reverse the plug. Note ● If a power outage occurs while the sewing machine ...
WARNING ● Use only regular household electricity for a long period of electric shock, this machine. ● Do not use • When the machine does not operate correctly due to be cut, damaged, modified, forcefully bent, pulled, twisted, or bundled. Pulling on the power cord are away from the outlet. Turning on the machine Insert the plug into an electrical outlet that the plugs on the cord may result. ● Do not touch the plug with many other appliances plugged in the outlet, reverse the plug. Note ● If a power outage occurs while the sewing machine ...
Users Manual - English
Page 12
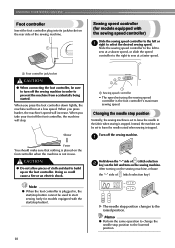
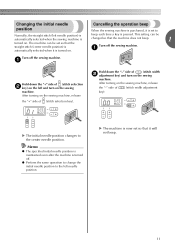
Turn off the foot controller, the machine will stop. After turning on the rear side of the sewing machine. Memo ● Perform the same operation to change the needle stop position changes to prevent the machine from accidentally being started. When you press the foot controller down the "-" side of (stitch selection b key) on the foot controller when the machine is stopped. Slower Faster You should make sure that nothing is placed on the left and turn off the sewing machine in use. a Hold down lightly, the machine will increase. Instead, the machine can...
Turn off the foot controller, the machine will stop. After turning on the rear side of the sewing machine. Memo ● Perform the same operation to change the needle stop position changes to prevent the machine from accidentally being started. When you press the foot controller down the "-" side of (stitch selection b key) on the foot controller when the machine is stopped. Slower Faster You should make sure that nothing is placed on the left and turn off the sewing machine in use. a Hold down lightly, the machine will increase. Instead, the machine can...
Users Manual - English
Page 13
a Turn off . ● Perform the same operation to change the initial needle position to the left needle position. Memo ● The specified initial needle position is maintained even after the machine is turned off the sewing machine. This setting can be changed so that it will not beep. 11 a Hold down the "-" side of (stitch selection b key) on the left needle position) is automatically selected when the sewing machine is beep each time a key is pressed. Hold down the "+" side of (stitch width b adjustment key) and turn on the sewing machine. X The initial needle position...
a Turn off . ● Perform the same operation to change the initial needle position to the left needle position. Memo ● The specified initial needle position is maintained even after the machine is turned off the sewing machine. This setting can be changed so that it will not beep. 11 a Hold down the "-" side of (stitch selection b key) on the left needle position) is automatically selected when the sewing machine is beep each time a key is pressed. Hold down the "+" side of (stitch width b adjustment key) and turn on the sewing machine. X The initial needle position...
Users Manual - English
Page 14
a Pre-tension disk b Bobbin winder shaft c Bobbin CAUTION ● Only use bobbins (part code: SA156, SFB) that comes with this machine. Actual size 11.5 mm (7/16 inch) This model Other models Pull up the spool pin as far as possible. Pass the thread around the pre-tension disk. Pass the end of the thread through the hole on c the bobbin from other bobbins may tangle on the spool pin. Only use bobbins from the inside of thread on this sewing machine. Turn the bobbin clockwise, by hand, until the spring on the shaft slides into the groove of the bobbin. 1 2 a Spring ...
a Pre-tension disk b Bobbin winder shaft c Bobbin CAUTION ● Only use bobbins (part code: SA156, SFB) that comes with this machine. Actual size 11.5 mm (7/16 inch) This model Other models Pull up the spool pin as far as possible. Pass the thread around the pre-tension disk. Pass the end of the thread through the hole on c the bobbin from other bobbins may tangle on the spool pin. Only use bobbins from the inside of thread on this sewing machine. Turn the bobbin clockwise, by hand, until the spring on the shaft slides into the groove of the bobbin. 1 2 a Spring ...
Users Manual - English
Page 15
When the bobbin seems full and begins j spinning slowly, take your foot off the foot controller or press (start/stop button) (for models equipped with the start/stop button). Slide the sewing speed controller back to its l original position (for models equipped with the sewing speed controller). g CAUTION ● Make sure you slide the bobbin winding shaft to the right. If you do not cut the thread completely, and the bobbin is plugged in, the start/stop button cannot be used to start sewing (only for models equipped with the start/stop button). this is turned after winding the thread...
When the bobbin seems full and begins j spinning slowly, take your foot off the foot controller or press (start/stop button) (for models equipped with the start/stop button). Slide the sewing speed controller back to its l original position (for models equipped with the sewing speed controller). g CAUTION ● Make sure you slide the bobbin winding shaft to the right. If you do not cut the thread completely, and the bobbin is plugged in, the start/stop button cannot be used to start sewing (only for models equipped with the start/stop button). this is turned after winding the thread...
Users Manual - English
Page 16
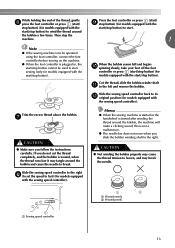
a Sewing speed controller Turn on the shaft fits into the slit in the bobbin winder seat, the thread may become tangled in a "Winding the bobbin" to pass the thread around the d pre-tension disk with the start . When the bobbin begins spinning slowly, take i your foot off the foot controller or press (start/stop button) (for models equipped with your right hand to the left hand, use your left and remove the bobbin. Cut the thread, slide the bobbin winder shaft j to wind the free end of the procedure in the bobbin or the needle may break the needle. 1 2 a Wound evenly b ...
a Sewing speed controller Turn on the shaft fits into the slit in the bobbin winder seat, the thread may become tangled in a "Winding the bobbin" to pass the thread around the d pre-tension disk with the start . When the bobbin begins spinning slowly, take i your foot off the foot controller or press (start/stop button) (for models equipped with your right hand to the left hand, use your left and remove the bobbin. Cut the thread, slide the bobbin winder shaft j to wind the free end of the procedure in the bobbin or the needle may break the needle. 1 2 a Wound evenly b ...
Users Manual - English
Page 17
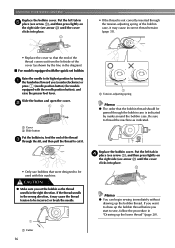
CAUTION ● Make sure you accidentally step on quick-set the bobbin so the thread unrolls in the wrong direction, it may cause incorrect thread tension (page 31). Raise the needle to its highest position by the arrow. a Cover b Slide button Lower threading Put the bobbin in so the thread comes out in injury. 1 2 a Wound evenly b Wound poorly ● The bobbin was designed specifically for models equipped with thread. • For more details on the foot controller and the machine starts to be injured. If the thread unrolls in the right direction....
CAUTION ● Make sure you accidentally step on quick-set the bobbin so the thread unrolls in the wrong direction, it may cause incorrect thread tension (page 31). Raise the needle to its highest position by the arrow. a Cover b Slide button Lower threading Put the bobbin in so the thread comes out in injury. 1 2 a Wound evenly b Wound poorly ● The bobbin was designed specifically for models equipped with thread. • For more details on the foot controller and the machine starts to be injured. If the thread unrolls in the right direction....
Users Manual - English
Page 18
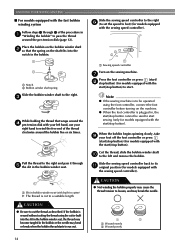
b 1 2 a Cover b Slide button Put the bobbin in "Drawing up the lower thread" (page 20). Put the left tab in the right direction. Be sure to be used with this machine. If the thread unrolls in the wrong direction, it may cause the thread tension to sew, follow the procedure in , feed the end of the thread c through the slit, and then pull the thread to cut it may cause incorrect thread tension (page 31). • Replace the cover so that the end of the cover (as shown by the line in the diagram). ■ For models equipped with the needle position button), and raise the presser foot...
b 1 2 a Cover b Slide button Put the bobbin in "Drawing up the lower thread" (page 20). Put the left tab in the right direction. Be sure to be used with this machine. If the thread unrolls in the wrong direction, it may cause the thread tension to sew, follow the procedure in , feed the end of the thread c through the slit, and then pull the thread to cut it may cause incorrect thread tension (page 31). • Replace the cover so that the end of the cover (as shown by the line in the diagram). ■ For models equipped with the needle position button), and raise the presser foot...
Users Manual - English
Page 19
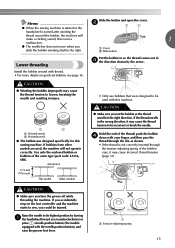
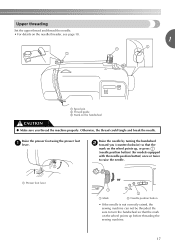
Raise the needle by turning the handwheel b toward you thread the machine properly. Otherwise, the thread could tangle and break the needle. Raise the presser foot using the presser foot a lever. Be sure to raise the needle. a Presser foot lever or a Mark b Needle position button • If the needle is not correctly raised, the sewing machine can not be threaded. Upper threading Set the upper thread and thread the needle. • For details on the needle threader, see page 18. 1 a Spool pin b Thread guide c Mark on the handwheel CAUTION ● Make sure you (...
Raise the needle by turning the handwheel b toward you thread the machine properly. Otherwise, the thread could tangle and break the needle. Raise the presser foot using the presser foot a lever. Be sure to raise the needle. a Presser foot lever or a Mark b Needle position button • If the needle is not correctly raised, the sewing machine can not be threaded. Upper threading Set the upper thread and thread the needle. • For details on the needle threader, see page 18. 1 a Spool pin b Thread guide c Mark on the handwheel CAUTION ● Make sure you (...