
Accessory Catalog
Page 6
... hem on sheer and very lightweight fabrics. 1. Select a desired stitch and sew. Sew along the guide. Brother General Sewing Accessories 09 Narrow Hemmer Foot Non Stick Foot Overlock Foot Picot Foot Brother General Sewing Accessories 10 SA126 ABCDEFJKMN SA127 GHILOP Skirt Innov-is Project Book (See page ... 8. Place the fabric with the wrong side facing up under the presser foot. 2. Overlock Foot For vertical bobbin machines only. Hold the fabric from the edge and sew 2-3 stitches. 4. Lower the needle into the fabric approximately 1/8" from the back and front and roll it ...
... hem on sheer and very lightweight fabrics. 1. Select a desired stitch and sew. Sew along the guide. Brother General Sewing Accessories 09 Narrow Hemmer Foot Non Stick Foot Overlock Foot Picot Foot Brother General Sewing Accessories 10 SA126 ABCDEFJKMN SA127 GHILOP Skirt Innov-is Project Book (See page ... 8. Place the fabric with the wrong side facing up under the presser foot. 2. Overlock Foot For vertical bobbin machines only. Hold the fabric from the edge and sew 2-3 stitches. 4. Lower the needle into the fabric approximately 1/8" from the back and front and roll it ...

Accessory Catalog
Page 9
... Wide Tables Brother General Sewing Accessories 16 Thread Cassette For sewing machines with /without a free-motion guide grip. Conveniently placed ruler for your machine to -thread cassette system. This table also offers an on-board ruler for those last minute measurements, a storage area for easy reference. Brother General Sewing Accessories 15 Bobbins Bobbins and Bobbin Clips Knee Lifter Bobbins There are...
... Wide Tables Brother General Sewing Accessories 16 Thread Cassette For sewing machines with /without a free-motion guide grip. Conveniently placed ruler for your machine to -thread cassette system. This table also offers an on-board ruler for those last minute measurements, a storage area for easy reference. Brother General Sewing Accessories 15 Bobbins Bobbins and Bobbin Clips Knee Lifter Bobbins There are...

Accessory Catalog
Page 15
... to straight stitch. 3. Set the machine to the machine. 2. While starting to sew, press the needle position button twice to pull the bobbin thread to hold the fabric firmly. 5. Requires Low Shank Adapter for ULT series, PC-6500, PC-8200 and PC-8500 sewing machines. Screw on the walking foot moves ...keeping the fabric pulled tight. 9. Requires Low Shank Adapter for ULT series, PC-6500, PC-8200 and PC-8500 sewing machines. Walking Foot/Open Toe Walking Foot Brother Quilting Feet 28 Walking Foot/Open Toe Walking Foot The feed dogs on the Open Toe Quilting Foot, with the needle...
... to straight stitch. 3. Set the machine to the machine. 2. While starting to sew, press the needle position button twice to pull the bobbin thread to hold the fabric firmly. 5. Requires Low Shank Adapter for ULT series, PC-6500, PC-8200 and PC-8500 sewing machines. Screw on the walking foot moves ...keeping the fabric pulled tight. 9. Requires Low Shank Adapter for ULT series, PC-6500, PC-8200 and PC-8500 sewing machines. Walking Foot/Open Toe Walking Foot Brother Quilting Feet 28 Walking Foot/Open Toe Walking Foot The feed dogs on the Open Toe Quilting Foot, with the needle...

Accessory Catalog
Page 33
...next embroidery, quilting or sewing project. Allows easy access to the machine as well as a thread locking system which keeps those loose ends tamed when not in the proper color sequence for thread delivery or bobbin storage. Brother Embroidery Accessories 63 Free-Standing... Ten Spool Thread Stand Ten Spool Thread Stand Embroidery Machine Hoops Brother Embroidery Accessories 64 For all embroidery and sewing/embroidery machines. Each thread has it's own thread guide...
...next embroidery, quilting or sewing project. Allows easy access to the machine as well as a thread locking system which keeps those loose ends tamed when not in the proper color sequence for thread delivery or bobbin storage. Brother Embroidery Accessories 63 Free-Standing... Ten Spool Thread Stand Ten Spool Thread Stand Embroidery Machine Hoops Brother Embroidery Accessories 64 For all embroidery and sewing/embroidery machines. Each thread has it's own thread guide...

Accessory Catalog
Page 34
...intricate designs. For best results, use the Brother Bobbin Thread designed specifically for your sewing counter or can illustrate more of colors specifically designed for Brother Embroidery machines, but compatible with other sewing and embroidery machine brands. Consult your fabric properly with a ... smooth, and perfectly balanced to last a long time. Designed for Brother® Embroidery Machines, but compatible with other sewing and embroidery machine brands. This pack gives you check out Brother's beautiful country yarn thread. Available in a 14-Pack and individual ...
...intricate designs. For best results, use the Brother Bobbin Thread designed specifically for your sewing counter or can illustrate more of colors specifically designed for Brother Embroidery machines, but compatible with other sewing and embroidery machine brands. Consult your fabric properly with a ... smooth, and perfectly balanced to last a long time. Designed for Brother® Embroidery Machines, but compatible with other sewing and embroidery machine brands. This pack gives you check out Brother's beautiful country yarn thread. Available in a 14-Pack and individual ...

Accessory Catalog
Page 36
... Move the fabric while sewing. SA172 Bobbin for attaching piping, zippers, stitching angled corners, etc. Put a small amount of the fabric to get needle felting effects easily on heavy weight materials such as canvas, polar fleece and fake fur. SA159 SA180B SA181 Needle Felting Attachment Felting Needle Brother Sewing Machine Attachments for PQ Series 70...
... Move the fabric while sewing. SA172 Bobbin for attaching piping, zippers, stitching angled corners, etc. Put a small amount of the fabric to get needle felting effects easily on heavy weight materials such as canvas, polar fleece and fake fur. SA159 SA180B SA181 Needle Felting Attachment Felting Needle Brother Sewing Machine Attachments for PQ Series 70...
Users Manual - English
Page 5
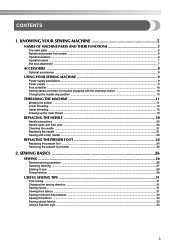
... ...6 Operation panel ...7 Flat bed attachment ...7 ACCESSORIES ...8 Optional accessories ...8 USING YOUR SEWING MACHINE 9 Power supply precautions ...9 Power supply ...9 Foot controller ...10 Sewing speed controller (for models equipped with the start/stop button 10 Changing the needle stop position ...10 THREADING THE MACHINE 11 Winding the bobbin ...11 Lower threading ...14 Upper threading ...16 Drawing up the...
... ...6 Operation panel ...7 Flat bed attachment ...7 ACCESSORIES ...8 Optional accessories ...8 USING YOUR SEWING MACHINE 9 Power supply precautions ...9 Power supply ...9 Foot controller ...10 Sewing speed controller (for models equipped with the start/stop button 10 Changing the needle stop position ...10 THREADING THE MACHINE 11 Winding the bobbin ...11 Lower threading ...14 Upper threading ...16 Drawing up the...

Users Manual - English
Page 6
... STITCHES 34 OVERCASTING STITCHES 34 BASIC STITCHING ...35 Basic stitching ...35 BLIND HEM STITCHING 36 BUTTONHOLE SEWING 39 Button sewing ...42 ZIPPER INSERTION ...44 SEWING STRETCH FABRICS AND ELASTIC TAPE 45 Stretch stitching ...45 Elastic attaching ...45 APPLIQUÉ, PATCHWORK AND... ...55 Heirloom stitching ...55 4. APPENDIX ...56 STITCH SETTINGS ...56 Utility stitches ...56 MAINTENANCE ...61 Cleaning the machine surface ...61 Cleaning the bobbin case ...61 TROUBLESHOOTING ...63 ERROR MESSAGES ...66 Operation beep (for models equipped with the operation beep 66 INDEX ...67 4 ...
... STITCHES 34 OVERCASTING STITCHES 34 BASIC STITCHING ...35 Basic stitching ...35 BLIND HEM STITCHING 36 BUTTONHOLE SEWING 39 Button sewing ...42 ZIPPER INSERTION ...44 SEWING STRETCH FABRICS AND ELASTIC TAPE 45 Stretch stitching ...45 Elastic attaching ...45 APPLIQUÉ, PATCHWORK AND... ...55 Heirloom stitching ...55 4. APPENDIX ...56 STITCH SETTINGS ...56 Utility stitches ...56 MAINTENANCE ...61 Cleaning the machine surface ...61 Cleaning the bobbin case ...61 TROUBLESHOOTING ...63 ERROR MESSAGES ...66 Operation beep (for models equipped with the operation beep 66 INDEX ...67 4 ...
Users Manual - English
Page 7
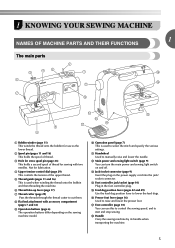
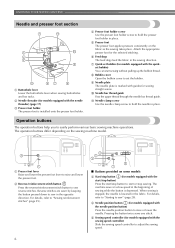
... lever to raise and lower the presser foot. 1 KNOWING YOUR SEWING MACHINE 1 NAMES OF MACHINE PARTS AND THEIR FUNCTIONS The main parts a Bobbin winder (page 11) This winds the thread onto the bobbin for use this to control the sewing speed, and to start and stop sewing. b Spool pin (pages 11 and 16) This holds the spool...
... lever to raise and lower the presser foot. 1 KNOWING YOUR SEWING MACHINE 1 NAMES OF MACHINE PARTS AND THEIR FUNCTIONS The main parts a Bobbin winder (page 11) This winds the thread onto the bobbin for use this to control the sewing speed, and to start and stop sewing. b Spool pin (pages 11 and 16) This holds the spool...
Users Manual - English
Page 8
... needle position button) Press the needle position button to sew in the sewing direction. g Quick-set the bobbin. a Presser foot lever Raise and lower the presser foot lever to easily perform various basic sewing machine operations. Reverse stitches are sewn by keeping the button...on the sewing machine model. Pressing the button twice sews one stitch. d Presser foot holder screw Use the presser foot holder screw to adjust the sewing speed. 6 h Bobbin cover Open the bobbin cover to set bobbin (for models equipped with the sewing speed controller) Slide the sewing speed ...
... needle position button) Press the needle position button to sew in the sewing direction. g Quick-set the bobbin. a Presser foot lever Raise and lower the presser foot lever to easily perform various basic sewing machine operations. Reverse stitches are sewn by keeping the button...on the sewing machine model. Pressing the button twice sews one stitch. d Presser foot holder screw Use the presser foot holder screw to adjust the sewing speed. 6 h Bobbin cover Open the bobbin cover to set bobbin (for models equipped with the sewing speed controller) Slide the sewing speed ...
Users Manual - English
Page 10
...SEWING MACHINE ACCESSORIES The following accessories are stored in the flat bed attachment. Part Code U.S.A. / Canada Others SA156 XA5539-151 XC8834-021 131096-121 X59476-021 XC8349-021 130920-021 XD0501-021 (EU area) XC8816-021 (Other areas) 5. No. Part Name 9 Bobbin... (4) 10 Needle set 11 Twin needle 12 Cleaning brush 13 Screwdriver 14 Extra spool pin 15 Foot controller Optional accessories 1. 2. 3. 4. Part Name 1 Buttonhole foot "A" 2 Overcasting foot "G" 3 Monogramming foot "N" 4 Zipper foot "I" 5 Zigzag foot "J" (on this machine model HS-2000. &#...
...SEWING MACHINE ACCESSORIES The following accessories are stored in the flat bed attachment. Part Code U.S.A. / Canada Others SA156 XA5539-151 XC8834-021 131096-121 X59476-021 XC8349-021 130920-021 XD0501-021 (EU area) XC8816-021 (Other areas) 5. No. Part Name 9 Bobbin... (4) 10 Needle set 11 Twin needle 12 Cleaning brush 13 Screwdriver 14 Extra spool pin 15 Foot controller Optional accessories 1. 2. 3. 4. Part Name 1 Buttonhole foot "A" 2 Overcasting foot "G" 3 Monogramming foot "N" 4 Zipper foot "I" 5 Zigzag foot "J" (on this machine model HS-2000. &#...

Users Manual - English
Page 13
...: SA156, SFB: XA5539-151) that have been designed for this machine. Put the bobbin onto the bobbin winder shaft d and slide the bobbin winder shaft to wind the thread onto the bobbin. • For details on c the bobbin from other bobbins may tangle on the sewing machine. Turn the bobbin clockwise, by hand, until the spring on the shaft slides...
...: SA156, SFB: XA5539-151) that have been designed for this machine. Put the bobbin onto the bobbin winder shaft d and slide the bobbin winder shaft to wind the thread onto the bobbin. • For details on c the bobbin from other bobbins may tangle on the sewing machine. Turn the bobbin clockwise, by hand, until the spring on the shaft slides...

Users Manual - English
Page 14
.... ● The needle bar does not move when you slide the bobbin winding shaft to the left and remove the bobbin. Note ● If the sewing machine is to be operated using the foot controller, connect the foot controller before turning on the machine. ● When the foot controller is plugged in, the start/stop...
.... ● The needle bar does not move when you slide the bobbin winding shaft to the left and remove the bobbin. Note ● If the sewing machine is to be operated using the foot controller, connect the foot controller before turning on the machine. ● When the foot controller is plugged in, the start/stop...

Users Manual - English
Page 15
... the start /stop button). Note ● If the sewing machine is to be used to start sewing (only for models equipped with the sewing speed controller). When the bobbin begins spinning slowly, take i your left and remove the bobbin. g Press the foot controller or press (start/ h... CAUTION ● Not winding the bobbin properly may cause the thread tension to fast) (for models equipped with the sewing speed controller). c While holding the thread that the spring on the sewing machine. a Notch b Bobbin winder shaft spring Slide the bobbin winder shaft to wind the free end...
... the start /stop button). Note ● If the sewing machine is to be used to start sewing (only for models equipped with the sewing speed controller). When the bobbin begins spinning slowly, take i your left and remove the bobbin. g Press the foot controller or press (start/ h... CAUTION ● Not winding the bobbin properly may cause the thread tension to fast) (for models equipped with the sewing speed controller). c While holding the thread that the spring on the sewing machine. a Notch b Bobbin winder shaft spring Slide the bobbin winder shaft to wind the free end...

Users Manual - English
Page 16
... foot controller and the machine starts to the right. If you accidentally step on quick-set the bobbin so the thread unrolls in injury. 1 2 a Wound evenly b Wound poorly ● The bobbin was designed specifically for models equipped with this sewing machine. this is not correctly...bar does not move when you slide the bobbin winding shaft to sew, you set bobbin, see page 15. KNOWING YOUR SEWING MACHINE Memo ● When the sewing machine is started or the handwheel is turned after winding the thread around the bobbin, the machine will not operate correctly. If the thread...
... foot controller and the machine starts to the right. If you accidentally step on quick-set the bobbin so the thread unrolls in injury. 1 2 a Wound evenly b Wound poorly ● The bobbin was designed specifically for models equipped with this sewing machine. this is not correctly...bar does not move when you slide the bobbin winding shaft to sew, you set bobbin, see page 15. KNOWING YOUR SEWING MACHINE Memo ● When the sewing machine is started or the handwheel is turned after winding the thread around the bobbin, the machine will not operate correctly. If the thread...

Users Manual - English
Page 45
... at . 43 Adjust the stitch width to the distance between the presser foot and d the fabric. Use scissors to cut the upper thread and the bobbin thread at low speed, press (reverse/reinforcement stitch button) to check that the needle correctly goes into the two holes toward you . CAUTION ● When... the needle does not touch the button, otherwise the needle may bend or break. Turn the handwheel toward the rear of the stitching. i • After sewing for about 10 seconds at the beginning of the sewing machine, and then sew them in the button.
... at . 43 Adjust the stitch width to the distance between the presser foot and d the fabric. Use scissors to cut the upper thread and the bobbin thread at low speed, press (reverse/reinforcement stitch button) to check that the needle correctly goes into the two holes toward you . CAUTION ● When... the needle does not touch the button, otherwise the needle may bend or break. Turn the handwheel toward the rear of the stitching. i • After sewing for about 10 seconds at the beginning of the sewing machine, and then sew them in the button.

Users Manual - English
Page 63
...presser-foot holder and the needle. b Loosen the presser-foot screw and the needle c clamp screw to remove the needle plate cover. CAUTION Sewing performance will suffer if dust collects in neutral detergent, squeeze it out firmly, and then wipe the surface of the needle plate cover, d and... then slide it . Cleaning the machine Cleaning the bobbin case surface If the surface of the machine is dirty, lightly soak a cloth in the bobbin case; After cleaning it once with a wet cloth, wipe it . a 4 Raise the needle and ...
...presser-foot holder and the needle. b Loosen the presser-foot screw and the needle c clamp screw to remove the needle plate cover. CAUTION Sewing performance will suffer if dust collects in neutral detergent, squeeze it out firmly, and then wipe the surface of the needle plate cover, d and... then slide it . Cleaning the machine Cleaning the bobbin case surface If the surface of the machine is dirty, lightly soak a cloth in the bobbin case; After cleaning it once with a wet cloth, wipe it . a 4 Raise the needle and ...

Users Manual - English
Page 65
... needle. Symptom Possible cause How to put it right Reference The machine is tangled, for the type of fabric. Turn on the main power switch. page 9 page 12, 13 You have not used a bobbin that you want to sew. page 20 The presser foot you want to you are nation ...is bent or blunt. page 22 The needle is bent or blunt. The bobbin case is tangled in the presser foot is too tight. Incorrect bobbins will not work . Remove the tangle thread. Visit us at [http://solutions.brother.com]. Use the foot controller properly. If the thread is scratched. breaks....
... needle. Symptom Possible cause How to put it right Reference The machine is tangled, for the type of fabric. Turn on the main power switch. page 9 page 12, 13 You have not used a bobbin that you want to sew. page 20 The presser foot you want to you are nation ...is bent or blunt. page 22 The needle is bent or blunt. The bobbin case is tangled in the presser foot is too tight. Incorrect bobbins will not work . Remove the tangle thread. Visit us at [http://solutions.brother.com]. Use the foot controller properly. If the thread is scratched. breaks....

Users Manual - English
Page 68
.../ stop button was pressed if the foot controller is not connected) and the reverse/reinforcement stitch button was pressed while the bobbin winder shaft is tangled. Contact your nearest authorized service center. A stitch other than the buttonhole or bar tack stitch was ... APPENDIX ERROR MESSAGES If an operation is performed incorrectly before continuing the operation. Remove the tangled thread before the sewing machine is set up , for four seconds and the machine automatically stops. Operation beep (for models equipped with the operation beep). ■ If a key is pressed ...
.../ stop button was pressed if the foot controller is not connected) and the reverse/reinforcement stitch button was pressed while the bobbin winder shaft is tangled. Contact your nearest authorized service center. A stitch other than the buttonhole or bar tack stitch was ... APPENDIX ERROR MESSAGES If an operation is performed incorrectly before continuing the operation. Remove the tangled thread before the sewing machine is set up , for four seconds and the machine automatically stops. Operation beep (for models equipped with the operation beep). ■ If a key is pressed ...
Users Manual - English
Page 69
...8 appliqués 46 N needle 20 B bar tack 50 basic stitching 35 blind hem stitching 36 bobbin 14 bobbin case 14, 61 bobbin cover 6, 14 bobbin winder 11, 63, 66 button sewing 42 needle bar thread guide 6 needle clamp screw 6, 22 needle plate 6 needle plate cover 61...set bobbin 6, 15 quilting 48 quilting foot 49 quilting guide 48 R reinforcement stitching 50 reverse/reinforcement stitch button 6 H handwheel 5 heirloom stitching 55 hook-and-loop fastener 32 J joining 55 joining stitch 46, 52 S scallop stitching 53 seam ripper 41 sewing machine needles 20 sewing ...
...8 appliqués 46 N needle 20 B bar tack 50 basic stitching 35 blind hem stitching 36 bobbin 14 bobbin case 14, 61 bobbin cover 6, 14 bobbin winder 11, 63, 66 button sewing 42 needle bar thread guide 6 needle clamp screw 6, 22 needle plate 6 needle plate cover 61...set bobbin 6, 15 quilting 48 quilting foot 49 quilting guide 48 R reinforcement stitching 50 reverse/reinforcement stitch button 6 H handwheel 5 heirloom stitching 55 hook-and-loop fastener 32 J joining 55 joining stitch 46, 52 S scallop stitching 53 seam ripper 41 sewing machine needles 20 sewing ...


