Quick Setup Guide - English
Page 4
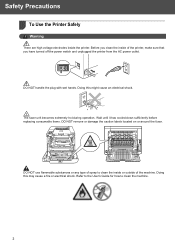
...handle the plug with wet hands. Refer to the User's Guide for how to clean the inside or outside of the machine. Before you have turned off the power switch and unplugged the printer from the AC power outlet. Wait until it has cooled down sufficiently before replacing ...around the fuser. DO NOT use flammable substances or any type of spray to clean the machine. 2 Safety Precautions To Use the Printer Safely Warning There are high voltage electrodes inside of the printer, make sure that you clean the inside the printer. Doing this may cause a fire or electrical shock.
...handle the plug with wet hands. Refer to the User's Guide for how to clean the inside or outside of the machine. Before you have turned off the power switch and unplugged the printer from the AC power outlet. Wait until it has cooled down sufficiently before replacing ...around the fuser. DO NOT use flammable substances or any type of spray to clean the machine. 2 Safety Precautions To Use the Printer Safely Warning There are high voltage electrodes inside of the printer, make sure that you clean the inside the printer. Doing this may cause a fire or electrical shock.
Quick Setup Guide - English
Page 5
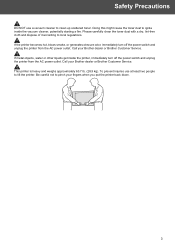
... smoke, or generates obscure odor, immediately turn off the power switch and unplug the printer from the AC power outlet. Call your Brother dealer or Brother Customer Service. To prevent injuries use a vacuum cleaner to clean up scattered toner. Please carefully clean the toner dust with a dry, lint-free cloth and dispose of it according...
... smoke, or generates obscure odor, immediately turn off the power switch and unplug the printer from the AC power outlet. Call your Brother dealer or Brother Customer Service. To prevent injuries use a vacuum cleaner to clean up scattered toner. Please carefully clean the toner dust with a dry, lint-free cloth and dispose of it according...
Users Manual - English
Page 3
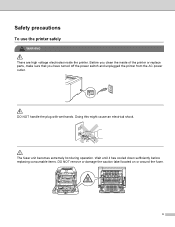
Before you have turned off the power switch and unplugged the printer from the AC power outlet. Wait until it has cooled down sufficiently before replacing consumable items. DO NOT remove or damage the caution label located on or around the fuser. The fuser unit becomes extremely hot during operation. Safety precautions To use the printer safely WA RNING There are high voltage electrodes inside of the printer or replace parts, make sure that you clean the inside the printer. Doing this might cause an electrical shock. DO NOT handle the plug with wet hands. ii
Before you have turned off the power switch and unplugged the printer from the AC power outlet. Wait until it has cooled down sufficiently before replacing consumable items. DO NOT remove or damage the caution label located on or around the fuser. The fuser unit becomes extremely hot during operation. Safety precautions To use the printer safely WA RNING There are high voltage electrodes inside of the printer or replace parts, make sure that you clean the inside the printer. Doing this might cause an electrical shock. DO NOT handle the plug with wet hands. ii
Users Manual - English
Page 4
..., or unplug the printer during a lightning storm. Call your Brother dealer or Brother Customer Service. Call your Brother dealer or Brother Customer Service. We recommend that you set the printer back down. iii DO NOT use a vacuum cleaner to use at least two people. Doing this printer, make sure to clean up scattered toner. This printer is heavy and...
..., or unplug the printer during a lightning storm. Call your Brother dealer or Brother Customer Service. Call your Brother dealer or Brother Customer Service. We recommend that you set the printer back down. iii DO NOT use a vacuum cleaner to use at least two people. Doing this printer, make sure to clean up scattered toner. This printer is heavy and...
Users Manual - English
Page 7
... outside of the printer 122 Cleaning the inside of the scanner windows 123 Cleaning the corona wires ...127 Cleaning the drum unit...132 Shipping the printer...134 Repacking Instructions ...134 7 Troubleshooting 142 Identifying your problem ...142 LCD messages ...143 vi Software for networks ...66 About emulation modes...67 Automatic emulation selection (HL-4050CDN / HL-4070CDW only 67...
... outside of the printer 122 Cleaning the inside of the scanner windows 123 Cleaning the corona wires ...127 Cleaning the drum unit...132 Shipping the printer...134 Repacking Instructions ...134 7 Troubleshooting 142 Identifying your problem ...142 LCD messages ...143 vi Software for networks ...66 About emulation modes...67 Automatic emulation selection (HL-4050CDN / HL-4070CDW only 67...
Users Manual - English
Page 107
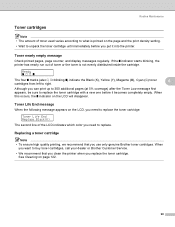
...replace the toner cartridge. Replacing a toner cartridge 6 Note • To ensure high quality printing, we recommend that you clean the printer when you use only genuine Brother toner cartridges. Toner nearly empty message 6 Check printed pages, page counter, and display messages regularly. If the o ...indicator starts blinking, the printer has nearly run out of the LCD indicates which color you need to replace the toner...
...replace the toner cartridge. Replacing a toner cartridge 6 Note • To ensure high quality printing, we recommend that you clean the printer when you use only genuine Brother toner cartridges. Toner nearly empty message 6 Check printed pages, page counter, and display messages regularly. If the o ...indicator starts blinking, the printer has nearly run out of the LCD indicates which color you need to replace the toner...
Users Manual - English
Page 110
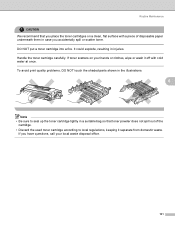
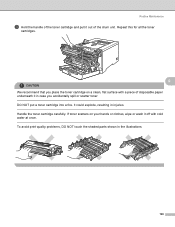
... does not spill out of disposable paper underneath them in case you have questions, call your local waste disposal office. 101 If toner scatters on a clean, flat surface with cold water at once. Handle the toner cartridge carefully. To avoid print quality problems, DO NOT touch the shaded parts shown in...
... does not spill out of disposable paper underneath them in case you have questions, call your local waste disposal office. 101 If toner scatters on a clean, flat surface with cold water at once. Handle the toner cartridge carefully. To avoid print quality problems, DO NOT touch the shaded parts shown in...

Users Manual - English
Page 111
1 1 1 2 2 1 2 1 2 Routine Maintenance d Clean the corona wire as follows: 1 Push to release the latches of the white corona wire cover (1), and then open the cover. 6 1 2 Clean the corona wire inside the drum unit by gently sliding the green tab from left to right and right to left several times. 1 CA UTI ON Be sure to return the tab to the home position a (1). If you do not, printed pages may have a vertical stripe. 102 2 2 1 2 1 2 1 1 1
1 1 1 2 2 1 2 1 2 Routine Maintenance d Clean the corona wire as follows: 1 Push to release the latches of the white corona wire cover (1), and then open the cover. 6 1 2 Clean the corona wire inside the drum unit by gently sliding the green tab from left to right and right to left several times. 1 CA UTI ON Be sure to return the tab to the home position a (1). If you do not, printed pages may have a vertical stripe. 102 2 2 1 2 1 2 1 1 1
Users Manual - English
Page 112
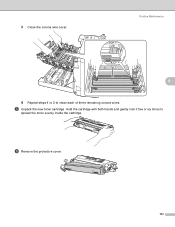
e Unpack the new toner cartridge. 3 Close the corona wire cover. Routine Maintenance 1 1 1 2 2 1 2 1 2 6 4 Repeat steps 1 to 3 to spread the toner evenly inside the cartridge. Hold the cartridge with both hands and gently rock it five or six times to clean each of three remaining corona wires. f Remove the protective cover. 103
e Unpack the new toner cartridge. 3 Close the corona wire cover. Routine Maintenance 1 1 1 2 2 1 2 1 2 6 4 Repeat steps 1 to 3 to spread the toner evenly inside the cartridge. Hold the cartridge with both hands and gently rock it five or six times to clean each of three remaining corona wires. f Remove the protective cover. 103
Users Manual - English
Page 114
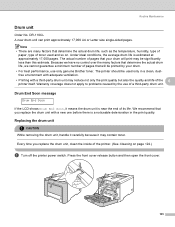
...number of pages that your drum will be printed by the use only genuine Brother toner. Every time you replace the drum unit with a third-party drum unit... the actual drum life, we have no control over the many factors that you replace the drum unit, clean the inside of its life. Note • There are many factors that will print may contain toner. ...Under ideal conditions, the average drum life is near the end of the printer. (See Cleaning on . Warranty coverage does not apply to problems caused by your drum. • For best performance, use ...
...number of pages that your drum will be printed by the use only genuine Brother toner. Every time you replace the drum unit with a third-party drum unit... the actual drum life, we have no control over the many factors that you replace the drum unit, clean the inside of its life. Note • There are many factors that will print may contain toner. ...Under ideal conditions, the average drum life is near the end of the printer. (See Cleaning on . Warranty coverage does not apply to problems caused by your drum. • For best performance, use ...
Users Manual - English
Page 115
Lift the drum unit up and then pull it out until it . Pull the drum unit completely out of the printer using the green handles on the left side of disposable paper underneath it in case you carry it stops. DO NOT hold the sides of .... c Release the gray lock lever (1) that you place the drum unit on your hands or clothes, wipe or wash it off with a piece of the printer. Handle the toner cartridges carefully. We recommend that is on the drum unit. 6 1 CA UTI ON Hold the green handles of the drum unit when...
Lift the drum unit up and then pull it out until it . Pull the drum unit completely out of the printer using the green handles on the left side of disposable paper underneath it in case you carry it stops. DO NOT hold the sides of .... c Release the gray lock lever (1) that you place the drum unit on your hands or clothes, wipe or wash it off with a piece of the printer. Handle the toner cartridges carefully. We recommend that is on the drum unit. 6 1 CA UTI ON Hold the green handles of the drum unit when...

Users Manual - English
Page 121
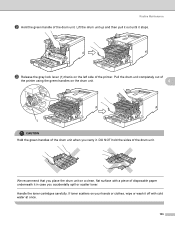
...unit. 1 6 CA UTI ON Hold the green handles of the drum unit when you carry it in the illustration. 112 To prevent damage to the printer from static electricity, DO NOT touch the electrodes shown in case you accidentally spill or scatter toner. Routine Maintenance c Release the gray lock lever (1) ...that you place the drum unit and belt unit on a clean, flat surface with a piece of disposable paper underneath it . DO NOT hold the sides of the printer. Pull the drum unit completely out of the printer using the green handles on the left side of the drum unit.
...unit. 1 6 CA UTI ON Hold the green handles of the drum unit when you carry it in the illustration. 112 To prevent damage to the printer from static electricity, DO NOT touch the electrodes shown in case you accidentally spill or scatter toner. Routine Maintenance c Release the gray lock lever (1) ...that you place the drum unit and belt unit on a clean, flat surface with a piece of disposable paper underneath it . DO NOT hold the sides of the printer. Pull the drum unit completely out of the printer using the green handles on the left side of the drum unit.
Users Manual - English
Page 127
We recommend that you place the drum unit and belt unit on a clean, flat surface with a piece of disposable paper underneath it in the illustration. Routine Maintenance CA UTI ON Hold the green handles of the drum unit ... scatter toner. 6 If toner scatters on your hands or clothes, wipe or wash it off with cold water at once. To prevent damage to the printer from static electricity, DO NOT touch the electrodes shown in case you carry it. DO NOT hold the sides of the belt unit with both...
We recommend that you place the drum unit and belt unit on a clean, flat surface with a piece of disposable paper underneath it in the illustration. Routine Maintenance CA UTI ON Hold the green handles of the drum unit ... scatter toner. 6 If toner scatters on your hands or clothes, wipe or wash it off with cold water at once. To prevent damage to the printer from static electricity, DO NOT touch the electrodes shown in case you carry it. DO NOT hold the sides of the belt unit with both...
Users Manual - English
Page 131
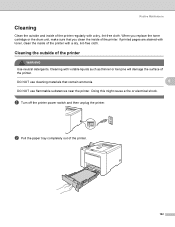
...unit, make sure that contain ammonia. 6 DO NOT use cleaning materials that you clean the inside of the printer. DO NOT use flammable substances near the printer. b Pull the paper tray completely out of the printer regularly with a dry, lint-free cloth. If printed ... with toner, clean the inside of the printer. 122 Cleaning with a dry, lint-free cloth. Doing this might cause a fire or electrical shock. Routine Maintenance Cleaning 6 Clean the outside of the printer 6 WA RNING Use neutral detergents. Cleaning the outside and inside of the printer with volatile liquids...
...unit, make sure that contain ammonia. 6 DO NOT use cleaning materials that you clean the inside of the printer. DO NOT use flammable substances near the printer. b Pull the paper tray completely out of the printer regularly with a dry, lint-free cloth. If printed ... with toner, clean the inside of the printer. 122 Cleaning with a dry, lint-free cloth. Doing this might cause a fire or electrical shock. Routine Maintenance Cleaning 6 Clean the outside of the printer 6 WA RNING Use neutral detergents. Cleaning the outside and inside of the printer with volatile liquids...
Users Manual - English
Page 132
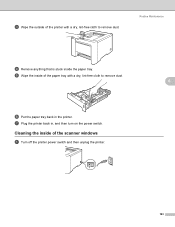
Routine Maintenance d Remove anything that is stuck inside of the scanner windows a Turn off the printer power switch and then unplug the printer. 6 6 123 f Put the paper tray back in , and then turn on the power switch. e Wipe the inside of the paper tray with a dry, lint-free cloth to remove dust. c Wipe the outside of the printer with a dry, lint-free cloth to remove dust. g Plug the printer back in the printer. Cleaning the inside the paper tray.
Routine Maintenance d Remove anything that is stuck inside of the scanner windows a Turn off the printer power switch and then unplug the printer. 6 6 123 f Put the paper tray back in , and then turn on the power switch. e Wipe the inside of the paper tray with a dry, lint-free cloth to remove dust. c Wipe the outside of the printer with a dry, lint-free cloth to remove dust. g Plug the printer back in the printer. Cleaning the inside the paper tray.
Users Manual - English
Page 134
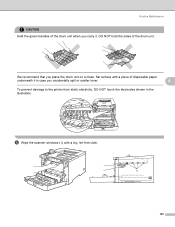
DO NOT hold the sides of the drum unit. We recommend that you accidentally spill or scatter toner. 6 To prevent damage to the printer from static electricity, DO NOT touch the electrodes shown in the illustration. Routine Maintenance CA UTI ON Hold the green handles of the drum unit when you carry it in case you place the drum unit on a clean, flat surface with a dry, lint-free cloth. 1 125 e Wipe the scanner windows (1) with a piece of disposable paper underneath it .
DO NOT hold the sides of the drum unit. We recommend that you accidentally spill or scatter toner. 6 To prevent damage to the printer from static electricity, DO NOT touch the electrodes shown in the illustration. Routine Maintenance CA UTI ON Hold the green handles of the drum unit when you carry it in case you place the drum unit on a clean, flat surface with a dry, lint-free cloth. 1 125 e Wipe the scanner windows (1) with a piece of disposable paper underneath it .
Users Manual - English
Page 136
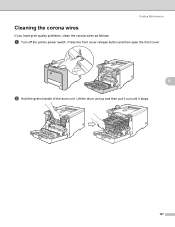
Lift the drum unit up and then pull it out until it stops. 127 Routine Maintenance Cleaning the corona wires 6 If you have print quality problems, clean the corona wires as follows: a Turn off the printer power switch. Press the front cover release button and then open the front cover. 6 b Hold the green handle of the drum unit.
Lift the drum unit up and then pull it out until it stops. 127 Routine Maintenance Cleaning the corona wires 6 If you have print quality problems, clean the corona wires as follows: a Turn off the printer power switch. Press the front cover release button and then open the front cover. 6 b Hold the green handle of the drum unit.
Users Manual - English
Page 137
... shown in case you place the toner cartridge on your hands or clothes, wipe or wash it in the illustrations. 128 If toner scatters on a clean, flat surface with cold water at once. It could explode, resulting in injuries. DO NOT put a toner cartridge into a fire.
... shown in case you place the toner cartridge on your hands or clothes, wipe or wash it in the illustrations. 128 If toner scatters on a clean, flat surface with cold water at once. It could explode, resulting in injuries. DO NOT put a toner cartridge into a fire.

Users Manual - English
Page 138
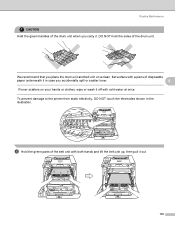
Routine Maintenance d Push to release the latches of the white corona wire cover (1), and then open the cover. 1 1 1 2 2 1 2 1 2 6 1 Note We recommend that caused the print quality problem, see the illustration below to clean only the corona wire of the color that you clean the corona wire for each of the colors. If you want to identify the position of each of the corona wires. 1 23 4 1 Corona wire cover for Black (K) 2 Corona wire cover for Yellow (Y) 3 Corona wire cover for Magenta (M) 4 Corona wire cover for Cyan (C) 129
Routine Maintenance d Push to release the latches of the white corona wire cover (1), and then open the cover. 1 1 1 2 2 1 2 1 2 6 1 Note We recommend that caused the print quality problem, see the illustration below to clean only the corona wire of the color that you clean the corona wire for each of the colors. If you want to identify the position of each of the corona wires. 1 23 4 1 Corona wire cover for Black (K) 2 Corona wire cover for Yellow (Y) 3 Corona wire cover for Magenta (M) 4 Corona wire cover for Cyan (C) 129

Users Manual - English
Page 139
If you do not, printed pages may have a vertical stripe. f Close the corona wire cover. g Repeat steps d to f to the home position a (1). 2 2 1 2 1 2 1 1 1 Routine Maintenance e Clean the corona wire inside the drum unit by gently sliding the green tab from left to right and right to left several times. 1 6 CA UTI ON Be sure to return the tab to clean each of the remaining corona wires. 130 1 1 1 2 2 1 2 1 2
If you do not, printed pages may have a vertical stripe. f Close the corona wire cover. g Repeat steps d to f to the home position a (1). 2 2 1 2 1 2 1 1 1 Routine Maintenance e Clean the corona wire inside the drum unit by gently sliding the green tab from left to right and right to left several times. 1 6 CA UTI ON Be sure to return the tab to clean each of the remaining corona wires. 130 1 1 1 2 2 1 2 1 2


