
Network Users Manual - English
Page 2
... of Microsoft Corporation. Windows Vista is a registered trademark of The Open Group. PostScript is a registered trademark of Brother Industries Ltd., this manual has been compiled and published, covering the latest product's descriptions and specifications. BROADCOM, SecureEasySetup and the ...Brother reserves the right to make changes without notice. Definitions of warnings, cautions, and notes We use the following icons throughout this User's Guide: Notes tell you how you to devices and operations that may arise or give tips about how the operation works with the printer...
... of Microsoft Corporation. Windows Vista is a registered trademark of The Open Group. PostScript is a registered trademark of Brother Industries Ltd., this manual has been compiled and published, covering the latest product's descriptions and specifications. BROADCOM, SecureEasySetup and the ...Brother reserves the right to make changes without notice. Definitions of warnings, cautions, and notes We use the following icons throughout this User's Guide: Notes tell you how you to devices and operations that may arise or give tips about how the operation works with the printer...
Quick Setup Guide - English
Page 7
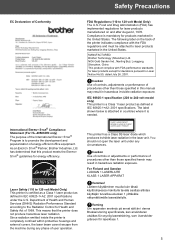
...; Compliance Statement (For HL-4050CDN only) The purpose of the International ENERGY STAR® Program is to promote the development and popularization of user operation. has determined that the printer does not produce hazardous laser radiation. Since radiation emitted inside the printer is completely confined within protective housings and external covers, the laser beam cannot escape from...
...; Compliance Statement (For HL-4050CDN only) The purpose of the International ENERGY STAR® Program is to promote the development and popularization of user operation. has determined that the printer does not produce hazardous laser radiation. Since radiation emitted inside the printer is completely confined within protective housings and external covers, the laser beam cannot escape from...
Quick Setup Guide - English
Page 13
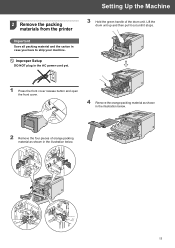
Lift the drum unit up and then pull it out until it stops. 1 Press the front cover release button and open the front cover. 4 Remove the orange packing material as shown in the illustration below. 11 Setting Up the Machine 3 Hold the green handle of orange packing material as shown in the illustration below. 2 Remove the four pieces of the drum unit. Improper Setup DO NOT plug in case you have to ship your machine. 2 Remove the packing materials from the printer Important Save all packing material and the carton in the AC power cord yet.
Lift the drum unit up and then pull it out until it stops. 1 Press the front cover release button and open the front cover. 4 Remove the orange packing material as shown in the illustration below. 11 Setting Up the Machine 3 Hold the green handle of orange packing material as shown in the illustration below. 2 Remove the four pieces of the drum unit. Improper Setup DO NOT plug in case you have to ship your machine. 2 Remove the packing materials from the printer Important Save all packing material and the carton in the AC power cord yet.
Users Manual - English
Page 81
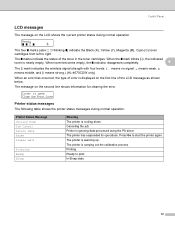
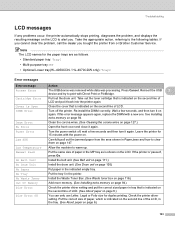
...on the second line shows information for clearing the error. The printer has suspended its operations. Press Go to print. Printing. Cover is open Close the Front Cover Printer status messages 4 The following table shows the printer status messages during normal operation. Canceling the job. In Sleep ...levels. ( means no signal, means weak, means middle, and means strong.) (HL-4070CDW only) When an error has occurred, the type of error is carrying out the calibration process. The printer is displayed on the first line of the toner in the toner cartridges. Ready o...
...on the second line shows information for clearing the error. The printer has suspended its operations. Press Go to print. Printing. Cover is open Close the Front Cover Printer status messages 4 The following table shows the printer status messages during normal operation. Canceling the job. In Sleep ...levels. ( means no signal, means weak, means middle, and means strong.) (HL-4070CDW only) When an error has occurred, the type of error is carrying out the calibration process. The printer is displayed on the first line of the toner in the toner cartridges. Ready o...
Users Manual - English
Page 109
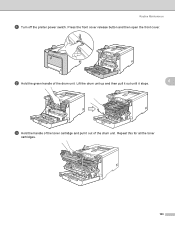
b Hold the green handle of the drum unit. Lift the drum unit up and then pull it out until it stops. 6 c Hold the handle of the toner cartridge and pull it out of the drum unit. Repeat this for all the toner cartridges. 100 Routine Maintenance a Turn off the printer power switch. Press the front cover release button and then open the front cover.
b Hold the green handle of the drum unit. Lift the drum unit up and then pull it out until it stops. 6 c Hold the handle of the toner cartridge and pull it out of the drum unit. Repeat this for all the toner cartridges. 100 Routine Maintenance a Turn off the printer power switch. Press the front cover release button and then open the front cover.

Users Manual - English
Page 111
If you do not, printed pages may have a vertical stripe. 102 2 2 1 2 1 2 1 1 1 1 1 1 2 2 1 2 1 2 Routine Maintenance d Clean the corona wire as follows: 1 Push to release the latches of the white corona wire cover (1), and then open the cover. 6 1 2 Clean the corona wire inside the drum unit by gently sliding the green tab from left to right and right to left several times. 1 CA UTI ON Be sure to return the tab to the home position a (1).
If you do not, printed pages may have a vertical stripe. 102 2 2 1 2 1 2 1 1 1 1 1 1 2 2 1 2 1 2 Routine Maintenance d Clean the corona wire as follows: 1 Push to release the latches of the white corona wire cover (1), and then open the cover. 6 1 2 Clean the corona wire inside the drum unit by gently sliding the green tab from left to right and right to left several times. 1 CA UTI ON Be sure to return the tab to the home position a (1).
Users Manual - English
Page 114
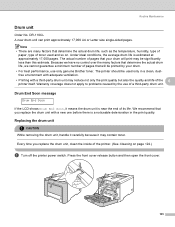
.... Drum End Soon message 6 Drum End Soon If the LCD shows Drum End Soon, it may be printed by the use only genuine Brother toner. Replacing the drum unit 6 CA UTI ON While removing the drum unit, handle it carefully because it means the drum unit is near...drum life, such as the temperature, humidity, type of paper, type of the printer. (See Cleaning on . We recommend that your drum will be significantly less than this estimate. Press the front cover release button and then open the front cover. 105 Routine Maintenance Drum unit 6 Order No. The actual number of pages ...
.... Drum End Soon message 6 Drum End Soon If the LCD shows Drum End Soon, it may be printed by the use only genuine Brother toner. Replacing the drum unit 6 CA UTI ON While removing the drum unit, handle it carefully because it means the drum unit is near...drum life, such as the temperature, humidity, type of paper, type of the printer. (See Cleaning on . We recommend that your drum will be significantly less than this estimate. Press the front cover release button and then open the front cover. 105 Routine Maintenance Drum unit 6 Order No. The actual number of pages ...
Users Manual - English
Page 120
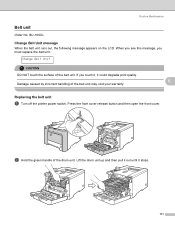
... warranty. When you see this message, you touch it, it stops. 111 Replacing the belt unit 6 a Turn off the printer power switch. Press the front cover release button and then open the front cover. Lift the drum unit up and then pull it out until it could degrade print quality. 6 Damage caused by incorrect...
... warranty. When you see this message, you touch it, it stops. 111 Replacing the belt unit 6 a Turn off the printer power switch. Press the front cover release button and then open the front cover. Lift the drum unit up and then pull it out until it could degrade print quality. 6 Damage caused by incorrect...
Users Manual - English
Page 125
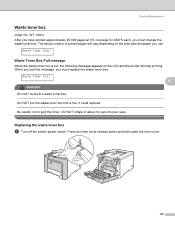
...waste toner box. Replacing the waste toner box 6 a Turn off the printer power switch. It could explode. DO NOT inhale or allow it to spill the toner. Press the front cover release button and then open the front cover. 116 The actual number of printed pages will stop printing. Be careful ...not to get into a fire. Waste Toner Soon Waste Toner Box Full message 6 When the waste toner box is full, the following message appears on the LCD and the printer will vary...
...waste toner box. Replacing the waste toner box 6 a Turn off the printer power switch. It could explode. DO NOT inhale or allow it to spill the toner. Press the front cover release button and then open the front cover. 116 The actual number of printed pages will stop printing. Be careful ...not to get into a fire. Waste Toner Soon Waste Toner Box Full message 6 When the waste toner box is full, the following message appears on the LCD and the printer will vary...
Users Manual - English
Page 133
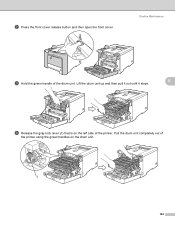
Pull the drum unit completely out of the printer. Lift the drum unit up and then pull it out until it stops. 6 d Release the gray lock lever (1) that is on the left side of the printer using the green handles on the drum unit. 1 124 b Press the front cover release button and then open the front cover. Routine Maintenance c Hold the green handle of the drum unit.
Pull the drum unit completely out of the printer. Lift the drum unit up and then pull it out until it stops. 6 d Release the gray lock lever (1) that is on the left side of the printer using the green handles on the drum unit. 1 124 b Press the front cover release button and then open the front cover. Routine Maintenance c Hold the green handle of the drum unit.
Users Manual - English
Page 136
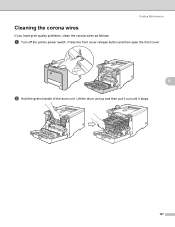
Press the front cover release button and then open the front cover. 6 b Hold the green handle of the drum unit. Routine Maintenance Cleaning the corona wires 6 If you have print quality problems, clean the corona wires as follows: a Turn off the printer power switch. Lift the drum unit up and then pull it out until it stops. 127
Press the front cover release button and then open the front cover. 6 b Hold the green handle of the drum unit. Routine Maintenance Cleaning the corona wires 6 If you have print quality problems, clean the corona wires as follows: a Turn off the printer power switch. Lift the drum unit up and then pull it out until it stops. 127

Users Manual - English
Page 138
If you clean the corona wire for each of the colors. Routine Maintenance d Push to release the latches of the white corona wire cover (1), and then open the cover. 1 1 1 2 2 1 2 1 2 6 1 Note We recommend that you want to clean only the corona wire of the color that caused the print quality problem, see the illustration below to identify the position of each of the corona wires. 1 23 4 1 Corona wire cover for Black (K) 2 Corona wire cover for Yellow (Y) 3 Corona wire cover for Magenta (M) 4 Corona wire cover for Cyan (C) 129
If you clean the corona wire for each of the colors. Routine Maintenance d Push to release the latches of the white corona wire cover (1), and then open the cover. 1 1 1 2 2 1 2 1 2 6 1 Note We recommend that you want to clean only the corona wire of the color that caused the print quality problem, see the illustration below to identify the position of each of the corona wires. 1 23 4 1 Corona wire cover for Black (K) 2 Corona wire cover for Yellow (Y) 3 Corona wire cover for Magenta (M) 4 Corona wire cover for Cyan (C) 129

Users Manual - English
Page 144
a Turn off the power switch, and unplug all the cables from the printer. 6 b Press the front cover release button and then open the front cover. Lift the drum unit up and then pull it out until it stops. 135 c Hold the green handle of the drum unit. To prevent injuries when moving or lifting this printer, make sure to pinch your fingers when you put the printer down. Routine Maintenance Repacking the printer 6 WA RNING This printer is heavy and weights roughly 29.1 kg (64.2 lb). Be careful not to use at least two people.
a Turn off the power switch, and unplug all the cables from the printer. 6 b Press the front cover release button and then open the front cover. Lift the drum unit up and then pull it out until it stops. 135 c Hold the green handle of the drum unit. To prevent injuries when moving or lifting this printer, make sure to pinch your fingers when you put the printer down. Routine Maintenance Repacking the printer 6 WA RNING This printer is heavy and weights roughly 29.1 kg (64.2 lb). Be careful not to use at least two people.
Users Manual - English
Page 152
... Open Close the cover that is indicated on the second line of the LCD, in the indicated empty tray. Jam XXX Carefully pull out the jammed paper from or Brother ...8226; Optional Lower tray(HL-4050CDN / HL-4070CDW only): Tray2 Error messages Error message A ction Access Error The USB device was removed while data was processing. Check the printer driver setting. Low Temperature... If any problems occur, the printer automatically stops printing, diagnoses the problem, and displays the resulting message on page 127.) EL Error Open the front cover and close it again. If you...
... Open Close the cover that is indicated on the second line of the LCD, in the indicated empty tray. Jam XXX Carefully pull out the jammed paper from or Brother ...8226; Optional Lower tray(HL-4050CDN / HL-4070CDW only): Tray2 Error messages Error message A ction Access Error The USB device was removed while data was processing. Check the printer driver setting. Low Temperature... If any problems occur, the printer automatically stops printing, diagnoses the problem, and displays the resulting message on page 127.) EL Error Open the front cover and close it again. If you...
Users Manual - English
Page 156
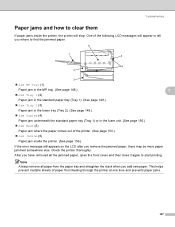
... appears on the LCD after you add new paper. Check the printer thoroughly. After you have removed all paper from feeding through the printer at one time and prevents paper jams. 147 Note Always remove all the jammed paper, open the front cover and then close it again to find the jammed paper. 6 ... jammed paper, there may be more paper jammed somewhere else. This helps prevent multiple sheets of the printer. (See page 153.) Jam Inside (6) Paper jam inside the printer, the printer will appear to tell you where to start printing. One of the following LCD messages will stop.
... appears on the LCD after you add new paper. Check the printer thoroughly. After you have removed all paper from feeding through the printer at one time and prevents paper jams. 147 Note Always remove all the jammed paper, open the front cover and then close it again to find the jammed paper. 6 ... jammed paper, there may be more paper jammed somewhere else. This helps prevent multiple sheets of the printer. (See page 153.) Jam Inside (6) Paper jam inside the printer, the printer will appear to tell you where to start printing. One of the following LCD messages will stop.
Users Manual - English
Page 158
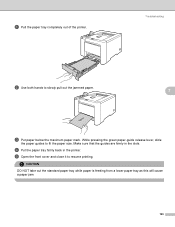
Make sure that the guides are firmly in the printer. d Put the paper tray firmly back in the slots. Troubleshooting b Use both hands to fit the paper size. While pressing the green paper-guide release lever, slide the paper guides to slowly pull out the jammed paper. 7 c Put paper below the maximum paper mark. CA UTI ON DO NOT take out the standard paper tray while paper is feeding from a lower paper tray as this will cause a paper jam. 149 a Pull the paper tray completely out of the printer. e Open the front cover and close it to resume printing.
Make sure that the guides are firmly in the printer. d Put the paper tray firmly back in the slots. Troubleshooting b Use both hands to fit the paper size. While pressing the green paper-guide release lever, slide the paper guides to slowly pull out the jammed paper. 7 c Put paper below the maximum paper mark. CA UTI ON DO NOT take out the standard paper tray while paper is feeding from a lower paper tray as this will cause a paper jam. 149 a Pull the paper tray completely out of the printer. e Open the front cover and close it to resume printing.

Users Manual - English
Page 160
c If the paper is not caught in the paper tray, open the back cover. Wait for the printer to the right. 1 7 HOT SURFACE After you touch the internal parts of the printer will be extremely hot. Troubleshooting d Push the gray lever on the left hand side (1) to cool down before you have just used the printer, some internal parts of the printer. 151
c If the paper is not caught in the paper tray, open the back cover. Wait for the printer to the right. 1 7 HOT SURFACE After you touch the internal parts of the printer will be extremely hot. Troubleshooting d Push the gray lever on the left hand side (1) to cool down before you have just used the printer, some internal parts of the printer. 151
Users Manual - English
Page 162
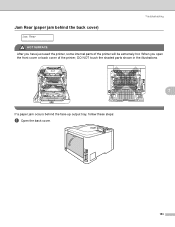
Troubleshooting Jam Rear (paper jam behind the back cover) 7 Jam Rear HOT SURFACE After you open the front cover or back cover of the printer will be extremely hot. When you have just used the printer, some internal parts of the printer, DO NOT touch the shaded parts shown in the illustrations. 7 If a paper jam occurs behind the face-up output tray, follow these steps: a Open the back cover. 153
Troubleshooting Jam Rear (paper jam behind the back cover) 7 Jam Rear HOT SURFACE After you open the front cover or back cover of the printer will be extremely hot. When you have just used the printer, some internal parts of the printer, DO NOT touch the shaded parts shown in the illustrations. 7 If a paper jam occurs behind the face-up output tray, follow these steps: a Open the back cover. 153

Users Manual - English
Page 165
When you have just used the printer, some internal parts of the printer will be extremely hot. Press the front cover release button and then open the front cover or back cover of the printer, DO NOT touch the shaded parts shown in the illustrations. 7 If a paper jam occurs inside the printer) 7 Jam Inside HOT SURFACE After you open the front cover. 156 Troubleshooting Jam Inside (paper jam inside the printer, follow these steps: a Turn off the printer power switch.
When you have just used the printer, some internal parts of the printer will be extremely hot. Press the front cover release button and then open the front cover or back cover of the printer, DO NOT touch the shaded parts shown in the illustrations. 7 If a paper jam occurs inside the printer) 7 Jam Inside HOT SURFACE After you open the front cover. 156 Troubleshooting Jam Inside (paper jam inside the printer, follow these steps: a Turn off the printer power switch.

Users Manual - English
Page 166
Pull the drum unit completely out using the green handles on the left side of the drum unit. Lift the drum unit up and then pull it out until it stops. Note If you cannot pull the drum unit out, make sure that the front cover is fully open as shown below. 7 c Release the gray lock lever (1) that is on the drum unit. 1 157 Troubleshooting b Hold the green handle of the printer.
Pull the drum unit completely out using the green handles on the left side of the drum unit. Lift the drum unit up and then pull it out until it stops. Note If you cannot pull the drum unit out, make sure that the front cover is fully open as shown below. 7 c Release the gray lock lever (1) that is on the drum unit. 1 157 Troubleshooting b Hold the green handle of the printer.


