Users Manual - English
Page 7
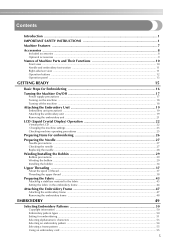
......8 Included accessories ...8 Optional accessories ...9 Names of Machine Parts and Their Functions 10 Front view ...10 Needle and embroidery foot section ...11 Right-side/rear view ...11 Operation buttons ...12 Operation panel ...13 GETTING READY 15 Basic Steps...the fabric ...43 Setting the fabric in the embroidery frame ...44 Attaching the Embroidery Frame 47 Attaching the embroidery frame ...47 Removing the embroidery frame ...48 EMBROIDERY 49 Selecting Embroidery Patterns 50 Copyright information ...50 Embroidery pattern types ...50 Setting for embroidering ...51 Selecting ...
......8 Included accessories ...8 Optional accessories ...9 Names of Machine Parts and Their Functions 10 Front view ...10 Needle and embroidery foot section ...11 Right-side/rear view ...11 Operation buttons ...12 Operation panel ...13 GETTING READY 15 Basic Steps...the fabric ...43 Setting the fabric in the embroidery frame ...44 Attaching the Embroidery Frame 47 Attaching the embroidery frame ...47 Removing the embroidery frame ...48 EMBROIDERY 49 Selecting Embroidery Patterns 50 Copyright information ...50 Embroidery pattern types ...50 Setting for embroidering ...51 Selecting ...

Users Manual - English
Page 8
... upper thread tension ...63 Adjusting the bobbin thread tension ...64 Connecting character patterns ...65 Resewing ...66 Thread runs out partway through a design ...67 Stopping while embroidering ...67 Using the Memory Function 69 Embroidery data precautions ...69 Saving patterns ...70 Retrieving embroidery patterns from the computer 71 APPENDIX 73 Care and Maintenance ...74 Cleaning the machine...
... upper thread tension ...63 Adjusting the bobbin thread tension ...64 Connecting character patterns ...65 Resewing ...66 Thread runs out partway through a design ...67 Stopping while embroidering ...67 Using the Memory Function 69 Embroidery data precautions ...69 Saving patterns ...70 Retrieving embroidery patterns from the computer 71 APPENDIX 73 Care and Maintenance ...74 Cleaning the machine...
Users Manual - English
Page 9
c USB port Various embroidery patterns on , the machine is ready to embroider. f Easy-to work on dark fabrics. h Embroidery You can thread the needle easily by using the USB cable (page 71). g Lighting Start/Stop button When the green light is warming up the ... be cut automatically after embroidering (page 58). A red or orange light indicates an error or that the machine is on the website or saved in embroidery patterns, alphanumeric characters, framed decorations, and designs from optional...
c USB port Various embroidery patterns on , the machine is ready to embroider. f Easy-to work on dark fabrics. h Embroidery You can thread the needle easily by using the USB cable (page 71). g Lighting Start/Stop button When the green light is warming up the ... be cut automatically after embroidering (page 58). A red or orange light indicates an error or that the machine is on the website or saved in embroidery patterns, alphanumeric characters, framed decorations, and designs from optional...

Users Manual - English
Page 12
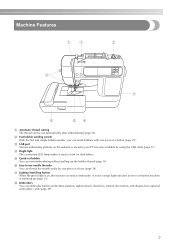
... crystal display) (touch panel) (page 22) Setting for the selected pattern and error messages appear in the connector for the embroidery unit. b Thread guide (page 31, 39) Pass the thread under this panel to select embroidery patterns, or check how to operate the machine. m Thread tension dial (...page 63) Adjust the upper thread tension with this thread guide and around the pretension disc when winding the bobbin thread. 10 g Embroidery unit connector slot (page 20...
... crystal display) (touch panel) (page 22) Setting for the selected pattern and error messages appear in the connector for the embroidery unit. b Thread guide (page 31, 39) Pass the thread under this panel to select embroidery patterns, or check how to operate the machine. m Thread tension dial (...page 63) Adjust the upper thread tension with this thread guide and around the pretension disc when winding the bobbin thread. 10 g Embroidery unit connector slot (page 20...
Users Manual - English
Page 15
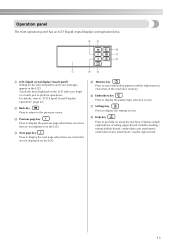
... to display the previous page when there are items that are not displayed on the LCD. e Memory key Press to save embroidery patterns and the alphanumeric characters in the LCD. g Settings key Press to "LCD (Liquid Crystal Display) Operation" (page 22).... simple explanations of setting upper thread / bobbin winding / setting bobbin thread / embroidery unit attachment / embroidery frame attachment / needle replacement. 13 a LCD (liquid crystal display) (touch panel) Setting for the selected pattern and error messages appear in the machine's memory. b Back key Press to return...
... to display the previous page when there are items that are not displayed on the LCD. e Memory key Press to save embroidery patterns and the alphanumeric characters in the LCD. g Settings key Press to "LCD (Liquid Crystal Display) Operation" (page 22).... simple explanations of setting upper thread / bobbin winding / setting bobbin thread / embroidery unit attachment / embroidery frame attachment / needle replacement. 13 a LCD (liquid crystal display) (touch panel) Setting for the selected pattern and error messages appear in the machine's memory. b Back key Press to return...
Users Manual - English
Page 18
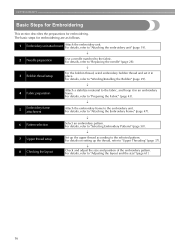
... for embroidering. For details, refer to "Preparing the Fabric" (page 43). ↓ 5 Embroidery frame attachment Attach the embroidery frame to "Attaching the Embroidery Frame" (page 47). ↓ 6 Pattern selection Select an embroidery pattern. For details, refer to the fabric. For details, refer to "Attaching the embroidery unit" (page 19). ↓ 2 Needle preparation Use a needle matched to "Adjusting...
... for embroidering. For details, refer to "Preparing the Fabric" (page 43). ↓ 5 Embroidery frame attachment Attach the embroidery frame to "Attaching the Embroidery Frame" (page 47). ↓ 6 Pattern selection Select an embroidery pattern. For details, refer to the fabric. For details, refer to "Attaching the embroidery unit" (page 19). ↓ 2 Needle preparation Use a needle matched to "Adjusting...
Users Manual - English
Page 22
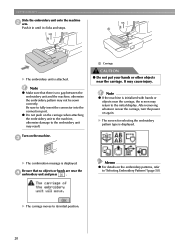
...the carriage when attaching the embroidery unit to the machine, otherwise damage to the embroidery unit may not be sewn correctly. It may return to "Selecting Embroidery Patterns" (page 50). Push it in until it clicks and stops. Turn on the embroidery patterns, refer to the initial display...whatever is initialized with hands or objects near the d embroidery unit and press . Be sure to its initial position. 20 z Do not push on again. a X The embroidery unit is displayed. X The screen for selecting the embroidery pattern type is no objects or hands are near the ...
...the carriage when attaching the embroidery unit to the machine, otherwise damage to the embroidery unit may not be sewn correctly. It may return to "Selecting Embroidery Patterns" (page 50). Push it in until it clicks and stops. Turn on the embroidery patterns, refer to the initial display...whatever is initialized with hands or objects near the d embroidery unit and press . Be sure to its initial position. 20 z Do not push on again. a X The embroidery unit is displayed. X The screen for selecting the embroidery pattern type is no objects or hands are near the ...
Users Manual - English
Page 24
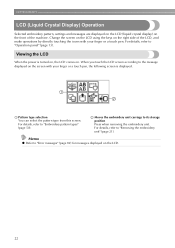
...LCD (Liquid Crystal Display) Operation Selected embroidery pattern, settings and messages are displayed on the LCD (liquid crystal display) on . Change the screen on the LCD using the keys on the right side of the machine. a b a Pattern type selection You can select the pattern type from this screen. When you...of the LCD, and make operations by directly touching the icons with your finger or a touch pen. For details, refer to "Removing the embroidery unit" (page 21). Viewing the LCD When the power is displayed. Memo z Refer to the message displayed on the LCD. 22 For ...
...LCD (Liquid Crystal Display) Operation Selected embroidery pattern, settings and messages are displayed on the LCD (liquid crystal display) on . Change the screen on the LCD using the keys on the right side of the machine. a b a Pattern type selection You can select the pattern type from this screen. When you...of the LCD, and make operations by directly touching the icons with your finger or a touch pen. For details, refer to "Removing the embroidery unit" (page 21). Viewing the LCD When the power is displayed. Memo z Refer to the message displayed on the LCD. 22 For ...

Users Manual - English
Page 40
b a a a Presser foot lever X The embroidery foot is not correct, the thread may become tangled or the needle may not turn out correctly. z Before threading the upper thread, check the appropriate ... inserted onto the spool pin. Press (Needle position button) once or c twice to "Selecting Embroidery Patterns" (page 50). a a Mark on the machine. Memo z Use embroidery thread, or country embroidery thread intended for the selected pattern. If you use other threads, the pattern may bend or break. CAUTION ● When threading the upper thread, carefully follow the...
b a a a Presser foot lever X The embroidery foot is not correct, the thread may become tangled or the needle may not turn out correctly. z Before threading the upper thread, check the appropriate ... inserted onto the spool pin. Press (Needle position button) once or c twice to "Selecting Embroidery Patterns" (page 50). a a Mark on the machine. Memo z Use embroidery thread, or country embroidery thread intended for the selected pattern. If you use other threads, the pattern may bend or break. CAUTION ● When threading the upper thread, carefully follow the...
Users Manual - English
Page 46
... area with the stabilizer material on b top of the pattern being embroidered. GETTING READY Setting the fabric in the embroidery frame The fabric is loose, the quality of the embroidery pattern may be hit by removing inner frame upward. This is used to embroider multiple patterns without changing the fabric position in the frame. 1 a Right...
... area with the stabilizer material on b top of the pattern being embroidered. GETTING READY Setting the fabric in the embroidery frame The fabric is loose, the quality of the embroidery pattern may be hit by removing inner frame upward. This is used to embroider multiple patterns without changing the fabric position in the frame. 1 a Right...
Users Manual - English
Page 47
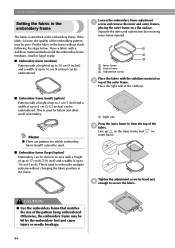
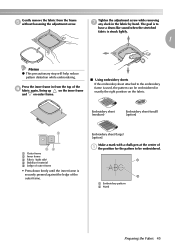
... removing g any slack in exactly the right position on outer frame. ■ Using embroidery sheets If the embroidery sheet attached to the embroidery frame is used, the pattern can be embroidered. Gently remove the fabric from the top of the f fabric again,...8226; Press down firmly until the inner frame is struck lightly. 1 Memo z This precautionary step will help reduce pattern distortion while embroidering. a b a Embroidery pattern b Mark Preparing the Fabric 45 Embroidery sheet (medium) Embroidery sheet (small) [option] 3 12 54 a Outer frame b Inner frame c Fabric (right side) d ...
... removing g any slack in exactly the right position on outer frame. ■ Using embroidery sheets If the embroidery sheet attached to the embroidery frame is used, the pattern can be embroidered. Gently remove the fabric from the top of the f fabric again,...8226; Press down firmly until the inner frame is struck lightly. 1 Memo z This precautionary step will help reduce pattern distortion while embroidering. a b a Embroidery pattern b Mark Preparing the Fabric 45 Embroidery sheet (medium) Embroidery sheet (small) [option] 3 12 54 a Outer frame b Inner frame c Fabric (right side) d ...
Users Manual - English
Page 51
2 EMBROIDERY The steps for embroidering are described in this chapter. Selecting Embroidery Patterns 50 Embroidering...57 Editing and Saving Patterns 61 Using the Memory Function 69
2 EMBROIDERY The steps for embroidering are described in this chapter. Selecting Embroidery Patterns 50 Embroidering...57 Editing and Saving Patterns 61 Using the Memory Function 69

Users Manual - English
Page 52
... thread according to "Using an embroidery card" (page 55). d Embroidery card Press when selecting patterns from the following types available. For details, refer to "Selecting an embroidery pattern"(page 54). Copyright information The patterns saved in the machine's memory Press when retrieving patterns from a computer can be selected from an embroidery card. EMBROIDERY Selecting Embroidery Patterns This section provides details on...
... thread according to "Using an embroidery card" (page 55). d Embroidery card Press when selecting patterns from the following types available. For details, refer to "Selecting an embroidery pattern"(page 54). Copyright information The patterns saved in the machine's memory Press when retrieving patterns from a computer can be selected from an embroidery card. EMBROIDERY Selecting Embroidery Patterns This section provides details on...
Users Manual - English
Page 53
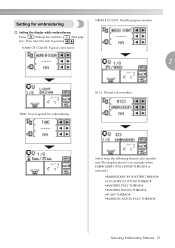
... Select from the following thread color number sets (The display above is an example when EMBROIDERY (POLYESTER) THREAD# is selected.) •EMBROIDERY (POLYESTER) THREAD# •COUNTRY (COTTON) THREAD# •MADEIRA POLY THREAD# •MADEIRA RAYON THREAD# •SULKY THREAD# •ROBISON-ANTON POLY THREAD# Selecting Embroidery Patterns 51 Then, select the item by pressing .
... Select from the following thread color number sets (The display above is an example when EMBROIDERY (POLYESTER) THREAD# is selected.) •EMBROIDERY (POLYESTER) THREAD# •COUNTRY (COTTON) THREAD# •MADEIRA POLY THREAD# •MADEIRA RAYON THREAD# •SULKY THREAD# •ROBISON-ANTON POLY THREAD# Selecting Embroidery Patterns 51 Then, select the item by pressing .
Users Manual - English
Page 55
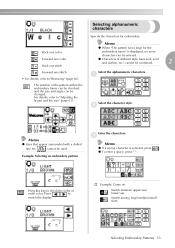
... multi color. z Characters of different style (sans serif, serif and outline, etc.) cannot be combined. 2 Forward one stitch Memo z When "The pattern is too large for embroidery. Example: Selecting an embroidery pattern Enter the characters. Press this key to "Resewing" (page 66). Press to "Adjusting the layout and the size" (page 61). Select the...
... multi color. z Characters of different style (sans serif, serif and outline, etc.) cannot be combined. 2 Forward one stitch Memo z When "The pattern is too large for embroidery. Example: Selecting an embroidery pattern Enter the characters. Press this key to "Resewing" (page 66). Press to "Adjusting the layout and the size" (page 61). Select the...

Users Manual - English
Page 56
... samples of patterns moves backward/forward 10 patterns. Press . Select the pattern. For details, refer to "Embroidery Pattern Color Change Table" in the Quick reference guide for later use. EMBROIDERY Selecting an embroidery pattern There are 70 embroidery patterns, such as flowers and animals, saved in the machine's memory. 70 Embroidery patterns Memo z Refer to "Saving patterns" (page 70). 54 X When a pattern is selected...
... samples of patterns moves backward/forward 10 patterns. Press . Select the pattern. For details, refer to "Embroidery Pattern Color Change Table" in the Quick reference guide for later use. EMBROIDERY Selecting an embroidery pattern There are 70 embroidery patterns, such as flowers and animals, saved in the machine's memory. 70 Embroidery patterns Memo z Refer to "Saving patterns" (page 70). 54 X When a pattern is selected...
Users Manual - English
Page 57
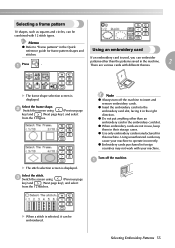
...), and select from the 12 stitches. Memo z Refer to insert and remove embroidery cards. Select the frame shape. Selecting Embroidery Patterns 55 z Use only embroidery cards manufactured for frame pattern shapes and Using an embroidery card stitches. Press . z Insert the embroidery card into the embroidery card slot, facing it can be combined with different themes. Using unauthorized cards...
...), and select from the 12 stitches. Memo z Refer to insert and remove embroidery cards. Select the frame shape. Selecting Embroidery Patterns 55 z Use only embroidery cards manufactured for frame pattern shapes and Using an embroidery card stitches. Press . z Insert the embroidery card into the embroidery card slot, facing it can be combined with different themes. Using unauthorized cards...

Users Manual - English
Page 58
Face the arrow on the embroidery card toward you, and insert it in the card is the same as in the embroidery b card slot on the right side of the arrow. X This selection screen for the patterns saved in the direction of the machine. Select a pattern. c Press d on the machine. e The operation is displayed. EMBROIDERY Insert the embroidery card in "Selecting an embroidery pattern" (page 54). 56 Turn on the screen.
Face the arrow on the embroidery card toward you, and insert it in the card is the same as in the embroidery b card slot on the right side of the arrow. X This selection screen for the patterns saved in the direction of the machine. Select a pattern. c Press d on the machine. e The operation is displayed. EMBROIDERY Insert the embroidery card in "Selecting an embroidery pattern" (page 54). 56 Turn on the screen.
Users Manual - English
Page 59
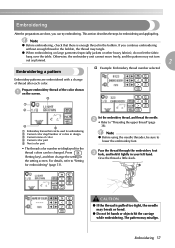
... a change the setting in the bobbin. Note z Before embroidering, check that can try embroidering. c a b d e a Embroidery frames that there is pulled too tight, the needle may not turn out as planned. 2 Embroidering a pattern † Example: Embroidery thread number selected Embroidery patterns are done, you continue embroidering without enough thread in your left hand. Press (Setting key...
... a change the setting in the bobbin. Note z Before embroidering, check that can try embroidering. c a b d e a Embroidery frames that there is pulled too tight, the needle may not turn out as planned. 2 Embroidering a pattern † Example: Embroidery thread number selected Embroidery patterns are done, you continue embroidering without enough thread in your left hand. Press (Setting key...
Users Manual - English
Page 60
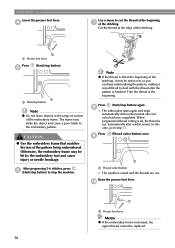
...is raised and the threads are cut. Otherwise, the embroidery frame may strike the object and cause a poor finish to step j . Trim the thread at the beginning of the stitching, it may be sewn over as you continue embroidering the pattern, making it very difficult to stop button) again. ...may be replaced. 58 a a Presser foot lever Press e (Start/stop button Note z Do not leave objects in the range of motion of the pattern being embroidered. Press i (Thread cutter button) once. In this case, go to the embroidery pattern. EMBROIDERY Lower the presser foot lever.
...is raised and the threads are cut. Otherwise, the embroidery frame may strike the object and cause a poor finish to step j . Trim the thread at the beginning of the stitching, it may be sewn over as you continue embroidering the pattern, making it very difficult to stop button) again. ...may be replaced. 58 a a Presser foot lever Press e (Start/stop button Note z Do not leave objects in the range of motion of the pattern being embroidered. Press i (Thread cutter button) once. In this case, go to the embroidery pattern. EMBROIDERY Lower the presser foot lever.


