
Product Information - English
Page 9
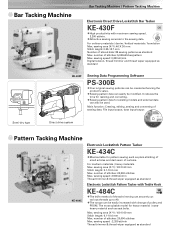
... speed : 2,200 sti/min Thread trimmer & thread wiper equipped as seat belts. number of stored data: 89 sewing patterns as standard KE-430DF Sewing Data Programming Software PS-300B •Your original sewing patterns can be modified. The torque can be used. Max. Attractive sewing accurate to #0. sewing speed: 3,200 sti...
... speed : 2,200 sti/min Thread trimmer & thread wiper equipped as seat belts. number of stored data: 89 sewing patterns as standard KE-430DF Sewing Data Programming Software PS-300B •Your original sewing patterns can be modified. The torque can be used. Max. Attractive sewing accurate to #0. sewing speed: 3,200 sti...
Product Information - English
Page 10
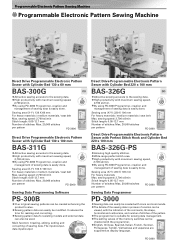
... icons and commands. ••The details of the sewing data in process of stitches: Max. 20,000 stitches per pattern PD-3000 Sewing Data Programming Software PS-300B •Your original sewing patterns can easily be modified. Sewing pattern data for resizing and correcting. Sewing area (X-Y): 220 X 100 mm For...
... icons and commands. ••The details of the sewing data in process of stitches: Max. 20,000 stitches per pattern PD-3000 Sewing Data Programming Software PS-300B •Your original sewing patterns can easily be modified. Sewing pattern data for resizing and correcting. Sewing area (X-Y): 220 X 100 mm For...
Instruction Manual - English
Page 6
...4-17-2. Home position detection (preparation 29 5-3. Operating the treadle 30 5-3-1. Checking the length of each operation panel item..27 5-2. Parameter table 36 5-5-1. Using the program memos 53 5-13. SPECIFICATIONS 2 2-1. Standard sewing pattern list 3 3. Connecting the standing operation pedal harness (option 16 4-11-6. Installing the transformer 17 4-12. ... length 46 5-5-3. CHECKING THE SEWING PATTERN . 55 6-1. OPERATION 27 5-1. CORRECT USE 57 7-1. Installing the belt cover 26 5. Thread tension 61 HE-800A Threading the upper thread 58 7-3.
...4-17-2. Home position detection (preparation 29 5-3. Operating the treadle 30 5-3-1. Checking the length of each operation panel item..27 5-2. Parameter table 36 5-5-1. Using the program memos 53 5-13. SPECIFICATIONS 2 2-1. Standard sewing pattern list 3 3. Connecting the standing operation pedal harness (option 16 4-11-6. Installing the transformer 17 4-12. ... length 46 5-5-3. CHECKING THE SEWING PATTERN . 55 6-1. OPERATION 27 5-1. CORRECT USE 57 7-1. Installing the belt cover 26 5. Thread tension 61 HE-800A Threading the upper thread 58 7-3.
Instruction Manual - English
Page 7
... the needle and hook timing .......... 73 10-3. Adjusting the installation height of thread trimmed by upper thread trimmer assembly 101 16-15. PROGRAM INITIALIZATION 80 12-1. Panel DIP switches 81 13-2. Uneven seams (1) ...... Lower thread is lifted up at the sewing start 95 16-5.... 12-2. Initializing a single program 80 13. Circuit board DIP switches 83 14. Upper thread breakage 92 16-2. Seam lifts up stop switch is finished.... 67 8-5. Needle breakage 103 HE-800A Sewing 64 8-2. Cleaning the length feed plate 71 10. Thread sticking out at...
... the needle and hook timing .......... 73 10-3. Adjusting the installation height of thread trimmed by upper thread trimmer assembly 101 16-15. PROGRAM INITIALIZATION 80 12-1. Panel DIP switches 81 13-2. Uneven seams (1) ...... Lower thread is lifted up at the sewing start 95 16-5.... 12-2. Initializing a single program 80 13. Circuit board DIP switches 83 14. Upper thread breakage 92 16-2. Seam lifts up stop switch is finished.... 67 8-5. Needle breakage 103 HE-800A Sewing 64 8-2. Cleaning the length feed plate 71 10. Thread sticking out at...
Instruction Manual - English
Page 10
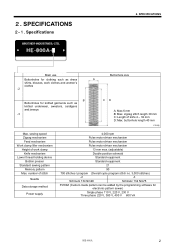
...and women's clothes -2 B Buttonholes for electronic pattern sewer) Single phase 110 V, 220 V, 230 V Three phase 220 V, 380 V, 400 V 600 VA HE-800A 2 Specifications 2. number of knife 4 - 32 mm D: Max. zigzag stitch length 39 mm C: Length of stitch Needle Data storage method Power supply 4,000 rpm... motor driven mechanism 13 mm max. (adjustable) Double position solenoid Standard equipment Standard equipment 21 90 700 stitches / program (Overall cycle program stitch no. 3,000 stitches) -2 -3 Schmetz 134 Nm90 Schmetz 134 Nm75 P-ROM (Custom made pattern can be added by the...
...and women's clothes -2 B Buttonholes for electronic pattern sewer) Single phase 110 V, 220 V, 230 V Three phase 220 V, 380 V, 400 V 600 VA HE-800A 2 Specifications 2. number of knife 4 - 32 mm D: Max. zigzag stitch length 39 mm C: Length of stitch Needle Data storage method Power supply 4,000 rpm... motor driven mechanism 13 mm max. (adjustable) Double position solenoid Standard equipment Standard equipment 21 90 700 stitches / program (Overall cycle program stitch no. 3,000 stitches) -2 -3 Schmetz 134 Nm90 Schmetz 134 Nm75 P-ROM (Custom made pattern can be added by the...
Instruction Manual - English
Page 11
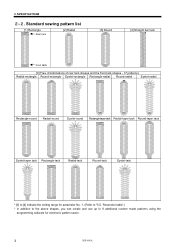
...-tack Eyelet-tack * [0] to "5-5. Parameter table".) * In addition to the above shapes, you can create and use up to 9 additional custom made patterns using the programming software for parameter No. 1. (Refer to [4] indicate the setting range for electronic pattern sewer. 3 HE...
...-tack Eyelet-tack * [0] to "5-5. Parameter table".) * In addition to the above shapes, you can create and use up to 9 additional custom made patterns using the programming software for parameter No. 1. (Refer to [4] indicate the setting range for electronic pattern sewer. 3 HE...
Instruction Manual - English
Page 35
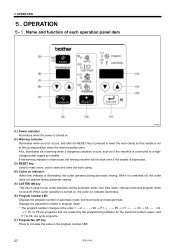
...RESET key Used to reset errors, and to lower the work clamp. (4) Cutter on indicator illuminates. (6) Program number LED Displays the program number in the program number LED. 27 HE-800A Name and function of each operation panel item 3902Q (1) Power indicator Illuminates when the power is turned on. ... the up stop position when the machine pulley turns. OPERATION 5. C9. → 1. UP key Press to P9 are programs that are cycle programs. (7) Program No. P1 to increase the value in automatic mode, test feed mode and manual mode. OPERATION 5-1. When it is...
...RESET key Used to reset errors, and to lower the work clamp. (4) Cutter on indicator illuminates. (6) Program number LED Displays the program number in the program number LED. 27 HE-800A Name and function of each operation panel item 3902Q (1) Power indicator Illuminates when the power is turned on. ... the up stop position when the machine pulley turns. OPERATION 5. C9. → 1. UP key Press to P9 are programs that are cycle programs. (7) Program No. P1 to increase the value in automatic mode, test feed mode and manual mode. OPERATION 5-1. When it is...
Instruction Manual - English
Page 36
... mode. If you depress the treadle to start the sewing machine while the ENTER key is used to change to accept changed values for sewing programs. If the program no . HE-800A 28 UP key and the ENTER key is simultaneously pressed during memory switch setting mode, the mode changes to cycle...
... mode. If you depress the treadle to start the sewing machine while the ENTER key is used to change to accept changed values for sewing programs. If the program no . HE-800A 28 UP key and the ENTER key is simultaneously pressed during memory switch setting mode, the mode changes to cycle...
Instruction Manual - English
Page 37
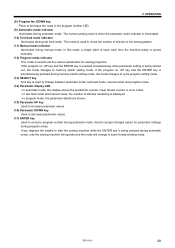
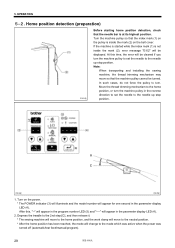
... (2), error message "E-02" will change to the mode which was active when the power was turned off (automatic/test feed/manual/program). 29 HE-800A If the machine is started while the index mark (1) is at its highest position. Note: When transporting and installing the sewing machine...machine pulley to set the needle to turn the machine pulley in the parameter display LED (4). After this time, the error will appear in the program number LED (5) and "----" will be displayed. At this , "--" will appear in the parameter display LED (4). 2. Move the thread trimming ...
... (2), error message "E-02" will change to the mode which was active when the power was turned off (automatic/test feed/manual/program). 29 HE-800A If the machine is started while the index mark (1) is at its highest position. Note: When transporting and installing the sewing machine...machine pulley to set the needle to turn the machine pulley in the parameter display LED (4). After this time, the error will appear in the program number LED (5) and "----" will be displayed. At this , "--" will appear in the parameter display LED (4). 2. Move the thread trimming ...
Instruction Manual - English
Page 40
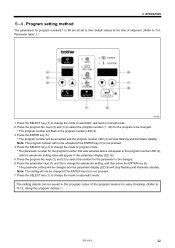
... saved in the parameter display LED (6). 5. Press the program No. Using the program memos".) HE-800A 32 Press the program No. Note: The program number will stop flashing and illuminate steadily. keys (2) and (3) to select the program number (1 - 90) for the program to program mode. * The parameter number for program numbers 1 to 90 are all set to their default...
... saved in the parameter display LED (6). 5. Press the program No. Using the program memos".) HE-800A 32 Press the program No. Note: The program number will stop flashing and illuminate steadily. keys (2) and (3) to select the program number (1 - 90) for the program to program mode. * The parameter number for program numbers 1 to 90 are all set to their default...
Instruction Manual - English
Page 41
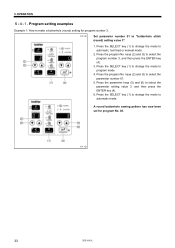
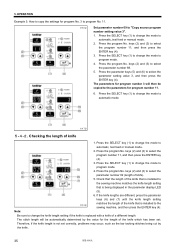
... then press the ENTER key (4). 6. Press the parameter keys (5) and (6) to select the program number 3, and then press the ENTER key (4). 3. OPERATION Program setting examples Example 1: How to make a buttonhole (round) setting for program No. 03. 3911Q 33 HE-800A Press the program No. keys (2) and (3) to "buttonhole stitch (round) setting value 3". 1. Press the SELECT...
... then press the ENTER key (4). 6. Press the parameter keys (5) and (6) to select the program number 3, and then press the ENTER key (4). 3. OPERATION Program setting examples Example 1: How to make a buttonhole (round) setting for program No. 03. 3911Q 33 HE-800A Press the program No. keys (2) and (3) to "buttonhole stitch (round) setting value 3". 1. Press the SELECT...
Instruction Manual - English
Page 42
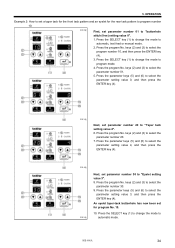
... setting value 3, and then press the ENTER key (4). Press the program No. Press the parameter keys (5) and (6) to select the parameter number 01. 5. Press the SELECT key (1) to change the mode to "Taper tack setting value 4". 6. HE-800A 34 OPERATION Example 2: How to set a taper tack for the ...front tack pattern and an eyelet for program No. 10. 10. Press the SELECT key (1) to change the mode to select the parameter number ...
... setting value 3, and then press the ENTER key (4). Press the program No. Press the parameter keys (5) and (6) to select the parameter number 01. 5. Press the SELECT key (1) to change the mode to "Taper tack setting value 4". 6. HE-800A 34 OPERATION Example 2: How to set a taper tack for the ...front tack pattern and an eyelet for program No. 10. 10. Press the SELECT key (1) to change the mode to select the parameter number ...
Instruction Manual - English
Page 43
... the mode to select the parameter number 69. 5. Press the program No. Press the SELECT key (1) to change the knife length setting if the knife is not set . The stitch length will then be automatically determined by the knife. 35 HE-800A The parameters for the length of the knife that is...
... the mode to select the parameter number 69. 5. Press the program No. Press the SELECT key (1) to change the knife length setting if the knife is not set . The stitch length will then be automatically determined by the knife. 35 HE-800A The parameters for the length of the knife that is...

Instruction Manual - English
Page 44
Parameter table ▪ The parameter values can be stored independently for each program. ▪ The allowable setting range for some setting speeds. ▪ ...underlays sewn together, then saw-shape underlays and then rectangle underlays. • Parameters that are not applicable to a particular program will be skipped and not displayed. No. 3, No. 4 and No. 5 are at some parameters may not be ... 0.350 05 Zigzag width 1.0 - 3.0mm 0.1 1.5 06 Knife X space -0.4 - 1.0mm 0.1 0.4 07 Knife Y space 0.00 - 2.00mm 0.05 1.00 HE-800A 36 No. OPERATION 5-5. 5.
Parameter table ▪ The parameter values can be stored independently for each program. ▪ The allowable setting range for some setting speeds. ▪ ...underlays sewn together, then saw-shape underlays and then rectangle underlays. • Parameters that are not applicable to a particular program will be skipped and not displayed. No. 3, No. 4 and No. 5 are at some parameters may not be ... 0.350 05 Zigzag width 1.0 - 3.0mm 0.1 1.5 06 Knife X space -0.4 - 1.0mm 0.1 0.4 07 Knife Y space 0.00 - 2.00mm 0.05 1.00 HE-800A 36 No. OPERATION 5-5. 5.

Instruction Manual - English
Page 53
...".) If DIP switch B is not set correctly, it will not be possible to set to 1.0) 0.1 OFF 69 Program copy Available sewing area OFF, 1 - 90 (Specify copy source) 1 OFF The available sewing area (C x D)... 20.0 OFF 4.0 X 32.0 4.0 X 32.0 N/A 4.0 X 20.0 5.4 X 20.0 N/A 4.0 X 32.0 5.4 X 32.0 OFF 4.0 X 40.0 5.4 x 40.0 N/A 4.0 X 20.0 6.0 X 20.0 N/A 4.0 X 32.0 6.0 X 32.0 ON 4.0 X 40.0 6.0 X 40.0 45 HE-800A 5. Set panel DIP switch B correctly in accordance with the work clamp and needle breakages or damage to "13-1. Setting items 67 Sewing end tension apply...
...".) If DIP switch B is not set correctly, it will not be possible to set to 1.0) 0.1 OFF 69 Program copy Available sewing area OFF, 1 - 90 (Specify copy source) 1 OFF The available sewing area (C x D)... 20.0 OFF 4.0 X 32.0 4.0 X 32.0 N/A 4.0 X 20.0 5.4 X 20.0 N/A 4.0 X 32.0 5.4 X 32.0 OFF 4.0 X 40.0 5.4 x 40.0 N/A 4.0 X 20.0 6.0 X 20.0 N/A 4.0 X 32.0 6.0 X 32.0 ON 4.0 X 40.0 6.0 X 40.0 45 HE-800A 5. Set panel DIP switch B correctly in accordance with the work clamp and needle breakages or damage to "13-1. Setting items 67 Sewing end tension apply...

Instruction Manual - English
Page 56
Setting range 3: Saw-shape This is set by means of sewing is effective for preventing dimples in preventing the material from getting stuck. HE-800A 48 Rear tack vector shape programs 1: Triangle Parameter No. 37 2: Rectangle 5. OPERATION 3: Saw-shape 3928Q 3929Q 3930Q Setting range 1: Triangle General sewing Setting range 2: Rectangle ▪ This is...
Setting range 3: Saw-shape This is set by means of sewing is effective for preventing dimples in preventing the material from getting stuck. HE-800A 48 Rear tack vector shape programs 1: Triangle Parameter No. 37 2: Rectangle 5. OPERATION 3: Saw-shape 3928Q 3929Q 3930Q Setting range 1: Triangle General sewing Setting range 2: Rectangle ▪ This is...

Instruction Manual - English
Page 57
...appear not to prevent them from stretching. ▪ This is underlays sewn together → saw-shape underlays → rectangle underlays. 49 HE-800A Refer to the examples of underlay is useful for stretch materials to have a very coarse weave. Saw-shape underlays ▪ This type of use...▪ This type of fluffy fabrics is complete without the upper thread breaking even though the lower thread has run out. Underlay programs Four types of underlay patterns are sewn together, the order of sewing is effective in preventing seams from unravelling in the illustration can...
...appear not to prevent them from stretching. ▪ This is underlays sewn together → saw-shape underlays → rectangle underlays. 49 HE-800A Refer to the examples of underlay is useful for stretch materials to have a very coarse weave. Saw-shape underlays ▪ This type of use...▪ This type of fluffy fabrics is complete without the upper thread breaking even though the lower thread has run out. Underlay programs Four types of underlay patterns are sewn together, the order of sewing is effective in preventing seams from unravelling in the illustration can...

Instruction Manual - English
Page 59
... flashing and illuminate steadily. 6. Press the parameter keys (5) and (6) to program number 10. If C1 is set to accept the program number 3. * The display will be cleared. 51 HE-800A appears in the parameter display LED (7). 7. OPERATION 5-9. The numbers "3." [the program number for all subsequent steps will stop flashing and illuminate steadily...
... flashing and illuminate steadily. 6. Press the parameter keys (5) and (6) to program number 10. If C1 is set to accept the program number 3. * The display will be cleared. 51 HE-800A appears in the parameter display LED (7). 7. OPERATION 5-9. The numbers "3." [the program number for all subsequent steps will stop flashing and illuminate steadily...

Instruction Manual - English
Page 60
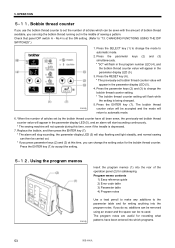
... production counter value is at the OFF setting. (Refer to "0", press the RESET key (6). 4. HE-800A 52 Production counter Check that panel DIP switch A - Press the parameter keys (2) and (3) simultaneously. * "PC" will flash in the program number LED (4), and the production counter value will return to automatic mode. * If you would like...
... production counter value is at the OFF setting. (Refer to "0", press the RESET key (6). 4. HE-800A 52 Production counter Check that panel DIP switch A - Press the parameter keys (2) and (3) simultaneously. * "PC" will flash in the program number LED (4), and the production counter value will return to automatic mode. * If you would like...
Instruction Manual - English
Page 61
...The bobbin thread counter value will appear in the parameter display LED (5). 4. Press the parameter keys (2) and (3) simultaneously. * "bC" will flash in the program number LED (4), and the bobbin thread counter value will be re-used. Press the parameter keys (2) and (3) to change the mode to the parameter table... the amount of the operation panel (2) for recording what patterns have all been sewn, the previously-set the number of articles which programs. 53 HE-800A When the number of articles set bobbin thread counter value will flash while the setting is depressed. 7.
...The bobbin thread counter value will appear in the parameter display LED (5). 4. Press the parameter keys (2) and (3) simultaneously. * "bC" will flash in the program number LED (4), and the bobbin thread counter value will be re-used. Press the parameter keys (2) and (3) to change the mode to the parameter table... the amount of the operation panel (2) for recording what patterns have all been sewn, the previously-set the number of articles which programs. 53 HE-800A When the number of articles set bobbin thread counter value will flash while the setting is depressed. 7.


