
Accessory Catalog
Page 2
... to work hard to a new level of straw hats Contents 02 FZ2-B1 Brother Sewing Machine Lineup 03-04 Brother General Sewing Accessories 05-16 Brother Embellishment Feet 17-24 Brother Quilting Feet 25-28 Brother Embroidery Accessories 29-66 Brother Sewing Machine Attachments for the production of art and creativity. We at your imagination and dreams to provide and deliver the...
... to work hard to a new level of straw hats Contents 02 FZ2-B1 Brother Sewing Machine Lineup 03-04 Brother General Sewing Accessories 05-16 Brother Embellishment Feet 17-24 Brother Quilting Feet 25-28 Brother Embroidery Accessories 29-66 Brother Sewing Machine Attachments for the production of art and creativity. We at your imagination and dreams to provide and deliver the...

Accessory Catalog
Page 3
... (i.e. We invite you have made Brother the most requested in sewing and embroidery utilizing the latest innovations including USB media and touch screen technology. B Innov-is 1200, 1000 Affordable Sewing & Embroidery Combination Machines Everyday sewing features and 7" x 5" embroidery for which the shown accessory is QC1000 Advanced Sewing & Quilting Machine A quilting machine filled with models in sewing, quilting, embroidery and even crafting capability! F : PS3100...
... (i.e. We invite you have made Brother the most requested in sewing and embroidery utilizing the latest innovations including USB media and touch screen technology. B Innov-is 1200, 1000 Affordable Sewing & Embroidery Combination Machines Everyday sewing features and 7" x 5" embroidery for which the shown accessory is QC1000 Advanced Sewing & Quilting Machine A quilting machine filled with models in sewing, quilting, embroidery and even crafting capability! F : PS3100...

Accessory Catalog
Page 17
... Function. - Accepts USB mouse* to give you to embroider 150 decorative sewing stitches within the frame. - Compatible with the Brother Innov-is 4000D sewing and embroidery machine. * Requires additional purchases. Drag and drop embroidery pattern positioning. - Expand the functionality of your fabric to the actual machine: - Add even more control with center needle position straight stitch Open...
... Function. - Accepts USB mouse* to give you to embroider 150 decorative sewing stitches within the frame. - Compatible with the Brother Innov-is 4000D sewing and embroidery machine. * Requires additional purchases. Drag and drop embroidery pattern positioning. - Expand the functionality of your fabric to the actual machine: - Add even more control with center needle position straight stitch Open...

Accessory Catalog
Page 33
...60 mm (approx. 1 x 2-1/2 inches) SA442 For Innov-is 900D series, SE-350, HE-240, LB6770, Innov-is 500 series, SE-270D, HE-120 series, PE-300S, PE-400D: • Large: 172 x 100 mm (approx. 6-3/4 x 4 inches) • Medium: 100 x 100 mm (...; Small: 60 x 60 mm (approx. 2-1/2 x 2-1/2 inches) SA411 www.brother.com Brother Embroidery Accessories 63 Free-Standing Ten Spool Thread Stand Ten Spool Thread Stand Embroidery Machine Hoops Brother Embroidery Accessories 64 For all embroidery and sewing/embroidery machines. Place your threads in use. For Quattro™ 6000D: • Extra-large...
...60 mm (approx. 1 x 2-1/2 inches) SA442 For Innov-is 900D series, SE-350, HE-240, LB6770, Innov-is 500 series, SE-270D, HE-120 series, PE-300S, PE-400D: • Large: 172 x 100 mm (approx. 6-3/4 x 4 inches) • Medium: 100 x 100 mm (...; Small: 60 x 60 mm (approx. 2-1/2 x 2-1/2 inches) SA411 www.brother.com Brother Embroidery Accessories 63 Free-Standing Ten Spool Thread Stand Ten Spool Thread Stand Embroidery Machine Hoops Brother Embroidery Accessories 64 For all embroidery and sewing/embroidery machines. Place your threads in use. For Quattro™ 6000D: • Extra-large...

Accessory Catalog
Page 34
... well as fur or terrycloth. Brother Embroidery Accessories PacesetterTM Polyester Threads 65 Brother Country Yarn Embroidery Threads Metallic Threads For the best embroidery results, use these embroidery threads especially designed for Brother sewing and embroidering machines. 61 Color Thread Set with Wooden Rack ETKSP999 PacesetterTM Polyester Threads (61 Color Thread Set with other sewing and embroidery machine brands. Stabilizers and Water Soluble...
... well as fur or terrycloth. Brother Embroidery Accessories PacesetterTM Polyester Threads 65 Brother Country Yarn Embroidery Threads Metallic Threads For the best embroidery results, use these embroidery threads especially designed for Brother sewing and embroidering machines. 61 Color Thread Set with Wooden Rack ETKSP999 PacesetterTM Polyester Threads (61 Color Thread Set with other sewing and embroidery machine brands. Stabilizers and Water Soluble...

Users Manual - English
Page 3
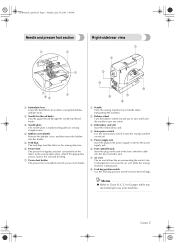
... 2003 3:44 PM Names of Machine Parts and Their Functions The names of the various parts of thread for this sewing machine in this spool pin in the connector for the embroidery unit. When the sewing machine is not being used, store the machine with the flap folded up.... i Sliding leg Pull out the sliding leg during free-arm sewing. Front view 1 F 2 E 3 D C 4 B A 5 0 6...
... 2003 3:44 PM Names of Machine Parts and Their Functions The names of the various parts of thread for this sewing machine in this spool pin in the connector for the embroidery unit. When the sewing machine is not being used, store the machine with the flap folded up.... i Sliding leg Pull out the sliding leg during free-arm sewing. Front view 1 F 2 E 3 D C 4 B A 5 0 6...
Users Manual - English
Page 4
..., and then insert the bobbin into the foot controller jack. c Embroidery card slot Insert the embroidery card. g Presser foot holder The presser foot is being used. d Main power switch Use the main power switch to turn the sewing machine on the fabric as the sewing takes place. f Foot controller jack Insert the plug on the...
..., and then insert the bobbin into the foot controller jack. c Embroidery card slot Insert the embroidery card. g Presser foot holder The presser foot is being used. d Main power switch Use the main power switch to turn the sewing machine on the fabric as the sewing takes place. f Foot controller jack Insert the plug on the...

Users Manual - English
Page 6
...to the previous LCD display. b Back key Press to return to the initial embroidery screen. d Next page key Displays the next screen when there are items that are not displayed on using the sewing machine. c Previous page key Displays the previous screen when there are items that are... displayed. e Menu key Select pattern group; f Settings key Press to enter character embroidery, combined stitch patterns, My Custom Stitch patterns, etc into the sewing machine memory. g Memory key Press to set the needle stop position, the buzzer sound, and more. Touch the...
...to the previous LCD display. b Back key Press to return to the initial embroidery screen. d Next page key Displays the next screen when there are items that are not displayed on using the sewing machine. c Previous page key Displays the previous screen when there are items that are... displayed. e Menu key Select pattern group; f Settings key Press to enter character embroidery, combined stitch patterns, My Custom Stitch patterns, etc into the sewing machine memory. g Memory key Press to set the needle stop position, the buzzer sound, and more. Touch the...

Users Manual - English
Page 9
... manual, store it where it can embroider built-in embroidery patterns, characters, framed decorations, and designs from optional embroidery cards. (page 127) 3 In addition, after sewing. (page 60) f Embroidery You can quickly be cut automatically after you for future... reference. Then, simply insert the thread cassette into the thread cassette. Sewing Machine Features 1 2 3 5 4 6 ...
... manual, store it where it can embroider built-in embroidery patterns, characters, framed decorations, and designs from optional embroidery cards. (page 127) 3 In addition, after sewing. (page 60) f Embroidery You can quickly be cut automatically after you for future... reference. Then, simply insert the thread cassette into the thread cassette. Sewing Machine Features 1 2 3 5 4 6 ...

Users Manual - English
Page 12
... length ...117 Realigning the pattern ...117 Sewing combined patterns 119 Combining patterns...119 Storing a pattern...121 Designing a Pattern (My Custom Stitch 123 Drawing a sketch of the pattern...123 Entering the pattern data ...124 Examples of designs ...126 EMBROIDERY 127 Embroidering neatly ...128 What to prepare ...128 Embroidery step by step ...130 Attaching the...
... length ...117 Realigning the pattern ...117 Sewing combined patterns 119 Combining patterns...119 Storing a pattern...121 Designing a Pattern (My Custom Stitch 123 Drawing a sketch of the pattern...123 Entering the pattern data ...124 Examples of designs ...126 EMBROIDERY 127 Embroidering neatly ...128 What to prepare ...128 Embroidery step by step ...130 Attaching the...

Users Manual - English
Page 20
..." (page 47). Viewing the LCD When the power is displayed. When an animation is attached. Memo z A different screen is displayed when the embroidery unit is displayed, the screen above will be displayed if you touch the LCD with your finger. 14 The details are displayed on the LCD... when the power is turned on , and the following screen is turned on, the LCD comes on . z Depending on the model of the sewing machine. SE-BrotherE_sgml.book Page 14 Monday, June 30, 2003 3:44 PM GETTING READY LCD (liquid crystal display) operation Selected stitch, pattern settings and ...
..." (page 47). Viewing the LCD When the power is displayed. When an animation is attached. Memo z A different screen is displayed when the embroidery unit is displayed, the screen above will be displayed if you touch the LCD with your finger. 14 The details are displayed on the LCD... when the power is turned on , and the following screen is turned on, the LCD comes on . z Depending on the model of the sewing machine. SE-BrotherE_sgml.book Page 14 Monday, June 30, 2003 3:44 PM GETTING READY LCD (liquid crystal display) operation Selected stitch, pattern settings and ...

Users Manual - English
Page 21
... the PE-DESIGN Ver.5.0 is saved on a blank card, the stored custom thread colors are displayed on the machine, if "ON" is selected for embroidery Specifies where the needle is positioned when the sewing machine is turned on . Vertical pattern adjustment Adjusts the up and down position of the LCD. Lighter Darker Turn on...
... the PE-DESIGN Ver.5.0 is saved on a blank card, the stored custom thread colors are displayed on the machine, if "ON" is selected for embroidery Specifies where the needle is positioned when the sewing machine is turned on . Vertical pattern adjustment Adjusts the up and down position of the LCD. Lighter Darker Turn on...

Users Manual - English
Page 22
... The "Thread color index" is the color number display used . z Settings that are changed are not lost when the power is the number for the sewing machine. z The "NO." When settings are complete, press d key). (Back X The initial screen appears again. is turned off. • The items shown... in reverse highlighting are used when embroidery cards made by "PE-Design" are the settings at the time of purchase. † Example: Changing the needle stop position 16 SE-BrotherE_sgml.book...
... The "Thread color index" is the color number display used . z Settings that are changed are not lost when the power is the number for the sewing machine. z The "NO." When settings are complete, press d key). (Back X The initial screen appears again. is turned off. • The items shown... in reverse highlighting are used when embroidery cards made by "PE-Design" are the settings at the time of purchase. † Example: Changing the needle stop position 16 SE-BrotherE_sgml.book...

Users Manual - English
Page 23
... be displayed. Displays simple explanations of setting upper thread / bobbin winding / setting bobbin thread / needle † Example: Upper threading 1 replacement / embroidery unit attachment / embroidery frame attachment / embroidery foot attachment / presser foot replacement on . Press (Sewing machine help screen appears. Note z For details on the b display panel. LCD (liquid crystal display) operation 17 Turn on the...
... be displayed. Displays simple explanations of setting upper thread / bobbin winding / setting bobbin thread / needle † Example: Upper threading 1 replacement / embroidery unit attachment / embroidery frame attachment / embroidery foot attachment / presser foot replacement on . Press (Sewing machine help screen appears. Note z For details on the b display panel. LCD (liquid crystal display) operation 17 Turn on the...
Users Manual - English
Page 42
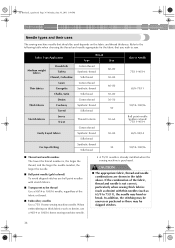
...To avoid skipped stitches use a 90/14 or 100/16 home sewing machine needle. • A 75/11 needle is already installed when the sewing machine is not correct, particularly when sewing thick fabrics (such as 65/9 to sew. Fabric Type/Application Medium weight fabrics Thin fabrics Thick fabrics Stretch fabrics... break. When embroidering on the fabric and thread thickness. If the combination of the fabric or thread. ■ Embroidery needles Use a 75/11 home sewing machine needle. CAUTION ● The appropriate fabric, thread and needle combinations are shown in the table above.
...To avoid skipped stitches use a 90/14 or 100/16 home sewing machine needle. • A 75/11 needle is already installed when the sewing machine is not correct, particularly when sewing thick fabrics (such as 65/9 to sew. Fabric Type/Application Medium weight fabrics Thin fabrics Thick fabrics Stretch fabrics... break. When embroidering on the fabric and thread thickness. If the combination of the fabric or thread. ■ Embroidery needles Use a 75/11 home sewing machine needle. CAUTION ● The appropriate fabric, thread and needle combinations are shown in the table above.

Users Manual - English
Page 47
... aligned with the selected stitch, refer to "Stitch Settings" (page 66). Raise the presser foot lever to sew. If the 1 wrong presser foot is installed, turn off the sewing machine, attach the correct presser foot, and then select the desired stitch again. 2 3 a Presser foot holder...the screen. Buttonhole foot "A" Overcasting foot "G" Zigzag foot "J" Button fitting foot "M" Monogramming foot "N" Blind stitch foot "R" Side cutter "S" Embroidery foot "Q" z For details on the presser foot that the g presser foot is attached. Position the presser foot so the letter indicating the...
... aligned with the selected stitch, refer to "Stitch Settings" (page 66). Raise the presser foot lever to sew. If the 1 wrong presser foot is installed, turn off the sewing machine, attach the correct presser foot, and then select the desired stitch again. 2 3 a Presser foot holder...the screen. Buttonhole foot "A" Overcasting foot "G" Zigzag foot "J" Button fitting foot "M" Monogramming foot "N" Blind stitch foot "R" Side cutter "S" Embroidery foot "Q" z For details on the presser foot that the g presser foot is attached. Position the presser foot so the letter indicating the...

Users Manual - English
Page 48
a • For details, refer to remove the presser foot holder. Remove the presser foot holder when cleaning the sewing machine or when installing a presser foot that does not use the presser foot holder, such as the embroidery foot and quilting foot. Use the screwdriver to "Replacing the presser foot" (page 40). Use the screwdriver...
a • For details, refer to remove the presser foot holder. Remove the presser foot holder when cleaning the sewing machine or when installing a presser foot that does not use the presser foot holder, such as the embroidery foot and quilting foot. Use the screwdriver to "Replacing the presser foot" (page 40). Use the screwdriver...

Users Manual - English
Page 107
...the base, to (to the left hand. 1 a Presser foot holder screw a Pattern After sewing is finished, slide the drop feed g lever to (to the right as seen from the rear of the machine) to bend or break. CAUTION ● Be sure to "Selecting stitching" (page 47). Appliqu...the embroidery foot "Q". Remove the presser foot and the presser foot 3 a holder. • Refer to follow the pattern. Hold the quilting foot in place with your right c hand, and then tighten the presser foot holder 1 screw using the screwdriver in any direction. a Pin on the sewing machine, ...
...the base, to (to the left hand. 1 a Presser foot holder screw a Pattern After sewing is finished, slide the drop feed g lever to (to the right as seen from the rear of the machine) to bend or break. CAUTION ● Be sure to "Selecting stitching" (page 47). Appliqu...the embroidery foot "Q". Remove the presser foot and the presser foot 3 a holder. • Refer to follow the pattern. Hold the quilting foot in place with your right c hand, and then tighten the presser foot holder 1 screw using the screwdriver in any direction. a Pin on the sewing machine, ...

Users Manual - English
Page 134
... to break. SE-BrotherE_sgml.book Page 128 Monday, June 30, 2003 3:44 PM EMBROIDERY Embroidering neatly What is necessary before embroidering will be impaired, this could cause the pattern to sew incorrectly. ■ Stabilizer material Attach a stabilizer material for embroidery machines. What to prepare The following is necessary for embroidering. ■ Fabric Prepare the...
... to break. SE-BrotherE_sgml.book Page 128 Monday, June 30, 2003 3:44 PM EMBROIDERY Embroidering neatly What is necessary before embroidering will be impaired, this could cause the pattern to sew incorrectly. ■ Stabilizer material Attach a stabilizer material for embroidery machines. What to prepare The following is necessary for embroidering. ■ Fabric Prepare the...

Users Manual - English
Page 141
... above will be displayed if you and then push it clicks and stops. 1 2 2 a Embroidery unit connector slot b Cover X The embroidery unit is on the LCD. f 4 X A message will be displayed on the left side of the sew- Turn on the LCD. SE-BrotherE_sgml.book Page 135 Monday, June 30, 2003 3:44 PM... cover open toward you touch the LCD with your finger. Be sure that no objects or hands are near the g embroidery unit and touch on the sewing machine. If the embroidery unit is attached without the cover being pushed all the way in until it all the way back into the slot. ...
... above will be displayed if you and then push it clicks and stops. 1 2 2 a Embroidery unit connector slot b Cover X The embroidery unit is on the LCD. f 4 X A message will be displayed on the left side of the sew- Turn on the LCD. SE-BrotherE_sgml.book Page 135 Monday, June 30, 2003 3:44 PM... cover open toward you touch the LCD with your finger. Be sure that no objects or hands are near the g embroidery unit and touch on the sewing machine. If the embroidery unit is attached without the cover being pushed all the way in until it all the way back into the slot. ...


