
Accessory Catalog
Page 2
... of straw hats Contents 02 FZ2-B1 Brother Sewing Machine Lineup 03-04 Brother General Sewing Accessories 05-16 Brother Embellishment Feet 17-24 Brother Quilting Feet 25-28 Brother Embroidery Accessories 29-66 Brother Sewing Machine Attachments for PQ Series 0637-0740 Brother Serger/Overlock Feet 71-74 Brother Cover Stitch Feet 75-78 More From Brother 79 Index 80 You can always find...
... of straw hats Contents 02 FZ2-B1 Brother Sewing Machine Lineup 03-04 Brother General Sewing Accessories 05-16 Brother Embellishment Feet 17-24 Brother Quilting Feet 25-28 Brother Embroidery Accessories 29-66 Brother Sewing Machine Attachments for PQ Series 0637-0740 Brother Serger/Overlock Feet 71-74 Brother Cover Stitch Feet 75-78 More From Brother 79 Index 80 You can always find...

Accessory Catalog
Page 3
... that are compatible with these machines. This machine is the perfect multifunction machine. E CS6000i/T, HS2000, HS1000, BC1000, EX660, CS100T, ES2000, CE4000 Lightweight Sewing Machines Choose from the extensive Brother Embroidery Library. * Brother embroidery accessories are specified to use, unique cassette based threading system, these compact and mid-sized sewing machines. Advanced Sewing & Embroidery Combination Machines The ultimate in sewing, quilting, embroidery and even crafting capability! Once...
... that are compatible with these machines. This machine is the perfect multifunction machine. E CS6000i/T, HS2000, HS1000, BC1000, EX660, CS100T, ES2000, CE4000 Lightweight Sewing Machines Choose from the extensive Brother Embroidery Library. * Brother embroidery accessories are specified to use, unique cassette based threading system, these compact and mid-sized sewing machines. Advanced Sewing & Embroidery Combination Machines The ultimate in sewing, quilting, embroidery and even crafting capability! Once...

Accessory Catalog
Page 17
... for embellishing a wide variety of the line machine. Easy to add and easy to assure perfectly connected and aligned designs. Duetta™ 4500D/Innov-is 4000D Premium Upgrade Package II Brother Embroidery Accessories 32 Duetta™ 4500D/ 4000D Premium ... spacing between individual characters. - The 4000D Premium Upgrade Package is compatible only with the Brother Innov-is 4000D sewing and embroidery machine. * Requires additional purchases. Addition of embroidery designs - Automatic Height Adjuster™ (AHA) feature adjusts the presser foot pressure automatically and...
... for embellishing a wide variety of the line machine. Easy to add and easy to assure perfectly connected and aligned designs. Duetta™ 4500D/Innov-is 4000D Premium Upgrade Package II Brother Embroidery Accessories 32 Duetta™ 4500D/ 4000D Premium ... spacing between individual characters. - The 4000D Premium Upgrade Package is compatible only with the Brother Innov-is 4000D sewing and embroidery machine. * Requires additional purchases. Addition of embroidery designs - Automatic Height Adjuster™ (AHA) feature adjusts the presser foot pressure automatically and...

Accessory Catalog
Page 33
... those loose ends tamed when not in use. Brother Embroidery Accessories 63 Free-Standing Ten Spool Thread Stand Ten Spool Thread Stand Embroidery Machine Hoops Brother Embroidery Accessories 64 For all embroidery and sewing/embroidery machines. For all models: SA503 Free-Standing Ten Spool... x 160 mm (approx. 10-1/4 x 6-1/4 inches) Large: 180 x 130 mm (approx. 7 x 5 inches) SA441 * Compatible with limited machines. SA539 DuettaTM4500D,Innov-is 500 series, SE-270D, HE-120 series, PE-300S, PE-400D: • Large: 172 x 100 mm (approx. 6-3/4 x 4 inches) • Medium: 100 x 100 ...
... those loose ends tamed when not in use. Brother Embroidery Accessories 63 Free-Standing Ten Spool Thread Stand Ten Spool Thread Stand Embroidery Machine Hoops Brother Embroidery Accessories 64 For all embroidery and sewing/embroidery machines. For all models: SA503 Free-Standing Ten Spool... x 160 mm (approx. 10-1/4 x 6-1/4 inches) Large: 180 x 130 mm (approx. 7 x 5 inches) SA441 * Compatible with limited machines. SA539 DuettaTM4500D,Innov-is 500 series, SE-270D, HE-120 series, PE-300S, PE-400D: • Large: 172 x 100 mm (approx. 6-3/4 x 4 inches) • Medium: 100 x 100 ...

Accessory Catalog
Page 34
... when it is important that can stand on your fabric properly with other sewing and embroidery machine brands. For best results, use the Brother Bobbin Thread designed specifically for your instruction manual for advice on the wall...special and sophisticated look with other sewing and embroidery machine brands. Brother Embroidery Accessories PacesetterTM Polyester Threads 65 Brother Country Yarn Embroidery Threads Metallic Threads For the best embroidery results, use these embroidery threads especially designed for Brother sewing and embroidering machines. 61 Color Thread Set with ...
... when it is important that can stand on your fabric properly with other sewing and embroidery machine brands. For best results, use the Brother Bobbin Thread designed specifically for your instruction manual for advice on the wall...special and sophisticated look with other sewing and embroidery machine brands. Brother Embroidery Accessories PacesetterTM Polyester Threads 65 Brother Country Yarn Embroidery Threads Metallic Threads For the best embroidery results, use these embroidery threads especially designed for Brother sewing and embroidering machines. 61 Color Thread Set with ...

Users Manual - English
Page 3
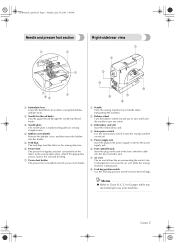
.... j Operation buttons Use the operation buttons to start the sewing machine and raise and lower the needle. (page Cover D) k Operation panel Select a stitch from those that appear in the connector for the embroidery unit. o Bobbin winder cover Open this thread guide when winding...B m Bobbin thread spool pin Place the spool of the sewing machine and their functions are described below. p Thread guide for the embroidery unit. n Bobbin storage compartment Store the bobbins designed specifically for this sewing machine in the connector for bobbin winding Pass the thread around this...
.... j Operation buttons Use the operation buttons to start the sewing machine and raise and lower the needle. (page Cover D) k Operation panel Select a stitch from those that appear in the connector for the embroidery unit. o Bobbin winder cover Open this thread guide when winding...B m Bobbin thread spool pin Place the spool of the sewing machine and their functions are described below. p Thread guide for the embroidery unit. n Bobbin storage compartment Store the bobbins designed specifically for this sewing machine in the connector for bobbin winding Pass the thread around this...
Users Manual - English
Page 4
... foot The presser foot applies pressure consistently on the power supply cord into the foot controller jack. c Embroidery card slot Insert the embroidery card. d Main power switch Use the main power switch to turn the sewing machine on the end of the foot controller cable into the power supply jack. Do not cover the...
... foot The presser foot applies pressure consistently on the power supply cord into the foot controller jack. c Embroidery card slot Insert the embroidery card. d Main power switch Use the main power switch to turn the sewing machine on the end of the foot controller cable into the power supply jack. Do not cover the...

Users Manual - English
Page 6
... pattern group; g Memory key Press to "LCD (liquid crystal display) operation" (page 14). Cover E For details, refer to enter character embroidery, combined stitch patterns, My Custom Stitch patterns, etc into the sewing machine memory. f Settings key Press to set the needle stop position, the buzzer sound, and more. d Next page key Displays the...
... pattern group; g Memory key Press to "LCD (liquid crystal display) operation" (page 14). Cover E For details, refer to enter character embroidery, combined stitch patterns, My Custom Stitch patterns, etc into the sewing machine memory. f Settings key Press to set the needle stop position, the buzzer sound, and more. d Next page key Displays the...

Users Manual - English
Page 9
... 24) b Simple bobbin-winding The bobbin can select from the built-in embroidery patterns, characters, framed decorations, and designs from optional embroidery cards. (page 127) 3 Before using this sewing machine, carefully read the "Important Safety Instructions" (page 8), and then study this sewing machine. Then, simply insert the thread cassette into the thread cassette. In addition, after...
... 24) b Simple bobbin-winding The bobbin can select from the built-in embroidery patterns, characters, framed decorations, and designs from optional embroidery cards. (page 127) 3 Before using this sewing machine, carefully read the "Important Safety Instructions" (page 8), and then study this sewing machine. Then, simply insert the thread cassette into the thread cassette. In addition, after...

Users Manual - English
Page 12
... length ...117 Realigning the pattern ...117 Sewing combined patterns 119 Combining patterns...119 Storing a pattern...121 Designing a Pattern (My Custom Stitch 123 Drawing a sketch of the pattern...123 Entering the pattern data ...124 Examples of designs ...126 EMBROIDERY 127 Embroidering neatly ...128 What to prepare ...128 Embroidery step by step ...130 Attaching the...
... length ...117 Realigning the pattern ...117 Sewing combined patterns 119 Combining patterns...119 Storing a pattern...121 Designing a Pattern (My Custom Stitch 123 Drawing a sketch of the pattern...123 Entering the pattern data ...124 Examples of designs ...126 EMBROIDERY 127 Embroidering neatly ...128 What to prepare ...128 Embroidery step by step ...130 Attaching the...

Users Manual - English
Page 20
... screen is displayed when the embroidery unit is displayed. The LCD display is turned on the LCD. z Refer to display the screen for messages displayed on . z Depending on the front of the sewing machine. The details are displayed on the LCD (liquid crystal display) on the model of sewing machine, an animation may be displayed...
... screen is displayed when the embroidery unit is displayed. The LCD display is turned on the LCD. z Refer to display the screen for messages displayed on . z Depending on the front of the sewing machine. The details are displayed on the LCD (liquid crystal display) on the model of sewing machine, an animation may be displayed...

Users Manual - English
Page 21
... whether or not to display the opening screen when the power is turned on the machine, if "ON" is selected for embroidery Specifies where the needle is positioned when the sewing machine is saved on . Thread color/Embroidery thread number/Country Embroidery thread number/Needle count/Time to use the automatic thread cutting function when embroidering...
... whether or not to display the opening screen when the power is turned on the machine, if "ON" is selected for embroidery Specifies where the needle is positioned when the sewing machine is saved on . Thread color/Embroidery thread number/Country Embroidery thread number/Needle count/Time to use the automatic thread cutting function when embroidering...

Users Manual - English
Page 22
z Settings that are changed are not lost when the power is the color number display used when embroidery cards made by "PE-Design" are used. c Switch screens using (Previous page key) and (Next page key). z The "NO." Note z The "Thread color index" is ... be set. When settings are the settings at the time of purchase. † Example: Changing the needle stop position 16 is the number for the sewing machine. SE-BrotherE_sgml.book Page 16 Monday, June 30, 2003 3:44 PM GETTING READY X The settings screen appears.
z Settings that are changed are not lost when the power is the color number display used when embroidery cards made by "PE-Design" are used. c Switch screens using (Previous page key) and (Next page key). z The "NO." Note z The "Thread color index" is ... be set. When settings are the settings at the time of purchase. † Example: Changing the needle stop position 16 is the number for the sewing machine. SE-BrotherE_sgml.book Page 16 Monday, June 30, 2003 3:44 PM GETTING READY X The settings screen appears.

Users Manual - English
Page 23
... setting upper thread / bobbin winding / setting bobbin thread / needle † Example: Upper threading 1 replacement / embroidery unit attachment / embroidery frame attachment / embroidery foot attachment / presser foot replacement on . Note z For details on each topic, refer to the d next page. Press (Sewing machine help screen appears. SE-BrotherE_sgml.book Page 17 Monday, June 30, 2003 3:44 PM...
... setting upper thread / bobbin winding / setting bobbin thread / needle † Example: Upper threading 1 replacement / embroidery unit attachment / embroidery frame attachment / embroidery foot attachment / presser foot replacement on . Note z For details on each topic, refer to the d next page. Press (Sewing machine help screen appears. SE-BrotherE_sgml.book Page 17 Monday, June 30, 2003 3:44 PM...
Users Manual - English
Page 42
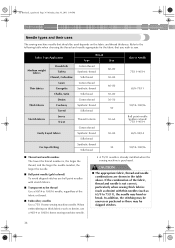
...or break. SE-BrotherE_sgml.book Page 36 Monday, June 30, 2003 3:44 PM GETTING READY Needle types and their uses The sewing machine needle that you wish to sew. CAUTION ● The appropriate fabric, thread and needle combinations are shown in the table above. Refer to the following table...-80 60-80 50-80 30-50 50 50-60 50-80 30 Size of the fabric or thread. ■ Embroidery needles Use a 75/11 home sewing machine needle. Fabric Type/Application Medium weight fabrics Thin fabrics Thick fabrics Stretch fabrics Broadcloth Taffeta Flannel, Gabardine Lawn Georgette Challis, ...
...or break. SE-BrotherE_sgml.book Page 36 Monday, June 30, 2003 3:44 PM GETTING READY Needle types and their uses The sewing machine needle that you wish to sew. CAUTION ● The appropriate fabric, thread and needle combinations are shown in the table above. Refer to the following table...-80 60-80 50-80 30-50 50 50-60 50-80 30 Size of the fabric or thread. ■ Embroidery needles Use a 75/11 home sewing machine needle. Fabric Type/Application Medium weight fabrics Thin fabrics Thick fabrics Stretch fabrics Broadcloth Taffeta Flannel, Gabardine Lawn Georgette Challis, ...

Users Manual - English
Page 47
...sewing machine, attach the correct presser foot, and then select the desired stitch again. 2 3 a Presser foot holder b Notch c Pin Slowly lower the presser foot lever so that should be used with the notch in the holder. Buttonhole foot "A" Overcasting foot "G" Zigzag foot "J" Button fitting foot "M" Monogramming foot "N" Blind stitch foot "R" Side cutter "S" Embroidery...that should be used appears in the screen. Raise the presser foot lever to sew. Check that the g presser foot is attached before starting to check that the correct presser foot is securely attached....
...sewing machine, attach the correct presser foot, and then select the desired stitch again. 2 3 a Presser foot holder b Notch c Pin Slowly lower the presser foot lever so that should be used with the notch in the holder. Buttonhole foot "A" Overcasting foot "G" Zigzag foot "J" Button fitting foot "M" Monogramming foot "N" Blind stitch foot "R" Side cutter "S" Embroidery...that should be used appears in the screen. Raise the presser foot lever to sew. Check that the g presser foot is attached before starting to check that the correct presser foot is securely attached....

Users Manual - English
Page 48
Remove the presser foot holder when cleaning the sewing machine or when installing a presser foot that does not use the presser foot holder, such as the embroidery foot and quilting foot. Use the screwdriver to loosen the presser foot b holder screw. 1 a Screwdriver Note z If the presser foot holder is not correctly installed, ...
Remove the presser foot holder when cleaning the sewing machine or when installing a presser foot that does not use the presser foot holder, such as the embroidery foot and quilting foot. Use the screwdriver to loosen the presser foot b holder screw. 1 a Screwdriver Note z If the presser foot holder is not correctly installed, ...

Users Manual - English
Page 107
... screw. 1 2 3 1 a Feed dog position switch (as seen from the rear of the machine) X The feed dogs are sewn at the beginning and end of sewing. When using free-motion quilting, use the quilting foot or the embroidery foot "Q". a Pin on the base, to (to the left hand. 1 a Presser foot holder... screw a Pattern After sewing is finished, slide the drop feed g lever to (to the right as seen from the rear of the machine) to raise the feed dogs. •...
... screw. 1 2 3 1 a Feed dog position switch (as seen from the rear of the machine) X The feed dogs are sewn at the beginning and end of sewing. When using free-motion quilting, use the quilting foot or the embroidery foot "Q". a Pin on the base, to (to the left hand. 1 a Presser foot holder... screw a Pattern After sewing is finished, slide the drop feed g lever to (to the right as seen from the rear of the machine) to raise the feed dogs. •...

Users Manual - English
Page 134
... organdy and fabrics with the fabric hanging off the table where the sewing machine is necessary before embroidering will be embroidered. For details, refer to sew, be impaired, this could cause the pattern to sew incorrectly. ■ Stabilizer material Attach a stabilizer material for embroidery machines. Otherwise, the needle may be sure there is not space, do...
... organdy and fabrics with the fabric hanging off the table where the sewing machine is necessary before embroidering will be embroidered. For details, refer to sew, be impaired, this could cause the pattern to sew incorrectly. ■ Stabilizer material Attach a stabilizer material for embroidery machines. Otherwise, the needle may be sure there is not space, do...

Users Manual - English
Page 141
... the LCD. Be sure that no objects or hands are near the g embroidery unit and touch on the sewing machine. X The embroidery unit carriage moves to remove it clicks and stops. 1 2 2 a Embroidery unit connector slot b Cover X The embroidery unit is attached. Remove the embroidery unit cover. ing machine arm. f 4 X A message will be the cause of malfunctions. If the...
... the LCD. Be sure that no objects or hands are near the g embroidery unit and touch on the sewing machine. X The embroidery unit carriage moves to remove it clicks and stops. 1 2 2 a Embroidery unit connector slot b Cover X The embroidery unit is attached. Remove the embroidery unit cover. ing machine arm. f 4 X A message will be the cause of malfunctions. If the...


