
Accessory Catalog
Page 2
... ZZ3-B894 QuattroTM 6000D Chain-stitch sewing machine for the production of straw hats Contents 02 FZ2-B1 Brother Sewing Machine Lineup 03-04 Brother General Sewing Accessories 05-16 Brother Embellishment Feet 17-24 Brother Quilting Feet 25-28 Brother Embroidery Accessories 29-66 Brother Sewing Machine Attachments for PQ Series 0637-0740 Brother Serger/Overlock Feet 71-74 Brother Cover Stitch Feet 75-78...
... ZZ3-B894 QuattroTM 6000D Chain-stitch sewing machine for the production of straw hats Contents 02 FZ2-B1 Brother Sewing Machine Lineup 03-04 Brother General Sewing Accessories 05-16 Brother Embellishment Feet 17-24 Brother Quilting Feet 25-28 Brother Embroidery Accessories 29-66 Brother Sewing Machine Attachments for PQ Series 0637-0740 Brother Serger/Overlock Feet 71-74 Brother Cover Stitch Feet 75-78...

Accessory Catalog
Page 3
...is not only incredibly sophisticated and innovative but powerful sewing and quilting machines. Brother Sewing Machine Lineup 03 Please select your very own customized stitches or embroidery motifs. Once you find your creative dreams come ...sewing and embroidery. Innov-is the perfect multifunction machine. C Innov-is 4000D, you need a lightweight and affordable sewing machine for everyone to work with leading-edge technology Brother's new and exciting high-end sewing and embroidery machine Quattro™ 6000D is QC1000 Advanced Sewing & Quilting Machine A quilting machine...
...is not only incredibly sophisticated and innovative but powerful sewing and quilting machines. Brother Sewing Machine Lineup 03 Please select your very own customized stitches or embroidery motifs. Once you find your creative dreams come ...sewing and embroidery. Innov-is the perfect multifunction machine. C Innov-is 4000D, you need a lightweight and affordable sewing machine for everyone to work with leading-edge technology Brother's new and exciting high-end sewing and embroidery machine Quattro™ 6000D is QC1000 Advanced Sewing & Quilting Machine A quilting machine...

Accessory Catalog
Page 17
... Character/Font Pattern Separation. SAVR4500D Duetta™ 4500D/Innov-is4000D Nightie Innov-is 4000D sewing and embroidery machine. * Requires additional purchases. Brother Embroidery Accessories 31 QuattroTM 6000D Embroidery Card Reader QuattroTM 6000D Border Frame Innov-is 4000D Premium Package SAECR1 Only compatible with QuattroTM 6000D SABF6000D QuattroTM 6000D SAVR4000D Innov-is 4000D QuattroTM ...
... Character/Font Pattern Separation. SAVR4500D Duetta™ 4500D/Innov-is4000D Nightie Innov-is 4000D sewing and embroidery machine. * Requires additional purchases. Brother Embroidery Accessories 31 QuattroTM 6000D Embroidery Card Reader QuattroTM 6000D Border Frame Innov-is 4000D Premium Package SAECR1 Only compatible with QuattroTM 6000D SABF6000D QuattroTM 6000D SAVR4000D Innov-is 4000D QuattroTM ...

Accessory Catalog
Page 33
...mm (approx. 8 x 8 inches) SA446 • Medium: 100 x 100 mm (approx. 4 x 4 inches) SA438 For Duetta™ 4500D/Innov-is 500 series, SE-270D, HE-120 series, PE-300S, PE-400D: • Large: 172 x 100 mm (approx. 6-3/4 x 4 inches) • Medium: 100 x 100 mm (approx. 4 x 4 inches) SA432... delivery or bobbin storage. Ask your spool thread tails by placing them in use. Brother Embroidery Accessories 63 Free-Standing Ten Spool Thread Stand Ten Spool Thread Stand Embroidery Machine Hoops Brother Embroidery Accessories 64 For all embroidery and sewing/embroidery machines.
...mm (approx. 8 x 8 inches) SA446 • Medium: 100 x 100 mm (approx. 4 x 4 inches) SA438 For Duetta™ 4500D/Innov-is 500 series, SE-270D, HE-120 series, PE-300S, PE-400D: • Large: 172 x 100 mm (approx. 6-3/4 x 4 inches) • Medium: 100 x 100 mm (approx. 4 x 4 inches) SA432... delivery or bobbin storage. Ask your spool thread tails by placing them in use. Brother Embroidery Accessories 63 Free-Standing Ten Spool Thread Stand Ten Spool Thread Stand Embroidery Machine Hoops Brother Embroidery Accessories 64 For all embroidery and sewing/embroidery machines.

Accessory Catalog
Page 34
..., soft and smooth, and perfectly balanced to the needle thread. Available in a 5-pack sleeve). 300 meters (328 yards) of colors specifically designed for Brother Embroidery machines, but compatible with other sewing and embroidery machine brands. This pack gives you just the right color for each design. MT986, MT987, MT988, MT989, MT990, MT991, MT992, MT993, MT994, MT995...
..., soft and smooth, and perfectly balanced to the needle thread. Available in a 5-pack sleeve). 300 meters (328 yards) of colors specifically designed for Brother Embroidery machines, but compatible with other sewing and embroidery machine brands. This pack gives you just the right color for each design. MT986, MT987, MT988, MT989, MT990, MT991, MT992, MT993, MT994, MT995...

Users Manual - English
Page 3
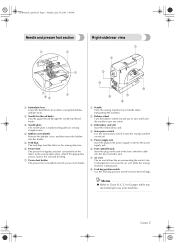
...Sliding leg Pull out the sliding leg during free-arm sewing. e Thread cutter Pass the threads through the thread cutter to sew cylindrical pieces such as sleeve cuffs. g Embroidery unit connector slot Plug in the connector for this sewing machine in the operation panel. (page Cover E) l Bobbin ...n Bobbin storage compartment Store the bobbins designed specifically for the embroidery unit. Remove the flap to cut them. Cover B d Thread tension dial Use the thread tension dial to learn the names of the sewing machine and their functions are described below. f Arm Plug in...
...Sliding leg Pull out the sliding leg during free-arm sewing. e Thread cutter Pass the threads through the thread cutter to sew cylindrical pieces such as sleeve cuffs. g Embroidery unit connector slot Plug in the connector for this sewing machine in the operation panel. (page Cover E) l Bobbin ...n Bobbin storage compartment Store the bobbins designed specifically for the embroidery unit. Remove the flap to cut them. Cover B d Thread tension dial Use the thread tension dial to learn the names of the sewing machine and their functions are described below. f Arm Plug in...
Users Manual - English
Page 4
... Main power switch Use the main power switch to use your machine. Do not cover the air vent while the sewing machine is installed onto the presser foot holder. 4 8 5 7 6 a Handle Carry the sewing machine by its handle when transporting the machine. Cover C SE-BrotherE_sgml.book Page C Monday, June 30, ...the feed dogs. f Presser foot The presser foot applies pressure consistently on the power supply cord into the shuttle. c Embroidery card slot Insert the embroidery card. b Needle bar thread hooks Pass the upper thread through the needle bar thread hooks. c Needle plate The ...
... Main power switch Use the main power switch to use your machine. Do not cover the air vent while the sewing machine is installed onto the presser foot holder. 4 8 5 7 6 a Handle Carry the sewing machine by its handle when transporting the machine. Cover C SE-BrotherE_sgml.book Page C Monday, June 30, ...the feed dogs. f Presser foot The presser foot applies pressure consistently on the power supply cord into the shuttle. c Embroidery card slot Insert the embroidery card. b Needle bar thread hooks Pass the upper thread through the needle bar thread hooks. c Needle plate The ...

Users Manual - English
Page 6
... to return to the initial embroidery screen. e Menu key Select pattern group; h Sewing machine help key Press to enter character embroidery, combined stitch patterns, My Custom Stitch patterns, etc into the sewing machine memory. and when it is in embroidery, returns to the previous LCD... 6 7 8 4 3 a LCD (liquid crystal display) (touch panel) Selected pattern settings and messages are not displayed on using the sewing machine. c Previous page key Displays the previous screen when there are items that are displayed. Displays simple explanations of setting upper thread / bobbin ...
... to return to the initial embroidery screen. e Menu key Select pattern group; h Sewing machine help key Press to enter character embroidery, combined stitch patterns, My Custom Stitch patterns, etc into the sewing machine memory. and when it is in embroidery, returns to the previous LCD... 6 7 8 4 3 a LCD (liquid crystal display) (touch panel) Selected pattern settings and messages are not displayed on using the sewing machine. c Previous page key Displays the previous screen when there are items that are displayed. Displays simple explanations of setting upper thread / bobbin ...

Users Manual - English
Page 9
.... Then, simply insert the thread cassette into the thread cassette. Before using this sewing machine, carefully read the "Important Safety Instructions" (page 8), and then study this sewing machine. SE-BrotherE_sgml.book Page 3 Monday, June 30, 2003 3:44 PM Introduction Introduction...be wound with thread. (page 18) c Built-in stitches You can select from the built-in embroidery patterns, characters, framed decorations, and designs from optional embroidery cards. (page 127) 3 Sewing Machine Features 1 2 3 5 4 6 a Thread cassette Easily thread the upper thread by loading a spool...
.... Then, simply insert the thread cassette into the thread cassette. Before using this sewing machine, carefully read the "Important Safety Instructions" (page 8), and then study this sewing machine. SE-BrotherE_sgml.book Page 3 Monday, June 30, 2003 3:44 PM Introduction Introduction...be wound with thread. (page 18) c Built-in stitches You can select from the built-in embroidery patterns, characters, framed decorations, and designs from optional embroidery cards. (page 127) 3 Sewing Machine Features 1 2 3 5 4 6 a Thread cassette Easily thread the upper thread by loading a spool...

Users Manual - English
Page 12
... length ...117 Realigning the pattern ...117 Sewing combined patterns 119 Combining patterns...119 Storing a pattern...121 Designing a Pattern (My Custom Stitch 123 Drawing a sketch of the pattern...123 Entering the pattern data ...124 Examples of designs ...126 EMBROIDERY 127 Embroidering neatly ...128 What to prepare ...128 Embroidery step by step ...130 Attaching the...
... length ...117 Realigning the pattern ...117 Sewing combined patterns 119 Combining patterns...119 Storing a pattern...121 Designing a Pattern (My Custom Stitch 123 Drawing a sketch of the pattern...123 Entering the pattern data ...124 Examples of designs ...126 EMBROIDERY 127 Embroidering neatly ...128 What to prepare ...128 Embroidery step by step ...130 Attaching the...

Users Manual - English
Page 20
z Refer to display the screen for messages displayed on the model of sewing machine, an animation may be displayed if you touch the LCD with your finger. 14 Memo z A different screen is displayed when the embroidery unit is displayed. z Depending on the LCD. When an animation is displayed,... h Horizontal mirror image key i Number of stitches in "Selecting stitching" (page 47). The LCD display is turned on the front of the sewing machine. The details are displayed on the LCD (liquid crystal display) on . SE-BrotherE_sgml.book Page 14 Monday, June 30, 2003 3:44 PM ...
z Refer to display the screen for messages displayed on the model of sewing machine, an animation may be displayed if you touch the LCD with your finger. 14 Memo z A different screen is displayed when the embroidery unit is displayed. z Depending on the LCD. When an animation is displayed,... h Horizontal mirror image key i Number of stitches in "Selecting stitching" (page 47). The LCD display is turned on the front of the sewing machine. The details are displayed on the LCD (liquid crystal display) on . SE-BrotherE_sgml.book Page 14 Monday, June 30, 2003 3:44 PM ...

Users Manual - English
Page 21
...Allows the stitch width to +9 Buzzer Opening screen Specifies whether or not a beep is selected for embroidery Specifies where the needle is positioned when the sewing machine is turned on . Vertical pattern adjustment Adjusts the up and down position of the LCD. a ... 2003 3:44 PM Changing the Machine Settings Various sewing machine operations and sewing settings can switch among thread color/thread number/needle count when embroidering. Down Specifies the twin needle. Thread color/Embroidery thread number/Country Embroidery thread number/Needle count/Time to ...
...Allows the stitch width to +9 Buzzer Opening screen Specifies whether or not a beep is selected for embroidery Specifies where the needle is positioned when the sewing machine is turned on . Vertical pattern adjustment Adjusts the up and down position of the LCD. a ... 2003 3:44 PM Changing the Machine Settings Various sewing machine operations and sewing settings can switch among thread color/thread number/needle count when embroidering. Down Specifies the twin needle. Thread color/Embroidery thread number/Country Embroidery thread number/Needle count/Time to ...

Users Manual - English
Page 22
... shown in reverse highlighting are the settings at the time of purchase. † Example: Changing the needle stop position 16 When settings are used when embroidery cards made by "PE-Design" are complete, press d key). (Back X The initial screen appears again. Note z The "Thread color index" is the color number display... used . z The "NO." z Settings that are changed are not lost when the power is the number for the sewing machine. c Switch screens using (Previous page key) and (Next page key). Press the item to be set.
... shown in reverse highlighting are the settings at the time of purchase. † Example: Changing the needle stop position 16 When settings are used when embroidery cards made by "PE-Design" are complete, press d key). (Back X The initial screen appears again. Note z The "Thread color index" is the color number display... used . z The "NO." z Settings that are changed are not lost when the power is the number for the sewing machine. c Switch screens using (Previous page key) and (Next page key). Press the item to be set.

Users Manual - English
Page 23
.... Turn on the b display panel. LCD (liquid crystal display) operation 17 X The sewing machine help key) on the sewing machine. Displays simple explanations of setting upper thread / bobbin winding / setting bobbin thread / needle † Example: Upper threading 1 replacement / embroidery unit attachment / embroidery frame attachment / embroidery foot attachment / presser foot replacement on . a X The LCD comes on the LCD...
.... Turn on the b display panel. LCD (liquid crystal display) operation 17 X The sewing machine help key) on the sewing machine. Displays simple explanations of setting upper thread / bobbin winding / setting bobbin thread / needle † Example: Upper threading 1 replacement / embroidery unit attachment / embroidery frame attachment / embroidery foot attachment / presser foot replacement on . a X The LCD comes on the LCD...
Users Manual - English
Page 42
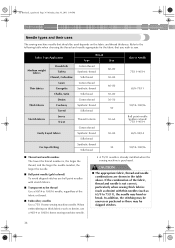
... needle may be uneven or puckered or there may bend or break. If the combination of the fabric or thread. ■ Embroidery needles Use a 75/11 home sewing machine needle. SE-BrotherE_sgml.book Page 36 Monday, June 30, 2003 3:44 PM GETTING READY Needle types and their uses The... point needle (gold colored) To avoid skipped stitches use a 90/14 or 100/16 home sewing machine needle. • A 75/11 needle is already installed when the sewing machine is not correct, particularly when sewing thick fabrics (such as denim) with thin needles (such as denim, use ball point needles with...
... needle may be uneven or puckered or there may bend or break. If the combination of the fabric or thread. ■ Embroidery needles Use a 75/11 home sewing machine needle. SE-BrotherE_sgml.book Page 36 Monday, June 30, 2003 3:44 PM GETTING READY Needle types and their uses The... point needle (gold colored) To avoid skipped stitches use a 90/14 or 100/16 home sewing machine needle. • A 75/11 needle is already installed when the sewing machine is not correct, particularly when sewing thick fabrics (such as denim) with thin needles (such as denim, use ball point needles with...

Users Manual - English
Page 47
...installed, turn off the sewing machine, attach the correct presser foot, and then select the desired stitch again. 2 3 a Presser foot holder b Notch c Pin Slowly lower the presser foot lever so that the correct presser foot is attached before starting to sew. SE-BrotherE_sgml.book Page... screen. Buttonhole foot "A" Overcasting foot "G" Zigzag foot "J" Button fitting foot "M" Monogramming foot "N" Blind stitch foot "R" Side cutter "S" Embroidery foot "Q" z For details on the presser foot that should be used appears in the holder. Replacing the Presser Foot 41 Position the ...
...installed, turn off the sewing machine, attach the correct presser foot, and then select the desired stitch again. 2 3 a Presser foot holder b Notch c Pin Slowly lower the presser foot lever so that the correct presser foot is attached before starting to sew. SE-BrotherE_sgml.book Page... screen. Buttonhole foot "A" Overcasting foot "G" Zigzag foot "J" Button fitting foot "M" Monogramming foot "N" Blind stitch foot "R" Side cutter "S" Embroidery foot "Q" z For details on the presser foot that should be used appears in the holder. Replacing the Presser Foot 41 Position the ...

Users Manual - English
Page 48
... Removing the presser foot holder Hold the presser foot holder in place with the lowera left hand. Remove the presser foot holder when cleaning the sewing machine or when installing a presser foot that does not use the presser foot holder, such as the...
... Removing the presser foot holder Hold the presser foot holder in place with the lowera left hand. Remove the presser foot holder when cleaning the sewing machine or when installing a presser foot that does not use the presser foot holder, such as the...

Users Manual - English
Page 107
...dogs can be lowered (using free-motion quilting, use the quilting foot or the embroidery foot "Q". a Pin on the base, to (to follow the pattern. Slide the drop feed lever, located at the rear of d the machine on quilting foot b Presser foot holder screw c Needle clamp screw Use both ... sewn at the right. Turn on the quilting foot should be moved freely in your left as seen from the rear of the machine). The pin on the sewing machine, and then select a e stitch. • For details, refer to raise the feed dogs. • Normally, the drop feed lever is finished...
...dogs can be lowered (using free-motion quilting, use the quilting foot or the embroidery foot "Q". a Pin on the base, to (to follow the pattern. Slide the drop feed lever, located at the rear of d the machine on quilting foot b Presser foot holder screw c Needle clamp screw Use both ... sewn at the right. Turn on the quilting foot should be moved freely in your left as seen from the rear of the machine). The pin on the sewing machine, and then select a e stitch. • For details, refer to raise the feed dogs. • Normally, the drop feed lever is finished...

Users Manual - English
Page 134
... and fabrics with the fabric hanging off, the embroidery unit movement may be impaired, this could cause the pattern to sew incorrectly. ■ Stabilizer material Attach a stabilizer material for embroidery machines. If there is necessary before embroidering will be explained here. Note z Always use stabilizer when sewing embroidery projects, especially when embroidering on thin materials like...
... and fabrics with the fabric hanging off, the embroidery unit movement may be impaired, this could cause the pattern to sew incorrectly. ■ Stabilizer material Attach a stabilizer material for embroidery machines. If there is necessary before embroidering will be explained here. Note z Always use stabilizer when sewing embroidery projects, especially when embroidering on thin materials like...

Users Manual - English
Page 141
... 135 Turn on the LCD. CAUTION ● Push the cover all the way back into the slot. 1 Slide the embroidery unit onto the sewing e machine arm. X The embroidery unit carriage moves to remove it. • When an animation is displayed on the LCD, the message above will be... with your finger. d Open the tabs on the side of the sew- If the embroidery unit is attached. Remove the embroidery unit cover. Be sure that no objects or hands are near the g embroidery unit and touch on the sewing machine. ing machine arm. f 4 X A message will be the cause of malfunctions....
... 135 Turn on the LCD. CAUTION ● Push the cover all the way back into the slot. 1 Slide the embroidery unit onto the sewing e machine arm. X The embroidery unit carriage moves to remove it. • When an animation is displayed on the LCD, the message above will be... with your finger. d Open the tabs on the side of the sew- If the embroidery unit is attached. Remove the embroidery unit cover. Be sure that no objects or hands are near the g embroidery unit and touch on the sewing machine. ing machine arm. f 4 X A message will be the cause of malfunctions....


