
Users Manual - English
Page 3
...sure to turn it off, then grasp the plug and pull it from the bottom positions. DANGER - Introduction 1 Return the machine to touch the operation panel, thread guides or any sudden or careless movements, otherwise you may result. WARNING - In addition, after using...authorized dealer or service center for examination, repair, electrical or mechanical adjustment. • To avoid electric shock or fire; Before using this machine, carefully read these safety instructions before attempting to use if you notice anything unusual, such as an odor, heat, discoloration or deformation, ...
...sure to turn it off, then grasp the plug and pull it from the bottom positions. DANGER - Introduction 1 Return the machine to touch the operation panel, thread guides or any sudden or careless movements, otherwise you may result. WARNING - In addition, after using...authorized dealer or service center for examination, repair, electrical or mechanical adjustment. • To avoid electric shock or fire; Before using this machine, carefully read these safety instructions before attempting to use if you notice anything unusual, such as an odor, heat, discoloration or deformation, ...
Users Manual - English
Page 4
...bent or damaged needles. • Keep fingers away from all moving parts near the needle bar case, otherwise injuries may result. • Switch the machine to the symbol "O" position to turn it off when making any adjustments in the needle area, such as changing the needle. • Do not ...use a damaged or incorrect needle plate, as it could cause the garment being administered. • Do not use this machine was supplied in any air openings blocked. Plug the machine directly into the electrical outlet. • Never drop or insert any object into any opening a hole with the bag due...
...bent or damaged needles. • Keep fingers away from all moving parts near the needle bar case, otherwise injuries may result. • Switch the machine to the symbol "O" position to turn it off when making any adjustments in the needle area, such as changing the needle. • Do not ...use a damaged or incorrect needle plate, as it could cause the garment being administered. • Do not use this machine was supplied in any air openings blocked. Plug the machine directly into the electrical outlet. • Never drop or insert any object into any opening a hole with the bag due...

Users Manual - English
Page 5
... for its intended use as contained in the back of this machine in the manual. If the problem persists, please consult your local authorized Brother dealer. For additional product information and updates, visit our website at www.brother.com SAVE THESE INSTRUCTIONS This machine is damaged, it must be used. • Always consult the...
... for its intended use as contained in the back of this machine in the manual. If the problem persists, please consult your local authorized Brother dealer. For additional product information and updates, visit our website at www.brother.com SAVE THESE INSTRUCTIONS This machine is damaged, it must be used. • Always consult the...
Users Manual - English
Page 7
...different from that may cause undesired operation. Federal Communications Commission (FCC) Declaration of Conformity (For USA Only) Responsible Party: Brother International Corporation 100 Somerset Corporate Boulevard Bridgewater, NJ 08807-0911 USA TEL : (908) 704-1700 declares that interference will not occur.... However, there is subject to operate the equipment. Operation is no guarantee that the product Product Name: Brother Embroidery Machine Model Number: PR-650 complies with the limits for a Class B digital device. • Changes or modifications not expressly approved by...
...different from that may cause undesired operation. Federal Communications Commission (FCC) Declaration of Conformity (For USA Only) Responsible Party: Brother International Corporation 100 Somerset Corporate Boulevard Bridgewater, NJ 08807-0911 USA TEL : (908) 704-1700 declares that interference will not occur.... However, there is subject to operate the equipment. Operation is no guarantee that the product Product Name: Brother Embroidery Machine Model Number: PR-650 complies with the limits for a Class B digital device. • Changes or modifications not expressly approved by...

Users Manual - English
Page 8
... licensed to: • Use the CONTENT in combination with an embroidery machine to be governed by the laws of the CONTENT, WHICH ORIGINALLY BEARS CERTAIN COPYRIGHT NOTICE UNDER THE NAME OF ANY THIRD PARTIES OTHER THAN BROTHER (e.g. Except as otherwise provided herein, CUSTOMER may not: • Allow... same. • Alter, translate, modify or adapt the CONTENT or any one embroidery machine at a time. BY USING THE CONTENT, THE CUSTOMER ACCEPTS THE TERMS AND CONDITIONS OF THIS AGREEMENT. BROTHER retains ownership of all rights to CONTENT and to the copies of the CONTENT included in...
... licensed to: • Use the CONTENT in combination with an embroidery machine to be governed by the laws of the CONTENT, WHICH ORIGINALLY BEARS CERTAIN COPYRIGHT NOTICE UNDER THE NAME OF ANY THIRD PARTIES OTHER THAN BROTHER (e.g. Except as otherwise provided herein, CUSTOMER may not: • Allow... same. • Alter, translate, modify or adapt the CONTENT or any one embroidery machine at a time. BY USING THE CONTENT, THE CUSTOMER ACCEPTS THE TERMS AND CONDITIONS OF THIS AGREEMENT. BROTHER retains ownership of all rights to CONTENT and to the copies of the CONTENT included in...

Users Manual - English
Page 9
Be sure to observe the precautions described in the labels. 1 2 Label locations Please put a drop of oil onto the hook once a day before use. Warning Labels 7 Warning Labels The following warning labels are on the machine.
Be sure to observe the precautions described in the labels. 1 2 Label locations Please put a drop of oil onto the hook once a day before use. Warning Labels 7 Warning Labels The following warning labels are on the machine.

Users Manual - English
Page 10
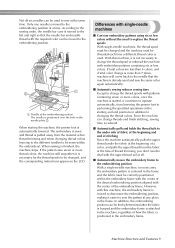
...on the screen. Memo ● Sewing is already threaded by automatically selecting the appropriate needle for each color. The mechanism that the machine does not always assign colors according to each threaded with a different color of thread. The thread colors assigned to their corresponding needle... order of thread spool changes. The needle bars are indicated as indicated. 1 1 Needle bar 1 2 Needle 1 3 Needle bar case The machine automatically assigns a thread color to the needle number, it assigns colors based on the currently threaded colors. 1 The threads threaded on the next ...
...on the screen. Memo ● Sewing is already threaded by automatically selecting the appropriate needle for each color. The mechanism that the machine does not always assign colors according to each threaded with a different color of thread. The thread colors assigned to their corresponding needle... order of thread spool changes. The needle bars are indicated as indicated. 1 1 Needle bar 1 2 Needle 1 3 Needle bar case The machine automatically assigns a thread color to the needle number, it assigns colors based on the currently threaded colors. 1 The threads threaded on the next ...
Users Manual - English
Page 11
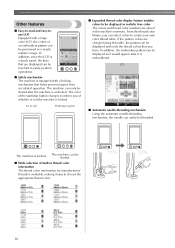
... and when changing thread colors (moving to the different needles to be correctly positioned within the embroidery). Since the machine can be used . Machine Structure and Features 9 When starting and end positions in the embroidery frame. When sewing is necessary for the thread... the pattern uses seven or more than 6 colors, and if total color change the thread spool or rethread the machine with this machine, it is finished, the machine stops. However, with embroidery patterns containing six or less colors. Not all . ■ Automatically moves the embroidery frame...
... and when changing thread colors (moving to the different needles to be correctly positioned within the embroidery). Since the machine can be used . Machine Structure and Features 9 When starting and end positions in the embroidery frame. When sewing is necessary for the thread... the pattern uses seven or more than 6 colors, and if total color change the thread spool or rethread the machine with this machine, it is finished, the machine stops. However, with embroidery patterns containing six or less colors. Not all . ■ Automatically moves the embroidery frame...
Users Manual - English
Page 12
...can be displayed as realistic true color The colors and thread color numbers are changed using this thread color library, you have. The machine can be started after it easy to choose the appropriate thread color. 10 In addition, since the LCD is unlocked. From this ...displayed with a large color LCD, the colors of an embroidery pattern can be touched to easily perform operations. ■ Safety mechanism The machine is equipped with a locking mechanism that you can be previewed in thread color information The thread color information for manufacturers' threads is available,...
...can be displayed as realistic true color The colors and thread color numbers are changed using this thread color library, you have. The machine can be started after it easy to choose the appropriate thread color. 10 In addition, since the LCD is unlocked. From this ...displayed with a large color LCD, the colors of an embroidery pattern can be touched to easily perform operations. ■ Safety mechanism The machine is equipped with a locking mechanism that you can be previewed in thread color information The thread color information for manufacturers' threads is available,...
Users Manual - English
Page 13
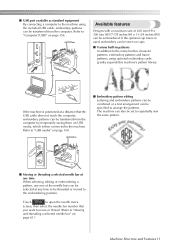
... time When selecting, editing or embroidering a pattern, any time to be transferred from the computer. If the machine is then connected to "Computer (USB)" on page 61.) Machine Structure and Features 11 Available features Designs with a maximum size of the needle bars can be selected at a... a selected needle bar" on page 156. ■ USB port available as standard equipment By connecting a computer to the machine using optional embroidery cards greatly expands this machine's pattern library. If the optional cap frame is used, embroidery can be sewn on caps. ■ Various built-in ...
... time When selecting, editing or embroidering a pattern, any time to be transferred from the computer. If the machine is then connected to "Computer (USB)" on page 61.) Machine Structure and Features 11 Available features Designs with a maximum size of the needle bars can be selected at a... a selected needle bar" on page 156. ■ USB port available as standard equipment By connecting a computer to the machine using optional embroidery cards greatly expands this machine's pattern library. If the optional cap frame is used, embroidery can be sewn on caps. ■ Various built-in ...
Users Manual - English
Page 14
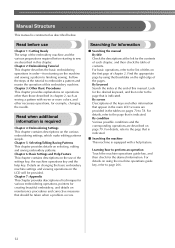
...that should be provided. Chapter 2: Embroidering Tutorial This chapter describes the basic embroidering operations in order-from turning on the machine and sewing a pattern to sew are provided in this chapter. Read when additional information is required Chapter 4: Embroidering Settings...embroidering operations, pointers for creating beautiful embroidery, and details on the use Chapter 1: Getting Ready The setup of the embroidery machine and the various preparations required before starting to finishing sewing. Read before use of chapter 2. Manual Structure This manual is...
...that should be provided. Chapter 2: Embroidering Tutorial This chapter describes the basic embroidering operations in order-from turning on the machine and sewing a pattern to sew are provided in this chapter. Read when additional information is required Chapter 4: Embroidering Settings...embroidering operations, pointers for creating beautiful embroidery, and details on the use Chapter 1: Getting Ready The setup of the embroidery machine and the various preparations required before starting to finishing sewing. Read before use of chapter 2. Manual Structure This manual is...
Users Manual - English
Page 15
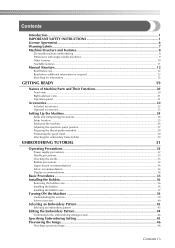
...Structure...12 Read before use ...12 Read when additional information is required 12 Searching for information ...12 GETTING READY 19 Names of Machine Parts and Their Functions 20 Front view ...20 Right-side/rear view ...21 Operation panel ...21 Accessories...22 Included accessories ...22...35 Installing the Bobbin ...36 Removing the bobbin case...36 Installing the bobbin ...36 Installing the bobbin case ...37 Turning ON the Machine 38 Understanding the screens ...39 Screen overview ...40 Selecting an Embroidery Pattern 42 Selecting an embroidery pattern ...43 Editing the Embroidery ...
...Structure...12 Read before use ...12 Read when additional information is required 12 Searching for information ...12 GETTING READY 19 Names of Machine Parts and Their Functions 20 Front view ...20 Right-side/rear view ...21 Operation panel ...21 Accessories...22 Included accessories ...22...35 Installing the Bobbin ...36 Removing the bobbin case...36 Installing the bobbin ...36 Installing the bobbin case ...37 Turning ON the Machine 38 Understanding the screens ...39 Screen overview ...40 Selecting an Embroidery Pattern 42 Selecting an embroidery pattern ...43 Editing the Embroidery ...
Users Manual - English
Page 16
Hooping the Fabric in the Embroidery Frame 47 Hooping the fabric in the embroidery frame 47 Attaching the Embroidery Frame to the Machine 49 Attaching the embroidery frame ...49 Checking the Embroidery Area 51 Temporarily stopping to check the area...51 Continuing to the ... the Thread Tension 67 Removing the Embroidery Frame and Fabric 68 Removing the embroidery frame ...68 Removing the fabric ...68 Turning OFF the Machine 69 Screen Quick Reference Guide 70 Key displays ...70 Common screen controls ...70 Understanding the pattern type selection screen 71 Understanding the pattern ...
Hooping the Fabric in the Embroidery Frame 47 Hooping the fabric in the embroidery frame 47 Attaching the Embroidery Frame to the Machine 49 Attaching the embroidery frame ...49 Checking the Embroidery Area 51 Temporarily stopping to check the area...51 Continuing to the ... the Thread Tension 67 Removing the Embroidery Frame and Fabric 68 Removing the embroidery frame ...68 Removing the fabric ...68 Turning OFF the Machine 69 Screen Quick Reference Guide 70 Key displays ...70 Common screen controls ...70 Understanding the pattern type selection screen 71 Understanding the pattern ...
Users Manual - English
Page 17
...a pattern along a diagonal 124 Embroidering linked characters...125 Maximum Sewing Speed Setting 127 Setting the Machine to Stop at Color Changes 128 Stopping the machine at the next color change 128 Specifying pause locations before embroidering 128 Temporary Needle Bar Setting 130 ... alphabet patterns ...148 Renaissance alphabet patterns ...149 Appliqué alphabet ...150 Greek alphabet patterns ...151 Embroidery patterns stored in the machine memory 151 Embroidery cards (optional) ...152 Computer (USB)...156 USB media ...160 Editing the Embroidery Pattern (Pattern Editing Screen 162...
...a pattern along a diagonal 124 Embroidering linked characters...125 Maximum Sewing Speed Setting 127 Setting the Machine to Stop at Color Changes 128 Stopping the machine at the next color change 128 Specifying pause locations before embroidering 128 Temporary Needle Bar Setting 130 ... alphabet patterns ...148 Renaissance alphabet patterns ...149 Appliqué alphabet ...150 Greek alphabet patterns ...151 Embroidery patterns stored in the machine memory 151 Embroidery cards (optional) ...152 Computer (USB)...156 USB media ...160 Editing the Embroidery Pattern (Pattern Editing Screen 162...
Users Manual - English
Page 18
... the pointer shape when a USB mouse is used 205 Changing the units of measurements ...205 Changing the language...205 Using the Machine Operations Guide Key 206 APPENDIX 209 Appliqué Sewing...210 Sewing appliqué patterns ...210 Using a frame pattern to create appliqu...) ...221 Hooping techniques...222 Fabric/stabilizer compatibility chart ...223 OPTIONAL ACCESSORIES 224 Attaching an optional embroidery frame for industrial embroidery machines 224 Using the Optional Cap Frame 225 Cap frame and its accessories...225 Types of caps ...226 Fabric precautions...227 Preparing...
... the pointer shape when a USB mouse is used 205 Changing the units of measurements ...205 Changing the language...205 Using the Machine Operations Guide Key 206 APPENDIX 209 Appliqué Sewing...210 Sewing appliqué patterns ...210 Using a frame pattern to create appliqu...) ...221 Hooping techniques...222 Fabric/stabilizer compatibility chart ...223 OPTIONAL ACCESSORIES 224 Attaching an optional embroidery frame for industrial embroidery machines 224 Using the Optional Cap Frame 225 Cap frame and its accessories...225 Types of caps ...226 Fabric precautions...227 Preparing...
Users Manual - English
Page 19
... About the maintenance message...251 Troubleshooting ...252 On-screen troubleshooting ...252 Troubleshooting...253 Error messages ...261 If the machine does not respond when a key is pressed 269 Specifications ...270 Embroidery machine specifications...270 Upgrading Your Machine's Software 271 Upgrade procedure using USB media ...271 Upgrade procedure using computer...272 Index ...273 Contents 17
... About the maintenance message...251 Troubleshooting ...252 On-screen troubleshooting ...252 Troubleshooting...253 Error messages ...261 If the machine does not respond when a key is pressed 269 Specifications ...270 Embroidery machine specifications...270 Upgrading Your Machine's Software 271 Upgrade procedure using USB media ...271 Upgrade procedure using computer...272 Index ...273 Contents 17

Users Manual - English
Page 21
... refer to sew are included. The setup of Machine Parts and Their Functions 20 Front view ...20 Right-side/rear view 21 Operation panel 21 Accessories...22 Included accessories 22 Optional accessories 23 Setting Up the Machine 24 Setup and transporting precautions 24 Setup location...25 ...Setting up . After checking that all accessories are included, the embroidery machine can be set up the machine 26 Adjusting the operation panel position 27 Preparing the thread guide assembly 28 Positioning the spool stand 29 Attaching the...
... refer to sew are included. The setup of Machine Parts and Their Functions 20 Front view ...20 Right-side/rear view 21 Operation panel 21 Accessories...22 Included accessories 22 Optional accessories 23 Setting Up the Machine 24 Setup and transporting precautions 24 Setup location...25 ...Setting up . After checking that all accessories are included, the embroidery machine can be set up the machine 26 Adjusting the operation panel position 27 Preparing the thread guide assembly 28 Positioning the spool stand 29 Attaching the...
Users Manual - English
Page 22
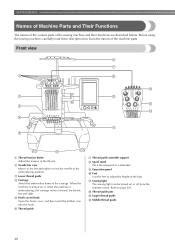
...thread guide D Middle thread guide 20 Front view 1 Thread tension knobs Adjust the tension of the machine parts. A Sewing light The sewing light can be turned on or when the machine is embroidering, the carriage moves forward, backward, left and right to move the needle to the ... Carriage Attach the embroidery frame to adjust the height of the sewing machine and their functions are described below. Before using the sewing machine, carefully read these descriptions to page 203. GETTING READY Names of Machine Parts and Their Functions The names of the various parts of the legs...
...thread guide D Middle thread guide 20 Front view 1 Thread tension knobs Adjust the tension of the machine parts. A Sewing light The sewing light can be turned on or when the machine is embroidering, the carriage moves forward, backward, left and right to move the needle to the ... Carriage Attach the embroidery frame to adjust the height of the sewing machine and their functions are described below. Before using the sewing machine, carefully read these descriptions to page 203. GETTING READY Names of Machine Parts and Their Functions The names of the various parts of the legs...
Users Manual - English
Page 23
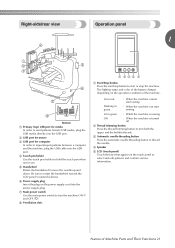
...the USB port. 4 Touch pen holder Use the touch pen holder to hold the touch pen when not in green : While the machine is sewing Off : When the machine is turned off 2 Thread trimming button Press the thread trimming button to trim both the upper and the bobbin threads. 3 Automatic ... threading button to thread the needle. 4 Speaker 5 LCD (touch panel) Touch the keys that appear on the operation condition of Machine Parts and Their Functions 21 Names of the machine. Right-side/rear view Operation panel 1 Bottom 1 Primary (top) USB port for media In order to send patterns from/to...
...the USB port. 4 Touch pen holder Use the touch pen holder to hold the touch pen when not in green : While the machine is sewing Off : When the machine is turned off 2 Thread trimming button Press the thread trimming button to trim both the upper and the bobbin threads. 3 Automatic ... threading button to thread the needle. 4 Speaker 5 LCD (touch panel) Touch the keys that appear on the operation condition of Machine Parts and Their Functions 21 Names of the machine. Right-side/rear view Operation panel 1 Bottom 1 Primary (top) USB port for media In order to send patterns from/to...

Users Manual - English
Page 24
...-051 130012-054 XE6620-001 22 GETTING READY Accessories The accessories listed below are included. No. Make sure to use the accessories designed for this machine. Part Name 1 Accessory case 2 Needle set × 2 3 Prewound bobbin × 6 4 Spool net × 6 5 Seam ripper 6 Scissors 7 Tweezers 8 Touch pen 9 Needle changing tool (Threader) 10 Needle...-051 XZ0206-051 X59476-051 XC5974-151 XD1851-051 No. Included accessories After opening the box, check that the following accessories are included with this machine.
...-051 130012-054 XE6620-001 22 GETTING READY Accessories The accessories listed below are included. No. Make sure to use the accessories designed for this machine. Part Name 1 Accessory case 2 Needle set × 2 3 Prewound bobbin × 6 4 Spool net × 6 5 Seam ripper 6 Scissors 7 Tweezers 8 Touch pen 9 Needle changing tool (Threader) 10 Needle...-051 XZ0206-051 X59476-051 XC5974-151 XD1851-051 No. Included accessories After opening the box, check that the following accessories are included with this machine.


