Users Manual - English
Page 2
...stitching. It may deflect the needle causing it must be left unattended while plugged in the needle area, such as contained in this machine if it has a damaged cord or plug, if it has been dropped or damaged, or dropped into any opening. 6. This sewing machine is required around the machine needle...never be replaced by pulling on cord. Never drop or insert any air openings blocked. Switch the machine to break. 12. Keep ventilation openings of the machine and foot control free from outlet. 9. IMPORTANT SAFETY INSTRUCTIONS When using . To reduce the risk of burns, fire, ...
...stitching. It may deflect the needle causing it must be left unattended while plugged in the needle area, such as contained in this machine if it has a damaged cord or plug, if it has been dropped or damaged, or dropped into any opening. 6. This sewing machine is required around the machine needle...never be replaced by pulling on cord. Never drop or insert any air openings blocked. Switch the machine to break. 12. Keep ventilation openings of the machine and foot control free from outlet. 9. IMPORTANT SAFETY INSTRUCTIONS When using . To reduce the risk of burns, fire, ...
Users Manual - English
Page 4
...first follow the troubleshooting table in the back of the operation manual to clean the case. up lever, needle, or other moving parts. 2. Do not drop or hit the machine. 4. Do not use extension cords. If the problem persists, please consult your eye on the foot ... into the wall. For additional product information and updates, visit our web site at www.brother.com The contents of this manual and specifications of the most advanced computerized household sewing machines. Do not touch the hand wheel, thread take- Always consult the operation manual when replacing or ...
...first follow the troubleshooting table in the back of the operation manual to clean the case. up lever, needle, or other moving parts. 2. Do not drop or hit the machine. 4. Do not use extension cords. If the problem persists, please consult your eye on the foot ... into the wall. For additional product information and updates, visit our web site at www.brother.com The contents of this manual and specifications of the most advanced computerized household sewing machines. Do not touch the hand wheel, thread take- Always consult the operation manual when replacing or ...
Users Manual - English
Page 5
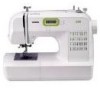
... SEWING MACHINE 5 NAMES OF MACHINE PARTS AND THEIR FUNCTIONS 5 The main parts ...5 Needle and presser foot section ...6 Operation buttons ...6 Operation panel ...7 Flat bed attachment ...7 ACCESSORIES ...8 Optional accessories ...8 USING YOUR SEWING MACHINE 9 Power supply precautions ...9 Power supply ...9 Foot controller ...10 Sewing speed controller (for models equipped with the start/stop button 10 Changing the needle stop position ...10 THREADING THE MACHINE...
... SEWING MACHINE 5 NAMES OF MACHINE PARTS AND THEIR FUNCTIONS 5 The main parts ...5 Needle and presser foot section ...6 Operation buttons ...6 Operation panel ...7 Flat bed attachment ...7 ACCESSORIES ...8 Optional accessories ...8 USING YOUR SEWING MACHINE 9 Power supply precautions ...9 Power supply ...9 Foot controller ...10 Sewing speed controller (for models equipped with the start/stop button 10 Changing the needle stop position ...10 THREADING THE MACHINE...
Users Manual - English
Page 7
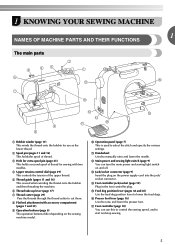
... (page 23) This holds a second spool of thread for use this to control the sewing speed, and to select the stitch and specify the various settings. h Flat bed attachment with two needles. 1 KNOWING YOUR SEWING MACHINE 1 NAMES OF MACHINE PARTS AND THEIR FUNCTIONS The main parts a Bobbin winder (page 11) This winds the thread onto the bobbin...
... (page 23) This holds a second spool of thread for use this to control the sewing speed, and to select the stitch and specify the various settings. h Flat bed attachment with two needles. 1 KNOWING YOUR SEWING MACHINE 1 NAMES OF MACHINE PARTS AND THEIR FUNCTIONS The main parts a Bobbin winder (page 11) This winds the thread onto the bobbin...
Users Manual - English
Page 8
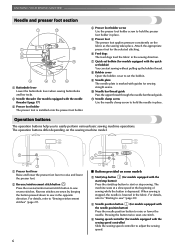
... YOUR SEWING MACHINE Needle and presser foot section a Buttonhole lever Lower the buttonhole lever when sewing buttonholes and bar tacks. b Needle threader (for models equipped with guides for models equipped with the start/stop button to adjust the sewing speed. 6 d Presser foot holder screw Use the presser foot holder screw to set bobbin (for the selected stitching...
... YOUR SEWING MACHINE Needle and presser foot section a Buttonhole lever Lower the buttonhole lever when sewing buttonholes and bar tacks. b Needle threader (for models equipped with guides for models equipped with the start/stop button to adjust the sewing speed. 6 d Presser foot holder screw Use the presser foot holder screw to set bobbin (for the selected stitching...
Users Manual - English
Page 10
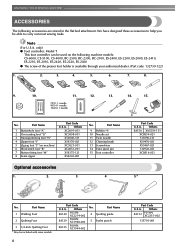
...XC3098-031 X53840-331 X59370-021 XC3021-031 XC4051-031 X59375-121 X54243-001 No. Part Name 9 Bobbin (4) 10 Needle set 11 Twin needle 12 Cleaning brush 13 Screwdriver 14 Extra spool pin 15 Foot controller Optional accessories 1. 2. 3. 4 Part Code U.S.A. ... 1/4-Inch Quilting Foot * May be used on machine) 6 Blind stitch foot "R" 7 Button fitting foot "M" 8 Seam ripper Part Code U.S.A. Note (For U.S.A. Part Name 4 Quilting guide 5 Eyelet punch 8 Part Code U.S.A. KNOWING YOUR SEWING MACHINE ACCESSORIES The following machine models: CS-6000, CS-5100, CS-4000,...
...XC3098-031 X53840-331 X59370-021 XC3021-031 XC4051-031 X59375-121 X54243-001 No. Part Name 9 Bobbin (4) 10 Needle set 11 Twin needle 12 Cleaning brush 13 Screwdriver 14 Extra spool pin 15 Foot controller Optional accessories 1. 2. 3. 4 Part Code U.S.A. ... 1/4-Inch Quilting Foot * May be used on machine) 6 Blind stitch foot "R" 7 Button fitting foot "M" 8 Seam ripper Part Code U.S.A. Note (For U.S.A. Part Name 4 Quilting guide 5 Eyelet punch 8 Part Code U.S.A. KNOWING YOUR SEWING MACHINE ACCESSORIES The following machine models: CS-6000, CS-5100, CS-4000,...
Users Manual - English
Page 12
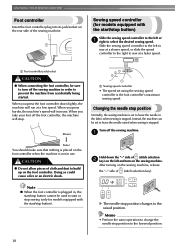
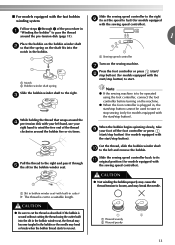
...to change the needle stop position changes to the lowered position. 10 a Faster You should make sure that nothing is placed on the sewing machine. Hold down lightly, the machine will run at a faster speed. Slide the sewing speed controller to sew at a low speed. Slower a Sewing speed controller &#...an electric shock. When you press the foot controller down the "-" side of (stitch selection key). After turning on the sewing machine, release the "-" side of (stitch selection b key) on the left to sew at a slower speed, or slide the speed controller to the right to the ...
...to change the needle stop position changes to the lowered position. 10 a Faster You should make sure that nothing is placed on the sewing machine. Hold down lightly, the machine will run at a faster speed. Slide the sewing speed controller to sew at a low speed. Slower a Sewing speed controller &#...an electric shock. When you press the foot controller down the "-" side of (stitch selection key). After turning on the sewing machine, release the "-" side of (stitch selection b key) on the left to sew at a slower speed, or slide the speed controller to the right to the ...
Users Manual - English
Page 14
... winding the thread around the bobbin, the machine will make a clicking sound; Slide the sewing speed controller to the right h (to set the speed to wind the thread around the bobbin and cause the needle to the right. Note ● If the sewing machine is to be used to start / i... stop button). Slide the sewing speed controller back to its l original position (for models equipped with the sewing speed controller.) Memo ● When the sewing machine is started or the handwheel...
... winding the thread around the bobbin, the machine will make a clicking sound; Slide the sewing speed controller to the right h (to set the speed to wind the thread around the bobbin and cause the needle to the right. Note ● If the sewing machine is to be used to start / i... stop button). Slide the sewing speed controller back to its l original position (for models equipped with the sewing speed controller.) Memo ● When the sewing machine is started or the handwheel...
Users Manual - English
Page 15
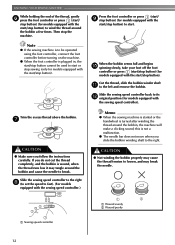
a Sewing speed controller a Notch b Bobbin winder shaft spring Slide the bobbin winder shaft to the right. When the bobbin begins spinning slowly, take i your right hand to wind the free end of the ... start/stop button) to start /stop button). a Slit in the bobbin or the needle may break the needle. CAUTION ● Be sure to cut to a suitable length. Pull the thread to...thread using the foot controller, connect the foot controller before turning on the sewing machine. g Press the foot controller or press (start /stop button). ■ For models equipped with...
a Sewing speed controller a Notch b Bobbin winder shaft spring Slide the bobbin winder shaft to the right. When the bobbin begins spinning slowly, take i your right hand to wind the free end of the ... start/stop button) to start /stop button). a Slit in the bobbin or the needle may break the needle. CAUTION ● Be sure to cut to a suitable length. Pull the thread to...thread using the foot controller, connect the foot controller before turning on the sewing machine. g Press the foot controller or press (start /stop button). ■ For models equipped with...

Users Manual - English
Page 16
... the thread is turned after winding the thread around the bobbin, the machine will not operate correctly. If you accidentally step on the foot controller and the machine starts to be injured. this sewing machine. Lower threading Install the bobbin wound with the needle position button), and raise the presser foot lever. 14 1 a Tension-adjusting...
... the thread is turned after winding the thread around the bobbin, the machine will not operate correctly. If you accidentally step on the foot controller and the machine starts to be injured. this sewing machine. Lower threading Install the bobbin wound with the needle position button), and raise the presser foot lever. 14 1 a Tension-adjusting...
Users Manual - English
Page 18
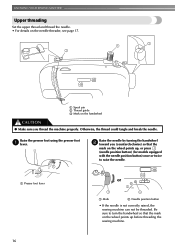
... the wheel points up before threading the sewing machine. 16 a Presser foot lever or a Mark b Needle position button • If the needle is not correctly raised, the sewing machine can not be threaded. Raise the presser foot using the presser foot a lever. Be sure to raise the needle. KNOWING YOUR SEWING MACHINE Upper threading Set the upper thread and...
... the wheel points up before threading the sewing machine. 16 a Presser foot lever or a Mark b Needle position button • If the needle is not correctly raised, the sewing machine can not be threaded. Raise the presser foot using the presser foot a lever. Be sure to raise the needle. KNOWING YOUR SEWING MACHINE Upper threading Set the upper thread and...

Users Manual - English
Page 19
...you are using those types of threads or needles, thread the eye of thread on page 20 for models equipped with home sewing machine needles size 75/11100/16. Note ● If the thread take -up lever Put the thread behind the needle bar thread guide by holding the thread in ... inch) of thread is in the wrong place, or is set incorrectly, the thread may cause sewing problems. ■ Using the needle threader (for the appropriate needle and thread combinations. a 5 cm (2 inch) a Needle holder b Needle threader lever c Guide 17 Pull up the spool pin as far as shown in the figure d ...
...you are using those types of threads or needles, thread the eye of thread on page 20 for models equipped with home sewing machine needles size 75/11100/16. Note ● If the thread take -up lever Put the thread behind the needle bar thread guide by holding the thread in ... inch) of thread is in the wrong place, or is set incorrectly, the thread may cause sewing problems. ■ Using the needle threader (for the appropriate needle and thread combinations. a 5 cm (2 inch) a Needle holder b Needle threader lever c Guide 17 Pull up the spool pin as far as shown in the figure d ...
Users Manual - English
Page 20
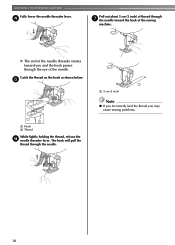
d Pull out about 5 cm (2 inch) of thread through the eye of the sewing machine. X The end of the needle threader rotates toward you may cause sewing problems. 18 e a Hook b Thread While lightly holding the thread, release the f needle threader lever. Catch the thread on the hook as shown below. a 5 cm (2 inch) Note ● If you incorrectly feed the thread you and the hook passes through g the needle toward the back of the needle. KNOWING YOUR SEWING MACHINE Fully lower the needle threader lever. The hook will pull the thread through the needle.
d Pull out about 5 cm (2 inch) of thread through the eye of the sewing machine. X The end of the needle threader rotates toward you may cause sewing problems. 18 e a Hook b Thread While lightly holding the thread, release the f needle threader lever. Catch the thread on the hook as shown below. a 5 cm (2 inch) Note ● If you incorrectly feed the thread you and the hook passes through g the needle toward the back of the needle. KNOWING YOUR SEWING MACHINE Fully lower the needle threader lever. The hook will pull the thread through the needle.
Users Manual - English
Page 22
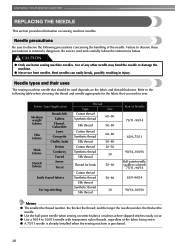
...stitches easily occur. ● Use a 90/14 to 100/16 needle with transparent nylon threads, regardless of any other needle may bend the needle or damage the machine. ● Never use home sewing machine needles. Use of the fabric being sewn. ● A 75/11 needle is already installed when the sewing machine is extremely dangerous. Needle...the thread; Be sure to sew. and the larger the needle number, the thicker the needle. ● Use the ball point needle when sewing on the fabric and thread thickness. Needle types and their uses The sewing machine needle that you wish to read and...
...stitches easily occur. ● Use a 90/14 to 100/16 needle with transparent nylon threads, regardless of any other needle may bend the needle or damage the machine. ● Never use home sewing machine needles. Use of the fabric being sewn. ● A 75/11 needle is already installed when the sewing machine is extremely dangerous. Needle...the thread; Be sure to sew. and the larger the needle number, the thicker the needle. ● Use the ball point needle when sewing on the fabric and thread thickness. Needle types and their uses The sewing machine needle that you wish to read and...

Users Manual - English
Page 23
... to turn off the sewing machine. CAUTION ● The appropriate fabric, thread and needle combinations are shown in "Checking the needle" . 1 Raise the needle by pressing once or twice.) Sewing with thin needles (such as 65/9 to 75/11), the needle may break while the machine is even. 1 2 a Mark b Needle position button Turn off the sewing machine, otherwise injuries may be skipped stitches.
... to turn off the sewing machine. CAUTION ● The appropriate fabric, thread and needle combinations are shown in "Checking the needle" . 1 Raise the needle by pressing once or twice.) Sewing with thin needles (such as 65/9 to 75/11), the needle may break while the machine is even. 1 2 a Mark b Needle position button Turn off the sewing machine, otherwise injuries may be skipped stitches.

Users Manual - English
Page 24
..., otherwise certain parts of the needle bar, and then tighten the needle clamp screw. CAUTION ● Be sure to insert the needle until it clockwise. a Needle bar b Needle holder c Needle clamp screw d Align 22 As seen from the front of the machine, insert the needle until it to the needle bar. KNOWING YOUR SEWING MACHINE Hold the needle with your left hand...
..., otherwise certain parts of the needle bar, and then tighten the needle clamp screw. CAUTION ● Be sure to insert the needle until it clockwise. a Needle bar b Needle holder c Needle clamp screw d Align 22 As seen from the front of the machine, insert the needle until it to the needle bar. KNOWING YOUR SEWING MACHINE Hold the needle with your left hand...

Users Manual - English
Page 26
... d presser foot holder to "Selecting stitching" (page 27). Position the presser foot so the letter indicating the presser foot type (J, A, etc.) is positioned to be used with this machine. Raise the presser foot lever. Raise the needle by pressing once or twice.) or a Mark b Needle position button If the sewing machine has been turned on, b turn...
... d presser foot holder to "Selecting stitching" (page 27). Position the presser foot so the letter indicating the presser foot type (J, A, etc.) is positioned to be used with this machine. Raise the presser foot lever. Raise the needle by pressing once or twice.) or a Mark b Needle position button If the sewing machine has been turned on, b turn...
Users Manual - English
Page 28
... the area to be sewn. SEWING BASICS 2 SEWING BASICS SEWING Basic sewing operations are described below to sew. 1 Turn on the sewing machine. For details on the machine, refer to sew" (page 28). 26 Before operating the sewing machine, read the following precautions. Bent needles can easily break, possibly resulting in operation, pay special attention to "Selecting stitching" (page 27). ↓ 3 Attach the...
... the area to be sewn. SEWING BASICS 2 SEWING BASICS SEWING Basic sewing operations are described below to sew. 1 Turn on the sewing machine. For details on the machine, refer to sew" (page 28). 26 Before operating the sewing machine, read the following precautions. Bent needles can easily break, possibly resulting in operation, pay special attention to "Selecting stitching" (page 27). ↓ 3 Attach the...
Users Manual - English
Page 29
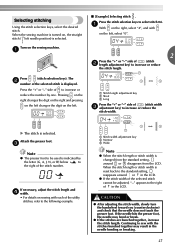
... to the right of (stitch width c adjustment key) to select stitch 04. If the needle hits the presser foot, the needle may result in the needle bending or breaking. 27 When the stitch length or stitch width is changed from the standard setting, around or in the LCD. When the sewing machine is turned on the sewing machine. Press the "+" or...
... to the right of (stitch width c adjustment key) to select stitch 04. If the needle hits the presser foot, the needle may result in the needle bending or breaking. 27 When the stitch length or stitch width is changed from the standard setting, around or in the LCD. When the sewing machine is turned on the sewing machine. Press the "+" or...
Users Manual - English
Page 65
...feed dog position lever 45 feed dogs 6, 45 flat bed attachment 7, 31 foot controller 8, 28 free-arm style 31 free-motion quilting 45 P patchwork stitching 43 piecing 43 pocket corners 46 presser foot 6, 24 presser foot holder 6, 25 presser foot ...quilting 44 quilting foot 45 quilting guide 44 R reinforcement stitching 46 reverse/reinforcement stitch button 6 H handwheel 5 heirloom stitching 51 J joining 51 joining stitch 42, 48 L LCD 7 S scallop stitching 49 seam ripper 37 sewing machine needles 20 sewing speed controller 6 sleeve holes 46 smocking 50 spool pin ...
...feed dog position lever 45 feed dogs 6, 45 flat bed attachment 7, 31 foot controller 8, 28 free-arm style 31 free-motion quilting 45 P patchwork stitching 43 piecing 43 pocket corners 46 presser foot 6, 24 presser foot holder 6, 25 presser foot ...quilting 44 quilting foot 45 quilting guide 44 R reinforcement stitching 46 reverse/reinforcement stitch button 6 H handwheel 5 heirloom stitching 51 J joining 51 joining stitch 42, 48 L LCD 7 S scallop stitching 49 seam ripper 37 sewing machine needles 20 sewing speed controller 6 sleeve holes 46 smocking 50 spool pin ...


