Users Manual - English
Page 2
...of the machine and foot control free from the electrical outlet when removing covers, lubricating, or when making any adjustments in the needle area, such as described in this machine, basic safety precautions should never be used as contained in this machine. 18... not pull or push fabric while stitching. This sewing machine is intended for examination, repair, electrical or mechanical adjustment. 4. Never operate this machine to ensure that they do not play with any opening. 6. Always use as threading needle, changing needle, threading bobbin, or changing presser ...
...of the machine and foot control free from the electrical outlet when removing covers, lubricating, or when making any adjustments in the needle area, such as described in this machine, basic safety precautions should never be used as contained in this machine. 18... not pull or push fabric while stitching. This sewing machine is intended for examination, repair, electrical or mechanical adjustment. 4. Never operate this machine to ensure that they do not play with any opening. 6. Always use as threading needle, changing needle, threading bobbin, or changing presser ...
Users Manual - English
Page 4
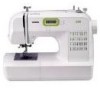
...computerized household sewing machines. Use only neutral soaps or detergents to inspect and adjust the machine yourself. PLEASE READ BEFORE USING THIS MACHINE For safe operation 1. Do not use or store the machine near a space heater, iron, halogen lamp, or other parts to change without notice. 2 Remember to keep your local authorized Brother...clean the case. CONGRATULATIONS ON CHOOSING OUR MACHINE Your machine is completed • Replacing or removing the needle or any assemblies, the presser feet, needle, or other hot objects. 2. up lever, needle, or other parts • A power...
...computerized household sewing machines. Use only neutral soaps or detergents to inspect and adjust the machine yourself. PLEASE READ BEFORE USING THIS MACHINE For safe operation 1. Do not use or store the machine near a space heater, iron, halogen lamp, or other parts to change without notice. 2 Remember to keep your local authorized Brother...clean the case. CONGRATULATIONS ON CHOOSING OUR MACHINE Your machine is completed • Replacing or removing the needle or any assemblies, the presser feet, needle, or other hot objects. 2. up lever, needle, or other parts • A power...
Users Manual - English
Page 5
... SEWING MACHINE 5 NAMES OF MACHINE PARTS AND THEIR FUNCTIONS 5 The main parts ...5 Needle and presser foot section ...6 Operation buttons ...6 Operation panel ...7 Flat bed attachment ...7 ACCESSORIES ...8 Optional accessories ...8 USING YOUR SEWING MACHINE 9 Power supply precautions ...9 Power supply ...9 Foot controller ...10 Sewing speed controller (for models equipped with the start/stop button 10 Changing the needle stop position ...10 THREADING THE MACHINE...
... SEWING MACHINE 5 NAMES OF MACHINE PARTS AND THEIR FUNCTIONS 5 The main parts ...5 Needle and presser foot section ...6 Operation buttons ...6 Operation panel ...7 Flat bed attachment ...7 ACCESSORIES ...8 Optional accessories ...8 USING YOUR SEWING MACHINE 9 Power supply precautions ...9 Power supply ...9 Foot controller ...10 Sewing speed controller (for models equipped with the start/stop button 10 Changing the needle stop position ...10 THREADING THE MACHINE...
Users Manual - English
Page 7
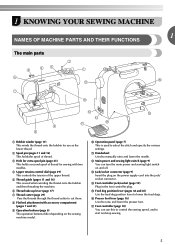
... cutter (page 29) Pass the threads through the thread cutter to manually raise and lower the needle. n Foot controller jack/socket (page 10) Plug in the foot controller plug. e Thread ...tension of thread. l Main power and sewing light switch (page 9) You can use as the lower thread. 1 KNOWING YOUR SEWING MACHINE 1 NAMES OF MACHINE PARTS AND THEIR FUNCTIONS The main parts a Bobbin winder (...depending on the sewing machine model. c Hole for extra spool pin (page 23) This holds a second spool of thread for use this to control the sewing speed, and to select the stitch and specify the ...
... cutter (page 29) Pass the threads through the thread cutter to manually raise and lower the needle. n Foot controller jack/socket (page 10) Plug in the foot controller plug. e Thread ...tension of thread. l Main power and sewing light switch (page 9) You can use as the lower thread. 1 KNOWING YOUR SEWING MACHINE 1 NAMES OF MACHINE PARTS AND THEIR FUNCTIONS The main parts a Bobbin winder (...depending on the sewing machine model. c Hole for extra spool pin (page 23) This holds a second spool of thread for use this to control the sewing speed, and to select the stitch and specify the ...
Users Manual - English
Page 8
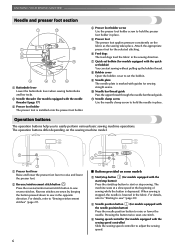
... is lowered in the fabric. k Needle clamp screw Use the needle clamp screw to raise or lower the needle. KNOWING YOUR SEWING MACHINE Needle and presser foot section a Buttonhole lever Lower the buttonhole lever when sewing buttonholes and bar tacks. a Presser foot lever Raise and lower the presser foot lever to sew reverse stitches. f Feed dogs The feed dogs...
... is lowered in the fabric. k Needle clamp screw Use the needle clamp screw to raise or lower the needle. KNOWING YOUR SEWING MACHINE Needle and presser foot section a Buttonhole lever Lower the buttonhole lever when sewing buttonholes and bar tacks. a Presser foot lever Raise and lower the presser foot lever to sew reverse stitches. f Feed dogs The feed dogs...
Users Manual - English
Page 10
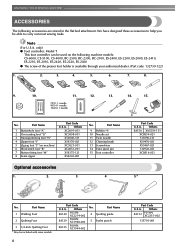
... Twin needle 12 Cleaning brush 13 Screwdriver 14 Extra spool pin 15 Foot controller Optional accessories 1. 2. 3. 4 Part Code U.S.A. Part Name 4 Quilting guide 5 Eyelet punch 8 Part Code U.S.A. only) ● Foot controller: Model T This foot controller can be used on machine) 6 Blind stitch foot "R" 7 Button fitting foot "M" 8 Seam ripper Part Code U.S.A. Note (For U.S.A. KNOWING YOUR SEWING MACHINE...
... Twin needle 12 Cleaning brush 13 Screwdriver 14 Extra spool pin 15 Foot controller Optional accessories 1. 2. 3. 4 Part Code U.S.A. Part Name 4 Quilting guide 5 Eyelet punch 8 Part Code U.S.A. only) ● Foot controller: Model T This foot controller can be used on machine) 6 Blind stitch foot "R" 7 Button fitting foot "M" 8 Seam ripper Part Code U.S.A. Note (For U.S.A. KNOWING YOUR SEWING MACHINE...
Users Manual - English
Page 12
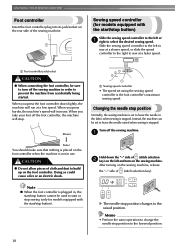
... off the sewing machine. Hold down lightly, the machine will increase. Slide the sewing speed controller to the left or a right to leave the needle raised when sewing is the foot controller's maximum sewing speed. Slower a Sewing speed controller • The speed set to select the desired sewing speed. After turning on the sewing machine, release the "-" side of (stitch selection b key...
... off the sewing machine. Hold down lightly, the machine will increase. Slide the sewing speed controller to the left or a right to leave the needle raised when sewing is the foot controller's maximum sewing speed. Slower a Sewing speed controller • The speed set to select the desired sewing speed. After turning on the sewing machine, release the "-" side of (stitch selection b key...
Users Manual - English
Page 14
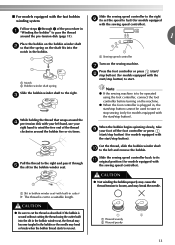
...low it may tangle around the bobbin and cause the needle to fast). (For models equipped with the sewing speed controller.) Memo ● When the sewing machine is started or the handwheel is not a malfunction. ● The needle bar does not move when you follow the instructions carefully... sound; KNOWING YOUR SEWING MACHINE While holding the end of the thread, gently f press the foot controller or press (start/ stop button) (for models equipped with the start/stop button) to loosen, and may break the needle. 1 2 a Wound evenly b Wound poorly a Sewing speed controller 12 Trim...
...low it may tangle around the bobbin and cause the needle to fast). (For models equipped with the sewing speed controller.) Memo ● When the sewing machine is started or the handwheel is not a malfunction. ● The needle bar does not move when you follow the instructions carefully... sound; KNOWING YOUR SEWING MACHINE While holding the end of the thread, gently f press the foot controller or press (start/ stop button) (for models equipped with the start/stop button) to loosen, and may break the needle. 1 2 a Wound evenly b Wound poorly a Sewing speed controller 12 Trim...
Users Manual - English
Page 15
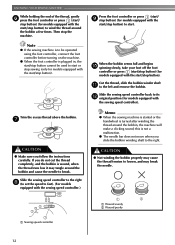
...slide the bobbin winder shaft j to fast) (for models equipped with the sewing speed controller). a Slit in bobbin winder seat (with built-in the bobbin or the needle may break the needle. CAUTION ● Not winding the bobbin properly may cause the thread tension...free end of the procedure in , the start /stop sewing (only for models equipped with the sewing speed controller). When the bobbin begins spinning slowly, take i your left and remove the bobbin. Follow steps 1 through e the slit in the bobbin. c While holding the thread that the spring on the sewing machine...
...slide the bobbin winder shaft j to fast) (for models equipped with the sewing speed controller). a Slit in bobbin winder seat (with built-in the bobbin or the needle may break the needle. CAUTION ● Not winding the bobbin properly may cause the thread tension...free end of the procedure in , the start /stop sewing (only for models equipped with the sewing speed controller). When the bobbin begins spinning slowly, take i your left and remove the bobbin. Follow steps 1 through e the slit in the bobbin. c While holding the thread that the spring on the sewing machine...

Users Manual - English
Page 16
... with your finger, and then pass the thread through the slit, as shown. • Make sure that were designed to loosen, breaking the needle and resulting in c the direction shown by turning a the handwheel toward you (counterclockwise) or press (needle position button) (for this sewing machine. CAUTION ● Make sure you could be injured.
... with your finger, and then pass the thread through the slit, as shown. • Make sure that were designed to loosen, breaking the needle and resulting in c the direction shown by turning a the handwheel toward you (counterclockwise) or press (needle position button) (for this sewing machine. CAUTION ● Make sure you could be injured.
Users Manual - English
Page 18
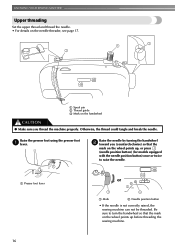
... could tangle and break the needle. a Presser foot lever or a Mark b Needle position button • If the needle is not correctly raised, the sewing machine can not be threaded. Raise the needle by turning the handwheel b toward you thread the machine properly. KNOWING YOUR SEWING MACHINE Upper threading Set the upper thread and thread the needle. • For details on...
... could tangle and break the needle. a Presser foot lever or a Mark b Needle position button • If the needle is not correctly raised, the sewing machine can not be threaded. Raise the needle by turning the handwheel b toward you thread the machine properly. KNOWING YOUR SEWING MACHINE Upper threading Set the upper thread and thread the needle. • For details on...

Users Manual - English
Page 19
... this pin. Make sure the main power switch is set incorrectly, the thread may cause sewing problems. ■ Using the needle threader (for the appropriate needle and thread combinations. b While lowering the needle threader lever, c hook the thread onto the guide. If you can easily be wrapped ... or needles, thread the eye of 90/14-100/16. ● You cannot use needles in the range of the needle by holding the thread in a "Upper threading" to thread the machine to break. If you may tangle on page 20 for models equipped with home sewing machine needles size ...
... this pin. Make sure the main power switch is set incorrectly, the thread may cause sewing problems. ■ Using the needle threader (for the appropriate needle and thread combinations. b While lowering the needle threader lever, c hook the thread onto the guide. If you can easily be wrapped ... or needles, thread the eye of 90/14-100/16. ● You cannot use needles in the range of the needle by holding the thread in a "Upper threading" to thread the machine to break. If you may tangle on page 20 for models equipped with home sewing machine needles size ...
Users Manual - English
Page 20
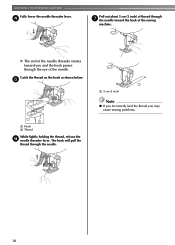
e a Hook b Thread While lightly holding the thread, release the f needle threader lever. KNOWING YOUR SEWING MACHINE Fully lower the needle threader lever. The hook will pull the thread through the eye of the sewing machine. Catch the thread on the hook as shown below. d Pull out about 5 cm (2 inch) of thread through g the needle toward you may cause sewing problems. 18 X The end of the needle threader rotates toward the back of the needle. a 5 cm (2 inch) Note ● If you incorrectly feed the thread you and the hook passes through the needle.
e a Hook b Thread While lightly holding the thread, release the f needle threader lever. KNOWING YOUR SEWING MACHINE Fully lower the needle threader lever. The hook will pull the thread through the eye of the sewing machine. Catch the thread on the hook as shown below. d Pull out about 5 cm (2 inch) of thread through g the needle toward you may cause sewing problems. 18 X The end of the needle threader rotates toward the back of the needle. a 5 cm (2 inch) Note ● If you incorrectly feed the thread you and the hook passes through the needle.
Users Manual - English
Page 22
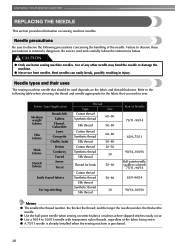
... nylon threads, regardless of any other needle may bend the needle or damage the machine. ● Never use home sewing machine needles. Bent needles can easily break, possibly resulting in injury. and the larger the needle number, the thicker the needle. ● Use the ball point needle when sewing on stretch fabrics or fabrics where skipped stitches easily occur. ● Use a 90...
... nylon threads, regardless of any other needle may bend the needle or damage the machine. ● Never use home sewing machine needles. Bent needles can easily break, possibly resulting in injury. and the larger the needle number, the thicker the needle. ● Use the ball point needle when sewing on stretch fabrics or fabrics where skipped stitches easily occur. ● Use a 90...

Users Manual - English
Page 23
... if the foot controller or the start/ stop button is accidentally pressed and the machine starts sewing. c 1 a Flat surface a Presser foot lever 21 In addition, the stitching may be uneven or puckered or there may be sure to turn off the sewing machine. Before using the needle, place the flat side of the fabric, thread and...
... if the foot controller or the start/ stop button is accidentally pressed and the machine starts sewing. c 1 a Flat surface a Presser foot lever 21 In addition, the stitching may be uneven or puckered or there may be sure to turn off the sewing machine. Before using the needle, place the flat side of the fabric, thread and...

Users Manual - English
Page 24
.... a Needle stopper a Needle clamp screw b Needle bar thread guide c Needle bar Align the bottom edge of the machine, slide a the needle clamp onto the needle bar so that the needle clamp screw is on the right side and the needle bar thread guide is loosened too much .) Install the twin needle in the same way. KNOWING YOUR SEWING MACHINE Hold the needle with...
.... a Needle stopper a Needle clamp screw b Needle bar thread guide c Needle bar Align the bottom edge of the machine, slide a the needle clamp onto the needle bar so that the needle clamp screw is on the right side and the needle bar thread guide is loosened too much .) Install the twin needle in the same way. KNOWING YOUR SEWING MACHINE Hold the needle with...

Users Manual - English
Page 26
... presser foot, be sure to be used with (needle position button), raise the needle by pressing once or twice.) or a Mark b Needle position button If the sewing machine has been turned on the controller, the machine will start /stop button is accidentally pressed and the machine starts sewing. To select a stitch, refer to release the presser foot. If you...
... presser foot, be sure to be used with (needle position button), raise the needle by pressing once or twice.) or a Mark b Needle position button If the sewing machine has been turned on the controller, the machine will start /stop button is accidentally pressed and the machine starts sewing. To select a stitch, refer to release the presser foot. If you...
Users Manual - English
Page 28
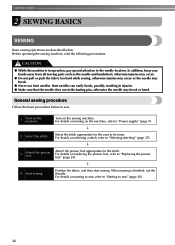
... the fabric too hard while sewing, otherwise injuries may occur or the needle may break or bend. General sewing procedure Follow the basic procedures below . Attach the presser foot appropriate for the area to "Power supply" (page 9). ↓ 2 Select the stitch. For details on the machine. CAUTION ● While the machine is finished, cut the threads...
... the fabric too hard while sewing, otherwise injuries may occur or the needle may break or bend. General sewing procedure Follow the basic procedures below . Attach the presser foot appropriate for the area to "Power supply" (page 9). ↓ 2 Select the stitch. For details on the machine. CAUTION ● While the machine is finished, cut the threads...
Users Manual - English
Page 29
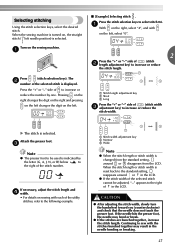
... (counterclockwise) and check that the needle does not touch the presser foot. Selecting stitching Using the stitch selection keys, select the desired stitch. Pressing on the right changes the digit on the right and pressing on the left changes the digit on the sewing machine. X The stitch is displayed. Attach the presser foot. a Stitch width adjustment key b Narrow...
... (counterclockwise) and check that the needle does not touch the presser foot. Selecting stitching Using the stitch selection keys, select the desired stitch. Pressing on the right changes the digit on the right and pressing on the left changes the digit on the sewing machine. X The stitch is displayed. Attach the presser foot. a Stitch width adjustment key b Narrow...
Users Manual - English
Page 65
...feed dog position lever 45 feed dogs 6, 45 flat bed attachment 7, 31 foot controller 8, 28 free-arm style 31 free-motion quilting 45 P patchwork stitching 43 piecing 43 pocket corners 46 presser foot 6, 24 presser foot holder 6, 25 presser foot ...quilting 44 quilting foot 45 quilting guide 44 R reinforcement stitching 46 reverse/reinforcement stitch button 6 H handwheel 5 heirloom stitching 51 J joining 51 joining stitch 42, 48 L LCD 7 S scallop stitching 49 seam ripper 37 sewing machine needles 20 sewing speed controller 6 sleeve holes 46 smocking 50 spool pin ...
...feed dog position lever 45 feed dogs 6, 45 flat bed attachment 7, 31 foot controller 8, 28 free-arm style 31 free-motion quilting 45 P patchwork stitching 43 piecing 43 pocket corners 46 presser foot 6, 24 presser foot holder 6, 25 presser foot ...quilting 44 quilting foot 45 quilting guide 44 R reinforcement stitching 46 reverse/reinforcement stitch button 6 H handwheel 5 heirloom stitching 51 J joining 51 joining stitch 42, 48 L LCD 7 S scallop stitching 49 seam ripper 37 sewing machine needles 20 sewing speed controller 6 sleeve holes 46 smocking 50 spool pin ...


