
Advanced Users Manual - English
Page 28
Press OK. It will be accurate if that part's life counter was reset during the life of the used part. 24 c Press a or b to choose one of the following : 4.Drum Life (DCP-7060D) 5.Drum Life (DCP-7065DN) 6.Drum Life (HL-2280DW) Press OK. Machine Info. 2.Page Counter d Press a or b to see the machine's Page Counters...
Press OK. It will be accurate if that part's life counter was reset during the life of the used part. 24 c Press a or b to choose one of the following : 4.Drum Life (DCP-7060D) 5.Drum Life (DCP-7065DN) 6.Drum Life (HL-2280DW) Press OK. Machine Info. 2.Page Counter d Press a or b to see the machine's Page Counters...
Users Manual - English
Page 12
...29 Cleaning the corona wire 34 Replacing the drum unit 35 B Troubleshooting 40 Error and maintenance messages 40 Document Jams 43 Document is jammed in the top of the ADF unit (For DCP-7065DN 43 Document is jammed under the document cover (For DCP-7065DN) ..........43 Removing small documents jammed in the...If you are having difficulty with your machine 54 Improving the print quality 59 Machine Information 69 Checking the Serial Number 69 Reset functions 69 How to reset the machine 69 C Menu and features 70 On-screen programming 70 Menu table ...70 Menu keys ...70 How to access...
...29 Cleaning the corona wire 34 Replacing the drum unit 35 B Troubleshooting 40 Error and maintenance messages 40 Document Jams 43 Document is jammed in the top of the ADF unit (For DCP-7065DN 43 Document is jammed under the document cover (For DCP-7065DN) ..........43 Removing small documents jammed in the...If you are having difficulty with your machine 54 Improving the print quality 59 Machine Information 69 Checking the Serial Number 69 Reset functions 69 How to reset the machine 69 C Menu and features 70 On-screen programming 70 Menu table ...70 Menu keys ...70 How to access...
Users Manual - English
Page 50
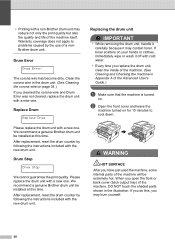
...Brother drum unit be installed at this , you cleaned the corona wire and Drum Error was not cleared, replace the drum unit with the new drum unit. When you have just used the machine, some internal parts of the machine, DO NOT touch the shaded parts shown in the illustration. After replacement, reset the drum...does not apply to cool down. Drum Stop A Drum Stop We cannot guarantee the print quality. Drum Error A Drum Error The corona wire has become dirty. We recommend a genuine Brother drum unit be installed at this time. After replacement, reset the drum counter by the use of a ...
...Brother drum unit be installed at this , you cleaned the corona wire and Drum Error was not cleared, replace the drum unit with the new drum unit. When you have just used the machine, some internal parts of the machine, DO NOT touch the shaded parts shown in the illustration. After replacement, reset the drum...does not apply to cool down. Drum Stop A Drum Stop We cannot guarantee the print quality. Drum Error A Drum Error The corona wire has become dirty. We recommend a genuine Brother drum unit be installed at this time. After replacement, reset the drum counter by the use of a ...
Users Manual - English
Page 53
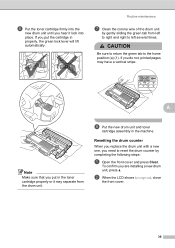
...put the cartridge in the machine. f Put the toner cartridge firmly into the new drum unit until you hear it may separate from left to right and right to left several times. Resetting the drum counter A When you replace the drum unit with a new one, you need to the home position (a) (1). Routine ...completing the following steps: a Open the front cover and press Clear. CAUTION Be sure to return the green tab to reset the drum counter by gently sliding the green tab from the drum unit. b When the LCD shows Accepted, close the front cover. 39 If you do not, printed pages may have...
...put the cartridge in the machine. f Put the toner cartridge firmly into the new drum unit until you hear it may separate from left to right and right to left several times. Resetting the drum counter A When you replace the drum unit with a new one, you need to the home position (a) (1). Routine ...completing the following steps: a Open the front cover and press Clear. CAUTION Be sure to return the green tab to reset the drum counter by gently sliding the green tab from the drum unit. b When the LCD shows Accepted, close the front cover. 39 If you do not, printed pages may have...
Users Manual - English
Page 56
... paper for suitable size for several minutes, then reconnect it. If the problem continues, call Brother Customer Service. Reset the drum unit counter. (See Resetting the drum counter on page 36.) The drum unit counter was not reset when a new drum was installed. Error Message Out of the following : Press Start to replace the toner cartridge...
... paper for suitable size for several minutes, then reconnect it. If the problem continues, call Brother Customer Service. Reset the drum unit counter. (See Resetting the drum counter on page 36.) The drum unit counter was not reset when a new drum was installed. Error Message Out of the following : Press Start to replace the toner cartridge...
Users Manual - English
Page 109
... information how to reset the machine 69 reset functions 69 serial number 69 Maintenance, routine replacing drum unit 35 toner cartridge 29 Menu Table 72 Mode, entering copy 24 N Network Printing See Network User's Guide Network Scanning See Software User's Guide O OPC drum 62 Out of ... difficulties 54 emulation 88 quality 57 resolution 88 specifications 88 Print quality 59 Programming your machine 70 Q Quality printing 57 R Replacing drum unit 35 toner cartridge 29 Resolution copy 86 print 88 scan 87 S Safety Instructions viii Scan 6, 26 Scanner glass using 22...
... information how to reset the machine 69 reset functions 69 serial number 69 Maintenance, routine replacing drum unit 35 toner cartridge 29 Menu Table 72 Mode, entering copy 24 N Network Printing See Network User's Guide Network Scanning See Software User's Guide O OPC drum 62 Out of ... difficulties 54 emulation 88 quality 57 resolution 88 specifications 88 Print quality 59 Programming your machine 70 Q Quality printing 57 R Replacing drum unit 35 toner cartridge 29 Resolution copy 86 print 88 scan 87 S Safety Instructions viii Scan 6, 26 Scanner glass using 22...


