Quick Setup Guide - English
Page 3
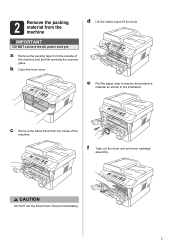
f Take out the drum unit and toner cartridge assembly. b Open the front cover. CCAAUUTTIOINON DO NOT eat the Silica Pack. a Remove the packing tape from the inside of the machine and the film covering the scanner glass. Discard immediately. 3 d Lift the elastic band off the drum. c Remove the Silica Pack from the outside of the machine. e Pull the paper strip to remove the protective material as shown in the illustration. 2 Remove the packing material from the machine IMPORTANT DO NOT connect the AC power cord yet.
f Take out the drum unit and toner cartridge assembly. b Open the front cover. CCAAUUTTIOINON DO NOT eat the Silica Pack. a Remove the packing tape from the inside of the machine and the film covering the scanner glass. Discard immediately. 3 d Lift the elastic band off the drum. c Remove the Silica Pack from the outside of the machine. e Pull the paper strip to remove the protective material as shown in the illustration. 2 Remove the packing material from the machine IMPORTANT DO NOT connect the AC power cord yet.
Quick Setup Guide - English
Page 4
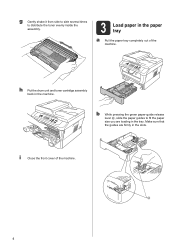
Make sure that the guides are loading in the tray. i Close the front cover of the machine. h Put the drum unit and toner cartridge assembly back in the machine. b While pressing the green paper-guide release lever a, slide the paper guides to distribute the toner evenly inside the assembly. 3 Load paper in the paper tray a Pull the paper tray completely out of the machine. 1 4 g Gently shake it from side to side several times to fit the paper size you are firmly in the slots.
Make sure that the guides are loading in the tray. i Close the front cover of the machine. h Put the drum unit and toner cartridge assembly back in the machine. b While pressing the green paper-guide release lever a, slide the paper guides to distribute the toner evenly inside the assembly. 3 Load paper in the paper tray a Pull the paper tray completely out of the machine. 1 4 g Gently shake it from side to side several times to fit the paper size you are firmly in the slots.

Quick Setup Guide - English
Page 5
... the stack of the paper tray. (Legal or Folio size paper are not available in some regions.) d Put paper in the tray and make sure: The paper is completely inserted into the machine. Over filling the paper tray will cause paper jams. The side to avoid paper jams and misfeeds. Note... For Legal or Folio size paper, press the release button in the bottom of the paper tray and then pull ...
... the stack of the paper tray. (Legal or Folio size paper are not available in some regions.) d Put paper in the tray and make sure: The paper is completely inserted into the machine. Over filling the paper tray will cause paper jams. The side to avoid paper jams and misfeeds. Note... For Legal or Folio size paper, press the release button in the bottom of the paper tray and then pull ...
Quick Setup Guide - English
Page 9
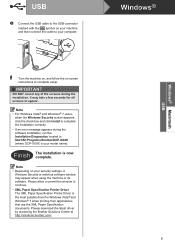
...7 when printing from applications that use the XML Paper Specification documents. IMPORTANT DO NOT cancel any of the screens during the software installation, run the Installation Diagnostics located in Start/All Programs/Brother/DCP-XXXX (where DCP-XXXX is your model name). Note •... or permit the window to continue. • XML Paper Specification Printer Driver The XML Paper Specification Printer Driver is now complete. Please download the latest driver by accessing the Brother Solutions Center at http://solutions.brother.com/. Windows® 9 Windows® Macintosh USB...
...7 when printing from applications that use the XML Paper Specification documents. IMPORTANT DO NOT cancel any of the screens during the software installation, run the Installation Diagnostics located in Start/All Programs/Brother/DCP-XXXX (where DCP-XXXX is your model name). Note •... or permit the window to continue. • XML Paper Specification Printer Driver The XML Paper Specification Printer Driver is now complete. Please download the latest driver by accessing the Brother Solutions Center at http://solutions.brother.com/. Windows® 9 Windows® Macintosh USB...
Quick Setup Guide - English
Page 13
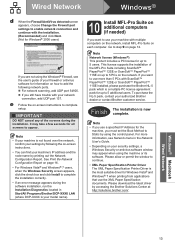
...for Windows® 2000 users) If you are not using the Windows® Firewall, see Network menu in Start/All Programs/Brother/DCP-XXXX LAN (where DCP-XXXX is the most suitable driver for Windows Vista® and Windows® 7 when printing from applications that use a specified... error message appears during the installation. See Print the Network Configuration Report on additional computers (if needed) If you use the XML Paper Specification documents. Go to complete setup. Please download the latest driver by printing out the Network Configuration Report. Note • If ...
...for Windows® 2000 users) If you are not using the Windows® Firewall, see Network menu in Start/All Programs/Brother/DCP-XXXX LAN (where DCP-XXXX is the most suitable driver for Windows Vista® and Windows® 7 when printing from applications that use a specified... error message appears during the installation. See Print the Network Configuration Report on additional computers (if needed) If you use the XML Paper Specification documents. Go to complete setup. Please download the latest driver by printing out the Network Configuration Report. Note • If ...

Advanced Users Manual - English
Page 3
... features ...1 Toner Save ...1 Sleep Mode ...1 Deep Sleep mode 2 Toner Settings ...2 Toner Setting (Continue Mode 2 LCD Contrast ...3 User Settings List 3 Network Configuration List (DCP-7065DN / HL-2280DW 4 WLAN Report (HL-2280DW only 4 Scanning using a scanner driver 4 2 Making copies 5 Copy settings ...5 Stop copying...5 Using the Options key 6 ... of the machine 14 Cleaning the scanner 15 Cleaning the corona wire 16 Cleaning the drum unit 17 Cleaning the paper pick-up rollers 22 Checking the machine 24 Checking the Page Counters 24 Checking the remaining life of the drum ...
... features ...1 Toner Save ...1 Sleep Mode ...1 Deep Sleep mode 2 Toner Settings ...2 Toner Setting (Continue Mode 2 LCD Contrast ...3 User Settings List 3 Network Configuration List (DCP-7065DN / HL-2280DW 4 WLAN Report (HL-2280DW only 4 Scanning using a scanner driver 4 2 Making copies 5 Copy settings ...5 Stop copying...5 Using the Options key 6 ... of the machine 14 Cleaning the scanner 15 Cleaning the corona wire 16 Cleaning the drum unit 17 Cleaning the paper pick-up rollers 22 Checking the machine 24 Checking the Page Counters 24 Checking the remaining life of the drum ...
Advanced Users Manual - English
Page 13
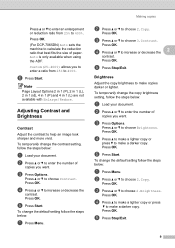
... 400%. c Press a or b to choose 2.Copy. Press OK. Press OK. b Press a or b to calculate the reduction ratio that best fits the size of paper. Press OK. (For DCP-7065DN) Auto sets the machine to choose 2.Copy. Press a or b to enter an enlargement or reduction ratio from 25% to 400%. Auto is only available...
... 400%. c Press a or b to choose 2.Copy. Press OK. Press OK. b Press a or b to calculate the reduction ratio that best fits the size of paper. Press OK. (For DCP-7065DN) Auto sets the machine to choose 2.Copy. Press a or b to enter an enlargement or reduction ratio from 25% to 400%. Auto is only available...
Advanced Users Manual - English
Page 14
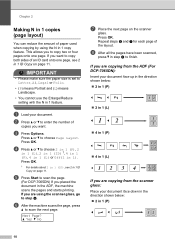
... 2 in 1 ID Copy on page 11. This allows you want to copy both sides of copies you to step f. IMPORTANT • Please make sure the paper size is set to choose 2 in 1 (P), 2 in 1 (L), 2 in 1 (ID) 1, 4 in 1 (P), 4 in 1 (L) or Off(1 in 1 feature. d Press a or b to Letter, A4, Legal or Folio... from the scanner glass: 2 Place your document. Press OK. 1 For details about 2 in 1 (ID), see 2 in step f to scan the page. (For DCP-7065DN) If you are using the N in 1 copy feature. e Press Start to finish. f After the machine scans the page, press a to choose Page Layout. Next ...
... 2 in 1 ID Copy on page 11. This allows you want to copy both sides of copies you to step f. IMPORTANT • Please make sure the paper size is set to choose 2 in 1 (P), 2 in 1 (L), 2 in 1 (ID) 1, 4 in 1 (P), 4 in 1 (L) or Off(1 in 1 feature. d Press a or b to Letter, A4, Legal or Folio... from the scanner glass: 2 Place your document. Press OK. 1 For details about 2 in 1 (ID), see 2 in step f to scan the page. (For DCP-7065DN) If you are using the N in 1 copy feature. e Press Start to finish. f After the machine scans the page, press a to choose Page Layout. Next ...
Advanced Users Manual - English
Page 18
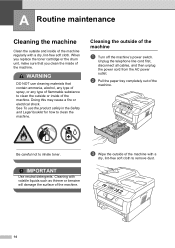
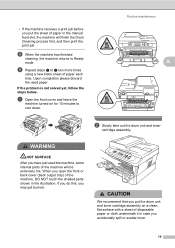
... or the drum unit, make sure that contain ammonia, alcohol, any type of spray, or any type of flammable substance to inhale toner. b Pull the paper tray completely out of the machine. Cleaning with volatile liquids such as thinner or benzine will damage the surface of the machine. Be careful not...
... or the drum unit, make sure that contain ammonia, alcohol, any type of spray, or any type of flammable substance to inhale toner. b Pull the paper tray completely out of the machine. Cleaning with volatile liquids such as thinner or benzine will damage the surface of the machine. Be careful not...
Advanced Users Manual - English
Page 19
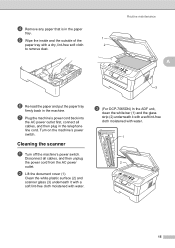
... a soft lint-free cloth moistened with water. Routine maintenance A 3 f Re-load the paper and put the paper tray firmly back in the paper tray. Cleaning the scanner A a Turn off the machine's power switch. c (For DCP-7065DN) In the ADF unit, clean the white bar (1) and the glass strip (2) underneath it... with a soft lint-free cloth moistened with water. 1 2 15 e Wipe the inside and the outside of the 1 paper tray with a dry, lint-free soft cloth 2...
... a soft lint-free cloth moistened with water. Routine maintenance A 3 f Re-load the paper and put the paper tray firmly back in the paper tray. Cleaning the scanner A a Turn off the machine's power switch. c (For DCP-7065DN) In the ADF unit, clean the white bar (1) and the glass strip (2) underneath it... with a soft lint-free cloth moistened with water. 1 2 15 e Wipe the inside and the outside of the 1 paper tray with a dry, lint-free soft cloth 2...
Advanced Users Manual - English
Page 20
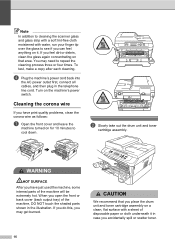
... the machine's power switch. To test, make a copy after each cleaning. Cleaning the corona wire A If you have just used the machine, some internal parts of the machine, DO NOT touch the shaded parts shown in the telephone line cord. Note In addition to cleaning the scanner glass and... glass strip with a soft lint-free cloth moistened with a sheet of disposable paper or cloth underneath it . WARNING HOT SURFACE After you open the front or back cover (back output tray) of the machine will be extremely...
... the machine's power switch. To test, make a copy after each cleaning. Cleaning the corona wire A If you have just used the machine, some internal parts of the machine, DO NOT touch the shaded parts shown in the telephone line cord. Note In addition to cleaning the scanner glass and... glass strip with a soft lint-free cloth moistened with a sheet of disposable paper or cloth underneath it . WARNING HOT SURFACE After you open the front or back cover (back output tray) of the machine will be extremely...
Advanced Users Manual - English
Page 21
... or wash it off with cold water. Handle the toner cartridge carefully. If toner scatters on the drum surface. a Prepare blank A4 or Letter size paper. b Make sure the machine is in the illustration. To prevent damage to left several times. Cleaning the drum unit A If you do not, printed pages...
... or wash it off with cold water. Handle the toner cartridge carefully. If toner scatters on the drum surface. a Prepare blank A4 or Letter size paper. b Make sure the machine is in the illustration. To prevent damage to left several times. Cleaning the drum unit A If you do not, printed pages...
Advanced Users Manual - English
Page 22
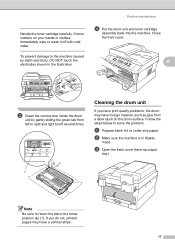
... sure that you feel the machine pull in the manual feed slot at the same time. If it may not be fed properly, resulting in a paper jam. • DO NOT close the back cover (face-up output tray) during the Drum Cleaning process because the machine rotates the OPC drum in... the manual feed slot. It may cause a jam. • If the paper in the manual feed slot is other than one sheet of the paper that the paper is not, it is straight and in the proper position in reverse. g Using both hands, slide the manual...
... sure that you feel the machine pull in the manual feed slot at the same time. If it may not be fed properly, resulting in a paper jam. • DO NOT close the back cover (face-up output tray) during the Drum Cleaning process because the machine rotates the OPC drum in... the manual feed slot. It may cause a jam. • If the paper in the manual feed slot is other than one sheet of the paper that the paper is not, it is straight and in the proper position in reverse. g Using both hands, slide the manual...
Advanced Users Manual - English
Page 23
...then print the print job. Upon completion please discard the used the machine, some internal parts of paper each time. a Open the front cover and leave the machine turned on a clean, flat surface with a ...sheet of disposable paper or cloth underneath it in case you put the sheet of the machine, DO NOT touch ...in the manual feed slot, the machine will be extremely hot. If you do this, you have just used paper. • If the machine receives a print job before you accidentally spill or scatter toner. 19 If the ...
...then print the print job. Upon completion please discard the used the machine, some internal parts of paper each time. a Open the front cover and leave the machine turned on a clean, flat surface with a ...sheet of disposable paper or cloth underneath it in case you put the sheet of the machine, DO NOT touch ...in the manual feed slot, the machine will be extremely hot. If you do this, you have just used paper. • If the machine receives a print job before you accidentally spill or scatter toner. 19 If the ...
Advanced Users Manual - English
Page 26
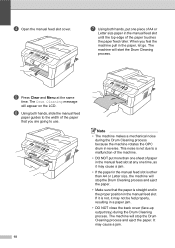
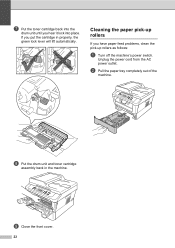
If you have paper feed problems, clean the pick-up rollers as follows: a Turn off the machine's power switch. i Close the front cover. 22 Cleaning the paper pick-up rollers A If you put the cartridge in the machine. h Put the drum unit and toner cartridge assembly back in properly, the green lock lever will lift automatically. b Pull the paper tray completely out of the machine. Unplug the power cord from the AC power outlet. g Put the toner cartridge back into the drum unit until you hear it lock into place.
If you have paper feed problems, clean the pick-up rollers as follows: a Turn off the machine's power switch. i Close the front cover. 22 Cleaning the paper pick-up rollers A If you put the cartridge in the machine. h Put the drum unit and toner cartridge assembly back in properly, the green lock lever will lift automatically. b Pull the paper tray completely out of the machine. Unplug the power cord from the AC power outlet. g Put the toner cartridge back into the drum unit until you hear it lock into place.

Advanced Users Manual - English
Page 27
f Plug the machine's power cord back into the AC power outlet. c Tightly wring out a lint-free cloth soaked in the machine. Turn on the machine's power switch. 23 A 1 1 e Put the paper tray back in lukewarm water, and then wipe the separator pad (1) of the machine to remove dust. Routine maintenance d Wipe the two pick-up rollers (1) inside of the paper tray with it to remove dust.
f Plug the machine's power cord back into the AC power outlet. c Tightly wring out a lint-free cloth soaked in the machine. Turn on the machine's power switch. 23 A 1 1 e Put the paper tray back in lukewarm water, and then wipe the separator pad (1) of the machine to remove dust. Routine maintenance d Wipe the two pick-up rollers (1) inside of the paper tray with it to remove dust.

Advanced Users Manual - English
Page 31
ADF (automatic document feeder (For DCP-7065DN)) The document can choose certain options for changing your computer. Menu mode Programming mode for each copy without changing the default settings. PageManager software application converts an image of a paper document into your machine's settings. ...list of vertical and horizontal lines per inch. Contrast Setting to text you purchased. Temporary settings You can be placed in Brother manuals. Availability of gray available for dark or light documents, by making copies of the machine. 27 OCR (optical character...
ADF (automatic document feeder (For DCP-7065DN)) The document can choose certain options for changing your computer. Menu mode Programming mode for each copy without changing the default settings. PageManager software application converts an image of a paper document into your machine's settings. ...list of vertical and horizontal lines per inch. Contrast Setting to text you purchased. Temporary settings You can be placed in Brother manuals. Availability of gray available for dark or light documents, by making copies of the machine. 27 OCR (optical character...
Advanced Users Manual - English
Page 32
C Index C Cleaning corona wire 16 drum unit 17 paper pick-up rollers 22 scanner 15 Copy 2 in 1 ID Copy 11 brightness 9 contrast 9 Enlarge/Reduce 8 keys 5 N in 1 (page layout 10 Options key 6 quality 8 sort (ADF ...
C Index C Cleaning corona wire 16 drum unit 17 paper pick-up rollers 22 scanner 15 Copy 2 in 1 ID Copy 11 brightness 9 contrast 9 Enlarge/Reduce 8 keys 5 N in 1 (page layout 10 Options key 6 quality 8 sort (ADF ...
Users Manual - English
Page 6
...(including but not limited to attempted warranty repair without the proper preparation and/or packaging); 3 Damage caused by this warranty. Brother reserves the right to supply a refurbished or remanufactured replacement Machine and/or accompanying Consumable and Accessory Items and use refurbished parts ... Except as Waste Ink Absorber, Paper Feeding Kit, Fuser and Laser Units. What is the length of the Warranty Periods: Machines: one year from the original purchase date. Accompanying Consumable and Accessory Items: 90 days from Brother and/or alteration/removal of the...
...(including but not limited to attempted warranty repair without the proper preparation and/or packaging); 3 Damage caused by this warranty. Brother reserves the right to supply a refurbished or remanufactured replacement Machine and/or accompanying Consumable and Accessory Items and use refurbished parts ... Except as Waste Ink Absorber, Paper Feeding Kit, Fuser and Laser Units. What is the length of the Warranty Periods: Machines: one year from the original purchase date. Accompanying Consumable and Accessory Items: 90 days from Brother and/or alteration/removal of the...
Users Manual - English
Page 7
... sent to you and your sole (i.e., only) and exclusive remedies under this Product. © 2010 Brother International Corporation v Except for the repair or replacement as described above, Brother shall not be liable for you to pick up to the cost of a new Product only if: (i) you do not allow the ...Items back to you and charged for damage to or loss of any equipment, media, programs or data related to the use of paper in accordance with Brother or its representatives. This warranty gives you certain rights and you may also have delivered the Machine to an Authorized Service...
... sent to you and your sole (i.e., only) and exclusive remedies under this Product. © 2010 Brother International Corporation v Except for the repair or replacement as described above, Brother shall not be liable for you to pick up to the cost of a new Product only if: (i) you do not allow the ...Items back to you and charged for damage to or loss of any equipment, media, programs or data related to the use of paper in accordance with Brother or its representatives. This warranty gives you certain rights and you may also have delivered the Machine to an Authorized Service...


