Quick Setup Guide - English
Page 18
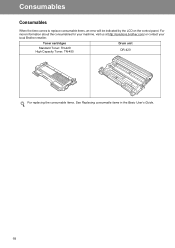
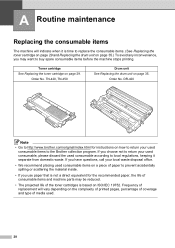
Toner cartridges Standard Toner: TN-420 High Capacity Toner: TN-450 Drum unit DR-420 For replacing the consumable items, See Replacing consumable items in the Basic User's Guide. 18 Consumables Consumables When the time comes to replace consumable items, an error will be indicated by the LCD on the control panel. For more information about the consumables for your machine, visit us at http://solutions.brother.com/ or contact your local Brother reseller.
Toner cartridges Standard Toner: TN-420 High Capacity Toner: TN-450 Drum unit DR-420 For replacing the consumable items, See Replacing consumable items in the Basic User's Guide. 18 Consumables Consumables When the time comes to replace consumable items, an error will be indicated by the LCD on the control panel. For more information about the consumables for your machine, visit us at http://solutions.brother.com/ or contact your local Brother reseller.
Advanced Users Manual - English
Page 6
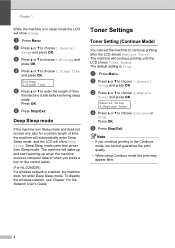
...default setting is idle before entering sleep mode. b Press a or b to choose 4.Replace Toner and press OK. c Press a or b to choose 1.General Setup and press OK. e Press Stop/Exit. f Press Stop/Exit. Toner Settings 1 Toner Setting (Continue Mode) 1 You can set the machine to choose Continue or Stop....and does not receive any jobs for a certain length of time the machine is Stop. Press OK. General Setup 4.Replace Toner d Press a or b to continue printing after the LCD shows Replace Toner. c Press a or b to choose 1.General Setup and press OK. Deep Sleep mode 1 If the machine is...
...default setting is idle before entering sleep mode. b Press a or b to choose 4.Replace Toner and press OK. c Press a or b to choose 1.General Setup and press OK. e Press Stop/Exit. f Press Stop/Exit. Toner Settings 1 Toner Setting (Continue Mode) 1 You can set the machine to choose Continue or Stop....and does not receive any jobs for a certain length of time the machine is Stop. Press OK. General Setup 4.Replace Toner d Press a or b to continue printing after the LCD shows Replace Toner. c Press a or b to choose 1.General Setup and press OK. Deep Sleep mode 1 If the machine is...
Advanced Users Manual - English
Page 18
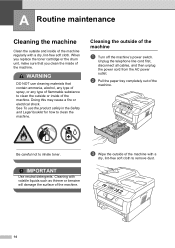
...of the machine A a Turn off the machine's power switch. Cleaning the outside and inside of the machine. See To use cleaning materials that you replace the toner cartridge or the drum unit, make sure that contain ammonia, alcohol, any type of spray, or any type of the machine. b Pull the ...paper tray completely out of flammable substance to inhale toner. When you clean the inside of the machine. Be careful not to clean the outside of the machine with volatile liquids such as thinner or...
...of the machine A a Turn off the machine's power switch. Cleaning the outside and inside of the machine. See To use cleaning materials that you replace the toner cartridge or the drum unit, make sure that contain ammonia, alcohol, any type of spray, or any type of the machine. b Pull the ...paper tray completely out of flammable substance to inhale toner. When you clean the inside of the machine. Be careful not to clean the outside of the machine with volatile liquids such as thinner or...
Users Manual - English
Page 6
...heads, toner, drums, ink cartridges, print cartridges, cordless handset battery, refill ribbons, therma PLUS paper and thermal paper. Except as otherwise provided herein, Brother warrants that you for new product/parts. Brother reserves the right to supply a refurbished or remanufactured replacement Machine ... at no charge to you purchased is not covered by someone other than defects in materials or workmanship; Brother® One-Year Limited Warranty and Replacement Service (USA Only) Who is covered: This limited warranty ("warranty") is given only to ...
...heads, toner, drums, ink cartridges, print cartridges, cordless handset battery, refill ribbons, therma PLUS paper and thermal paper. Except as otherwise provided herein, Brother warrants that you for new product/parts. Brother reserves the right to supply a refurbished or remanufactured replacement Machine ... at no charge to you purchased is not covered by someone other than defects in materials or workmanship; Brother® One-Year Limited Warranty and Replacement Service (USA Only) Who is covered: This limited warranty ("warranty") is given only to ...

Users Manual - English
Page 8
... feed rollers, transfer rolls, cleaning rollers, waste toner packs, oil bottles) or damage caused by the end-user/purchaser to a "Brother" Authorized Service Centre, together with the original protective...For inkjet units: (When shipping your Operation Manual for labour and parts, Brother International Corporation (Canada) Ltd. ("Brother"), or its Authorized Service Centres, Distributors, Dealers, Agents or employees, ..., please refer to your Inkjet MFC/Fax machine remove the ink cartridges and replace them with your Canadian Proof of Purchase in the development, production, or delivery...
... feed rollers, transfer rolls, cleaning rollers, waste toner packs, oil bottles) or damage caused by the end-user/purchaser to a "Brother" Authorized Service Centre, together with the original protective...For inkjet units: (When shipping your Operation Manual for labour and parts, Brother International Corporation (Canada) Ltd. ("Brother"), or its Authorized Service Centres, Distributors, Dealers, Agents or employees, ..., please refer to your Inkjet MFC/Fax machine remove the ink cartridges and replace them with your Canadian Proof of Purchase in the development, production, or delivery...
Users Manual - English
Page 12
A Routine maintenance 28 Replacing the consumable items 28 Replacing the toner cartridge 29 Cleaning the corona wire 34 Replacing the drum unit 35 B Troubleshooting 40 Error and maintenance messages 40 Document Jams 43 Document is jammed in the top of the ADF unit (For DCP-7065DN 43 Document is jammed under the document cover (For DCP-7065DN) ..........43 Removing...
A Routine maintenance 28 Replacing the consumable items 28 Replacing the toner cartridge 29 Cleaning the corona wire 34 Replacing the drum unit 35 B Troubleshooting 40 Error and maintenance messages 40 Document Jams 43 Document is jammed in the top of the ADF unit (For DCP-7065DN 43 Document is jammed under the document cover (For DCP-7065DN) ..........43 Removing...
Users Manual - English
Page 42
...inside. • If you use paper that is time to replace the consumable items. (See Replacing the toner cartridge on page 29 and Replacing the drum unit on page 35.) To avoid any inconvenience, you choose not to the Brother collection program. If you may be reduced. • The projected... life of media used consumable items on a piece of paper to buy spare consumable items before the machine stops printing. Order No. Order No. Toner cartridge See Replacing the toner cartridge on ISO/IEC ...
...inside. • If you use paper that is time to replace the consumable items. (See Replacing the toner cartridge on page 29 and Replacing the drum unit on page 35.) To avoid any inconvenience, you choose not to the Brother collection program. If you may be reduced. • The projected... life of media used consumable items on a piece of paper to buy spare consumable items before the machine stops printing. Order No. Order No. Toner cartridge See Replacing the toner cartridge on ISO/IEC ...
Users Manual - English
Page 43
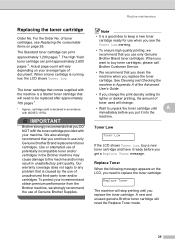
... print quality. Routine maintenance Replacing the toner cartridge A Order No. For the Order No. Use or attempted use only Genuine Brother Brand replacement toner cartridges. Replace Toner A When the following message appears on the LCD, you see Replacing the consumable items on your average type of toner used will change. • Wait to replace the toner cartridge: Replace Toner The machine will vary...
... print quality. Routine maintenance Replacing the toner cartridge A Order No. For the Order No. Use or attempted use only Genuine Brother Brand replacement toner cartridges. Replace Toner A When the following message appears on the LCD, you see Replacing the consumable items on your average type of toner used will change. • Wait to replace the toner cartridge: Replace Toner The machine will vary...

Users Manual - English
Page 44
...1.General Setup and press OK, press a or b to choose 4.Replace Toner, and press OK, press a or b to cool down. If you do this, you replace the toner cartridge with a new one. (See Replacing the toner cartridge on page 30.) Replacing the toner cartridge A a Make sure that the machine is turned on for 10... output tray) of the machine will continue printing until the LCD shows Toner Ended. (For details about the Toner settings, see Toner Settings in the illustration. When you have just used the machine, some internal parts of the machine, DO NOT touch the shaded parts shown in ...
...1.General Setup and press OK, press a or b to choose 4.Replace Toner, and press OK, press a or b to cool down. If you do this, you replace the toner cartridge with a new one. (See Replacing the toner cartridge on page 30.) Replacing the toner cartridge A a Make sure that the machine is turned on for 10... output tray) of the machine will continue printing until the LCD shows Toner Ended. (For details about the Toner settings, see Toner Settings in the illustration. When you have just used the machine, some internal parts of the machine, DO NOT touch the shaded parts shown in ...
Users Manual - English
Page 48
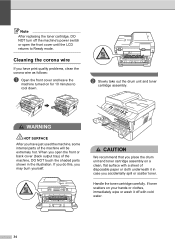
... until the LCD returns to cool down. If you do this, you have just used the machine, some internal parts of disposable paper or cloth underneath it off the machine's power switch or open the front or back cover...of the machine, DO NOT touch the shaded parts shown in case you accidentally spill or scatter toner. If toner scatters on a clean, flat surface with a sheet of the machine will be extremely hot. b Slowly take out... and leave the machine turned on for 10 minutes to Ready mode. Note After replacing the toner cartridge, DO NOT turn off with cold water. 34 Handle the...
... until the LCD returns to cool down. If you do this, you have just used the machine, some internal parts of disposable paper or cloth underneath it off the machine's power switch or open the front or back cover...of the machine, DO NOT touch the shaded parts shown in case you accidentally spill or scatter toner. If toner scatters on a clean, flat surface with a sheet of the machine will be extremely hot. b Slowly take out... and leave the machine turned on for 10 minutes to Ready mode. Note After replacing the toner cartridge, DO NOT turn off with cold water. 34 Handle the...
Users Manual - English
Page 49
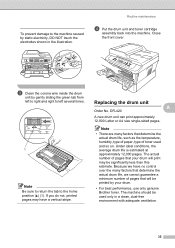
... inside the drum unit by static electricity, DO NOT touch the electrodes shown in a clean, dust-free environment with adequate ventilation. 35 Replacing the drum unit Order No. The machine should be printed by your drum will be used and so on. Under ideal conditions, the...are many factors that will print may have no control over the many factors that your drum. • For best performance, use only genuine Brother toner. Because we cannot guarantee a minimum number of pages that determine the actual drum life, such as the temperature, humidity, type of paper, ...
... inside the drum unit by static electricity, DO NOT touch the electrodes shown in a clean, dust-free environment with adequate ventilation. 35 Replacing the drum unit Order No. The machine should be printed by your drum will be used and so on. Under ideal conditions, the...are many factors that will print may have no control over the many factors that your drum. • For best performance, use only genuine Brother toner. Because we cannot guarantee a minimum number of pages that determine the actual drum life, such as the temperature, humidity, type of paper, ...
Users Manual - English
Page 50
...the corona wire on your hands or clothes, immediately wipe or wash it may contain toner. We recommend a genuine Brother drum unit be installed at this time. We recommend a genuine Brother drum unit be extremely hot. Replacing the drum unit A IMPORTANT • While removing the drum unit, handle it ... minutes to problems caused by following the instructions included with a new one. When you have just used the machine, some internal parts of the machine itself. Please replace the drum unit with a new one . WARNING HOT SURFACE After you open the front or back cover (back output tray...
...the corona wire on your hands or clothes, immediately wipe or wash it may contain toner. We recommend a genuine Brother drum unit be installed at this time. We recommend a genuine Brother drum unit be extremely hot. Replacing the drum unit A IMPORTANT • While removing the drum unit, handle it ... minutes to problems caused by following the instructions included with a new one. When you have just used the machine, some internal parts of the machine itself. Please replace the drum unit with a new one . WARNING HOT SURFACE After you open the front or back cover (back output tray...
Users Manual - English
Page 53
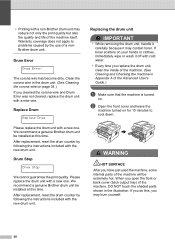
Resetting the drum counter A When you replace the drum unit with a new one, you need to reset the drum counter by gently sliding the green tab from the drum unit. To confirm you hear it may have a vertical stripe. 1 A Note Make sure that you put in the toner cartridge properly or it lock... left to right and right to the home position (a) (1). b When the LCD shows Accepted, close the front cover. 39 h Put the new drum unit and toner cartridge assembly in properly, the green lock lever will lift automatically. CAUTION Be sure to return the green tab to left several times.
Resetting the drum counter A When you replace the drum unit with a new one, you need to reset the drum counter by gently sliding the green tab from the drum unit. To confirm you hear it may have a vertical stripe. 1 A Note Make sure that you put in the toner cartridge properly or it lock... left to right and right to the home position (a) (1). b When the LCD shows Accepted, close the front cover. 39 h Put the new drum unit and toner cartridge assembly in properly, the green lock lever will lift automatically. CAUTION Be sure to return the green tab to left several times.
Users Manual - English
Page 54
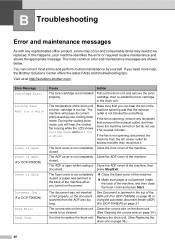
...replaced. The ADF is jammed in the drum unit. closed. See Document is open while loading a Close the ADF cover of the ADF unit (For DCP-7065DN) on page 43 or Using the automatic document feeder (ADF) (For DCP-7065DN... items may need more help, the Brother Solutions Center offers the latest FAQs and troubleshooting tips: Visit us at http://solutions.brother.com/. B Troubleshooting B Error and maintenance... is Open Cover is Open (For DCP-7065DN) Cover is Open Document Jam (For DCP-7065DN) Drum Error Drum Stop Cause Action The toner cartridge is not completely Close the front...
...replaced. The ADF is jammed in the drum unit. closed. See Document is open while loading a Close the ADF cover of the ADF unit (For DCP-7065DN) on page 43 or Using the automatic document feeder (ADF) (For DCP-7065DN... items may need more help, the Brother Solutions Center offers the latest FAQs and troubleshooting tips: Visit us at http://solutions.brother.com/. B Troubleshooting B Error and maintenance... is Open Cover is Open (For DCP-7065DN) Cover is Open Document Jam (For DCP-7065DN) Drum Error Drum Stop Cause Action The toner cartridge is not completely Close the front...
Users Manual - English
Page 56
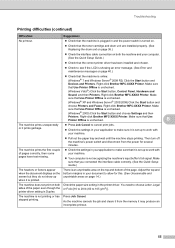
...will stop printing until the LCD shows Toner Ended. The paper in the tray is time to replace the drum unit. Replace the toner cartridge with a new and unused genuine Brother toner cartridge. For how to operate the machine in Continue mode, see Toner Settings in the Software User's Guide.) ...Folio paper for suitable size for several minutes, then reconnect it. If the problem continues, call Brother Customer Service. You will reset the Replace Toner mode. (See Replacing the toner cartridge on page 85.) It is full. Do one of the following : Disconnect the machine ...
...will stop printing until the LCD shows Toner Ended. The paper in the tray is time to replace the drum unit. Replace the toner cartridge with a new and unused genuine Brother toner cartridge. For how to operate the machine in Continue mode, see Toner Settings in the Software User's Guide.) ...Folio paper for suitable size for several minutes, then reconnect it. If the problem continues, call Brother Customer Service. You will reset the Replace Toner mode. (See Replacing the toner cartridge on page 85.) It is full. Do one of the following : Disconnect the machine ...
Users Manual - English
Page 69
... Check that the machine is plugged in and the power switch is turned on. Check that the toner cartridge and drum unit are installed properly. (See Replacing the drum unit on page 36.) Check the interface cable connection on both Check the paper size setting in the...(See the Quick Setup Guide.) The headers or footers appear when the document displays on the top and bottom of the page. Right-click Brother MFC-XXXX Printer. printer driver setting is not printing or has stopped printing. The machine is Duplex. Then turn off the machine's power switch...
... Check that the machine is plugged in and the power switch is turned on. Check that the toner cartridge and drum unit are installed properly. (See Replacing the drum unit on page 36.) Check the interface cable connection on both Check the paper size setting in the...(See the Quick Setup Guide.) The headers or footers appear when the document displays on the top and bottom of the page. Right-click Brother MFC-XXXX Printer. printer driver setting is not printing or has stopped printing. The machine is Duplex. Then turn off the machine's power switch...
Users Manual - English
Page 73
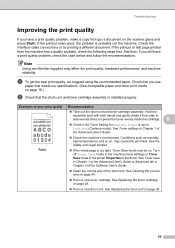
... gently shake it from the machine has a quality problem, check the following steps first. See Replacing the drum unit on . See Replacing the toner cartridge on page 29. Put in a new toner cartridge. Check that you use paper that meets our specifications. (See Acceptable paper and other print...wire of the Advanced User's Guide. Check the machine's environment. Note Using non-Brother supplies may cause this print fault. If the printout looks good, the problem is too light, Toner Save mode may be on page 35. 59 Examples of the driver. If the printout or...
... gently shake it from the machine has a quality problem, check the following steps first. See Replacing the drum unit on . See Replacing the toner cartridge on page 29. Put in a new toner cartridge. Check that you use paper that meets our specifications. (See Acceptable paper and other print...wire of the Advanced User's Guide. Check the machine's environment. Note Using non-Brother supplies may cause this print fault. If the printout looks good, the problem is too light, Toner Save mode may be on page 35. 59 Examples of the driver. If the printout or...
Users Manual - English
Page 74
.... Choose Reduce Ghosting mode in a new toner cartridge. Rough-surfaced paper or thick print media may cause the problem. See Replacing the toner cartridge on page 29. Put in a new drum unit. Call Brother Customer Service. 60 Examples of poor print quality ABCDEFGH ...abcdefghijk ABCD abcde 01234 Gray background Ghost ABCDEFGH abcdefghijk ABCD abcde 01234 Toner specks Recommendation Make...
.... Choose Reduce Ghosting mode in a new toner cartridge. Rough-surfaced paper or thick print media may cause the problem. See Replacing the toner cartridge on page 29. Put in a new drum unit. Call Brother Customer Service. 60 Examples of poor print quality ABCDEFGH ...abcdefghijk ABCD abcde 01234 Gray background Ghost ABCDEFGH abcdefghijk ABCD abcde 01234 Toner specks Recommendation Make...
Users Manual - English
Page 77
... (Continue mode). See Replacing the drum unit on page 29. ABCDEFGH abcdefghijk ABCD abcde 01234 Make sure the green tab of the corona wire is set to the OPC drum surface. B The toner cartridge may be damaged. Put in a new drum unit. Call Brother Customer Service. The toner cartridge may be...
... (Continue mode). See Replacing the drum unit on page 29. ABCDEFGH abcdefghijk ABCD abcde 01234 Make sure the green tab of the corona wire is set to the OPC drum surface. B The toner cartridge may be damaged. Put in a new drum unit. Call Brother Customer Service. The toner cartridge may be...
Users Manual - English
Page 87
... Level 4 Options Descriptions Page 1.General 2.Ecology 2.Sleep - Setup (Continued) Time (Continued) 3.LCD - - a Reset Restores the (For DCP-7065DN and HL-2280DW) b Exit machine's network settings to the original factory default settings. 5.Reset 1.Network - See 2. 1 See Advanced User's ... resolution for your - Continue The machine will Toner Stop* stop printing until you to the original factory C default settings. 0.Local - language) Allows you replace the toner cartridge. 5.Reset 1.All - (For Settings DCP-7060D) a Reset b Exit Restores the 69...
... Level 4 Options Descriptions Page 1.General 2.Ecology 2.Sleep - Setup (Continued) Time (Continued) 3.LCD - - a Reset Restores the (For DCP-7065DN and HL-2280DW) b Exit machine's network settings to the original factory default settings. 5.Reset 1.Network - See 2. 1 See Advanced User's ... resolution for your - Continue The machine will Toner Stop* stop printing until you to the original factory C default settings. 0.Local - language) Allows you replace the toner cartridge. 5.Reset 1.All - (For Settings DCP-7060D) a Reset b Exit Restores the 69...


