Software Users Manual - English
Page 3
... 1-22 Print Date & Time 1-22 Quick Print Setup 1-23 Status Monitor 1-23 Support tab 1-24 Brother Solutions Center 1-24 Web Update 1-24 Check Setting 1-24 2 How to scan using Windows 2-1 Scanning a document (For Windows® XP only 2-2 WIA compliant 2-2 How to access the scanner 2-2 Scanning a document into the PC (MFC-3240C and MFC-3340CN only...
... 1-22 Print Date & Time 1-22 Quick Print Setup 1-23 Status Monitor 1-23 Support tab 1-24 Brother Solutions Center 1-24 Web Update 1-24 Check Setting 1-24 2 How to scan using Windows 2-1 Scanning a document (For Windows® XP only 2-2 WIA compliant 2-2 How to access the scanner 2-2 Scanning a document into the PC (MFC-3240C and MFC-3340CN only...
Software Users Manual - English
Page 4
3 iii Scan to Card (not available for MFC-3240C, MFC-210C and MFC-5440CN 2-23 Changing the default quality 2-25 Changing the default black & white file format ..... 2-25 Changing the default color file format 2-25 Using ScanSoft® PaperPort® 9.0SE and OmniPage...3-4 PC-FAX 3-5 DEVICE SETTING 3-5 SCAN 3-6 Image (example: Microsoft Paint 3-6 OCR (Word Processing program 3-8 E-mail 3-9 File attachments 3-10 File 3-11 CUSTOM SCAN 3-12 Customizing a user-defined button 3-13 Scan to Image 3-13 Scan to OCR 3-14 Scan to E-mail 3-15 Scan to File 3-16 PHOTOCAPTURE (not available ...
3 iii Scan to Card (not available for MFC-3240C, MFC-210C and MFC-5440CN 2-23 Changing the default quality 2-25 Changing the default black & white file format ..... 2-25 Changing the default color file format 2-25 Using ScanSoft® PaperPort® 9.0SE and OmniPage...3-4 PC-FAX 3-5 DEVICE SETTING 3-5 SCAN 3-6 Image (example: Microsoft Paint 3-6 OCR (Word Processing program 3-8 E-mail 3-9 File attachments 3-10 File 3-11 CUSTOM SCAN 3-12 Customizing a user-defined button 3-13 Scan to Image 3-13 Scan to OCR 3-14 Scan to E-mail 3-15 Scan to File 3-16 PHOTOCAPTURE (not available ...
Software Users Manual - English
Page 6
... only 5-19 Running PC-FAX Receiving 5-19 Setting up your PC 5-19 Viewing new PC-FAX messages 5-20 Using the PhotoCapture Center™ from your PC (For Windows®) (not available for MFC-5440CN and MFC-3240C 6-1 For USB cable users 6-1 For Network... Registering your PC with the machine 7-2 Using the Scan key 7-5 Scan to E-mail (PC 7-5 Scan to Image 7-6 Scan to OCR 7-7 Scan to File 7-8 Using your machine with a Macintosh 8-1 Setting up your USB-equipped Apple® Macintosh 8-1 Media Type 8-2 Quality 8-2 Using the Brother printer driver with your Apple® Macintosh® (...
... only 5-19 Running PC-FAX Receiving 5-19 Setting up your PC 5-19 Viewing new PC-FAX messages 5-20 Using the PhotoCapture Center™ from your PC (For Windows®) (not available for MFC-5440CN and MFC-3240C 6-1 For USB cable users 6-1 For Network... Registering your PC with the machine 7-2 Using the Scan key 7-5 Scan to E-mail (PC 7-5 Scan to Image 7-6 Scan to OCR 7-7 Scan to File 7-8 Using your machine with a Macintosh 8-1 Setting up your USB-equipped Apple® Macintosh 8-1 Media Type 8-2 Quality 8-2 Using the Brother printer driver with your Apple® Macintosh® (...
Software Users Manual - English
Page 7
...28 OCR (Word Processing program 8-30 E-mail 8-31 File attachments 8-32 File 8-33 CUSTOM SCAN 8-34 Customizing a user-defined button 8-35 Scan to Image 8-35 Scan to OCR 8-36 Scan to E-mail 8-37 Scan to File 8-38 COPY 8-39 DEVICE SETTINGS 8-41 Remote Setup (not available for MFC-210C)... ....... 8-41 Quick-Dial (not available for MFC-210C 8-42 Ink Level 8-42 MFC Remote Setup (Mac OS® X 10.2.4 or greater) (not available for MFC-210C 8-43 Using the PhotoCapture Center...
...28 OCR (Word Processing program 8-30 E-mail 8-31 File attachments 8-32 File 8-33 CUSTOM SCAN 8-34 Customizing a user-defined button 8-35 Scan to Image 8-35 Scan to OCR 8-36 Scan to E-mail 8-37 Scan to File 8-38 COPY 8-39 DEVICE SETTINGS 8-41 Remote Setup (not available for MFC-210C)... ....... 8-41 Quick-Dial (not available for MFC-210C 8-42 Ink Level 8-42 MFC Remote Setup (Mac OS® X 10.2.4 or greater) (not available for MFC-210C 8-43 Using the PhotoCapture Center...
Software Users Manual - English
Page 11
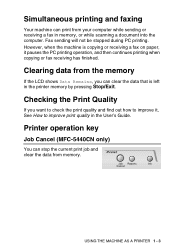
Fax sending will not be stopped during PC printing. USING THE MACHINE AS A PRINTER 1 - 3 However, when the machine is left in memory, or while scanning a document into the computer. Clearing data from the memory If the LCD shows Data Remains, you want to check the print quality and find out ...
Fax sending will not be stopped during PC printing. USING THE MACHINE AS A PRINTER 1 - 3 However, when the machine is left in memory, or while scanning a document into the computer. Clearing data from the memory If the LCD shows Data Remains, you want to check the print quality and find out ...
Software Users Manual - English
Page 33
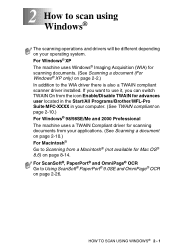
...page 2-26. For Windows® XP The machine uses Windows® Imaging Acquisition (WIA) for scanning documents from the icon Enable/Disable TWAIN for advances user located in the Start/All Programs/Brother/MFL-Pro Suite MFC-XXXX in your computer. (See TWAIN compliant on page 2-10.) For Windows...® 98/98SE/Me and 2000 Professional The machine uses a TWAIN Compliant driver for scanning documents. (See Scanning a document (For Windows® XP only)...
...page 2-26. For Windows® XP The machine uses Windows® Imaging Acquisition (WIA) for scanning documents from the icon Enable/Disable TWAIN for advances user located in the Start/All Programs/Brother/MFL-Pro Suite MFC-XXXX in your computer. (See TWAIN compliant on page 2-10.) For Windows...® 98/98SE/Me and 2000 Professional The machine uses a TWAIN Compliant driver for scanning documents. (See Scanning a document (For Windows® XP only)...

Software Users Manual - English
Page 34
... (For Windows® XP only) WIA compliant Windows® XP uses Windows® Image Acquisition (WIA) for when you can scan images directly into any other software application that Brother included with your software application to access the scanner 1 Open your machine or you use ScanSoft® PaperPort® 9.0SE. How to...
... (For Windows® XP only) WIA compliant Windows® XP uses Windows® Image Acquisition (WIA) for when you can scan images directly into any other software application that Brother included with your software application to access the scanner 1 Open your machine or you use ScanSoft® PaperPort® 9.0SE. How to...
Software Users Manual - English
Page 35
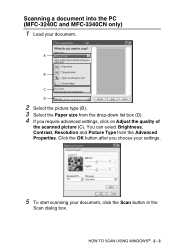
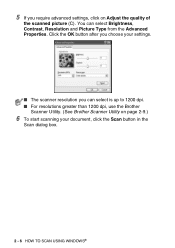
A B C D 2 Select the picture type (B). 3 Select the Paper size from the Advanced Properties. Click the OK button after you require advanced settings, click on Adjust the quality of the scanned picture (C). You can select Brightness, Contrast, Resolution and Picture Type from the drop-down list box (D). 4 If you choose your settings. 5 To start scanning your document. HOW TO SCAN USING WINDOWS® 2 - 3 Scanning a document into the PC (MFC-3240C and MFC-3340CN only) 1 Load your document, click the Scan button in the Scan dialog box.
A B C D 2 Select the picture type (B). 3 Select the Paper size from the Advanced Properties. Click the OK button after you require advanced settings, click on Adjust the quality of the scanned picture (C). You can select Brightness, Contrast, Resolution and Picture Type from the drop-down list box (D). 4 If you choose your settings. 5 To start scanning your document. HOW TO SCAN USING WINDOWS® 2 - 3 Scanning a document into the PC (MFC-3240C and MFC-3340CN only) 1 Load your document, click the Scan button in the Scan dialog box.

Software Users Manual - English
Page 36
■ The scanner resolution you can select is up to 1200 dpi. ■ For resolutions greater than 1200 dpi, use the Brother Scanner Utility. (See Brother Scanner Utility on page 2-9.) ■ You cannot select the Paper source (A) other than Document Feeder. 2 - 4 HOW TO SCAN USING WINDOWS®
■ The scanner resolution you can select is up to 1200 dpi. ■ For resolutions greater than 1200 dpi, use the Brother Scanner Utility. (See Brother Scanner Utility on page 2-9.) ■ You cannot select the Paper source (A) other than Document Feeder. 2 - 4 HOW TO SCAN USING WINDOWS®
Software Users Manual - English
Page 37
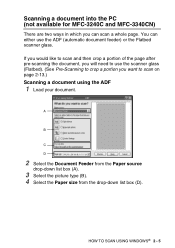
... then crop a portion of the page after pre-scanning the document, you will need to use the scanner glass (Flatbed). (See Pre-Scanning to crop a portion you can either use the ADF (automatic document feeder) or the Flatbed scanner glass. Scanning a document into the PC (not available for MFC...-3240C and MFC-3340CN) There are two ways in which you want to scan on page 2-13.) Scanning a document using the ADF 1 Load your document. You can scan a whole page. A B C D 2...
... then crop a portion of the page after pre-scanning the document, you will need to use the scanner glass (Flatbed). (See Pre-Scanning to crop a portion you can either use the ADF (automatic document feeder) or the Flatbed scanner glass. Scanning a document into the PC (not available for MFC...-3240C and MFC-3340CN) There are two ways in which you want to scan on page 2-13.) Scanning a document using the ADF 1 Load your document. You can scan a whole page. A B C D 2...
Software Users Manual - English
Page 38
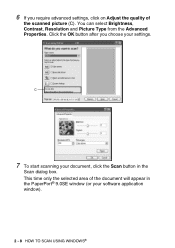
5 If you can select Brightness, Contrast, Resolution and Picture Type from the Advanced Properties. Click the OK button after you choose your settings. ■ The scanner resolution you require advanced settings, click on page 2-9.) 6 To start scanning your document, click the Scan button in the Scan dialog box. 2 - 6 HOW TO SCAN USING WINDOWS® You can select is up to 1200 dpi. ■ For resolutions greater than 1200 dpi, use the Brother Scanner Utility. (See Brother Scanner Utility on Adjust the quality of the scanned picture (C).
5 If you can select Brightness, Contrast, Resolution and Picture Type from the Advanced Properties. Click the OK button after you choose your settings. ■ The scanner resolution you require advanced settings, click on page 2-9.) 6 To start scanning your document, click the Scan button in the Scan dialog box. 2 - 6 HOW TO SCAN USING WINDOWS® You can select is up to 1200 dpi. ■ For resolutions greater than 1200 dpi, use the Brother Scanner Utility. (See Brother Scanner Utility on Adjust the quality of the scanned picture (C).

Software Users Manual - English
Page 39
... image for cropping any unwanted portions from the scanner window to scan the image. 1 Place the document face down on the scanner glass. 2 Select Flatbed in the scanning area. 5 Select the portion you do not need to scan by clicking the left mouse button and dragging it over the ...area. A Scanning area B 3 Select the picture type (B). 4 In the Scan dialog box, click the Preview button. When you are...
... image for cropping any unwanted portions from the scanner window to scan the image. 1 Place the document face down on the scanner glass. 2 Select Flatbed in the scanning area. 5 Select the portion you do not need to scan by clicking the left mouse button and dragging it over the ...area. A Scanning area B 3 Select the picture type (B). 4 In the Scan dialog box, click the Preview button. When you are...
Software Users Manual - English
Page 40
6 If you choose your document, click the Scan button in the PaperPort® 9.0SE window (or your software application window). 2 - 8 HOW TO SCAN USING WINDOWS® This time only the selected area of the scanned picture (C). C 7 To start scanning your settings. Click the OK button after you require advanced settings, click on Adjust the quality of the document will appear in the Scan dialog box. You can select Brightness, Contrast, Resolution and Picture Type from the Advanced Properties.
6 If you choose your document, click the Scan button in the PaperPort® 9.0SE window (or your software application window). 2 - 8 HOW TO SCAN USING WINDOWS® This time only the selected area of the scanned picture (C). C 7 To start scanning your settings. Click the OK button after you require advanced settings, click on Adjust the quality of the document will appear in the Scan dialog box. You can select Brightness, Contrast, Resolution and Picture Type from the Advanced Properties.
Software Users Manual - English
Page 41
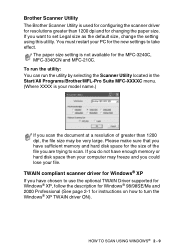
... the setting using this utility. To run the utility: You can run the utility by selecting the Scanner Utility located in the Start/All Programs/Brother/MFL-Pro Suite MFC-XXXXC menu. (Where XXXX is your model name.) If you could lose your file. Please make sure that you have chosen... Utility The Brother Scanner Utility is used for configuring the scanner driver for resolutions greater than 1200 dpi, the file size may freeze and you scan the document at a resolution of the file you want to take effect. If you are trying to turn the Windows® XP TWAIN driver ON). ...
... the setting using this utility. To run the utility: You can run the utility by selecting the Scanner Utility located in the Start/All Programs/Brother/MFL-Pro Suite MFC-XXXXC menu. (Where XXXX is your model name.) If you could lose your file. Please make sure that you have chosen... Utility The Brother Scanner Utility is used for configuring the scanner driver for resolutions greater than 1200 dpi, the file size may freeze and you scan the document at a resolution of the file you want to take effect. If you are trying to turn the Windows® XP TWAIN driver ON). ...

Software Users Manual - English
Page 42
... between scanners and software applications. This means that not only can you scan images directly into the PaperPort® viewer that Brother included with your machine, but you can also scan images directly into hundreds of other software applications that support TWAIN scanning. These applications include popular programs like Adobe® Photoshop®, Adobe...
... between scanners and software applications. This means that not only can you scan images directly into the PaperPort® viewer that Brother included with your machine, but you can also scan images directly into hundreds of other software applications that support TWAIN scanning. These applications include popular programs like Adobe® Photoshop®, Adobe...
Software Users Manual - English
Page 43
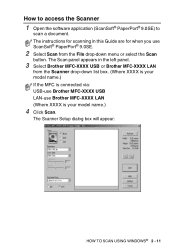
...to access the Scanner 1 Open the software application (ScanSoft® PaperPort® 9.0SE) to scan a document. The Scan panel appears in this Guide are for scanning in the left panel. 3 Select Brother MFC-XXXX USB or Brother MFC-XXXX LAN from the File drop-down list box. (Where XXXX is your model name....) If the MFC is your model name.) 4 Click Scan. The Scanner Setup dialog box will appear: HOW TO SCAN USING WINDOWS® 2 - 11 The instructions for when you use Brother MFC-XXXX LAN (Where XXXX is connected via: USB-use Brother MFC-XXXX USB LAN-use ScanSoft® PaperPort® ...
...to access the Scanner 1 Open the software application (ScanSoft® PaperPort® 9.0SE) to scan a document. The Scan panel appears in this Guide are for scanning in the left panel. 3 Select Brother MFC-XXXX USB or Brother MFC-XXXX LAN from the File drop-down list box. (Where XXXX is your model name....) If the MFC is your model name.) 4 Click Scan. The Scanner Setup dialog box will appear: HOW TO SCAN USING WINDOWS® 2 - 11 The instructions for when you use Brother MFC-XXXX LAN (Where XXXX is connected via: USB-use Brother MFC-XXXX USB LAN-use ScanSoft® PaperPort® ...
Software Users Manual - English
Page 44
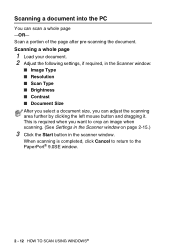
... required when you want to the PaperPort® 9.0SE window. 2 - 12 HOW TO SCAN USING WINDOWS® This is completed, click Cancel to return to crop an image when scanning. (See Settings in the Scanner window on page 2-15.) 3 Click the Start button in the Scanner window: ■ ...Image Type ■ Resolution ■ Scan Type ■ Brightness ■ Contrast ■ Document Size After you select...
... required when you want to the PaperPort® 9.0SE window. 2 - 12 HOW TO SCAN USING WINDOWS® This is completed, click Cancel to return to crop an image when scanning. (See Settings in the Scanner window on page 2-15.) 3 Click the Start button in the Scanner window: ■ ...Image Type ■ Resolution ■ Scan Type ■ Brightness ■ Contrast ■ Document Size After you select...
Software Users Manual - English
Page 45
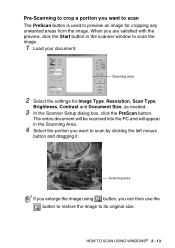
... with the preview, click the Start button in the Scanning Area. 4 Select the portion you want to scan The PreScan button is used to its original size. HOW TO SCAN USING WINDOWS® 2 - 13 Pre-Scanning to crop a portion you want to scan by clicking the left mouse button and dragging it. ...The entire document will be scanned into the PC and will appear in the scanner window to scan the image. 1 Load your document....
... with the preview, click the Start button in the Scanning Area. 4 Select the portion you want to scan The PreScan button is used to its original size. HOW TO SCAN USING WINDOWS® 2 - 13 Pre-Scanning to crop a portion you want to scan by clicking the left mouse button and dragging it. ...The entire document will be scanned into the PC and will appear in the scanner window to scan the image. 1 Load your document....

Software Users Manual - English
Page 46
5 Load your software application window). 7 In the PaperPort® 9.0SE window, use the options available to refine the image. 2 - 14 HOW TO SCAN USING WINDOWS® This time only the selected area of the document will appear in step 1, please skip this step. 6 Click Start. If your model is flatbed type, and you have loaded the document on the scanner glass in the PaperPort® 9.0SE window (or your document again.
5 Load your software application window). 7 In the PaperPort® 9.0SE window, use the options available to refine the image. 2 - 14 HOW TO SCAN USING WINDOWS® This time only the selected area of the document will appear in step 1, please skip this step. 6 Click Start. If your model is flatbed type, and you have loaded the document on the scanner glass in the PaperPort® 9.0SE window (or your document again.
Software Users Manual - English
Page 47
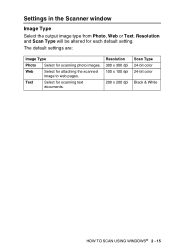
Resolution 300 x 300 dpi 100 x 100 dpi 200 x 200 dpi Scan Type 24-bit color 24-bit color Black & White HOW TO SCAN USING WINDOWS® 2 - 15 Web Select for each default setting. Resolution and Scan Type will be altered for attaching the scanned image to web pages. Settings in the Scanner window Image Type Select the output image type from Photo, Web or Text. The default settings are: Image Type Photo Select for scanning text documents. Text Select for scanning photo images.
Resolution 300 x 300 dpi 100 x 100 dpi 200 x 200 dpi Scan Type 24-bit color 24-bit color Black & White HOW TO SCAN USING WINDOWS® 2 - 15 Web Select for each default setting. Resolution and Scan Type will be altered for attaching the scanned image to web pages. Settings in the Scanner window Image Type Select the output image type from Photo, Web or Text. The default settings are: Image Type Photo Select for scanning text documents. Text Select for scanning photo images.

