
Product Information - English
Page 1
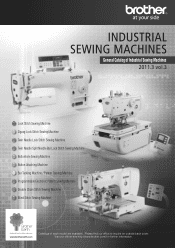
Please find our office to inquire on outside back cover. Visit our official site http://www.brother.com/ for further information. General Catalog of Industrial Sewing Machines 2011.3 vol.3 Lock Stitch Sewing Machine Zigzag Lock Stitch Sewing Machine Twin Needle Lock Stitch Sewing Machine Twin Needle Split Needle Bar Lock Stitch Sewing Machine Buttonhole Sewing Machine Button Attaching Machine Bar Tacking Machine / Pattern Tacking Machine Programmable Electronic Pattern Sewing Machine Double Chain Stitch Sewing Machine Blind Stitch Sewing Machine Catalogs of each model are available.
Please find our office to inquire on outside back cover. Visit our official site http://www.brother.com/ for further information. General Catalog of Industrial Sewing Machines 2011.3 vol.3 Lock Stitch Sewing Machine Zigzag Lock Stitch Sewing Machine Twin Needle Lock Stitch Sewing Machine Twin Needle Split Needle Bar Lock Stitch Sewing Machine Buttonhole Sewing Machine Button Attaching Machine Bar Tacking Machine / Pattern Tacking Machine Programmable Electronic Pattern Sewing Machine Double Chain Stitch Sewing Machine Blind Stitch Sewing Machine Catalogs of each model are available.
Product Information - English
Page 3
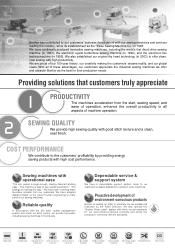
... service & support system We have continually produced innovative sewing machines, including the world's first direct-drive sewing machine (in 1993), the electronic eyelet buttonhole sewing machine (in 1994), and the electronic bar tacking machine (in 1908. Drop feed Needle feed Adjustable top and Double horizontal hook Triple horizontal hook bottom feed (vertical axis) (vertical axis) Light-weight materials Medium-weight materials Heavy-weight Extra heavy-weight Thread trimmer materials materials DD Direct Drive SEWING QUALITY...
... service & support system We have continually produced innovative sewing machines, including the world's first direct-drive sewing machine (in 1993), the electronic eyelet buttonhole sewing machine (in 1994), and the electronic bar tacking machine (in 1908. Drop feed Needle feed Adjustable top and Double horizontal hook Triple horizontal hook bottom feed (vertical axis) (vertical axis) Light-weight materials Medium-weight materials Heavy-weight Extra heavy-weight Thread trimmer materials materials DD Direct Drive SEWING QUALITY...

Product Information - English
Page 5
... type motor driven system Zigzag Lock Stitch Sewing Machine Electronic Direct Drive Zigzag Lock Stitcher Z-8550A Clean sewing with no oil staining. •Energy-saving model. ••Wide-variety pattern sewing is available. Max. feed amount: 5 mm stitch length: 4.2-5 mm Rotary hook Oil pan Wick lubrication type Built-in a single unit enables simple maintenance. sewing speed: 5,000 sti/min Max. For medium materials / heavy materials Max. Lock Stitch Sewing Machine / Zigzag Lock Stitch Sewing Machine Lock Stitch Sewing Machine S-62600A Single Needle Straight...
... type motor driven system Zigzag Lock Stitch Sewing Machine Electronic Direct Drive Zigzag Lock Stitcher Z-8550A Clean sewing with no oil staining. •Energy-saving model. ••Wide-variety pattern sewing is available. Max. feed amount: 5 mm stitch length: 4.2-5 mm Rotary hook Oil pan Wick lubrication type Built-in a single unit enables simple maintenance. sewing speed: 5,000 sti/min Max. For medium materials / heavy materials Max. Lock Stitch Sewing Machine / Zigzag Lock Stitch Sewing Machine Lock Stitch Sewing Machine S-62600A Single Needle Straight...
Product Information - English
Page 8
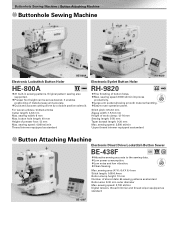
... power consumption. •Low noise and low vibration. ••Clean Sewing. Max. sewing area (X-Y): 6.4 X 6.4 mm Stitch length: 0.05-6.4mm Button clamp height: 13 mm Number of work clamp: 12-16 mm Sewing length: 5-50 mm Taper bartack length: 0-20 mm Max. button hole length: 40 mm Height of presser foot: 13 mm Max. sewing speed 2,500 sti/min improves productivity. sewing width: 6 mm Max. Original pattern sewing also •supported. Buttonhole Sewing Machine / Button Attaching Machine Buttonhole Sewing Machine HE-800A Electronic Lockstitch Button...
... power consumption. •Low noise and low vibration. ••Clean Sewing. Max. sewing area (X-Y): 6.4 X 6.4 mm Stitch length: 0.05-6.4mm Button clamp height: 13 mm Number of work clamp: 12-16 mm Sewing length: 5-50 mm Taper bartack length: 0-20 mm Max. button hole length: 40 mm Height of presser foot: 13 mm Max. sewing speed 2,500 sti/min improves productivity. sewing width: 6 mm Max. Original pattern sewing also •supported. Buttonhole Sewing Machine / Button Attaching Machine Buttonhole Sewing Machine HE-800A Electronic Lockstitch Button...
Instruction Manual - English
Page 2
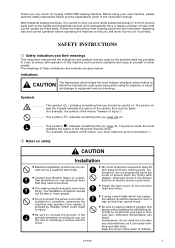
...industrial sewing machines, it is normal to carry out work while positioned directly in injury. ¡ Be sure to connect the ground. The picture inside the circle indicates the nature of the thing that must do . Furthermore, do not drink the oil under any circumstances, as the needle and thread take-up lever...the instruction manual. The meanings of these parts. Thank you very much for any electrical work that may need to be done. ¡ The sewing machine weighs more people. ¡ Do not connect the power cord until installation is complete, otherwise the machine may operate if ...
...industrial sewing machines, it is normal to carry out work while positioned directly in injury. ¡ Be sure to connect the ground. The picture inside the circle indicates the nature of the thing that must do . Furthermore, do not drink the oil under any circumstances, as the needle and thread take-up lever...the instruction manual. The meanings of these parts. Thank you very much for any electrical work that may need to be done. ¡ The sewing machine weighs more people. ¡ Do not connect the power cord until installation is complete, otherwise the machine may operate if ...

Instruction Manual - English
Page 3
... looper ii DA-9280 CAUTION Sewing ¡ This sewing machine should only be used by mistake, which could result in injury. ¡ When threading the needle ¡ When replacing the needle ¡ When not using the machine and when leaving the machine unattended ¡ If using a work table which has casters, the casters should be secured in such a way so that they operate correctly before using the sewing machine. Cleaning ¡...
... looper ii DA-9280 CAUTION Sewing ¡ This sewing machine should only be used by mistake, which could result in injury. ¡ When threading the needle ¡ When replacing the needle ¡ When not using the machine and when leaving the machine unattended ¡ If using a work table which has casters, the casters should be secured in such a way so that they operate correctly before using the sewing machine. Cleaning ¡...
Instruction Manual - English
Page 5
...-1. MACHINE SPECIFICATIONS 01 3. Presser foot pressure adjustment ... 11 8-3. Needle bar height adjustment ......... 15 10-2. Thread release lever adjustment ..... 18 10-7. Installing the lapper 20 10-12. CONTENTS 1. SEWING 10 7-1. Puller feed adjustment (Machines with puller 20 10-13. Threading the upper threads 09 7. Puller device timing adjustment (Machines with puller 20 11.INSTALLING OPTIONAL PARTS 21 12.TROUBLESHOOTING 23 iv DA-9280 Needles and threads 08 6-2. Installing the pulley cover 05 5-4. Daily cleaning 14 9-2. Lower thread take...
...-1. MACHINE SPECIFICATIONS 01 3. Presser foot pressure adjustment ... 11 8-3. Needle bar height adjustment ......... 15 10-2. Thread release lever adjustment ..... 18 10-7. Installing the lapper 20 10-12. CONTENTS 1. SEWING 10 7-1. Puller feed adjustment (Machines with puller 20 10-13. Threading the upper threads 09 7. Puller device timing adjustment (Machines with puller 20 11.INSTALLING OPTIONAL PARTS 21 12.TROUBLESHOOTING 23 iv DA-9280 Needles and threads 08 6-2. Installing the pulley cover 05 5-4. Daily cleaning 14 9-2. Lower thread take...
Instruction Manual - English
Page 6
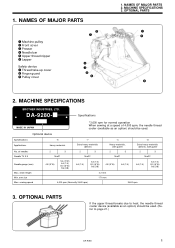
... 171 mm 4,000 rpm (Normally 3,600 rpm) 3,600 rpm 3. arm size Max. 1. MACHINE SPECIFICATIONS BROTHER INDUSTRIES, LTD. stitch length Min. NAMES OF MAJOR PARTS q Machine pulley w Front cover e Presser r Needle bar t Upper thread nipper y Lapper Safety device u Thread take-up cover i Finger guard o Pulley cover t u r e i y 1. OPTIONAL PARTS If the upper thread breaks due to page 21.) DA-9280 1 DA-9280-1 Specifications MADE IN JAPAN *3,600 rpm for normal operation When sewing at a speed of needles Needle TV X 5 Needle gauge (mm) Max. NAMES OF MAJOR...
... 171 mm 4,000 rpm (Normally 3,600 rpm) 3,600 rpm 3. arm size Max. 1. MACHINE SPECIFICATIONS BROTHER INDUSTRIES, LTD. stitch length Min. NAMES OF MAJOR PARTS q Machine pulley w Front cover e Presser r Needle bar t Upper thread nipper y Lapper Safety device u Thread take-up cover i Finger guard o Pulley cover t u r e i y 1. OPTIONAL PARTS If the upper thread breaks due to page 21.) DA-9280 1 DA-9280-1 Specifications MADE IN JAPAN *3,600 rpm for normal operation When sewing at a speed of needles Needle TV X 5 Needle gauge (mm) Max. NAMES OF MAJOR...

Instruction Manual - English
Page 7
....../ Sewing speed (rpm) 50Hz 60Hz 3100 3100 3600 4000 3600 4000 2 DA-9280 4. Power Single-phase Three-phase ¡ Refer to the table below to select the motor pulley and belt combination. ¡ The belt should be strong enough to the motor should be an M-type V-belt. WORK TABLE AND MOTOR 4. stalling and using a commercially-available table ¡ The top of the sewing machine. ¡ Drill holes...
....../ Sewing speed (rpm) 50Hz 60Hz 3100 3100 3600 4000 3600 4000 2 DA-9280 4. Power Single-phase Three-phase ¡ Refer to the table below to select the motor pulley and belt combination. ¡ The belt should be strong enough to the motor should be an M-type V-belt. WORK TABLE AND MOTOR 4. stalling and using a commercially-available table ¡ The top of the sewing machine. ¡ Drill holes...
Instruction Manual - English
Page 9
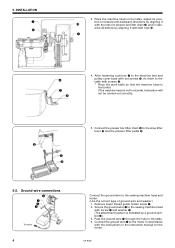
... sewing machine head and motor. (Use the correct type of ground wire and washer.) 1. Secure the ground wire q to the sewing machine head with belt hole !0. INSTALLATION u y 3. tion in side- After fastening cushions u to the machine bed and pulley cover base with set screws i, fix them to the motor in the table. 4. Remove lower thread guide holder screw w. 2. DA-9280 u i u o 4. Pass the ground wire q through the hole in accordance with screws o. * Place the work table so that the machine...
... sewing machine head and motor. (Use the correct type of ground wire and washer.) 1. Secure the ground wire q to the sewing machine head with belt hole !0. INSTALLATION u y 3. tion in side- After fastening cushions u to the machine bed and pulley cover base with set screws i, fix them to the motor in the table. 4. Remove lower thread guide holder screw w. 2. DA-9280 u i u o 4. Pass the ground wire q through the hole in accordance with screws o. * Place the work table so that the machine...
Instruction Manual - English
Page 13
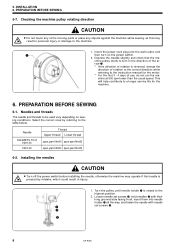
... machine. 1. PREPARATION BEFORE SEWING 6-1. Installing the needles CAUTION ¡ Turn off the power switch before installing the needle, otherwise the machine may result in the direction of the moving parts or place any of the ar- Loosen needle set screws w. INSTALLATION 6. PREPARATION BEFORE SEWING 5-7. Needles and threads The needle and threads to the highest position. 2. Turn the pulley until needle holder q is reversed, change the direction of use, do not run the ma- w e 8 DA-9280 row q. * If the direction...
... machine. 1. PREPARATION BEFORE SEWING 6-1. Installing the needles CAUTION ¡ Turn off the power switch before installing the needle, otherwise the machine may result in the direction of the moving parts or place any of the ar- Loosen needle set screws w. INSTALLATION 6. PREPARATION BEFORE SEWING 5-7. Needles and threads The needle and threads to the highest position. 2. Turn the pulley until needle holder q is reversed, change the direction of use, do not run the ma- w e 8 DA-9280 row q. * If the direction...
Instruction Manual - English
Page 17
... cover windows w. * The higher the value of the work . Puller feed adjustment (Machines with the stitch length set your desired feed position on the type and thickness of material being used . 1. With feed adjusting button q lightly pressed with the type of material and the type of the motor's inertia. Release the feed adjustment button q. (Check that the feed adjustment button q pops back out again.) 4. THREAD TENSION 8-3. However, the motor will operate if the treadle is operating, as a result of thread being used...
... cover windows w. * The higher the value of the work . Puller feed adjustment (Machines with the stitch length set your desired feed position on the type and thickness of material being used . 1. With feed adjusting button q lightly pressed with the type of material and the type of the motor's inertia. Release the feed adjustment button q. (Check that the feed adjustment button q pops back out again.) 4. THREAD TENSION 8-3. However, the motor will operate if the treadle is operating, as a result of thread being used...

Instruction Manual - English
Page 20
... tilt of the needle clamp e so that they operate correctly before starting work. ¡ When carrying out inspection, adjustment and maintenance ¡ When replacing consumable parts such as a result of the needles q. Remove the screw o, and then remove the presser foot !.0 2. Install the presser foot !0 with the three screws u, and after the power is raised to its highest position. 4. Turn the machine pulley to drop the needle bar to its lowest position. 3. However, the motor will be...
... tilt of the needle clamp e so that they operate correctly before starting work. ¡ When carrying out inspection, adjustment and maintenance ¡ When replacing consumable parts such as a result of the needles q. Remove the screw o, and then remove the presser foot !.0 2. Install the presser foot !0 with the three screws u, and after the power is raised to its highest position. 4. Turn the machine pulley to drop the needle bar to its lowest position. 3. However, the motor will be...

Instruction Manual - English
Page 21
... then loosen two set screws u securely, and then tighten cap screw t. 7. Close the belt cover plate r, and then tighten the two screws e. 10. Turn the pulley toward yourself until loopers w reach the end of the loopers. 9. Remove the presser foot, needle plate and feed dogs (Refer to the lowest position. 6. Loosen set screw i securely. 8. Install the presser foot, needle plate and feed dogs. 2.7 - 2.9mm o i Looper forward travel Looper backward travel . 4. STANDARD ADJUSTMENTS 10-2. Turn...
... then loosen two set screws u securely, and then tighten cap screw t. 7. Close the belt cover plate r, and then tighten the two screws e. 10. Turn the pulley toward yourself until loopers w reach the end of the loopers. 9. Remove the presser foot, needle plate and feed dogs (Refer to the lowest position. 6. Loosen set screw i securely. 8. Install the presser foot, needle plate and feed dogs. 2.7 - 2.9mm o i Looper forward travel Looper backward travel . 4. STANDARD ADJUSTMENTS 10-2. Turn...

Instruction Manual - English
Page 22
... breaking. 1. At this time, do not move the looper holder t in their backward travel . Turn the machine pulley toward the needles. Tighten the set screw e. 5. e w Turning direction Front Rear Needle Looper t r 0.05 - 0.1mm 1. Adjusting the needle and looper timing" on page 16. 4. DA-9280 17 Remove forward feed arm cover q. 2. Install the forward feed arm cover q. 10-4. Adjust the stitch length to the minimum setting. (Refer to adjust so that the clearance between the needle guard q and the needles...
... breaking. 1. At this time, do not move the looper holder t in their backward travel . Turn the machine pulley toward the needles. Tighten the set screw e. 5. e w Turning direction Front Rear Needle Looper t r 0.05 - 0.1mm 1. Adjusting the needle and looper timing" on page 16. 4. DA-9280 17 Remove forward feed arm cover q. 2. Install the forward feed arm cover q. 10-4. Adjust the stitch length to the minimum setting. (Refer to adjust so that the clearance between the needle guard q and the needles...

Instruction Manual - English
Page 23
... denim specifications) If stitch irregularities develop in the upper thread tension bracket when the needle bar is at its lowest position. 1. Remove set screws q. * The spacer is in the upper thread tension bracket. 3. Thread release lever adjustment q Adjust so that the highest part of the feed dog will be 1.2 mm above the center of the thread release lever thread hole is down at the lowest position. 2. w e 7 - 9mm 18 DA-9280 Feed dog height adjustment 1.2mm q 1.2mm q w e Becomes heigher w Becomes lower Feed dog Needle plate Make an adjustment so...
... denim specifications) If stitch irregularities develop in the upper thread tension bracket when the needle bar is at its lowest position. 1. Remove set screws q. * The spacer is in the upper thread tension bracket. 3. Thread release lever adjustment q Adjust so that the highest part of the feed dog will be 1.2 mm above the center of the thread release lever thread hole is down at the lowest position. 2. w e 7 - 9mm 18 DA-9280 Feed dog height adjustment 1.2mm q 1.2mm q w e Becomes heigher w Becomes lower Feed dog Needle plate Make an adjustment so...

Instruction Manual - English
Page 25
... needle plate. Installing the lapper w AB Insert the lapper guide plate from the front into the oval slot in line with puller) Reference line Make an adjust so that, when the needle bar is 0.1 to 0.2 mm high from the top of the presser foot. After the adjustment, retighten set screw w. q 10-12. 10. Puller timing adjustment (Machines with the reference line. 1. w q 20 DA-9280 After the adjustment, retighten set screws w. STANDARD ADJUSTMENTS 10-11. Adjust...
... needle plate. Installing the lapper w AB Insert the lapper guide plate from the front into the oval slot in line with puller) Reference line Make an adjust so that, when the needle bar is 0.1 to 0.2 mm high from the top of the presser foot. After the adjustment, retighten set screw w. q 10-12. 10. Puller timing adjustment (Machines with the reference line. 1. w q 20 DA-9280 After the adjustment, retighten set screws w. STANDARD ADJUSTMENTS 10-11. Adjust...
Instruction Manual - English
Page 28
... the power is incorrect, install the needle correctly. ¡ Are the looper points dull? Wait until the motor stops fully before calling for repairs or service. ¡ If the following points before starting work . Adjust the tension plate clearance of the upper thread nipper incorrect? rectly. ¡ Is the thread release lever position incorrect? Seam position is the lower thread tension too strong? Adjust the puller feed. ¡ Is the presser foot pressure incorrect? Adjust the presser foot pressure. ¡...
... the power is incorrect, install the needle correctly. ¡ Are the looper points dull? Wait until the motor stops fully before calling for repairs or service. ¡ If the following points before starting work . Adjust the tension plate clearance of the upper thread nipper incorrect? rectly. ¡ Is the thread release lever position incorrect? Seam position is the lower thread tension too strong? Adjust the puller feed. ¡ Is the presser foot pressure incorrect? Adjust the presser foot pressure. ¡...

Parts Manual - English
Page 17
...t- g*)t,Os 1 iv- t'- F PRESSER FOOT ASSY PIN SPRING SCREW, SM2.38 SPRING SHOULDER SCREW, SM2.38 FINGER GUARD 9-1 10-1...NEEDLE CALMP ASSY W/S SET SCREW, SM4.37 NEEDLE NEDDLE PLATE SCREW, FLAT SM4.37 SCREW, BIND SM3.57-40X8 FEED DOG SCREW, SM4.76 LAPPER GUIDE PLATE LAPPER GUIDE PLATE WASHER SCREW, SM3.57 LOPPER, S LOPPER, L SCREW, PAN SM4.37-40X6 LOOPER HOLDER, S LOOPER HOLDER, L SCREW, PAN SM4.37-40X10 _ - _ --- 5-1 101491101 1 71-1tI3/10 --Z. V /V- 7:..-j- -f -f 1 Y.*-( -fii* 2 ./'.)4 .t. 53.57 1 )t,-)vs 1 )i.--./q. 2 J-Na 4.37-40X6 1 )1,-- CODE Q'TY ei.X -f NAME OF PARTS...
...t- g*)t,Os 1 iv- t'- F PRESSER FOOT ASSY PIN SPRING SCREW, SM2.38 SPRING SHOULDER SCREW, SM2.38 FINGER GUARD 9-1 10-1...NEEDLE CALMP ASSY W/S SET SCREW, SM4.37 NEEDLE NEDDLE PLATE SCREW, FLAT SM4.37 SCREW, BIND SM3.57-40X8 FEED DOG SCREW, SM4.76 LAPPER GUIDE PLATE LAPPER GUIDE PLATE WASHER SCREW, SM3.57 LOPPER, S LOPPER, L SCREW, PAN SM4.37-40X6 LOOPER HOLDER, S LOOPER HOLDER, L SCREW, PAN SM4.37-40X10 _ - _ --- 5-1 101491101 1 71-1tI3/10 --Z. V /V- 7:..-j- -f -f 1 Y.*-( -fii* 2 ./'.)4 .t. 53.57 1 )t,-)vs 1 )i.--./q. 2 J-Na 4.37-40X6 1 )1,-- CODE Q'TY ei.X -f NAME OF PARTS...
Parts Manual - English
Page 19
..., 1 SM3.57 19 062671012 1 J- e> PIN 5-1-2 506309001 1 tit." f45 % (9270-A) / Gauge parts (9270-A) REF.NO. CODE Q'TY E > .X -r NAME OF PARTS RM 3 X 1 i\IJ-i 0 NEDDLE PLATE 4 100032004 3 -it-5* 54.37 SCREW, FLAT SM4.37 6 014760622 1 7 I V;j: )1, 0 L 3 .J-N 357-40X10 NEEDLE CALMP ASSY W/S SET SCREW, SM4.37 NEEDLE, TVX64NY LOPPER, S LOPPER, L SCREW, PAN SM4.37-40X6 LOOPER HOLDER, S LOOPER HOLDER, L SCREW, PAN SM4.37-40X10 NEEDLE CLAMP ASSY W/S SET SCREW, SOCKET (CP) SM3.18...
..., 1 SM3.57 19 062671012 1 J- e> PIN 5-1-2 506309001 1 tit." f45 % (9270-A) / Gauge parts (9270-A) REF.NO. CODE Q'TY E > .X -r NAME OF PARTS RM 3 X 1 i\IJ-i 0 NEDDLE PLATE 4 100032004 3 -it-5* 54.37 SCREW, FLAT SM4.37 6 014760622 1 7 I V;j: )1, 0 L 3 .J-N 357-40X10 NEEDLE CALMP ASSY W/S SET SCREW, SM4.37 NEEDLE, TVX64NY LOPPER, S LOPPER, L SCREW, PAN SM4.37-40X6 LOOPER HOLDER, S LOOPER HOLDER, L SCREW, PAN SM4.37-40X10 NEEDLE CLAMP ASSY W/S SET SCREW, SOCKET (CP) SM3.18...


