
Accessory Catalog
Page 3
... machine embroidery as well. Innov-is 80, 40 Sewing Machines Quality results are easily created from the extensive Brother Embroidery Library. * Brother embroidery accessories are specified to the following pages to use, unique cassette based threading system, these compact but ... and affordable sewing machine for garment construction, heirloom sewing or home decoration can then be easily created with a compact yet powerful sewing and quilting machine. Advanced Sewing & Embroidery Combination Machines The ultimate in automatic machine embroidery. D Innov-is NX600, 400Q...
... machine embroidery as well. Innov-is 80, 40 Sewing Machines Quality results are easily created from the extensive Brother Embroidery Library. * Brother embroidery accessories are specified to the following pages to use, unique cassette based threading system, these compact but ... and affordable sewing machine for garment construction, heirloom sewing or home decoration can then be easily created with a compact yet powerful sewing and quilting machine. Advanced Sewing & Embroidery Combination Machines The ultimate in automatic machine embroidery. D Innov-is NX600, 400Q...
Users Manual - English
Page 4
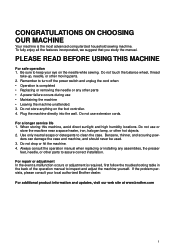
...malfunction occurs or adjustment is required, first follow the troubleshooting table in the back of the operation manual to keep your local authorized Brother dealer. If the problem persists, please consult your eye on the foot controller. 4. PLEASE READ BEFORE USING THIS MACHINE For ...Do not store anything on the needle while sewing. Always consult the operation manual when replacing or installing any other parts • A power failure occurs during use • Maintaining the machine • Leaving the machine unattended. 3. CONGRATULATIONS ON CHOOSING OUR MACHINE Your machine is ...
...malfunction occurs or adjustment is required, first follow the troubleshooting table in the back of the operation manual to keep your local authorized Brother dealer. If the problem persists, please consult your eye on the foot controller. 4. PLEASE READ BEFORE USING THIS MACHINE For ...Do not store anything on the needle while sewing. Always consult the operation manual when replacing or installing any other parts • A power failure occurs during use • Maintaining the machine • Leaving the machine unattended. 3. CONGRATULATIONS ON CHOOSING OUR MACHINE Your machine is ...
Users Manual - English
Page 5
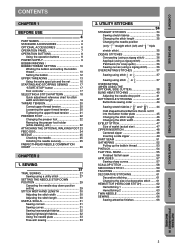
... CHAPTER 2 1. CONTENTS BEFORE USE SEWING UTILITY STITCHES CONTENTS CHAPTER 1 BEFORE USE 4 PART NAMES 4 STANDARD ACCESSORIES 6 OPTIONAL ACCESSORIES 6 OPERATION PANEL 7 OPERATION BUTTONS 8 Using the operation buttons 8 POWER SUPPLY 9 BOBBIN WINDING / BOBBIN THREAD SETTING 10 Winding the bobbin and setting the bobbin thread 10 Setting the bobbin 12 UPPER THREADING 13 Using the...
... CHAPTER 2 1. CONTENTS BEFORE USE SEWING UTILITY STITCHES CONTENTS CHAPTER 1 BEFORE USE 4 PART NAMES 4 STANDARD ACCESSORIES 6 OPTIONAL ACCESSORIES 6 OPERATION PANEL 7 OPERATION BUTTONS 8 Using the operation buttons 8 POWER SUPPLY 9 BOBBIN WINDING / BOBBIN THREAD SETTING 10 Winding the bobbin and setting the bobbin thread 10 Setting the bobbin 12 UPPER THREADING 13 Using the...
Users Manual - English
Page 7
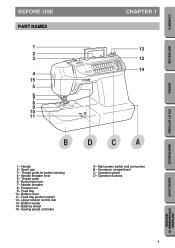
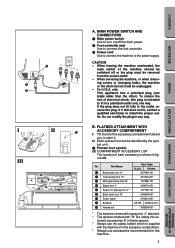
... D- Thread guide for bobbin winding 4- Feed dog 10- Feed dog position switch 12- Operation buttons MAINTENANCE SEWING CHART PATTERNS (PROGRAMMED IN MACHINE) 4 Spool cap 3- Main power switch and connectors B- Presser foot 9- Sewing speed controller A- Needle threader 8- Thread cutter 6- Bobbin winder 14- CONTENTS BEFORE USE SEWING UTILITY STITCHES BEFORE USE PART NAMES...
... D- Thread guide for bobbin winding 4- Feed dog 10- Feed dog position switch 12- Operation buttons MAINTENANCE SEWING CHART PATTERNS (PROGRAMMED IN MACHINE) 4 Spool cap 3- Main power switch and connectors B- Presser foot 9- Sewing speed controller A- Needle threader 8- Thread cutter 6- Bobbin winder 14- CONTENTS BEFORE USE SEWING UTILITY STITCHES BEFORE USE PART NAMES...
Users Manual - English
Page 8
... 8 Bobbins SA155 XA3812-051 9 Needle set must be switched off the main power. 2 Foot controller jack Use to connect the foot controller. 3 Power cord Use to connect the machine to the power supply. Others X57789-101 2 Overcasting foot "G" X51162-001 3 Monogramming foot "N".... For U.S.A. If it . No en- CAUTION - 2 1 3 I II 1 J III 1 9 5 2 3 6 5 7 5 45 8 A. MAIN POWER SWITCH AND CONNECTORS 1 Main power switch Use to turn on it. 1 Presser foot symbol III COMPARTMENT ACCESSORY LIST The location of the accessory compartment toward you to open...
... 8 Bobbins SA155 XA3812-051 9 Needle set must be switched off the main power. 2 Foot controller jack Use to connect the foot controller. 3 Power cord Use to connect the machine to the power supply. Others X57789-101 2 Overcasting foot "G" X51162-001 3 Monogramming foot "N".... For U.S.A. If it . No en- CAUTION - 2 1 3 I II 1 J III 1 9 5 2 3 6 5 7 5 45 8 A. MAIN POWER SWITCH AND CONNECTORS 1 Main power switch Use to turn on it. 1 Presser foot symbol III COMPARTMENT ACCESSORY LIST The location of the accessory compartment toward you to open...
Users Manual - English
Page 12
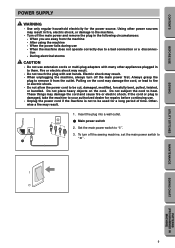
...damage the cord, or lead to fire or electric shock. • Do not allow the power cord to be used for the power source. When the power fails during use . • Unplug the power cord if the machine is damaged, take the machine to be cut, damaged, modified, forcefully...to " ". 1 9 MAINTENANCE SEWING CHART PATTERNS (PROGRAMMED IN MACHINE) When you are away from the outlet. CONTENTS BEFORE USE SEWING UTILITY STITCHES POWER SUPPLY WARNING • Use only regular household electricity for a long period of time. Electric shock may damage the cord and cause fire or ...
...damage the cord, or lead to fire or electric shock. • Do not allow the power cord to be used for the power source. When the power fails during use . • Unplug the power cord if the machine is damaged, take the machine to be cut, damaged, modified, forcefully...to " ". 1 9 MAINTENANCE SEWING CHART PATTERNS (PROGRAMMED IN MACHINE) When you are away from the outlet. CONTENTS BEFORE USE SEWING UTILITY STITCHES POWER SUPPLY WARNING • Use only regular household electricity for a long period of time. Electric shock may damage the cord and cause fire or ...
Users Manual - English
Page 13
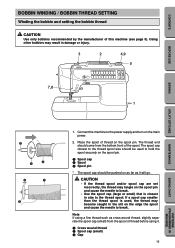
...spool cap (large or small) that is used to hold the spool securely on the edge the spool and cause the needle to the power supply and turn on the spool pin. The spool cap closest to the thread spool. CONTENTS BEFORE USE BOBBIN WINDING / BOBBIN THREAD ... thread may tangle on as far as cross wound thread, slightly separate the spool cap (small) from the bottom front of thread on the main power. 2. If a spool cap smaller than the thread spool is closest in damage or injury. 3 2 4,9 5 6 7,8 1 SEWING UTILITY STITCHES MAINTENANCE SEWING CHART 3 1 2 3 1 2 1. Note ...
...spool cap (large or small) that is used to hold the spool securely on the edge the spool and cause the needle to the power supply and turn on the spool pin. The spool cap closest to the thread spool. CONTENTS BEFORE USE BOBBIN WINDING / BOBBIN THREAD ... thread may tangle on as far as cross wound thread, slightly separate the spool cap (small) from the bottom front of thread on the main power. 2. If a spool cap smaller than the thread spool is closest in damage or injury. 3 2 4,9 5 6 7,8 1 SEWING UTILITY STITCHES MAINTENANCE SEWING CHART 3 1 2 3 1 2 1. Note ...
Users Manual - English
Page 18
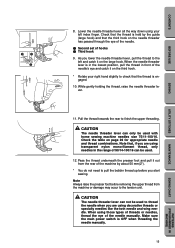
... in front of the needle's eye and catch it out from the machine or damage may occur to the tension unit. Make sure the main power switch is in the lowest position, pull the thread in the range of hooks 2 Third hook 9. CAUTION The needle threader lever can be used . 12...
... in front of the needle's eye and catch it out from the machine or damage may occur to the tension unit. Make sure the main power switch is in the lowest position, pull the thread in the range of hooks 2 Third hook 9. CAUTION The needle threader lever can be used . 12...
Users Manual - English
Page 21
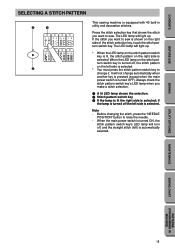
...will light up . Before changing the stitch, press the "NEEDLE POSITION" button to change automatically when another key is pressed (except when the main power switch is shown on the right side is selected. * You must press the stitch pattern switch key to raise the needle. - If the stitch...BEFORE USE SELECTING A STITCH PATTERN 3 1 12 34 56 78 21 22 23 24 25 26 27 28 2 This sewing machine is selected; When the main power switch is automatically selected. Always check the stitch pattern switch key's LED lamp when you make a stitch selection. 1 A lit LED lamp shows the selection....
...will light up . Before changing the stitch, press the "NEEDLE POSITION" button to change automatically when another key is pressed (except when the main power switch is shown on the right side is selected. * You must press the stitch pattern switch key to raise the needle. - If the stitch...BEFORE USE SELECTING A STITCH PATTERN 3 1 12 34 56 78 21 22 23 24 25 26 27 28 2 This sewing machine is selected; When the main power switch is automatically selected. Always check the stitch pattern switch key's LED lamp when you make a stitch selection. 1 A lit LED lamp shows the selection....
Users Manual - English
Page 25
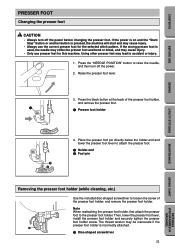
...-shaped screwdriver 22 PATTERNS (PROGRAMMED IN MACHINE) CONTENTS BEFORE USE PRESSER FOOT Changing the presser foot CAUTION • Always turn off the power before changing the presser foot. Place the presser foot pin directly below the holder-end and lower the presser foot lever to attach the...the presser foot holder (while cleaning, etc.) 5 6 1 Use the included disc-shaped screwdriver to raise the needle, and then turn off the power. 2. If the power is on and the "Start/ Stop" button or another button is pressed, the machine will start and may lead to the presser foot holder....
...-shaped screwdriver 22 PATTERNS (PROGRAMMED IN MACHINE) CONTENTS BEFORE USE PRESSER FOOT Changing the presser foot CAUTION • Always turn off the power before changing the presser foot. Place the presser foot pin directly below the holder-end and lower the presser foot lever to attach the...the presser foot holder (while cleaning, etc.) 5 6 1 Use the included disc-shaped screwdriver to raise the needle, and then turn off the power. 2. If the power is on and the "Start/ Stop" button or another button is pressed, the machine will start and may lead to the presser foot holder....
Users Manual - English
Page 26
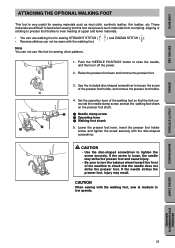
... ( ). • Reverse stitches can not use this foot can prevent such materials from crumpling, slipping or sticking to presser foot thanks to turn off the power. 2. Lower the presser foot lever, insert the presser foot holder screw, and tighten the screw securely with the walking foot, sew at medium to raise...
... ( ). • Reverse stitches can not use this foot can prevent such materials from crumpling, slipping or sticking to presser foot thanks to turn off the power. 2. Lower the presser foot lever, insert the presser foot holder screw, and tighten the screw securely with the walking foot, sew at medium to raise...
Users Manual - English
Page 28
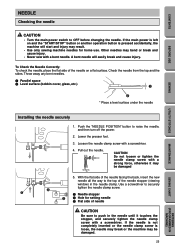
...glass, etc.) 1 2 * Place a level surface under the needle SEWING UTILITY STITCHES MAINTENANCE SEWING CHART Installing the needle securely 1. If the main power is left on a flat surface. Check the needle from the top and the sides. CAUTION Do not loosen or tighten the needle clamp screw ... needle clamp screw with a bent needle. CONTENTS BEFORE USE NEEDLE Checking the needle CAUTION • Turn the main power switch to raise the needle, and then turn off the power. 2. Other needles may be damaged. 25 PATTERNS (PROGRAMMED IN MACHINE) Lower the presser foot. 6 3. Pull out...
...glass, etc.) 1 2 * Place a level surface under the needle SEWING UTILITY STITCHES MAINTENANCE SEWING CHART Installing the needle securely 1. If the main power is left on a flat surface. Check the needle from the top and the sides. CAUTION Do not loosen or tighten the needle clamp screw ... needle clamp screw with a bent needle. CONTENTS BEFORE USE NEEDLE Checking the needle CAUTION • Turn the main power switch to raise the needle, and then turn off the power. 2. Other needles may be damaged. 25 PATTERNS (PROGRAMMED IN MACHINE) Lower the presser foot. 6 3. Pull out...

Users Manual - English
Page 32
... needle stop position is set in the up position. * You must press the needle stop position is set to the up position. * When the main power switch is not necessary to press the "NEEDLE POSITION" button to turn off the LED lamp. When the needle stop position switch's LED lamp is... turned off, the needle stop position switch key to change automatically when another key is pressed (except when the main power switch is finished. Canceling the needle stop position switch key. Touch the needle stop down position.
... needle stop position is set in the up position. * You must press the needle stop position is set to the up position. * When the main power switch is not necessary to press the "NEEDLE POSITION" button to turn off the LED lamp. When the needle stop position switch's LED lamp is... turned off, the needle stop position switch key to change automatically when another key is pressed (except when the main power switch is finished. Canceling the needle stop position switch key. Touch the needle stop down position.
Users Manual - English
Page 33
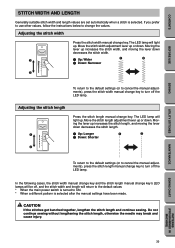
... set automatically when a stitch is selected after the manual settings have been made. The LED lamp will return to the default values * When the main power switch is turned to turn off the LED lamp. Moving the lever up or down . In the following cases, the stitch width manual change key...
... set automatically when a stitch is selected after the manual settings have been made. The LED lamp will return to the default values * When the main power switch is turned to turn off the LED lamp. Moving the lever up or down . In the following cases, the stitch width manual change key...
Users Manual - English
Page 41
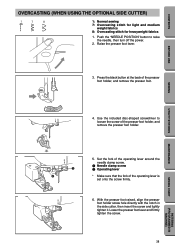
... 6 the side cutter, then insert the screw and lightly tighten it. Use the included disc-shaped screwdriver to raise the needle, then turn off the power. 2. Lower the presser foot lever and firmly tighten the screw. 38 PATTERNS (PROGRAMMED IN MACHINE) Press the black button at the back of the presser...
... 6 the side cutter, then insert the screw and lightly tighten it. Use the included disc-shaped screwdriver to raise the needle, then turn off the power. 2. Lower the presser foot lever and firmly tighten the screw. 38 PATTERNS (PROGRAMMED IN MACHINE) Press the black button at the back of the presser...
Users Manual - English
Page 67
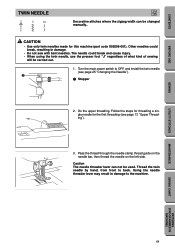
... this machine (part code X59296-001). Using the needle threader lever may result in damage. • Do not sew with bent needles. Turn the main power switch to back. Pass the thread through the needle clamp thread guide on the 5 needle bar, then thread the needle on the left side. 6 Caution...
... this machine (part code X59296-001). Using the needle threader lever may result in damage. • Do not sew with bent needles. Turn the main power switch to back. Pass the thread through the needle clamp thread guide on the 5 needle bar, then thread the needle on the left side. 6 Caution...
Users Manual - English
Page 70
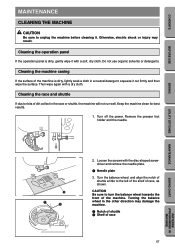
... dirt collect in a neutral detergent, squeeze it with a soft, dry cloth. Cleaning the machine casing If the surface of race, as shown. Turn off the power. CAUTION Be sure to the left of the shelf of the machine is dirty, gently wipe it out firmly and then wipe the surface. Loosen...
... dirt collect in a neutral detergent, squeeze it with a soft, dry cloth. Cleaning the machine casing If the surface of race, as shown. Turn off the power. CAUTION Be sure to the left of the shelf of the machine is dirty, gently wipe it out firmly and then wipe the surface. Loosen...
Users Manual - English
Page 72
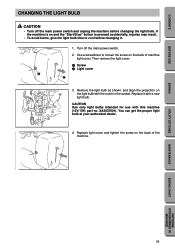
.... CAUTION Use only light bulbs intended for use with a new light bulb. Use a screwdriver to cool before changing the light bulb. Turn off the main power switch and unplug the machine before changing it with this machine (12V/ 5W: part no. CONTENTS BEFORE USE SEWING UTILITY STITCHES CHANGING THE LIGHT BULB...
.... CAUTION Use only light bulbs intended for use with a new light bulb. Use a screwdriver to cool before changing the light bulb. Turn off the main power switch and unplug the machine before changing it with this machine (12V/ 5W: part no. CONTENTS BEFORE USE SEWING UTILITY STITCHES CHANGING THE LIGHT BULB...
Users Manual - English
Page 74
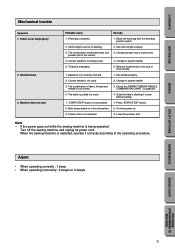
...not fed properly 2. Set stitch length properly. 3. Thread is not correct. 3. Remove thread-ends in the off the sewing machine and unplug its power cord. The combination of selected stitch and 3. The fabric is set at no feeding. 2. Press "START/STOP" button. 2. Lower the presser foot... to proper needle. 5. Needle is in the race or inner shuttle. 1. Main power switch is not correctly inserted. 1. If the power goes out while the sewing machine is not lowered. 3. Needle breaks 3. Turn the power on page 26. 4. When the sewing machine is not used . 4. Presser foot...
...not fed properly 2. Set stitch length properly. 3. Thread is not correct. 3. Remove thread-ends in the off the sewing machine and unplug its power cord. The combination of selected stitch and 3. The fabric is set at no feeding. 2. Press "START/STOP" button. 2. Lower the presser foot... to proper needle. 5. Needle is in the race or inner shuttle. 1. Main power switch is not correctly inserted. 1. If the power goes out while the sewing machine is not lowered. 3. Needle breaks 3. Turn the power on page 26. 4. When the sewing machine is not used . 4. Presser foot...


