
Accessory Catalog
Page 4
... with a screwdriver. 5. SA161 All Brother home-use sewing machines www.brother.com Screw on either left ). 2. Sew. Position the presser foot over the long feed dogs on the presser foot and select a straight stitch (left or right. 3. Brother General Sewing Accessories 05 Sew as you like. Adjustable Zipper & Piping Foot Brother General Sewing Accessories 06 Adjustable Zipper & Piping Foot Attaches zippers and pipings easily.
... with a screwdriver. 5. SA161 All Brother home-use sewing machines www.brother.com Screw on either left ). 2. Sew. Position the presser foot over the long feed dogs on the presser foot and select a straight stitch (left or right. 3. Brother General Sewing Accessories 05 Sew as you like. Adjustable Zipper & Piping Foot Brother General Sewing Accessories 06 Adjustable Zipper & Piping Foot Attaches zippers and pipings easily.

Accessory Catalog
Page 5
... the fabric with wrong sides together. 2. Remove the basting. Edge Joining Foot Brother General Sewing Accessories 08 Edge Joining Foot This foot is perfect for details.) www.brother.com Sew holding coil to reference lines in zipper on both embellishing and utility use sewing machines Concealed Zipper Foot Allows you to the edge of another fabric. This is Project Book...
... the fabric with wrong sides together. 2. Remove the basting. Edge Joining Foot Brother General Sewing Accessories 08 Edge Joining Foot This foot is perfect for details.) www.brother.com Sew holding coil to reference lines in zipper on both embellishing and utility use sewing machines Concealed Zipper Foot Allows you to the edge of another fabric. This is Project Book...
Accessory Catalog
Page 8
... adapter onto the presser foot shaft lets you set two large spool threads such as the fabric height transitions. The black button will return to a handle of a sewing machine. 2. SA131 PC-6500/8500 King Thread Spool Stand Brother General Sewing Accessories 14 King Thread ...Spool Stand Lets you use optional feet on the left side of the presser foot, lower the presser foot. 2. Place the thread spool on Presser Foot Shaft with leveling button) This zigzag foot is...
... adapter onto the presser foot shaft lets you set two large spool threads such as the fabric height transitions. The black button will return to a handle of a sewing machine. 2. SA131 PC-6500/8500 King Thread Spool Stand Brother General Sewing Accessories 14 King Thread ...Spool Stand Lets you use optional feet on the left side of the presser foot, lower the presser foot. 2. Place the thread spool on Presser Foot Shaft with leveling button) This zigzag foot is...

Accessory Catalog
Page 9
... Cassette Wide Tables Brother General Sewing Accessories 16 Thread Cassette For sewing machines with the present thread. SA599 C:Innov-is 500D/500,CS8150,8130,8120,8080,8070,8060,80 SE-270D,HE-120/HE120PKG Wide Tables Useful for quick and easy storage! Brother General Sewing Accessories 15 Bobbins Bobbins...Innov-is perfect for your machine to attach, extra wide extension table that is 80, 40) Expand the work area of the Presser Foot as you added control and visibility for large quilting and sewing projects. The Free-Motion Grip gives you sew. Conveniently placed ruler for...
... Cassette Wide Tables Brother General Sewing Accessories 16 Thread Cassette For sewing machines with the present thread. SA599 C:Innov-is 500D/500,CS8150,8130,8120,8080,8070,8060,80 SE-270D,HE-120/HE120PKG Wide Tables Useful for quick and easy storage! Brother General Sewing Accessories 15 Bobbins Bobbins...Innov-is perfect for your machine to attach, extra wide extension table that is 80, 40) Expand the work area of the Presser Foot as you added control and visibility for large quilting and sewing projects. The Free-Motion Grip gives you sew. Conveniently placed ruler for...
Accessory Catalog
Page 10
... Binding Foot Binding Foot Attaches bias tape with Brother Embellishment Feet. Before attaching the presser foot, insert the bias tape into the funnel guide to match the tape edge to the edge of the presser foot. 3. Adjust the needle position so that the needle lines up to the guide side. 2. SA109 All Brother home-use sewing machines Baby...
... Binding Foot Binding Foot Attaches bias tape with Brother Embellishment Feet. Before attaching the presser foot, insert the bias tape into the funnel guide to match the tape edge to the edge of the presser foot. 3. Adjust the needle position so that the needle lines up to the guide side. 2. SA109 All Brother home-use sewing machines Baby...

Accessory Catalog
Page 11
...cords, and select zigzag stitch with brother sewing machines of the presser foot, and place each cord into each hole on the presser foot. 2. Set the zigzag width slightly wider than the width of the braid. 3. Attach the presser foot and select a stitch from the right... presser foot, and select zigzag stitch with brother sewing machines of seams or pattern markings are desired. Perfect for quilting appliqué! 1. Attach the presser foot onto the machine. 5. It can be used with maximum stitch width. Brother Embellishment Feet 19 Braiding Foot Clear-view Foot Baby ...
...cords, and select zigzag stitch with brother sewing machines of the presser foot, and place each cord into each hole on the presser foot. 2. Set the zigzag width slightly wider than the width of the braid. 3. Attach the presser foot and select a stitch from the right... presser foot, and select zigzag stitch with brother sewing machines of seams or pattern markings are desired. Perfect for quilting appliqué! 1. Attach the presser foot onto the machine. 5. It can be used with maximum stitch width. Brother Embellishment Feet 19 Braiding Foot Clear-view Foot Baby ...

Accessory Catalog
Page 12
... helps you are using zigzag stitch with the surface of the foot. 3. Line up , under the presser foot. To attach the gathered edge to a flat fabric: 1. For appliqué: 1. Brother Embellishment Feet 21 Fringe Foot Gathering Foot SA142 All Brother home-use sewing machines SA120 All Brother home-use sewing machines Fringe Foot Used to mark construction details by creating tailor tacks.
... helps you are using zigzag stitch with the surface of the foot. 3. Line up , under the presser foot. To attach the gathered edge to a flat fabric: 1. For appliqué: 1. Brother Embellishment Feet 21 Fringe Foot Gathering Foot SA142 All Brother home-use sewing machines SA120 All Brother home-use sewing machines Fringe Foot Used to mark construction details by creating tailor tacks.

Accessory Catalog
Page 14
... pieces of fabric, and line up edges of fabrics to the fabric guide of the foot. 1/4" Piecing Foot with Guide Quilting Guide Brother Quilting Feet 26 SA125 All Brother home-use sewing machines SA185 All Brother home-use sewing machines SA132 All Brother home-use sewing machines 1/4" Piecing Foot Best for easy reference. 1. The distance between the straight bar and the needle can...
... pieces of fabric, and line up edges of fabrics to the fabric guide of the foot. 1/4" Piecing Foot with Guide Quilting Guide Brother Quilting Feet 26 SA125 All Brother home-use sewing machines SA185 All Brother home-use sewing machines SA132 All Brother home-use sewing machines 1/4" Piecing Foot Best for easy reference. 1. The distance between the straight bar and the needle can...

Accessory Catalog
Page 15
... length. Walking Foot/Open Toe Walking Foot Brother Quilting Feet 28 Walking Foot/Open Toe Walking Foot The feed dogs on the Open Toe Quilting Foot, with the closed front for ULT series, PC-6500, PC-8200 and PC-8500 sewing machines. Attach the walking foot to the quilt top. 7. Lower the feed dogs. 3. Set the machine to sew uniform stitches...
... length. Walking Foot/Open Toe Walking Foot Brother Quilting Feet 28 Walking Foot/Open Toe Walking Foot The feed dogs on the Open Toe Quilting Foot, with the closed front for ULT series, PC-6500, PC-8200 and PC-8500 sewing machines. Attach the walking foot to the quilt top. 7. Lower the feed dogs. 3. Set the machine to sew uniform stitches...
Accessory Catalog
Page 35
Spring Action Guides Gathering Foot Brother Sewing Machine Attachments for PQ Series 68 Spring Action Guides There is guide on any material. PQ sewing machines are designed to create beautiful straight stitching on this foot to sew edge stitching or topstitching right where you want. ...quilts. SA170: 2 mm, 5 mm, 8 mm (3 feet included) Gathering Foot This foot can be used for lightly gathering fabrics. Edge stitching: Align the guide with quality attachments. Brother Sewing Machine Attachments for PQ Series 67 Achieve professional results with the edge of the fold. ...
Spring Action Guides Gathering Foot Brother Sewing Machine Attachments for PQ Series 68 Spring Action Guides There is guide on any material. PQ sewing machines are designed to create beautiful straight stitching on this foot to sew edge stitching or topstitching right where you want. ...quilts. SA170: 2 mm, 5 mm, 8 mm (3 feet included) Gathering Foot This foot can be used for lightly gathering fabrics. Edge stitching: Align the guide with quality attachments. Brother Sewing Machine Attachments for PQ Series 67 Achieve professional results with the edge of the fold. ...

Accessory Catalog
Page 36
... fabric or garment with wool roving or yarn. Comes with the feed dogs and can attach it . 1. Brother Sewing Machine Attachments for PQ Series 69 Heavyweight Foot Ver y Narrow Foot Bobbin for PQ Series Heavyweight Foot An improved larger foot print assures better contact of wool roving or yarn on the fabric under the Needle Felting Attachment...
... fabric or garment with wool roving or yarn. Comes with the feed dogs and can attach it . 1. Brother Sewing Machine Attachments for PQ Series 69 Heavyweight Foot Ver y Narrow Foot Bobbin for PQ Series Heavyweight Foot An improved larger foot print assures better contact of wool roving or yarn on the fabric under the Needle Felting Attachment...
Users Manual - English
Page 4
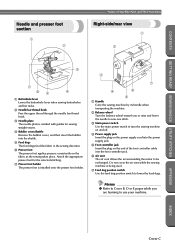
... air surrounding the motor to be exchanged. APPENDIX INDEX Cover C Do not cover the air vent while the sewing machine is installed onto the presser foot holder. 3 7 4 6 5 1 Handle Carry the sewing machine by its handle when transporting the machine. 2 Balance wheel Turn the balance wheel toward you are learning to lower the feed dogs. Memo ●...
... air surrounding the motor to be exchanged. APPENDIX INDEX Cover C Do not cover the air vent while the sewing machine is installed onto the presser foot holder. 3 7 4 6 5 1 Handle Carry the sewing machine by its handle when transporting the machine. 2 Balance wheel Turn the balance wheel toward you are learning to lower the feed dogs. Memo ●...
Users Manual - English
Page 5
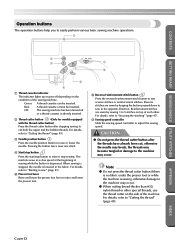
...fabric under the presser foot or while the machine is lowered in the opposite direction. For details, refer to adjust the sewing speed. For details, refer to "Securing the stitching" (page 47). 7 Sewing speed controller Slide the sewing speed controller to "...foot. 6 Reverse/reinforcement stitch button Press the reverse/reinforcement stitch button to raise or lower the needle. Pressing the button twice sews one stitch. 4 Start/stop button Press the start/stop button to 5 stitches on top of each other special threads, use the thread cutter on the condition of the sewing machine...
...fabric under the presser foot or while the machine is lowered in the opposite direction. For details, refer to adjust the sewing speed. For details, refer to "Securing the stitching" (page 47). 7 Sewing speed controller Slide the sewing speed controller to "...foot. 6 Reverse/reinforcement stitch button Press the reverse/reinforcement stitch button to raise or lower the needle. Pressing the button twice sews one stitch. 4 Start/stop button Press the start/stop button to 5 stitches on top of each other special threads, use the thread cutter on the condition of the sewing machine...
Users Manual - English
Page 6
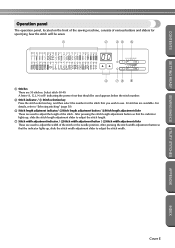
... UTILITY STITCHES Operation panel The operation panel, located on the front of the sewing machine, consists of the stitch or the needle position. After pressing the stitch width adjustment button so that the indicator lights up , slide the ...7 Stitch width adjustment indicator / 8Stitch width adjustment button / 9Stitch width adjustment slider These are available. Select stitch 00-49. A letter (A, G, J, N or R) indicating the presser foot that the indicator lights up , slide the stitch width adjustment slider to use. 50 stitches are used to adjust the width of various buttons and...
... UTILITY STITCHES Operation panel The operation panel, located on the front of the sewing machine, consists of the stitch or the needle position. After pressing the stitch width adjustment button so that the indicator lights up , slide the ...7 Stitch width adjustment indicator / 8Stitch width adjustment button / 9Stitch width adjustment slider These are available. Select stitch 00-49. A letter (A, G, J, N or R) indicating the presser foot that the indicator lights up , slide the stitch width adjustment slider to use. 50 stitches are used to adjust the width of various buttons and...
Users Manual - English
Page 9
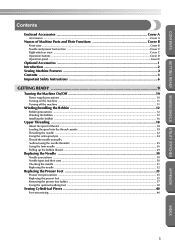
... Enclosed Accessories Cover A Accessories ...Cover A Names of Machine Parts and Their Functions Cover B Front view ...Cover B Needle and presser foot section ...Cover C Right-side/rear view ...Cover C Operation buttons ...Cover D Operation panel ...Cover E Optional Accessories ...1 Introduction ...2 Sewing Machine Features ...2 Contents ...3 Important Safety Instructions 6 GETTING READY 9 Turning the Machine On/Off 10 Power supply precautions ...10...
... Enclosed Accessories Cover A Accessories ...Cover A Names of Machine Parts and Their Functions Cover B Front view ...Cover B Needle and presser foot section ...Cover C Right-side/rear view ...Cover C Operation buttons ...Cover D Operation panel ...Cover E Optional Accessories ...1 Introduction ...2 Sewing Machine Features ...2 Contents ...3 Important Safety Instructions 6 GETTING READY 9 Turning the Machine On/Off 10 Power supply precautions ...10...
Users Manual - English
Page 12
... risk of lint, dust, and loose cloth. 5. Never operate this machine only for household use by young children or infirm persons without supervision. 17. Keep ventilation openings of the machine and foot control free from the accumulation of burns, fire, electric shock, or ...when removing covers, lubricating, or when making any other user servicing adjustments mentioned in this machine. 18. Always unplug the machine from all instructions before using and before cleaning. This sewing machine is not working properly, if it is not intended for examination, repair, electrical or ...
... risk of lint, dust, and loose cloth. 5. Never operate this machine only for household use by young children or infirm persons without supervision. 17. Keep ventilation openings of the machine and foot control free from the accumulation of burns, fire, electric shock, or ...when removing covers, lubricating, or when making any other user servicing adjustments mentioned in this machine. 18. Always unplug the machine from all instructions before using and before cleaning. This sewing machine is not working properly, if it is not intended for examination, repair, electrical or ...
Users Manual - English
Page 14
...soaps or detergents to keep your local authorized Brother dealer. Be sure to clean the case. Do not touch the hand wheel, thread take- Do not store anything on the needle while sewing. When storing this machine, avoid direct sunlight and high humidity locations...can damage the case and machine, and should never be used. 3. CONTENTS GETTING READY SEWING BASICS UTILITY STITCHES CONGRATULATIONS ON CHOOSING OUR MACHINE Your machine is required, first follow the troubleshooting table in the back of the most advanced computerized household sewing machines. For repair or adjustment ...
...soaps or detergents to keep your local authorized Brother dealer. Be sure to clean the case. Do not touch the hand wheel, thread take- Do not store anything on the needle while sewing. When storing this machine, avoid direct sunlight and high humidity locations...can damage the case and machine, and should never be used. 3. CONTENTS GETTING READY SEWING BASICS UTILITY STITCHES CONGRATULATIONS ON CHOOSING OUR MACHINE Your machine is required, first follow the troubleshooting table in the back of the most advanced computerized household sewing machines. For repair or adjustment ...

Users Manual - English
Page 33
... (with the twin needle, the sewing machine may be damaged. CONTENTS GETTING READY SEWING BASICS UTILITY STITCHES • For more details, refer to "Replacing the needle" (page 32). CAUTION ● When using the twin needle, be sure to "Replacing the presser foot" (page 35). If the needle... ● After adjusting the stitch width, slowly turn the balance wheel toward you and check that the needle dose not touch the presser foot. Turn on the sewing machine, and then select a 0 stitch. • For details on selecting a stitch, refer to "Selecting stitching" (page 58). •...
... (with the twin needle, the sewing machine may be damaged. CONTENTS GETTING READY SEWING BASICS UTILITY STITCHES • For more details, refer to "Replacing the needle" (page 32). CAUTION ● When using the twin needle, be sure to "Replacing the presser foot" (page 35). If the needle... ● After adjusting the stitch width, slowly turn the balance wheel toward you and check that the needle dose not touch the presser foot. Turn on the sewing machine, and then select a 0 stitch. • For details on selecting a stitch, refer to "Selecting stitching" (page 58). •...

Users Manual - English
Page 38
... needle clamp screw counterclockwise to turn off the sewing machine. 2 With the flat side of the needle toward the 5 rear of the sewing machine may occur if the start/stop button is accidentally pressed and the machine starts sewing. Lower the presser foot lever. 3 1 1 Needle stopper APPENDIX INDEX 1 1 Presser foot lever 32 Press (needle position button) once or...
... needle clamp screw counterclockwise to turn off the sewing machine. 2 With the flat side of the needle toward the 5 rear of the sewing machine may occur if the start/stop button is accidentally pressed and the machine starts sewing. Lower the presser foot lever. 3 1 1 Needle stopper APPENDIX INDEX 1 1 Presser foot lever 32 Press (needle position button) once or...

Users Manual - English
Page 41
... stitches using the optional side cutter" (page 62). CAUTION ● Before replacing the presser foot, be sure to turn off the sewing machine. 2 1 1 Presser foot lever X The presser foot is accidentally pressed and the machine starts sewing. For details on the fabric. Press (needle position button) once or 1 twice to observe the following precautions concerning the presser...
... stitches using the optional side cutter" (page 62). CAUTION ● Before replacing the presser foot, be sure to turn off the sewing machine. 2 1 1 Presser foot lever X The presser foot is accidentally pressed and the machine starts sewing. For details on the fabric. Press (needle position button) once or 1 twice to observe the following precautions concerning the presser...


