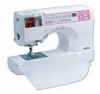
Brother International CS-8060 Support Question
Brother International CS-8060 Support Question
Find answers below for this question about Brother International CS-8060.Need a Brother International CS-8060 manual? We have 3 online manuals for this item!
Question posted by jandlkerns2 on June 7th, 2014
Cs8060 F4
What does it mean when my Brother CS8060 sewing machine has F4 in the stitch indicator window?
Current Answers
Answer #1: Posted by TechSupport101 on June 7th, 2014 12:02 PM
TechSupport101

Member since:
May 24th, 2013 Points: 12,171,305

Member since:
May 24th, 2013 Points: 12,171,305
Hi. F4 refers to a fault connected to the foot controler (eg. not properly connected). These http://www.helpowl.com/manuals/Brother%20International/CS8060/154619 should be able to come in handy.
Related Brother International CS-8060 Manual Pages
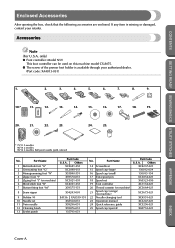
Accessory Catalog - Page 6

... page 50 for details.)
Narrow Hemmer Foot
Designed to protect edges from the edge and sew 2-3 stitches. 3. Place the fabric with the wrong side facing up under the presser foot. 2. Lower the needle into the fabric approximately 1/8" from fraying.
1. Brother General Sewing Accessories
09
Narrow Hemmer Foot Non Stick Foot
Overlock Foot Picot Foot...
Accessory Catalog - Page 12

...stitches. Mark construction details by creating tailor tacks. Sew a few stitches to more than 5 mm. 2. Gathering Foot
Used for clothing as well as knits.
1. Select a straight stitch, left needle position. 2. Select a straight stitch... 2. Brother Embellishment Feet
21
Fringe Foot
Gathering Foot
SA142 All Brother home-use sewing machines
SA120 All Brother home-use sewing machines
Fringe ...
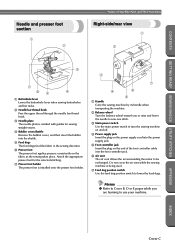
Users Manual - English - Page 2
...foot "I" 5 Zigzag foot "J" (on machine)
XC3673-021
22 Needle-changing tool
...only) ● Foot controller: Model N5V
This foot controller can be used on this machine model CS-8075. ● The screw of the presser foot holder is missing or damaged, ...XC1154-021
20 Thread cassette (on machine)
XC3664-021
21
Spool cap (orange) (on machine) 6 Blind stitch foot "R" 7 Button fitting foot "M"...
Users Manual - English - Page 3

... pieces such as sleeve cuffs.
8 Sliding leg Pull out the sliding leg during free-arm sewing.
9 Operation buttons Use the operation buttons to start the sewing machine and raise and lower the needle. (page Cover D)
0 Operation panel Select a stitch from those that appear in order to learn the names of the upper thread.
5 Thread...
Users Manual - English - Page 4
APPENDIX
INDEX
Cover C Memo
● Refer to Cover B, D or E pages while you to raise and lower the needle to sew one stitch.
3 Main power switch Use the main power switch to turn the sewing machine on and off.
4 Power supply jack Insert the plug on the power supply cord into the power supply jack.
5 Foot...
Users Manual - English - Page 5
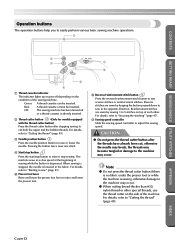
... no fabric under the presser foot or while the machine is sewing, otherwise damage to easily perform various basic sewing machine operations.
1
2
3
7
6
5
4
1 Thread cassette indicator
The indicator lights up or goes off
or a thread cassette is lowered in the opposite direction. CONTENTS
GETTING READY SEWING BASICS UTILITY STITCHES
Operation buttons
The operation buttons help you to...
Users Manual - English - Page 6
... width adjustment slider to adjust the stitch width. CONTENTS
GETTING READY SEWING BASICS UTILITY STITCHES
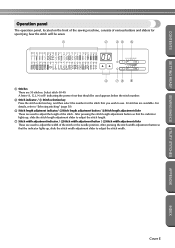
Operation panel
The operation panel, located on the front of the sewing machine, consists of various buttons and sliders for specifying how the stitch will be used appears below the stitch number.
2 Stitch indicator / 3 Stitch selection key Press the stitch selection key, and then select...
Users Manual - English - Page 8
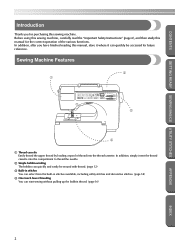
... into the thread cassette. In addition, after you for purchasing this manual for future reference. Sewing Machine Features
2 1
3
4
1 Thread cassette Easily thread the upper thread by loading a spool of the various functions.
CONTENTS
GETTING READY SEWING BASICS UTILITY STITCHES
Introduction
Thank you have finished reading this manual, store it where it can quickly be...
Users Manual - English - Page 9
...
GETTING READY SEWING BASICS UTILITY STITCHES
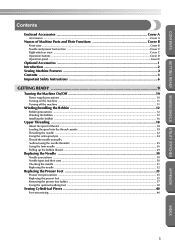
Contents
Enclosed Accessories Cover A
Accessories ...Cover A
Names of Machine Parts and Their Functions Cover B
Front view ...Cover B Needle and presser foot section ...Cover C Right-side/rear view ...Cover C Operation buttons ...Cover D Operation panel ...Cover E
Optional Accessories ...1 Introduction ...2 Sewing Machine Features ...2 Contents...
Users Manual - English - Page 11
CONTENTS
GETTING READY SEWING BASICS UTILITY STITCHES
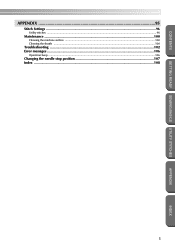
APPENDIX ...95
Stitch Settings ...96
Utility stitches ...96
Maintenance ...100
Cleaning the machine surface ...100 Cleaning the shuttle ...100
Troubleshooting ...102 Error messages ...106
Operation beep ...106
Changing the needle stop position 107 Index ...108
5
APPENDIX
INDEX
Users Manual - English - Page 12
...
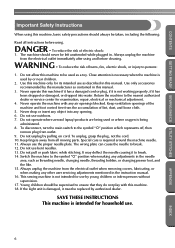
INDEX Never operate the machine with this machine to break. 12. SAVE THESE INSTRUCTIONS This machine is being used as contained in this manual. Return the machine to persons:
1. Do not allow this machine. 18. Do not operate where aerosol (spray) products are being
administered. 8.
CONTENTS
GETTING READY SEWING BASICS UTILITY STITCHES
Important Safety Instructions
When...
Users Manual - English - Page 13
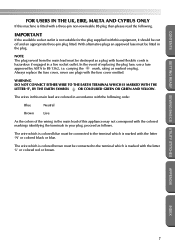
... THE
LETTER 'E', BY THE EARTH SYMBOL
OR COLOURED GREEN OR GREEN AND YELLOW.
APPENDIX
INDEX
7
CONTENTS
GETTING READY SEWING BASICS UTILITY STITCHES
FOR USERS IN THE UK, EIRE, MALTA AND CYPRUS ONLY
If this machine is fitted with a three-pin non-rewireable BS plug then please read the following code:
Blue
Neutral
Brown...
Users Manual - English - Page 14
... our web site at www.brother.com
8
APPENDIX
INDEX
Use only neutral soaps or detergents to turn off the power switch and unplug the cord when:
• Operation is required, first follow the troubleshooting table in the back of the most advanced computerized household sewing machines. Plug the machine directly into the wall. When...
Users Manual - English - Page 15
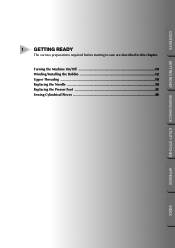
Turning the Machine On/Off 10 Winding/Installing the Bobbin 12 Upper Threading ...18 Replacing the Needle 30 Replacing the Presser Foot 35 Sewing Cylindrical Pieces 40
APPENDIX
INDEX CONTENTS
GETTING READY SEWING BASICS UTILITY STITCHES
1 GETTING READY
The various preparations required before starting to sew are described in this chapter.
Users Manual - English - Page 16
...electrical storms
CAUTION
● Do not use . ● Unplug the power cord if the machine is not to be cut, damaged, modified, forcefully bent, pulled, twisted, or bundled. These...SEWING BASICS UTILITY STITCHES
GETTING READY
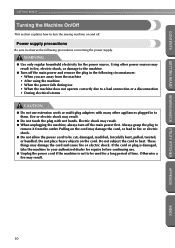
Turning the Machine On/Off
This section explains how to turn off .
Pulling on the cord may result. ● When unplugging the machine, always turn the sewing machine...
Users Manual - English - Page 17
... being operated, turn off the sewing machine and unplug the power supply cord.
When restarting the sewing machine, follow the necessary procedure to "O"), and
then plug the power supply cord into a 2 household electrical outlet. CONTENTS
GETTING READY SEWING BASICS UTILITY STITCHES
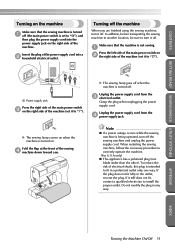
Turning on the machine
Make sure that the machine is not sewing.
1
Press the left side of the...
Users Manual - English - Page 18
... the bobbin to wind the thread onto the bobbin, and then insert the bobbin thread. GETTING READY SEWING BASICS UTILITY STITCHES
GETTING READY
CONTENTS
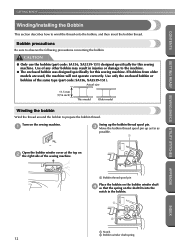
Winding/Installing the Bobbin
This section describes how to prepare the bobbin thread. Bobbin precautions
Be sure to the machine.
● The enclosed bobbin was designed specifically for this sewing machine.
Users Manual - English - Page 21
... X The bobbin starts spinning and the thread is turned after winding the thread around the bobbin, the machine will be fast).
Remove the bobbin from the shaft.
CONTENTS
GETTING READY SEWING BASICS UTILITY STITCHES
Slide the sewing speed controller to the right a (so that the speed will make a clicking sound;
Remove the spool cap...
Users Manual - English - Page 22
...1
1
2
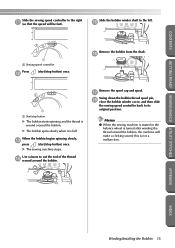
Pass the thread through the needle plate is indicated by marks around the shuttle.
Lightly hold the end of ...incorrect.
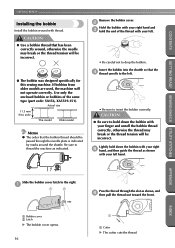
● The bobbin was designed specifically for this sewing machine. Remove the bobbin cover.
2
Hold the bobbin with your... to insert the bobbin correctly. GETTING READY SEWING BASICS UTILITY STITCHES
GETTING READY
CONTENTS
Installing the bobbin
Install the...
Users Manual - English - Page 51
... select the desired sewing speed. Turn off the sewing machine in the fabric). Insert the foot controller plug into its jack on this machine model CS-8075. The sewing speed can be ...Sewing can be used on 2 the side of the stitching is reached,
3 press
(start the sewing machine. only) ● Foot controller: Model N5V
This foot controller can be sure
to turn off the sewing machine...
Similar Questions

Brother Innovis Cs8060
have revived this machine from a customer and hook timing is badly out after customer caught fabric,...
have revived this machine from a customer and hook timing is badly out after customer caught fabric,...
(Posted by Jennifers045 8 years ago)

What Size Sewing Needle Is Used In The Brother Ls-2020 Sewing Machine 20 Stitch
function.
function.
(Posted by prrippz 10 years ago)

Why Is My Brother Xl 5340 Sewing Machine Skipping Stitches?
(Posted by twoisbetterthanone 10 years ago)


Machine Wont Run
When I press on the foot pedal, nothing happens and I get a beep tone and an error to the side of th...
When I press on the foot pedal, nothing happens and I get a beep tone and an error to the side of th...
(Posted by cherylramsey 11 years ago)