
Accessory Catalog
Page 6
... Place the fabric with fabrics such as leather, vinyl and other novelty fabrics. Continue to sew to the end of the fabric. Increase upper thread tension. 2. Hold the fabric from the edge and sew 2-3 stitches. 4. Slowly sew 2-3 stitches, making sure the fabric is rolling around the curled ... 2. Raise the needle and the presser foot. 5. Raise the needle and the presser foot. 4. Non Stick Foot Designed for details.) www.brother.com Lower the needle into the fabric approximately 1/8" from the back and front and roll it into the curled part of the fabric behind the...
... Place the fabric with fabrics such as leather, vinyl and other novelty fabrics. Continue to sew to the end of the fabric. Increase upper thread tension. 2. Hold the fabric from the edge and sew 2-3 stitches. 4. Slowly sew 2-3 stitches, making sure the fabric is rolling around the curled ... 2. Raise the needle and the presser foot. 5. Raise the needle and the presser foot. 4. Non Stick Foot Designed for details.) www.brother.com Lower the needle into the fabric approximately 1/8" from the back and front and roll it into the curled part of the fabric behind the...

Accessory Catalog
Page 12
...Ideal for edge-stitching heavy fabric such as home decor. Also used for securing edges of appliqué. 2. Increase the upper thread tension. 3. Place the fabric to be gathered into the slit in the needle area. Place the fabric to be gathered, right side up...SA142 All Brother home-use sewing machines SA120 All Brother home-use sewing machines Fringe Foot Used to mark construction details by creating tailor tacks. Mark construction details by creating tailor tacks. Mark a guideline to follow on thin to medium weight fabrics. Adjust the upper thread tension. 2....
...Ideal for edge-stitching heavy fabric such as home decor. Also used for securing edges of appliqué. 2. Increase the upper thread tension. 3. Place the fabric to be gathered into the slit in the needle area. Place the fabric to be gathered, right side up...SA142 All Brother home-use sewing machines SA120 All Brother home-use sewing machines Fringe Foot Used to mark construction details by creating tailor tacks. Mark construction details by creating tailor tacks. Mark a guideline to follow on thin to medium weight fabrics. Adjust the upper thread tension. 2....

Accessory Catalog
Page 34
... stand on your machine. Stabilizers and Water Soluble Stabilizers When doing machine embroidery, the use of colors specifically designed for Brother Embroidery machines, but compatible with other sewing and embroidery machine brands. Consult your fabric properly with a stabilizer. SA519 Iron...sold in the 61 color set of fabrics. Dependable thread delivery through machine tensions. Polyester retains its color beauty and quality even in a 5-pack sleeve) at selected dealers. 30-Pack: CYTPK30 Brother Countr y Yarn Embroider y Threads (30 Color Thread Pack) Attention all ...
... stand on your machine. Stabilizers and Water Soluble Stabilizers When doing machine embroidery, the use of colors specifically designed for Brother Embroidery machines, but compatible with other sewing and embroidery machine brands. Consult your fabric properly with a stabilizer. SA519 Iron...sold in the 61 color set of fabrics. Dependable thread delivery through machine tensions. Polyester retains its color beauty and quality even in a 5-pack sleeve) at selected dealers. 30-Pack: CYTPK30 Brother Countr y Yarn Embroider y Threads (30 Color Thread Pack) Attention all ...

Accessory Catalog
Page 38
...beads. 1. Align them . 3. Note: When the fabrics gather, tighten the thread tension. Pearls and Sequins Foot Attaches threaded pearls or beads on your machine. 2. SA210 Party Bag SA212 Piping Foot Taping Foot Brother Serger/ Overlock Feet 74 Piping Foot Sews piping tapes with two pieces of fabric. ...Set the machine setting: 3/4 thread overlock, stitch length to 3 mm from the folded edge. 6. Sew. www.brother.com Can be used for the other models. Place the strings of 3 to 3. 2. Place two fabrics inside out together and insert the piping...
...beads. 1. Align them . 3. Note: When the fabrics gather, tighten the thread tension. Pearls and Sequins Foot Attaches threaded pearls or beads on your machine. 2. SA210 Party Bag SA212 Piping Foot Taping Foot Brother Serger/ Overlock Feet 74 Piping Foot Sews piping tapes with two pieces of fabric. ...Set the machine setting: 3/4 thread overlock, stitch length to 3 mm from the folded edge. 6. Sew. www.brother.com Can be used for the other models. Place the strings of 3 to 3. 2. Place two fabrics inside out together and insert the piping...

Users Manual - English
Page 3
... B C Bobbin storage compartment Store the bobbins designed specifically for the bobbin onto this lever to eject the installed thread cassette. 4 Thread tension dial Use the thread tension dial to adjust the tension of the upper thread. 5 Thread cutter Pass the threads through the thread cutter to cut them. 6 Arm 7 Flap Use the flap...
... B C Bobbin storage compartment Store the bobbins designed specifically for the bobbin onto this lever to eject the installed thread cassette. 4 Thread tension dial Use the thread tension dial to adjust the tension of the upper thread. 5 Thread cutter Pass the threads through the thread cutter to cut them. 6 Arm 7 Flap Use the flap...

Users Manual - English
Page 10
... General sewing procedure ...43 Positioning the fabric ...44 Starting to sew ...45 Securing the stitching ...47 Cutting the thread ...49 Adjusting the Thread Tension 50 Changing the tension of the upper thread ...50 Adjusting the Stitch Width and Length 51 Adjusting the stitch width ...51 Adjusting the stitch length ...52 Useful Sewing...
... General sewing procedure ...43 Positioning the fabric ...44 Starting to sew ...45 Securing the stitching ...47 Cutting the thread ...49 Adjusting the Thread Tension 50 Changing the tension of the upper thread ...50 Adjusting the Stitch Width and Length 51 Adjusting the stitch width ...51 Adjusting the stitch length ...52 Useful Sewing...
Users Manual - English
Page 22
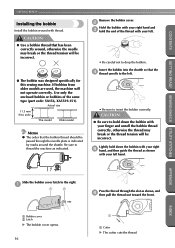
CAUTION ● Use a bobbin thread that has been correctly wound, otherwise the needle may break or the thread tension will not operate correctly. Remove the bobbin cover. 2 Hold the bobbin with your right hand and 3 hold the end of the same type (part code: ... CONTENTS Installing the bobbin Install the bobbin wound with your finger and unroll the bobbin thread correctly, otherwise the thread may break or the thread tension will be incorrect. APPENDIX INDEX Slide the bobbin cover latch to thread the machine as shown, and 6 then pull the thread out toward the front...
CAUTION ● Use a bobbin thread that has been correctly wound, otherwise the needle may break or the thread tension will not operate correctly. Remove the bobbin cover. 2 Hold the bobbin with your right hand and 3 hold the end of the same type (part code: ... CONTENTS Installing the bobbin Install the bobbin wound with your finger and unroll the bobbin thread correctly, otherwise the thread may break or the thread tension will be incorrect. APPENDIX INDEX Slide the bobbin cover latch to thread the machine as shown, and 6 then pull the thread out toward the front...
Users Manual - English
Page 43
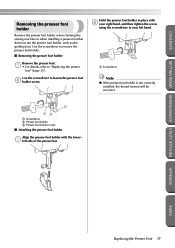
... then tighten the screw using the screwdriver in your left hand. 1 Screwdriver Note ● If the presser foot holder is not correctly installed, the thread tension will be incorrect. 2 13 1 Screwdriver 2 Presser foot holder 3 Presser foot holder screw ■ Attaching the presser foot holder Align the presser foot holder with the...
... then tighten the screw using the screwdriver in your left hand. 1 Screwdriver Note ● If the presser foot holder is not correctly installed, the thread tension will be incorrect. 2 13 1 Screwdriver 2 Presser foot holder 3 Presser foot holder screw ■ Attaching the presser foot holder Align the presser foot holder with the...

Users Manual - English
Page 47
Sewing ...42 Adjusting the Thread Tension 50 Adjusting the Stitch Width and Length 51 Useful Sewing Tips 53 APPENDIX INDEX CONTENTS GETTING READY SEWING BASICS UTILITY STITCHES 2 SEWING BASICS The necessary preparations for sewing are described in this chapter.
Sewing ...42 Adjusting the Thread Tension 50 Adjusting the Stitch Width and Length 51 Useful Sewing Tips 53 APPENDIX INDEX CONTENTS GETTING READY SEWING BASICS UTILITY STITCHES 2 SEWING BASICS The necessary preparations for sewing are described in this chapter.

Users Manual - English
Page 56
... of fabric 2 Right side of fabric 3 Upper thread 4 Bobbin thread 5 The upper thread is visible from the wrong side of the fabric. Turn the thread tension dial upward to tighten the upper thread. 2 3 4 1 Wrong side of fabric 2 Right side of fabric 3 Upper thread 4 Bobbin thread ■ Upper thread is... too tight If the bobbin thread is visible from the right side of the fabric, the upper thread is too tight. 1 Tight Loose 1 1 Thread tension dial 2 3 5 4 1 Wrong side of fabric 2 Right side of fabric 3 Upper thread 4 Bobbin thread 5 The bobbin thread is visible from the right side ...
... of fabric 2 Right side of fabric 3 Upper thread 4 Bobbin thread 5 The upper thread is visible from the wrong side of the fabric. Turn the thread tension dial upward to tighten the upper thread. 2 3 4 1 Wrong side of fabric 2 Right side of fabric 3 Upper thread 4 Bobbin thread ■ Upper thread is... too tight If the bobbin thread is visible from the right side of the fabric, the upper thread is too tight. 1 Tight Loose 1 1 Thread tension dial 2 3 5 4 1 Wrong side of fabric 2 Right side of fabric 3 Upper thread 4 Bobbin thread 5 The bobbin thread is visible from the right side ...

Users Manual - English
Page 57
... ■ Changing the needle position With the straight stitch (left . sliding the slider to the left makes the stitch width narrower. INDEX Adjusting the Thread Tension/Adjusting the Stitch Width and Length 51 X The stitch width adjustment indicator lights up. APPENDIX • To automatically select the stitch width most appropriate for...
... ■ Changing the needle position With the straight stitch (left . sliding the slider to the left makes the stitch width narrower. INDEX Adjusting the Thread Tension/Adjusting the Stitch Width and Length 51 X The stitch width adjustment indicator lights up. APPENDIX • To automatically select the stitch width most appropriate for...

Users Manual - English
Page 59
... of stitching and the number of layers of fabric being sewn, the desired results may not be used for your project, and check the thread tension and stitch length and width. For the trial sewing, use a piece of fabric and stitching being sewn, the machine automatically sets the thread... tension and stitch length and width for the stitch that is selected. Since the results differ depending on sewing with the thread and needle appropriate for ...
... of stitching and the number of layers of fabric being sewn, the desired results may not be used for your project, and check the thread tension and stitch length and width. For the trial sewing, use a piece of fabric and stitching being sewn, the machine automatically sets the thread... tension and stitch length and width for the stitch that is selected. Since the results differ depending on sewing with the thread and needle appropriate for ...
Users Manual - English
Page 96
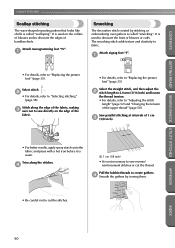
... • It is called "smocking". Select the straight stitch, and then adjust the 2 stitch length to 4.0 mm (3/16 inch) and loosen the thread tension. • For details, refer to fabric. Sew parallel stitching at intervals of the upper thread" (page 50). Attach monogramming foot "N". 1 Smocking The decorative... created by ironing them. The smocking stitch adds texture and elasticity to "Adjusting the stitch length" (page 52) and "Changing the tension of 1 cm 3 (3/8 inch). 1 • For better results, apply spray starch onto the fabric and press with a hot iron before it...
... • It is called "smocking". Select the straight stitch, and then adjust the 2 stitch length to 4.0 mm (3/16 inch) and loosen the thread tension. • For details, refer to fabric. Sew parallel stitching at intervals of the upper thread" (page 50). Attach monogramming foot "N". 1 Smocking The decorative... created by ironing them. The smocking stitch adds texture and elasticity to "Adjusting the stitch length" (page 52) and "Changing the tension of 1 cm 3 (3/8 inch). 1 • For better results, apply spray starch onto the fabric and press with a hot iron before it...
Users Manual - English
Page 108
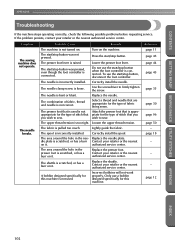
... the type of stitch that are appropriate for this machine. page 12 APPENDIX INDEX 102 Correctly install the needle. Loosen the upper thread tension. Lower the presser foot lever. dle plate is loose. Incorrect bobbins will not work properly. The needle clamp screw is scratched, or... Contact your retailer or the nearest authorized service center. Select a thread and needle that you you wish to sew. The upper thread tension is not correct. Replace the needle plate. Reference page 11 page 45 page 44 page 45 page 35 page 30 page 96 page 50...
... the type of stitch that are appropriate for this machine. page 12 APPENDIX INDEX 102 Correctly install the needle. Loosen the upper thread tension. Lower the presser foot lever. dle plate is loose. Incorrect bobbins will not work properly. The needle clamp screw is scratched, or... Contact your retailer or the nearest authorized service center. Select a thread and needle that you you wish to sew. The upper thread tension is not correct. Replace the needle plate. Reference page 11 page 45 page 44 page 45 page 35 page 30 page 96 page 50...
Users Manual - English
Page 109
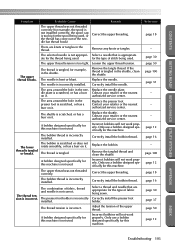
...used, or the thread has come out of fabric being sewn. The bobbin thread is not appropri- The thread tension is too tight. The upper thread tension is incorrect. Remove the tangle thread. Correctly install the needle. The shuttle is scratched, or has a burr on... STITCHES Symptom Probable Cause Remedy The upper thread was not threaded correctly. The presser foot holder is tangled or breaks. The thread tension is tangled. Replace the needle plate. A bobbin designed specifically for this machine. Correctly install the bobbin thread. The bobbin is not...
...used, or the thread has come out of fabric being sewn. The bobbin thread is not appropri- The thread tension is too tight. The upper thread tension is incorrect. Remove the tangle thread. Correctly install the needle. The shuttle is scratched, or has a burr on... STITCHES Symptom Probable Cause Remedy The upper thread was not threaded correctly. The presser foot holder is tangled or breaks. The thread tension is tangled. Replace the needle plate. A bobbin designed specifically for this machine. Correctly install the bobbin thread. The bobbin is not...

Users Manual - English
Page 110
... the tangle thread. Probable Cause The upper thread was not raised. The upper thread was not threaded correctly. The needle is incorrect. The thread tension is incorrectly installed. Select a thread and needle that are appropriate for the type of fabric, thread and needle is not correct. Adjust the... tension of fabric, thread and needle is not correct. page 12 page 22 page 32 page 96 page 50 page 100 APPENDIX INDEX 104 APPENDIX...
... the tangle thread. Probable Cause The upper thread was not raised. The upper thread was not threaded correctly. The needle is incorrect. The thread tension is incorrectly installed. Select a thread and needle that are appropriate for the type of fabric, thread and needle is not correct. Adjust the... tension of fabric, thread and needle is not correct. page 12 page 22 page 32 page 96 page 50 page 100 APPENDIX INDEX 104 APPENDIX...
Users Manual - English
Page 115
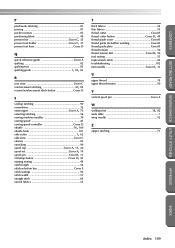
... fabrics 55 thread cutter Cover B thread cutter button Cover D, 49 thread guide cover Cover B thread guide for bobbin winding Cover B thread guide plate Cover B thread tension 50 thread tension dial Cover B, 50 trial sewing 53 triple stretch stitch 85 troubleshooting 102 twin needle Cover A, 33 U upper thread 18 upper thread...
... fabrics 55 thread cutter Cover B thread cutter button Cover D, 49 thread guide cover Cover B thread guide for bobbin winding Cover B thread guide plate Cover B thread tension 50 thread tension dial Cover B, 50 trial sewing 53 triple stretch stitch 85 troubleshooting 102 twin needle Cover A, 33 U upper thread 18 upper thread...


