Users Manual - English
Page 9
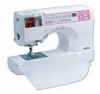
CONTENTS GETTING READY SEWING BASICS UTILITY STITCHES Contents Enclosed Accessories Cover A Accessories ...Cover A Names of Machine Parts and Their Functions Cover B Front view ...Cover B Needle and presser foot section ...Cover C Right-side/rear view ...Cover C Operation buttons ...Cover... Needle ...30 Needle precautions ...30 Needle types and their uses ...30 Checking the needle ...31 Replacing the needle ...32 Replacing the Presser Foot 35 Presser foot precautions ...35 Replacing the presser foot ...35 Removing the presser foot holder ...37 Using the optional walking foot ...38 Sewing ...
CONTENTS GETTING READY SEWING BASICS UTILITY STITCHES Contents Enclosed Accessories Cover A Accessories ...Cover A Names of Machine Parts and Their Functions Cover B Front view ...Cover B Needle and presser foot section ...Cover C Right-side/rear view ...Cover C Operation buttons ...Cover... Needle ...30 Needle precautions ...30 Needle types and their uses ...30 Checking the needle ...31 Replacing the needle ...32 Replacing the Presser Foot 35 Presser foot precautions ...35 Replacing the presser foot ...35 Removing the presser foot holder ...37 Using the optional walking foot ...38 Sewing ...
Users Manual - English
Page 12
.... 12. Use this machine only for use . 6 APPENDIX INDEX Never operate the machine with this machine, basic safety precautions should never be replaced by authorized dealer. Do not use bent needles. 13. To unplug, grasp the plug, not the cord. 10. The wrong plate can ...away from the electrical outlet immediately after using and before using. Switch the machine to be taken, including the following: Read all moving parts. SAVE THESE INSTRUCTIONS This machine is required around the machine needle. 11. Always unplug the machine from all instructions before cleaning. Always ...
.... 12. Use this machine only for use . 6 APPENDIX INDEX Never operate the machine with this machine, basic safety precautions should never be replaced by authorized dealer. Do not use bent needles. 13. To unplug, grasp the plug, not the cord. 10. The wrong plate can ...away from the electrical outlet immediately after using and before using. Switch the machine to be taken, including the following: Read all moving parts. SAVE THESE INSTRUCTIONS This machine is required around the machine needle. 11. Always unplug the machine from all instructions before cleaning. Always ...
Users Manual - English
Page 14
...locations. Do not use or store the machine near a space heater, iron, halogen lamp, or other parts to assure correct installation. Always consult the operation manual when replacing or installing any other moving parts. 2. If the problem persists, please consult your eye on the foot controller. 4. up lever, needle... damage the case and machine, and should never be used. 3. For additional product information and updates, visit our web site at www.brother.com 8 APPENDIX INDEX To fully enjoy all the features, we suggest that you study the manual before using the machine. Remember to turn...
...locations. Do not use or store the machine near a space heater, iron, halogen lamp, or other parts to assure correct installation. Always consult the operation manual when replacing or installing any other moving parts. 2. If the problem persists, please consult your eye on the foot controller. 4. up lever, needle... damage the case and machine, and should never be used. 3. For additional product information and updates, visit our web site at www.brother.com 8 APPENDIX INDEX To fully enjoy all the features, we suggest that you study the manual before using the machine. Remember to turn...

Users Manual - English
Page 32
... needle or damage the machine. ● Never use bent needles. Use of the same stitch with the twin needle, refer to use the twin needle (Part code : X59296-051). Be sure to "Stitch Settings" (page 96). INDEX 26 GETTING READY SEWING BASICS UTILITY STITCHES GETTING READY CONTENTS Using the twin needle... twin needle, you can sew two parallel lines of any other needle may result. For details on the thread cassette. Use the two threads to "Replacing the needle" (page 32).
... needle or damage the machine. ● Never use bent needles. Use of the same stitch with the twin needle, refer to use the twin needle (Part code : X59296-051). Be sure to "Stitch Settings" (page 96). INDEX 26 GETTING READY SEWING BASICS UTILITY STITCHES GETTING READY CONTENTS Using the twin needle... twin needle, you can sew two parallel lines of any other needle may result. For details on the thread cassette. Use the two threads to "Replacing the needle" (page 32).

Users Manual - English
Page 38
... 1 Screwdriver 2 Needle clamp screw • Do not apply a strong force when loosening or tightening the needle clamp screw, otherwise certain parts of the sewing machine may occur if the start/stop button is accidentally pressed and the machine starts sewing. Hold the needle with your ...side of the needle toward the 5 rear of the machine, insert the needle until it touches the needle stopper. GETTING READY CONTENTS Replacing the needle Replace the needle as described below. Press (needle position button) once or 1 twice to turn the needle clamp screw counterclockwise to the ...
... 1 Screwdriver 2 Needle clamp screw • Do not apply a strong force when loosening or tightening the needle clamp screw, otherwise certain parts of the sewing machine may occur if the start/stop button is accidentally pressed and the machine starts sewing. Hold the needle with your ...side of the needle toward the 5 rear of the machine, insert the needle until it touches the needle stopper. GETTING READY CONTENTS Replacing the needle Replace the needle as described below. Press (needle position button) once or 1 twice to turn the needle clamp screw counterclockwise to the ...
Users Manual - English
Page 77
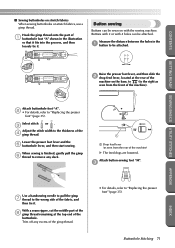
... on the base, to (to the right as seen from the front of the machine) X The feed dogs are lowered. Adjust the stitch width to "Replacing the presser foot" (page 35). When sewing is finished, gently pull the gimp 6 thread to the wrong side of 1 buttonhole foot "A" shown in the ...1 button to "Replacing the presser foot" (page 35). Lower the presser foot lever and the 5 buttonhole lever, and then start sewing. Hook the gimp thread onto the part of the fabric, and then tie it . Buttons with 2 or with 4 holes can...
... on the base, to (to the right as seen from the front of the machine) X The feed dogs are lowered. Adjust the stitch width to "Replacing the presser foot" (page 35). When sewing is finished, gently pull the gimp 6 thread to the wrong side of 1 buttonhole foot "A" shown in the ...1 button to "Replacing the presser foot" (page 35). Lower the presser foot lever and the 5 buttonhole lever, and then start sewing. Hook the gimp thread onto the part of the fabric, and then tie it . Buttons with 2 or with 4 holes can...

