Users Manual - English
Page 7
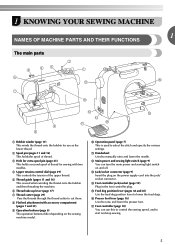
...on the power supply cord into the jack/ socket connector. e Thread guide (pages 11 and 16) This is used when winding the thread onto the bobbin and then threading the machine. q Foot controller (page 10) You can turn the main power and sewing light switch on and off. f Thread take...16) Used to lower the feed dogs. 1 KNOWING YOUR SEWING MACHINE 1 NAMES OF MACHINE PARTS AND THEIR FUNCTIONS The main parts a Bobbin winder (page 11) This winds the thread onto the bobbin for use this to control the sewing speed, and to start and stop sewing. 5 d Upper tension-control dial (page 29) ...
...on the power supply cord into the jack/ socket connector. e Thread guide (pages 11 and 16) This is used when winding the thread onto the bobbin and then threading the machine. q Foot controller (page 10) You can turn the main power and sewing light switch on and off. f Thread take...16) Used to lower the feed dogs. 1 KNOWING YOUR SEWING MACHINE 1 NAMES OF MACHINE PARTS AND THEIR FUNCTIONS The main parts a Bobbin winder (page 11) This winds the thread onto the bobbin for use this to control the sewing speed, and to start and stop sewing. 5 d Upper tension-control dial (page 29) ...

Users Manual - English
Page 13
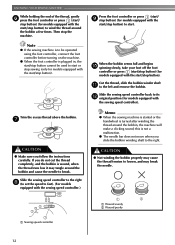
... the spool pin. Put the bobbin onto the bobbin winder shaft d and slide the bobbin winder shaft to the machine. ● We designed the bobbin that have been designed for this machine or bobbins of the thread through the hole on the sewing machine. a Pre-tension disk b Bobbin winder shaft c Bobbin CAUTION ● Only use bobbins (part code: SA156, SFB: XA5539...
... the spool pin. Put the bobbin onto the bobbin winder shaft d and slide the bobbin winder shaft to the machine. ● We designed the bobbin that have been designed for this machine or bobbins of the thread through the hole on the sewing machine. a Pre-tension disk b Bobbin winder shaft c Bobbin CAUTION ● Only use bobbins (part code: SA156, SFB: XA5539...
Users Manual - English
Page 14
...the thread tension to be used to the left and remove the bobbin. Note ● If the sewing machine is to loosen, and may tangle around the bobbin, the machine will make a clicking sound; Cut the thread, slide the bobbin winder shaft k to start or stop sewing (only for models equipped with... the start/stop button). If you do not cut the thread completely, and the bobbin is plugged in, the start/stop button cannot be operated using the ...
...the thread tension to be used to the left and remove the bobbin. Note ● If the sewing machine is to loosen, and may tangle around the bobbin, the machine will make a clicking sound; Cut the thread, slide the bobbin winder shaft k to start or stop sewing (only for models equipped with... the start/stop button). If you do not cut the thread completely, and the bobbin is plugged in, the start/stop button cannot be operated using the ...
Users Manual - English
Page 15
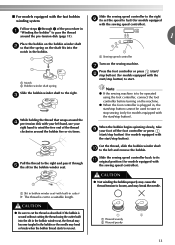
...9679; Be sure to cut to pass the thread around the pre-tension disk (page 11). 1 Place the bobbin on the bobbin winder shaft b so that wraps around the bobbin five or six times. Turn on the machine. ● When the foot controller is plugged in, the start...equipped with the start or stop button). a Slit in bobbin winder seat (with the sewing speed controller). a Sewing speed controller a Notch b Bobbin winder shaft spring Slide the bobbin winder shaft to start /stop sewing (only for models equipped with built-in the bobbin. c While holding the thread that the spring on ...
...9679; Be sure to cut to pass the thread around the pre-tension disk (page 11). 1 Place the bobbin on the bobbin winder shaft b so that wraps around the bobbin five or six times. Turn on the machine. ● When the foot controller is plugged in, the start...equipped with the start or stop button). a Slit in bobbin winder seat (with the sewing speed controller). a Sewing speed controller a Notch b Bobbin winder shaft spring Slide the bobbin winder shaft to start /stop sewing (only for models equipped with built-in the bobbin. c While holding the thread that the spring on ...
Users Manual - English
Page 61
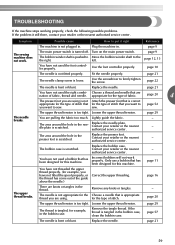
.... page 16 The upper thread breaks. If the thread is pushed to Move the bobbin winder shaft to the the right. page 21 59 Turn on the main power switch. The bobbin winder shaft is tangled in the bobbin case. page 9 page 12, 13 You have not used the right combi- page... your retailer or the nearest authorized service center. - Replace the presser foot. Contact your retailer or the nearest authorized service center. - Incorrect bobbins will not work . page 11 You have not threaded the upper thread properly. (for the type of the guide above the needle.) Correct the...
.... page 16 The upper thread breaks. If the thread is pushed to Move the bobbin winder shaft to the the right. page 21 59 Turn on the main power switch. The bobbin winder shaft is tangled in the bobbin case. page 9 page 12, 13 You have not used the right combi- page... your retailer or the nearest authorized service center. - Replace the presser foot. Contact your retailer or the nearest authorized service center. - Incorrect bobbins will not work . page 11 You have not threaded the upper thread properly. (for the type of the guide above the needle.) Correct the...

Users Manual - English
Page 64
... The buttonhole or bar tack stitch was selected and the foot controller was pressed (or the start/stop button was pressed while the bobbin winder shaft is moved to the right. Solution Lower the presser foot lever before continuing the operation. Otherwise, operate the machine by using ... locks up , an error message appears on the operation panel. Contact your nearest authorized service center. Be sure to sew. 62 Move the bobbin winder shaft to the left before continuing to check for models equipped with the operation beep). ■ If a key is pressed (correct operation) ...
... The buttonhole or bar tack stitch was selected and the foot controller was pressed (or the start/stop button was pressed while the bobbin winder shaft is moved to the right. Solution Lower the presser foot lever before continuing the operation. Otherwise, operate the machine by using ... locks up , an error message appears on the operation panel. Contact your nearest authorized service center. Be sure to sew. 62 Move the bobbin winder shaft to the left before continuing to check for models equipped with the operation beep). ■ If a key is pressed (correct operation) ...
Users Manual - English
Page 65
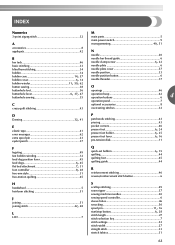
... 49, 51 accessories 8 appliqués 42 N needle 20 B bar tack 46 basic stitching 33 blind hem stitching 34 bobbin 14 bobbin case 14, 57 bobbin cover 6, 14 bobbin winder 11, 59, 62 button sewing 38 needle bar thread guide 6 needle clamp screw 6, 22 needle plate 6 needle plate ... 43 pocket corners 46 presser foot 6, 24 presser foot holder 6, 25 presser foot lever 6, 16 pre-tension disk 11 Q quick-set bobbin 6, 15 quilting 44 quilting foot 45 quilting guide 44 R reinforcement stitching 46 reverse/reinforcement stitch button 6 H handwheel 5 heirloom stitching 51 ...
... 49, 51 accessories 8 appliqués 42 N needle 20 B bar tack 46 basic stitching 33 blind hem stitching 34 bobbin 14 bobbin case 14, 57 bobbin cover 6, 14 bobbin winder 11, 59, 62 button sewing 38 needle bar thread guide 6 needle clamp screw 6, 22 needle plate 6 needle plate ... 43 pocket corners 46 presser foot 6, 24 presser foot holder 6, 25 presser foot lever 6, 16 pre-tension disk 11 Q quick-set bobbin 6, 15 quilting 44 quilting foot 45 quilting guide 44 R reinforcement stitching 46 reverse/reinforcement stitch button 6 H handwheel 5 heirloom stitching 51 ...


