Users Manual - English
Page 1
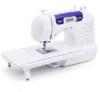
KNOWING YOUR SEWING MACHINE SEWING BASICS UTILITY STITCHES APPENDIX Computerized Sewing Machine Operation Manual
KNOWING YOUR SEWING MACHINE SEWING BASICS UTILITY STITCHES APPENDIX Computerized Sewing Machine Operation Manual
Users Manual - English
Page 2
...wrong plate can cause the needle to persons: 1. Always unplug the machine from all instructions before cleaning. Do not pull or push fabric while stitching. DANGER - To reduce the risk of electric shock: 1. This sewing machine is damaged, it must be used as described in this manual. Close... attention is necessary when the machine is used or where oxygen is required around the machine needle. 11. Do not use by pulling on cord. ...
...wrong plate can cause the needle to persons: 1. Always unplug the machine from all instructions before cleaning. Do not pull or push fabric while stitching. DANGER - To reduce the risk of electric shock: 1. This sewing machine is damaged, it must be used as described in this manual. Close... attention is necessary when the machine is used or where oxygen is required around the machine needle. 11. Do not use by pulling on cord. ...
Users Manual - English
Page 4
...that you study the manual before using the machine. Do not store anything on the needle while sewing. Plug the machine directly into the wall. Do not use • Maintaining the machine • Leaving the machine unattended 3. When storing this product are ...brother.com The contents of this manual and specifications of this machine, avoid direct sunlight and high humidity locations. Remember to turn off the power switch and unplug the cord when: • Operation is required, first follow the troubleshooting table in the back of the most advanced computerized household sewing machines...
...that you study the manual before using the machine. Do not store anything on the needle while sewing. Plug the machine directly into the wall. Do not use • Maintaining the machine • Leaving the machine unattended 3. When storing this product are ...brother.com The contents of this manual and specifications of this machine, avoid direct sunlight and high humidity locations. Remember to turn off the power switch and unplug the cord when: • Operation is required, first follow the troubleshooting table in the back of the most advanced computerized household sewing machines...
Users Manual - English
Page 5
......6 Operation buttons ...6 Operation panel ...7 Flat bed attachment ...7 ACCESSORIES ...8 Optional accessories ...8 USING YOUR SEWING MACHINE 9 Power supply precautions ...9 Power supply ...9 Foot controller ...10 Sewing speed controller (for models equipped with the start/stop button 10 Changing the needle stop position ...10... THREADING THE MACHINE 11 Winding the bobbin ...11 Lower threading ...14 Upper threading...
......6 Operation buttons ...6 Operation panel ...7 Flat bed attachment ...7 ACCESSORIES ...8 Optional accessories ...8 USING YOUR SEWING MACHINE 9 Power supply precautions ...9 Power supply ...9 Foot controller ...10 Sewing speed controller (for models equipped with the start/stop button 10 Changing the needle stop position ...10... THREADING THE MACHINE 11 Winding the bobbin ...11 Lower threading ...14 Upper threading...
Users Manual - English
Page 7
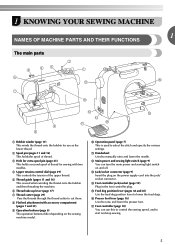
... to raise and lower the presser foot. h Flat bed attachment with two needles. m Jack/socket connector (page 9) Insert the plug on the sewing machine model. n Foot controller jack/socket (page 10) Plug in the foot controller plug. p Presser foot lever (page 16) Used to lower the...29) This controls the tension of thread. j Operation panel (page 7) This is used to start and stop sewing. 5 k Handwheel Used to cut them. 1 KNOWING YOUR SEWING MACHINE 1 NAMES OF MACHINE PARTS AND THEIR FUNCTIONS The main parts a Bobbin winder (page 11) This winds the thread onto the bobbin for...
... to raise and lower the presser foot. h Flat bed attachment with two needles. m Jack/socket connector (page 9) Insert the plug on the sewing machine model. n Foot controller jack/socket (page 10) Plug in the foot controller plug. p Presser foot lever (page 16) Used to lower the...29) This controls the tension of thread. j Operation panel (page 7) This is used to start and stop sewing. 5 k Handwheel Used to cut them. 1 KNOWING YOUR SEWING MACHINE 1 NAMES OF MACHINE PARTS AND THEIR FUNCTIONS The main parts a Bobbin winder (page 11) This winds the thread onto the bobbin for...
Users Manual - English
Page 8
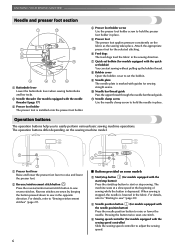
... equipped with the quickset bobbin) You can start or stop sewing. b Reverse/reinforcement stitch button Press the reverse/reinforcement stitch button to easily perform various basic sewing machine operations. When sewing is stopped, the needle is depressed. d Needle position button...Start/stop button (for models equipped with the sewing speed controller) Slide the sewing speed controller to "Sewing reinforcement stitches" (page 29). ■ Buttons provided on the sewing machine model. For details, refer to adjust the sewing speed. 6 a Presser foot lever Raise ...
... equipped with the quickset bobbin) You can start or stop sewing. b Reverse/reinforcement stitch button Press the reverse/reinforcement stitch button to easily perform various basic sewing machine operations. When sewing is stopped, the needle is depressed. d Needle position button...Start/stop button (for models equipped with the sewing speed controller) Slide the sewing speed controller to "Sewing reinforcement stitches" (page 29). ■ Buttons provided on the sewing machine model. For details, refer to adjust the sewing speed. 6 a Presser foot lever Raise ...
Users Manual - English
Page 9
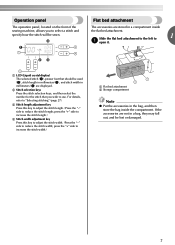
... length; Slide the flat bed attachment to the left to "Selecting stitching" (page 27). Operation panel The operation panel, located on the front of the sewing machine, allows you wish to use. Flat bed attachment The accessories are not in a compartment inside the compartment.
... length; Slide the flat bed attachment to the left to "Selecting stitching" (page 27). Operation panel The operation panel, located on the front of the sewing machine, allows you wish to use. Flat bed attachment The accessories are not in a compartment inside the compartment.
Users Manual - English
Page 10
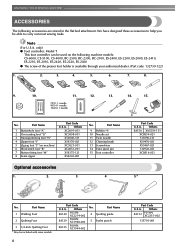
...stored in the flat bed attachment. Part Name 1 Walking Foot 2 Quilting Foot 3 1/4-Inch Quilting Foot * May be able to carry out most sewing tasks. Part Name 9 Bobbin (4) 10 Needle set 11 Twin needle 12 Cleaning brush 13 Screwdriver 14 Extra spool pin 15 Foot controller Optional accessories 1.... XC2691-031 XC3098-031 X53840-331 X59370-021 XC3021-031 XC4051-031 X59375-121 X54243-001 No. Part Code U.S.A. KNOWING YOUR SEWING MACHINE ACCESSORIES The following machine models: CS-6000, CS-5100, CS-4000, BC-2500, BC-2300, BC-2100, ES-2400, ES-2200, ES-2000, ES-2410, ES-2210, ES-...
...stored in the flat bed attachment. Part Name 1 Walking Foot 2 Quilting Foot 3 1/4-Inch Quilting Foot * May be able to carry out most sewing tasks. Part Name 9 Bobbin (4) 10 Needle set 11 Twin needle 12 Cleaning brush 13 Screwdriver 14 Extra spool pin 15 Foot controller Optional accessories 1.... XC2691-031 XC3098-031 X53840-331 X59370-021 XC3021-031 XC4051-031 X59375-121 X54243-001 No. Part Code U.S.A. KNOWING YOUR SEWING MACHINE ACCESSORIES The following machine models: CS-6000, CS-5100, CS-4000, BC-2500, BC-2300, BC-2100, ES-2400, ES-2200, ES-2000, ES-2410, ES-2210, ES-...
Users Manual - English
Page 11
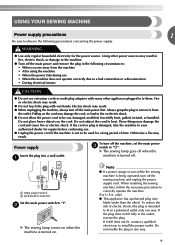
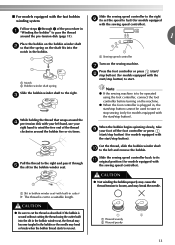
... the plug with many other ). If the cord or plug is being operated, turn off the main power first. a To turn off the sewing machine and unplug the power supply cord. If the plug does not fit fully in any way. 9 Do not modify the plug in the outlet,... shock may result. Otherwise a fire may result. ● When unplugging the machine, always turn off the machine, set the main power c switch to "{". Note ● If a power outage occurs while the sewing machine is damaged, take the machine to your authorized dealer for repairs before continuing use extension cords or multi-plug...
... the plug with many other ). If the cord or plug is being operated, turn off the main power first. a To turn off the sewing machine and unplug the power supply cord. If the plug does not fit fully in any way. 9 Do not modify the plug in the outlet,... shock may result. Otherwise a fire may result. ● When unplugging the machine, always turn off the machine, set the main power c switch to "{". Note ● If a power outage occurs while the sewing machine is damaged, take the machine to your authorized dealer for repairs before continuing use extension cords or multi-plug...
Users Manual - English
Page 12
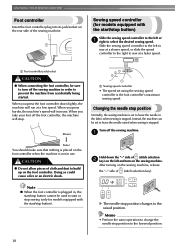
...selection key). Changing the needle stop position Normally, the sewing machine is set using the sewing speed controller is not in order to prevent the machine from accidentally being started. CAUTION ● Do not allow pieces of the sewing machine. Memo • Perform the same operation to change the...make sure that nothing is placed on the foot controller when the machine is the foot controller's maximum sewing speed. Doing so could cause a fire or an electric shock. KNOWING YOUR SEWING MACHINE Foot controller Insert the foot controller plug into its jack/socket on ...
...selection key). Changing the needle stop position Normally, the sewing machine is set using the sewing speed controller is not in order to prevent the machine from accidentally being started. CAUTION ● Do not allow pieces of the sewing machine. Memo • Perform the same operation to change the...make sure that nothing is placed on the foot controller when the machine is the foot controller's maximum sewing speed. Doing so could cause a fire or an electric shock. KNOWING YOUR SEWING MACHINE Foot controller Insert the foot controller plug into its jack/socket on ...

Users Manual - English
Page 13
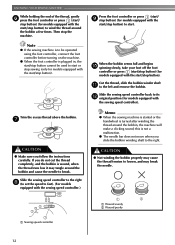
... onto the bobbin winder shaft d and slide the bobbin winder shaft to the right. THREADING THE MACHINE Winding the bobbin 1 This section describes how to wind the thread onto the bobbin. • For...same type (part code: SA156, SFB: XA5539-151). Pass the end of the bobbin Turn on the sewing machine. Pass the thread around the pre-tension disk. Turn the bobbin clockwise, by hand, until the spring... shaft b Groove of the thread through the hole on this sewing machine. a Pre-tension disk b Bobbin winder shaft c Bobbin CAUTION ● Only use the bobbin that comes with ...
... onto the bobbin winder shaft d and slide the bobbin winder shaft to the right. THREADING THE MACHINE Winding the bobbin 1 This section describes how to wind the thread onto the bobbin. • For...same type (part code: SA156, SFB: XA5539-151). Pass the end of the bobbin Turn on the sewing machine. Pass the thread around the pre-tension disk. Turn the bobbin clockwise, by hand, until the spring... shaft b Groove of the thread through the hole on this sewing machine. a Pre-tension disk b Bobbin winder shaft c Bobbin CAUTION ● Only use the bobbin that comes with ...
Users Manual - English
Page 14
...tension to fast). (For models equipped with the sewing speed controller.) Memo ● When the sewing machine is started or the handwheel is wound, when the thread runs low it may break the needle. 1 2 a Wound evenly b Wound poorly a Sewing speed controller 12 this is not a malfunction. &#...(for models equipped with the start/stop button) to break. g CAUTION ● Make sure you follow the instructions carefully. KNOWING YOUR SEWING MACHINE While holding the end of the thread, gently f press the foot controller or press (start/ stop button) (for models equipped with the...
...tension to fast). (For models equipped with the sewing speed controller.) Memo ● When the sewing machine is started or the handwheel is wound, when the thread runs low it may break the needle. 1 2 a Wound evenly b Wound poorly a Sewing speed controller 12 this is not a malfunction. &#...(for models equipped with the start/stop button) to break. g CAUTION ● Make sure you follow the instructions carefully. KNOWING YOUR SEWING MACHINE While holding the end of the thread, gently f press the foot controller or press (start/ stop button) (for models equipped with the...
Users Manual - English
Page 15
... in the bobbin winder seat, the thread may break the needle. Note ● If the sewing machine is to be used to start /stop sewing (only for models equipped with the sewing speed controller). CAUTION ● Not winding the bobbin properly may bend or break when the bobbin... a Wound evenly b Wound poorly 13 Follow steps 1 through e the slit in the bobbin. c While holding the thread that the spring on the sewing machine. If the bobbin is plugged in, the start/stop button cannot be operated using the foot controller, connect the foot controller before turning on the...
... in the bobbin winder seat, the thread may break the needle. Note ● If the sewing machine is to be used to start /stop sewing (only for models equipped with the sewing speed controller). CAUTION ● Not winding the bobbin properly may bend or break when the bobbin... a Wound evenly b Wound poorly 13 Follow steps 1 through e the slit in the bobbin. c While holding the thread that the spring on the sewing machine. If the bobbin is plugged in, the start/stop button cannot be operated using the foot controller, connect the foot controller before turning on the...

Users Manual - English
Page 16
... the needle and resulting in e place (see page 15. this sewing machine. If you accidentally step on the foot controller and the machine starts to sew, you turn the power off while threading the machine. Lower threading Install the bobbin wound with the needle position button), ...b Wound poorly ● The bobbin was designed specifically for models equipped with thread. • For more details on KNOWING YOUR SEWING MACHINE Memo ● When the sewing machine is started or the handwheel is not a malfunction. ● The needle bar does not move when you slide the bobbin winding ...
... the needle and resulting in e place (see page 15. this sewing machine. If you accidentally step on the foot controller and the machine starts to sew, you turn the power off while threading the machine. Lower threading Install the bobbin wound with the needle position button), ...b Wound poorly ● The bobbin was designed specifically for models equipped with thread. • For more details on KNOWING YOUR SEWING MACHINE Memo ● When the sewing machine is started or the handwheel is not a malfunction. ● The needle bar does not move when you slide the bobbin winding ...
Users Manual - English
Page 18
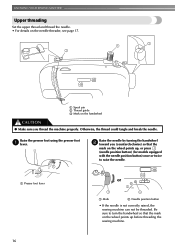
... raise the needle. Otherwise, the thread could tangle and break the needle. Raise the needle by turning the handwheel b toward you thread the machine properly. KNOWING YOUR SEWING MACHINE Upper threading Set the upper thread and thread the needle. • For details on the wheel points up before threading the... sewing machine. 16 a Spool pin b Thread guide c Mark on the handwheel CAUTION ● Make sure you (counterclockwise) so that the mark on the wheel points up...
... raise the needle. Otherwise, the thread could tangle and break the needle. Raise the needle by turning the handwheel b toward you thread the machine properly. KNOWING YOUR SEWING MACHINE Upper threading Set the upper thread and thread the needle. • For details on the wheel points up before threading the... sewing machine. 16 a Spool pin b Thread guide c Mark on the handwheel CAUTION ● Make sure you (counterclockwise) so that the mark on the wheel points up...

Users Manual - English
Page 19
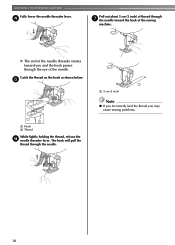
... and pull g out about 5 cm (2 inch) of the procedure in a "Upper threading" to thread the machine to left hand, then feeding the thread with your right hand. ● The needle threader can only use needles... in the wrong place, or is set incorrectly, the thread may cause sewing problems. ■ Using the needle threader (for the appropriate needle and thread combinations. Lower the presser foot...in the figure d on page 20 for models equipped with home sewing machine needles size 75/11100/16. Pull up lever from front to break.
... and pull g out about 5 cm (2 inch) of the procedure in a "Upper threading" to thread the machine to left hand, then feeding the thread with your right hand. ● The needle threader can only use needles... in the wrong place, or is set incorrectly, the thread may cause sewing problems. ■ Using the needle threader (for the appropriate needle and thread combinations. Lower the presser foot...in the figure d on page 20 for models equipped with home sewing machine needles size 75/11100/16. Pull up lever from front to break.
Users Manual - English
Page 20
e a Hook b Thread While lightly holding the thread, release the f needle threader lever. The hook will pull the thread through g the needle toward you may cause sewing problems. 18 a 5 cm (2 inch) Note ● If you incorrectly feed the thread you and the hook passes through the eye of the needle. X The end of the needle threader rotates toward the back of thread through the needle. d Pull out about 5 cm (2 inch) of the sewing machine. Catch the thread on the hook as shown below. KNOWING YOUR SEWING MACHINE Fully lower the needle threader lever.
e a Hook b Thread While lightly holding the thread, release the f needle threader lever. The hook will pull the thread through g the needle toward you may cause sewing problems. 18 a 5 cm (2 inch) Note ● If you incorrectly feed the thread you and the hook passes through the eye of the needle. X The end of the needle threader rotates toward the back of thread through the needle. d Pull out about 5 cm (2 inch) of the sewing machine. Catch the thread on the hook as shown below. KNOWING YOUR SEWING MACHINE Fully lower the needle threader lever.
Users Manual - English
Page 22
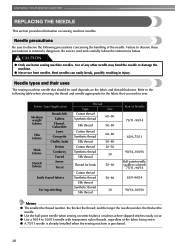
...16 needle with transparent nylon threads, regardless of any other needle may bend the needle or damage the machine. ● Never use home sewing machine needles. Fabric Type/Application Medium weight fabrics Thin fabrics Thick fabrics Stretch fabrics Broadcloth Taffeta Flannel, Gabardine Lawn...The smaller the thread number, the thicker the thread; Be sure to observe these precautions is purchased. 20 Refer to sew. KNOWING YOUR SEWING MACHINE REPLACING THE NEEDLE This section provides information on stretch fabrics or fabrics where skipped stitches easily occur. ● Use ...
...16 needle with transparent nylon threads, regardless of any other needle may bend the needle or damage the machine. ● Never use home sewing machine needles. Fabric Type/Application Medium weight fabrics Thin fabrics Thick fabrics Stretch fabrics Broadcloth Taffeta Flannel, Gabardine Lawn...The smaller the thread number, the thicker the thread; Be sure to observe these precautions is purchased. 20 Refer to sew. KNOWING YOUR SEWING MACHINE REPLACING THE NEEDLE This section provides information on stretch fabrics or fabrics where skipped stitches easily occur. ● Use ...

Users Manual - English
Page 23
...the distance between the needle and the flat surface is even. 1 2 a Mark b Needle position button Turn off the sewing machine, otherwise injuries may break while the machine is bent. Lower the presser foot lever. CAUTION ● The appropriate fabric, thread and needle combinations are shown in "... surface a Presser foot lever 21 In addition, the stitching may be uneven or puckered or there may be sure to turn off the sewing machine. Checking the needle Replacing the needle Replace the needle as described below. If the combination of the or needle on a flat surface and...
...the distance between the needle and the flat surface is even. 1 2 a Mark b Needle position button Turn off the sewing machine, otherwise injuries may break while the machine is bent. Lower the presser foot lever. CAUTION ● The appropriate fabric, thread and needle combinations are shown in "... surface a Presser foot lever 21 In addition, the stitching may be uneven or puckered or there may be sure to turn off the sewing machine. Checking the needle Replacing the needle Replace the needle as described below. If the combination of the or needle on a flat surface and...

Users Manual - English
Page 24
... sure to insert the needle until it to the needle bar. KNOWING YOUR SEWING MACHINE Hold the needle with your left hand, and then d use the screwdriver ...8226; Do not apply strong force when loosening or tightening the needle clamp screw, otherwise certain parts of the machine, slide a the needle clamp onto the needle bar so that the needle clamp screw is on the right..., f use a screwdriver to attach it touches the needle stopper. As seen from the front of the sewing machine may fall off. While holding the needle with the screwdriver, otherwise the needle may break or damage may ...
... sure to insert the needle until it to the needle bar. KNOWING YOUR SEWING MACHINE Hold the needle with your left hand, and then d use the screwdriver ...8226; Do not apply strong force when loosening or tightening the needle clamp screw, otherwise certain parts of the machine, slide a the needle clamp onto the needle bar so that the needle clamp screw is on the right..., f use a screwdriver to attach it touches the needle stopper. As seen from the front of the sewing machine may fall off. While holding the needle with the screwdriver, otherwise the needle may break or damage may ...


