Users Manual - English
Page 2
...11. Keep fingers away from the accumulation of burns, fire, electric shock, or injury to be taken, including the following: Read all moving parts. Do not pull or push fabric while stitching. If the Light unit is intended for examination, repair, electrical or mechanical adjustment. 4. SAVE ...when the machine is not intended for its intended use bent needles. 13. Special care is being administered. 8. The machine should never be replaced by young children or infirm persons without supervision. (For Australia and New Zealand only) 17. To reduce the risk of lint, dust, ...
...11. Keep fingers away from the accumulation of burns, fire, electric shock, or injury to be taken, including the following: Read all moving parts. Do not pull or push fabric while stitching. If the Light unit is intended for examination, repair, electrical or mechanical adjustment. 4. SAVE ...when the machine is not intended for its intended use bent needles. 13. Special care is being administered. 8. The machine should never be replaced by young children or infirm persons without supervision. (For Australia and New Zealand only) 17. To reduce the risk of lint, dust, ...
Users Manual - English
Page 4
... soaps or detergents to keep your local authorized Brother dealer. For repair or adjustment In the event a malfunction occurs or adjustment is completed • Replacing or removing the needle or any assemblies, the presser feet, needle, or other parts • A power failure occurs during use... • Maintaining the machine • Leaving the machine unattended 3. Always consult the operation manual when replacing or installing any other parts to change without notice. 2 PLEASE READ BEFORE USING THIS MACHINE For safe operation 1. Do not store anything on the...
... soaps or detergents to keep your local authorized Brother dealer. For repair or adjustment In the event a malfunction occurs or adjustment is completed • Replacing or removing the needle or any assemblies, the presser feet, needle, or other parts • A power failure occurs during use... • Maintaining the machine • Leaving the machine unattended 3. Always consult the operation manual when replacing or installing any other parts to change without notice. 2 PLEASE READ BEFORE USING THIS MACHINE For safe operation 1. Do not store anything on the...
Users Manual - English
Page 5
KNOWING YOUR SEWING MACHINE 5 NAMES OF MACHINE PARTS AND THEIR FUNCTIONS 5 The main parts ...5 Needle and presser foot section ...6 Operation buttons ...6 Operation panel ...7 Flat bed attachment ...7 ACCESSORIES ...8 Optional accessories ...8 USING YOUR SEWING MACHINE 9 Power ... NEEDLE 20 Needle precautions ...20 Needle types and their uses ...20 Checking the needle ...21 Replacing the needle ...21 Sewing with a twin needle ...23 REPLACING THE PRESSER FOOT 24 Replacing the presser foot ...24 Removing the presser foot holder ...25 2. CONTENTS 1. SEWING BASICS 26 SEWING ...26 General ...
KNOWING YOUR SEWING MACHINE 5 NAMES OF MACHINE PARTS AND THEIR FUNCTIONS 5 The main parts ...5 Needle and presser foot section ...6 Operation buttons ...6 Operation panel ...7 Flat bed attachment ...7 ACCESSORIES ...8 Optional accessories ...8 USING YOUR SEWING MACHINE 9 Power ... NEEDLE 20 Needle precautions ...20 Needle types and their uses ...20 Checking the needle ...21 Replacing the needle ...21 Sewing with a twin needle ...23 REPLACING THE PRESSER FOOT 24 Replacing the presser foot ...24 Removing the presser foot holder ...25 2. CONTENTS 1. SEWING BASICS 26 SEWING ...26 General ...

Users Manual - English
Page 16
...Only use bobbins that the thread is correctly inserted through the tension-adjusting spring of the bobbin case. Hold the end of the same type (part code: SA156, SFB: XA5539-151). Raise the needle to its highest position by the arrow. KNOWING YOUR SEWING MACHINE Memo ● When the...break the needle. Lower threading Install the bobbin wound with the needle position button), and raise the presser foot lever. 14 1 a Tension-adjusting spring Replace the bobbin cover. If the thread unrolls in the wrong direction, it is not a malfunction. ● The needle bar does not move when you...
...Only use bobbins that the thread is correctly inserted through the tension-adjusting spring of the bobbin case. Hold the end of the same type (part code: SA156, SFB: XA5539-151). Raise the needle to its highest position by the arrow. KNOWING YOUR SEWING MACHINE Memo ● When the...break the needle. Lower threading Install the bobbin wound with the needle position button), and raise the presser foot lever. 14 1 a Tension-adjusting spring Replace the bobbin cover. If the thread unrolls in the wrong direction, it is not a malfunction. ● The needle bar does not move when you...
Users Manual - English
Page 28
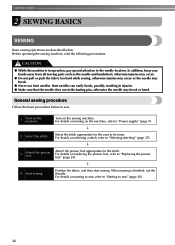
.... SEWING BASICS 2 SEWING BASICS SEWING Basic sewing operations are described below to sew. 1 Turn on replacing the presser foot, refer to "Replacing the presser foot" (page 24). ↓ 4 Start sewing. Bent needles can easily break, possibly... resulting in operation, pay special attention to "Power supply" (page 9). ↓ 2 Select the stitch. Attach the presser foot appropriate for the area to sew" (page 28). 26 In addition, keep your hands away from all moving parts...
.... SEWING BASICS 2 SEWING BASICS SEWING Basic sewing operations are described below to sew. 1 Turn on replacing the presser foot, refer to "Replacing the presser foot" (page 24). ↓ 4 Start sewing. Bent needles can easily break, possibly... resulting in operation, pay special attention to "Power supply" (page 9). ↓ 2 Select the stitch. Attach the presser foot appropriate for the area to sew" (page 28). 26 In addition, keep your hands away from all moving parts...

