Users Manual - English
Page 2
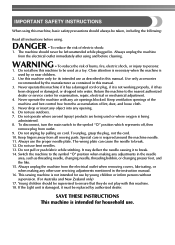
... service center for household use bent needles. 13. Do not allow this machine to the symbol "{" position which represents off, then remove plug from the accumulation of the machine and foot control free from outlet. 9. To disconnect, turn the main switch to be used... or where oxygen is intended for examination, repair, electrical or mechanical adjustment. 4. Always unplug the machine from the electrical outlet when removing covers, lubricating, or when making any air openings blocked. If the Light unit is required around the machine needle. 11. IMPORTANT SAFETY INSTRUCTIONS...
... service center for household use bent needles. 13. Do not allow this machine to the symbol "{" position which represents off, then remove plug from the accumulation of the machine and foot control free from outlet. 9. To disconnect, turn the main switch to be used... or where oxygen is intended for examination, repair, electrical or mechanical adjustment. 4. Always unplug the machine from the electrical outlet when removing covers, lubricating, or when making any air openings blocked. If the Light unit is required around the machine needle. 11. IMPORTANT SAFETY INSTRUCTIONS...
Users Manual - English
Page 21
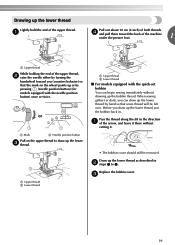
...) of both threads d and pull them toward you can begin sewing immediately without cutting it there without drawing up the bobbin thread. Replace the bobbin cover. Pass the thread along the slit in . or a Mark b Needle position button Pull on the wheel points up the lower c thread. Before...that the mark on the upper thread to 4. c 19 When sewing gathers or darts, you (counterclockwise) so that some thread will be removed. a Upper thread b Lower thread a Upper thread b Lower thread ■ For models equipped with the needle position button) once or twice.
...) of both threads d and pull them toward you can begin sewing immediately without cutting it there without drawing up the bobbin thread. Replace the bobbin cover. Pass the thread along the slit in . or a Mark b Needle position button Pull on the wheel points up the lower c thread. Before...that the mark on the upper thread to 4. c 19 When sewing gathers or darts, you (counterclockwise) so that some thread will be removed. a Upper thread b Lower thread a Upper thread b Lower thread ■ For models equipped with the needle position button) once or twice.
Users Manual - English
Page 59
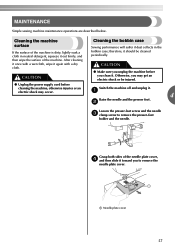
... or an Switch the machine off and unplug it should be cleaned periodically. Grasp both sides of the machine. Otherwise, you to remove the presser-foot holder and the needle. electric shock may get an electric shock or be injured. ● Unplug the power supply... occur. a 4 Raise the needle and the presser foot. b Loosen the presser-foot screw and the needle c clamp screw to remove the needle plate cover. therefore, it . After cleaning it once with a dry cloth. MAINTENANCE Simple sewing machine maintenance operations are described below. a Needle plate...
... or an Switch the machine off and unplug it should be cleaned periodically. Grasp both sides of the machine. Otherwise, you to remove the presser-foot holder and the needle. electric shock may get an electric shock or be injured. ● Unplug the power supply... occur. a 4 Raise the needle and the presser foot. b Loosen the presser-foot screw and the needle c clamp screw to remove the needle plate cover. therefore, it . After cleaning it once with a dry cloth. MAINTENANCE Simple sewing machine maintenance operations are described below. a Needle plate...
Users Manual - English
Page 60
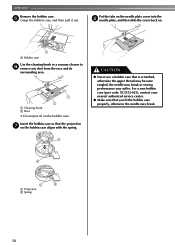
... performance may break. 2 1 2 a Projection b Spring 58 a Cleaning brush b Race • Do not put oil on . 1 a Bobbin case Use the cleaning brush or a vacuum cleaner to f remove any dust from the race and its surrounding area. Insert the bobbin case so that the projection g on the bobbin case aligns with the spring.... 1 CAUTION ● Never use a bobbin case that you fit the bobbin case properly, otherwise the needle may suffer. APPENDIX Remove the bobbin case. Put the tabs on the needle plate cover into the h needle plate, and then slide the...
... performance may break. 2 1 2 a Projection b Spring 58 a Cleaning brush b Race • Do not put oil on . 1 a Bobbin case Use the cleaning brush or a vacuum cleaner to f remove any dust from the race and its surrounding area. Insert the bobbin case so that the projection g on the bobbin case aligns with the spring.... 1 CAUTION ● Never use a bobbin case that you fit the bobbin case properly, otherwise the needle may suffer. APPENDIX Remove the bobbin case. Put the tabs on the needle plate cover into the h needle plate, and then slide the...
Users Manual - English
Page 63
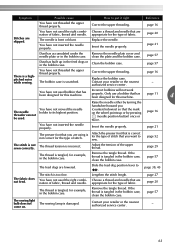
Correct the upper threading. page 20 page 21 Dust has accumulated under the Remove the needle plate cover and needle plate or in the bobbin case, clean the bobbin case. Correct the upper threading. page 16 - The thread tension is too fine. If ... the needle properly. page 52 The stitch is scratched. Adjust the tension of fabric, thread and needle. You have not threaded the upper thread properly. Remove the tangle thread. page 11 4 You have not used bobbin that the mark on . threader can not be used the right combination of fabric. page...
Correct the upper threading. page 20 page 21 Dust has accumulated under the Remove the needle plate cover and needle plate or in the bobbin case, clean the bobbin case. Correct the upper threading. page 16 - The thread tension is too fine. If ... the needle properly. page 52 The stitch is scratched. Adjust the tension of fabric, thread and needle. You have not threaded the upper thread properly. Remove the tangle thread. page 11 4 You have not used bobbin that the mark on . threader can not be used the right combination of fabric. page...


