Operation Manual
Page 1
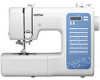
We recommend that you keep this document before using the machine. Operation Manual Sewing Machine Product Code: 888-N00/N02/N20/N22/N40/N42 CONTENTS IMPORTANT SAFETY INSTRUCTIONS 2 Names of Machine Parts 4 Main parts 4 Needle and presser ...read this document nearby for models equipped with the button fitting foot "M 21 Zipper insertion 22 Bar tack stitching 23 Making Adjustment 23 Brother Support Website Information (Downloading Manuals 24 Care and Maintenance 24 Restrictions on oiling 24 Precautions on storing the machine 24 Cleaning the machine surface 24 Cleaning the race...
We recommend that you keep this document before using the machine. Operation Manual Sewing Machine Product Code: 888-N00/N02/N20/N22/N40/N42 CONTENTS IMPORTANT SAFETY INSTRUCTIONS 2 Names of Machine Parts 4 Main parts 4 Needle and presser ...read this document nearby for models equipped with the button fitting foot "M 21 Zipper insertion 22 Bar tack stitching 23 Making Adjustment 23 Brother Support Website Information (Downloading Manuals 24 Care and Maintenance 24 Restrictions on oiling 24 Precautions on storing the machine 24 Cleaning the machine surface 24 Cleaning the race...

Operation Manual
Page 2
... iron; Do not use the machine. Never allow children to play with any adjustments in the instruction manual. • To unplug the machine, switch the machine to the symbol "O" position to the nearest authorized Brother dealer for use a damaged or incorrect needle plate, as an unsteady or slanted table, otherwise the machine...
... iron; Do not use the machine. Never allow children to play with any adjustments in the instruction manual. • To unplug the machine, switch the machine to the symbol "O" position to the nearest authorized Brother dealer for use a damaged or incorrect needle plate, as an unsteady or slanted table, otherwise the machine...

Operation Manual
Page 3
... 3 If the problem persists, please consult your authorized Brother dealer to ensure that they have been given supervision or instruction concerning use of replacing the plug fuse, use of this manual and specifications of the appliance in the manual. Do not use plugs with the fuse cover omitted.... • If the available electrical outlet is not suitable for the plug supplied with this equipment, you should be replaced by an authorized Brother dealer. •...
... 3 If the problem persists, please consult your authorized Brother dealer to ensure that they have been given supervision or instruction concerning use of replacing the plug fuse, use of this manual and specifications of the appliance in the manual. Do not use plugs with the fuse cover omitted.... • If the available electrical outlet is not suitable for the plug supplied with this equipment, you should be replaced by an authorized Brother dealer. •...
Operation Manual
Page 4
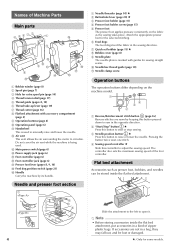
...; 8 Bobbin cover (page 8) 9 Needle plate The needle plate is used . Pressing the button twice sews one stitch. 4 Sewing speed controller ★ Slide this button to manually raise and lower the needle. Note • Before storing accessories inside the flat bed attachment, put accessories in a bag, they may fall out, and be...
...; 8 Bobbin cover (page 8) 9 Needle plate The needle plate is used . Pressing the button twice sews one stitch. 4 Sewing speed controller ★ Slide this button to manually raise and lower the needle. Note • Before storing accessories inside the flat bed attachment, put accessories in a bag, they may fall out, and be...
Operation Manual
Page 24
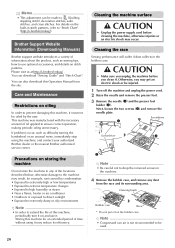
...Screwdriver 1 Screwdriver 3 2 Note • Be careful not to the machine may reduce its surrounding area. Please visit us at http://s.brother/cmkag/ . You can air is not recommended to be oiled by condensation. • Exposed to extremely high or low temperatures &#...to ensure correct operation, making periodic oiling unnecessary. Storing this machine for example, rust caused by the user. Brother Support Website Information (Downloading Manuals) Brother support website introduces a variety of oil applied to extend the life of time without using the machine, and...
...Screwdriver 1 Screwdriver 3 2 Note • Be careful not to the machine may reduce its surrounding area. Please visit us at http://s.brother/cmkag/ . You can air is not recommended to be oiled by condensation. • Exposed to extremely high or low temperatures &#...to ensure correct operation, making periodic oiling unnecessary. Storing this machine for example, rust caused by the user. Brother Support Website Information (Downloading Manuals) Brother support website introduces a variety of oil applied to extend the life of time without using the machine, and...
Operation Manual
Page 29
... is incorrect. 17 A bobbin designed for this machine is not used. 7 The needle threader cannot be used . The upper thread tension is not installed properly. Manually pass the thread through the eye of the needle. The needle is too tight. The thread tension is incompatible with stabilizer material under the pretension...
... is incorrect. 17 A bobbin designed for this machine is not used. 7 The needle threader cannot be used . The upper thread tension is not installed properly. Manually pass the thread through the eye of the needle. The needle is too tight. The thread tension is incompatible with stabilizer material under the pretension...
Sewing Guide
Page 1
Refer to first read the "IMPORTANT SAFETY INSTRUCTIONS" in the Operation Manual. Be sure to the Operation Manual for using the various utility stitches. Sewing Guide This guide describes useful sewing tips as well as procedures for detailed instruction.
Refer to first read the "IMPORTANT SAFETY INSTRUCTIONS" in the Operation Manual. Be sure to the Operation Manual for using the various utility stitches. Sewing Guide This guide describes useful sewing tips as well as procedures for detailed instruction.

Sewing Guide
Page 14
... hook-andloop fastener tape which is sewn with the needle size for sewing. When the glue adheres to "Fabric/Thread/Needle Combinations" on the Operation Manual. 1 1 Edge of the hook-and-loop fastener tape at a slow speed. If the needle does not pass through the hook-and-loop fastener tape by...
... hook-andloop fastener tape which is sewn with the needle size for sewing. When the glue adheres to "Fabric/Thread/Needle Combinations" on the Operation Manual. 1 1 Edge of the hook-and-loop fastener tape at a slow speed. If the needle does not pass through the hook-and-loop fastener tape by...
Sewing Guide
Page 16
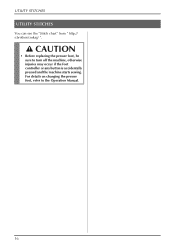
For details on changing the presser foot, refer to turn off the machine, otherwise injuries may occur if the foot controller or any button is accidentally pressed and the machine starts sewing. CAUTION • Before replacing the presser foot, be sure to the Operation Manual. 16 UTILITY STITCHES UTILITY STITCHES You can see the "Stitch chart" from " http:// s.brother/cmkag/ ".
For details on changing the presser foot, refer to turn off the machine, otherwise injuries may occur if the foot controller or any button is accidentally pressed and the machine starts sewing. CAUTION • Before replacing the presser foot, be sure to the Operation Manual. 16 UTILITY STITCHES UTILITY STITCHES You can see the "Stitch chart" from " http:// s.brother/cmkag/ ".

Sewing Guide
Page 17
...sew" on the model. e • For details, refer to "Starting to sew" on the Operation Manual. • For details on sewing reverse/ reinforcement stitches, refer to the left. * Stitches may differ depending on the Operation... Manual. 1 Stitch width keys 2 Left needle position 3 Right needle position 17 When sewing is finished, cut the ...adjusted. Start sewing. b Select a stitch. a Attach zigzag foot "J". Check stitch selections on the Operation Manual.
...sew" on the model. e • For details, refer to "Starting to sew" on the Operation Manual. • For details on sewing reverse/ reinforcement stitches, refer to the left. * Stitches may differ depending on the Operation... Manual. 1 Stitch width keys 2 Left needle position 3 Right needle position 17 When sewing is finished, cut the ...adjusted. Start sewing. b Select a stitch. a Attach zigzag foot "J". Check stitch selections on the Operation Manual.
Sewing Guide
Page 21
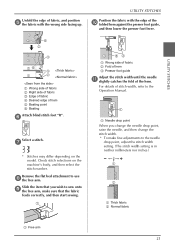
... k slightly catches the fold of hem 5 Basting point 6 Basting Attach blind stitch foot "R". UTILITY STITCHES Unfold the edge of stitch width, refer to the Operation Manual. 1 Needle drop point When you wish to sew onto i the free arm, make fine adjustments to the needle drop point, adjust the stitch width setting...
... k slightly catches the fold of hem 5 Basting point 6 Basting Attach blind stitch foot "R". UTILITY STITCHES Unfold the edge of stitch width, refer to the Operation Manual. 1 Needle drop point When you wish to sew onto i the free arm, make fine adjustments to the needle drop point, adjust the stitch width setting...

Sewing Guide
Page 33
... on the left side Align the left side of a the fabric that you wish to "Setting the stitch length and stitch width" on the Operation Manual and "Sewing an Even Seam Allowance" on the machine's body, and set the stitch width 5.5 mm (7/32 inch) and sew using stitch . 1 1 6.5 mm (1/4 inch) Memo...
... on the left side Align the left side of a the fabric that you wish to "Setting the stitch length and stitch width" on the Operation Manual and "Sewing an Even Seam Allowance" on the machine's body, and set the stitch width 5.5 mm (7/32 inch) and sew using stitch . 1 1 6.5 mm (1/4 inch) Memo...
Sewing Guide
Page 34
...is available, select " ", and at a speed between the top and bottom layers of fabric is to "Replacing the presser foot" on the Operation Manual. Baste the fabric to sew, slowly turn the handwheel toward you (counterclockwise) and check that is called "quilting". a b 1 Connecting fork 2 Needle... or break. • Before starting to be sewn using the walking foot* and the quilting guide*. * Items sold separately, please contact your authorized Brother dealer. e * Stitches may bend or break. a Remove the presser foot and the presser b foot holder. • For details, refer to be...
...is available, select " ", and at a speed between the top and bottom layers of fabric is to "Replacing the presser foot" on the Operation Manual. Baste the fabric to sew, slowly turn the handwheel toward you (counterclockwise) and check that is called "quilting". a b 1 Connecting fork 2 Needle... or break. • Before starting to be sewn using the walking foot* and the quilting guide*. * Items sold separately, please contact your authorized Brother dealer. e * Stitches may bend or break. a Remove the presser foot and the presser b foot holder. • For details, refer to be...
Sewing Guide
Page 36
...or decorative stitches or for free motion quilting of straight lines on fabric with an uneven thickness. * Items sold separately, please contact your authorized Brother dealer. Quilting foot Select a stitch. Slide the feed dog position switch, a located at a consistent speed. (For models equipped ...stitching and automatic reverse/reinforcement stitching. CAUTION • With free motion quilting, control the feeding speed of the fabric to the Operation Manual. The quilting foot* is moved faster than the sewing speed, the needle may break or other damage may differ depending on the...
...or decorative stitches or for free motion quilting of straight lines on fabric with an uneven thickness. * Items sold separately, please contact your authorized Brother dealer. Quilting foot Select a stitch. Slide the feed dog position switch, a located at a consistent speed. (For models equipped ...stitching and automatic reverse/reinforcement stitching. CAUTION • With free motion quilting, control the feeding speed of the fabric to the Operation Manual. The quilting foot* is moved faster than the sewing speed, the needle may break or other damage may differ depending on the...

Sewing Guide
Page 45
... fabrics in addition to the back. If the needle hits the presser foot, the needle may differ depending on replacing a needle, refer to the Operation Manual. • The needle threader cannot be damaged. d UTILITY STITCHES • Use a 130/705H 100/16 wing needle. • For details on ... (for models equipped with the monogramming foot "N") When sewing with the wing needle, the needle holes are enlarged, creating a lace-like decorative stitch. Manually pass the thread through the eye of 6.0 mm (15/64 inch) or less, otherwise the needle may bend or break. • After adjusting the...
... fabrics in addition to the back. If the needle hits the presser foot, the needle may differ depending on replacing a needle, refer to the Operation Manual. • The needle threader cannot be damaged. d UTILITY STITCHES • Use a 130/705H 100/16 wing needle. • For details on ... (for models equipped with the monogramming foot "N") When sewing with the wing needle, the needle holes are enlarged, creating a lace-like decorative stitch. Manually pass the thread through the eye of 6.0 mm (15/64 inch) or less, otherwise the needle may bend or break. • After adjusting the...

Stitch Chart
Page 1
... Note • The walking foot can only be used with the walking foot. • When using the twin needle, refer to the Operation Manual. *1 Twin needle can be used by attaching zigzag foot "J". For details on using the twin needle, set the machine to the twin needle mode.... For details, refer to the Operation Manual. No. Stitch Chart Memo • When any of the following stitches (reverse stitch patterns) are selected, pressing Reinforcement stitch button) will sew reverse...
... Note • The walking foot can only be used with the walking foot. • When using the twin needle, refer to the Operation Manual. *1 Twin needle can be used by attaching zigzag foot "J". For details on using the twin needle, set the machine to the twin needle mode.... For details, refer to the Operation Manual. No. Stitch Chart Memo • When any of the following stitches (reverse stitch patterns) are selected, pressing Reinforcement stitch button) will sew reverse...

Stitch Chart
Page 2
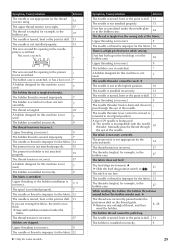
Stitch Presser foot Stitch name/Applications Stitch width (mm (inch)) Auto. 90 stitches model 80 stitches model 70 stitches model No. Manual Stitch length (mm (inch)) Auto. Manual 05*1 05*1 05*1 06 06 06 07 07 07 08*1 08*1 08*1 09*1 09*1 - 10 10 09 11 11 10 12*1 12*1 11*1 13*1 13...
Stitch Presser foot Stitch name/Applications Stitch width (mm (inch)) Auto. 90 stitches model 80 stitches model 70 stitches model No. Manual Stitch length (mm (inch)) Auto. Manual 05*1 05*1 05*1 06 06 06 07 07 07 08*1 08*1 08*1 09*1 09*1 - 10 10 09 11 11 10 12*1 12*1 11*1 13*1 13...

Stitch Chart
Page 3
Manual 22 22 19 23*1 23*1 20*1 24*1 24*1 21*1 25*1 25*1 22*1 26 26 23 27 27 24 28 28 25 29 29 26 30 ...) 3.0 - 6.0 (1/8 - 15/64) 1.5 (1/16) 1.0 - 3.0 (1/16 - 1/8) 3 Stitch Presser foot Stitch name/Applications Stitch width (mm (inch)) Auto. 90 stitches model 80 stitches model 70 stitches model No. Manual Stitch length (mm (inch)) Auto.
Manual 22 22 19 23*1 23*1 20*1 24*1 24*1 21*1 25*1 25*1 22*1 26 26 23 27 27 24 28 28 25 29 29 26 30 ...) 3.0 - 6.0 (1/8 - 15/64) 1.5 (1/16) 1.0 - 3.0 (1/16 - 1/8) 3 Stitch Presser foot Stitch name/Applications Stitch width (mm (inch)) Auto. 90 stitches model 80 stitches model 70 stitches model No. Manual Stitch length (mm (inch)) Auto.

Stitch Chart
Page 4
Stitch Presser foot Stitch name/Applications Stitch width (mm (inch)) Auto. Manual 38 38 - 39 39 33 40 40 34 41 41 35 42 42 36 43 ... 7.0 (1/4) 0.0 - 7.0 (0 - 1/4) 2.5 (3/32) 0.2 - 4.0 (1/64 - 3/16) Decorative stitch N For decoration, etc. 7.0 (1/4) 0.0 - 7.0 (0 - 1/4) 2.5 (3/32) 0.2 - 4.0 (1/64 - 3/16) 4 Use a needle between 90/14 and 100/16. Manual Stitch length (mm (inch)) Auto. Quilting appliqué zigzag stitch 3.5 (1/8) J Zigzag stitch for quilting and sewing on 0.0 - 7.0 appliqué quilt pieces (0 - 1/4) 1.4 (1/16) 0.0 - 4.0 (0 - 3/16) Quilting appliqu...
Stitch Presser foot Stitch name/Applications Stitch width (mm (inch)) Auto. Manual 38 38 - 39 39 33 40 40 34 41 41 35 42 42 36 43 ... 7.0 (1/4) 0.0 - 7.0 (0 - 1/4) 2.5 (3/32) 0.2 - 4.0 (1/64 - 3/16) Decorative stitch N For decoration, etc. 7.0 (1/4) 0.0 - 7.0 (0 - 1/4) 2.5 (3/32) 0.2 - 4.0 (1/64 - 3/16) 4 Use a needle between 90/14 and 100/16. Manual Stitch length (mm (inch)) Auto. Quilting appliqué zigzag stitch 3.5 (1/8) J Zigzag stitch for quilting and sewing on 0.0 - 7.0 appliqué quilt pieces (0 - 1/4) 1.4 (1/16) 0.0 - 4.0 (0 - 3/16) Quilting appliqu...

Stitch Chart
Page 5
... N For decoration, etc. Manual 7.0 (1/4) 0.0 - 7.0 (0 - 1/4) 7.0 (1/4) 0.0 - 7.0 (0 - 1/4) 7.0 (1/4) 0.0 - 7.0 (0 - 1/4) 7.0 (1/4) 0.0 - 7.0 (0 - 1/4) 7.0 (1/4) 0.0 - 7.0 (0 - 1/4) 7.0 (1/4) 0.0 - 7.0 (0 - 1/4) 7.0 (1/4) 0.0 - 7.0 (0 - 1/4) 7.0 (1/4) 0.0 - 7.0 (0 - 1/4) 7.0 (1/4) 0.0 - 7.0 (0 - 1/4) 7.0 (1/4) 0.0 - 7.0 (0 - 1/4) 7.0 (1/4) 0.0 - 7.0 (0 - 1/4) 7.0 (1/4) 0.0 - 7.0 (0 - 1/4) 5.0 (3/16) 0.0 - 7.0 (0 - 1/4) 7.0 (1/4) 0.0 - 7.0 (0 - 1/4) 7.0 (1/4) 0.0 - 7.0 (0 - 1/4) 7.0 (1/4) 0.0 - 7.0 ... decoration, etc. 5 Stitch width (mm (inch)) Auto. Manual Stitch length (mm (inch)) Auto.
... N For decoration, etc. Manual 7.0 (1/4) 0.0 - 7.0 (0 - 1/4) 7.0 (1/4) 0.0 - 7.0 (0 - 1/4) 7.0 (1/4) 0.0 - 7.0 (0 - 1/4) 7.0 (1/4) 0.0 - 7.0 (0 - 1/4) 7.0 (1/4) 0.0 - 7.0 (0 - 1/4) 7.0 (1/4) 0.0 - 7.0 (0 - 1/4) 7.0 (1/4) 0.0 - 7.0 (0 - 1/4) 7.0 (1/4) 0.0 - 7.0 (0 - 1/4) 7.0 (1/4) 0.0 - 7.0 (0 - 1/4) 7.0 (1/4) 0.0 - 7.0 (0 - 1/4) 7.0 (1/4) 0.0 - 7.0 (0 - 1/4) 7.0 (1/4) 0.0 - 7.0 (0 - 1/4) 5.0 (3/16) 0.0 - 7.0 (0 - 1/4) 7.0 (1/4) 0.0 - 7.0 (0 - 1/4) 7.0 (1/4) 0.0 - 7.0 (0 - 1/4) 7.0 (1/4) 0.0 - 7.0 ... decoration, etc. 5 Stitch width (mm (inch)) Auto. Manual Stitch length (mm (inch)) Auto.


