
Users Manual - English
Page 1
Operation Manual Sewing Machine Product Code: 885-V60/V61/V62/V63/V64/V65 KNOWING YOUR SEWING MACHINE SEWING BASICS UTILITY STITCHES APPENDIX Please visit us at http://solutions.brother.com where you can get product support and answers to frequently asked questions (FAQs).
Operation Manual Sewing Machine Product Code: 885-V60/V61/V62/V63/V64/V65 KNOWING YOUR SEWING MACHINE SEWING BASICS UTILITY STITCHES APPENDIX Please visit us at http://solutions.brother.com where you can get product support and answers to frequently asked questions (FAQs).
Users Manual - English
Page 3
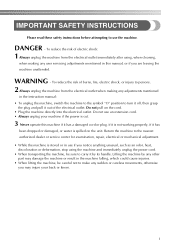
... To reduce the risk of electric shock: 1 Always unplug the machine from the electrical outlet when making any user servicing adjustments mentioned in the instruction manual: • To unplug the machine, switch the machine to the symbol "O" position to turn it off, then grasp the plug and pull it ...by any other part may injure your machine if the power is cut. 3 Never operate this manual, or if you are leaving the machine unattended. Do not use the machine. IMPORTANT SAFETY INSTRUCTIONS Please read these safety instructions before attempting to ...
... To reduce the risk of electric shock: 1 Always unplug the machine from the electrical outlet when making any user servicing adjustments mentioned in the instruction manual: • To unplug the machine, switch the machine to the symbol "O" position to turn it off, then grasp the plug and pull it ...by any other part may injure your machine if the power is cut. 3 Never operate this manual, or if you are leaving the machine unattended. Do not use the machine. IMPORTANT SAFETY INSTRUCTIONS Please read these safety instructions before attempting to ...
Users Manual - English
Page 4
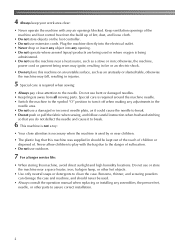
... the case. Special care is required when sewing: • Always pay close attention is necessary when the machine is used . • Always consult the operation manual when replacing or installing any air openings blocked. 4 Always keep your work area clear: • Never operate the machine with the bag due to the...
... the case. Special care is required when sewing: • Always pay close attention is necessary when the machine is used . • Always consult the operation manual when replacing or installing any air openings blocked. 4 Always keep your work area clear: • Never operate the machine with the bag due to the...

Users Manual - English
Page 5
...Use accessories recommended by the manufacturer as marked on plug. • Always replace the fuse cover. carrying the mark, rating as contained in this manual. 8 For repair or adjustment: • If the Light unit (light-emitting diode) is damaged, it must be supervised to inspect and adjust... the machine yourself. Children should contact your local authorized Brother dealer. Never use of this product are subject to change without notice. FOR USERS IN THE UK, EIRE, MALTA AND CYPRUS ONLY ...
...Use accessories recommended by the manufacturer as marked on plug. • Always replace the fuse cover. carrying the mark, rating as contained in this manual. 8 For repair or adjustment: • If the Light unit (light-emitting diode) is damaged, it must be supervised to inspect and adjust... the machine yourself. Children should contact your local authorized Brother dealer. Never use of this product are subject to change without notice. FOR USERS IN THE UK, EIRE, MALTA AND CYPRUS ONLY ...
Users Manual - English
Page 10
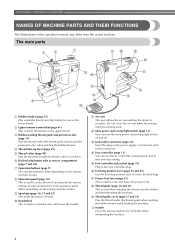
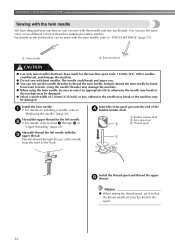
... vent allows the air surrounding the motor to start and stop sewing. Do not cover the air vent while the sewing machine is used to manually raise and lower the needle. s Thread guide cover (page 17 and 23) Pass the thread under this to control the sewing speed, and to circulate... switch (page 12) You can use as the lower thread. c Bobbin-winding thread guide and pretension disc (page 15) Pass the thread under this operation manual may differ from the actual machine.
... vent allows the air surrounding the motor to start and stop sewing. Do not cover the air vent while the sewing machine is used to manually raise and lower the needle. s Thread guide cover (page 17 and 23) Pass the thread under this to control the sewing speed, and to circulate... switch (page 12) You can use as the lower thread. c Bobbin-winding thread guide and pretension disc (page 15) Pass the thread under this operation manual may differ from the actual machine.

Users Manual - English
Page 12
... above) of models where the presser foot type appears above the number of the sewing machine, allows you wish to raise the spool pin. This manual shows, as shown in the illustration. KNOWING YOUR SEWING MACHINE Operation panel The operation panel, located on the front of the selected stitch. CAUTION ●...
... above) of models where the presser foot type appears above the number of the sewing machine, allows you wish to raise the spool pin. This manual shows, as shown in the illustration. KNOWING YOUR SEWING MACHINE Operation panel The operation panel, located on the front of the selected stitch. CAUTION ●...
Users Manual - English
Page 34
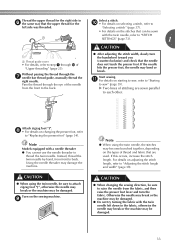
... it so that have designed your machine so you . ● You can use the needle threader to "STITCH SETTINGS" (page 73). Install the twin needle. Manually thread the left needle. Using the needle threader may damage the machine. ● When using the twin needle, be sure to select an appropriate stitch...
... it so that have designed your machine so you . ● You can use the needle threader to "STITCH SETTINGS" (page 73). Install the twin needle. Manually thread the left needle. Using the needle threader may damage the machine. ● When using the twin needle, be sure to select an appropriate stitch...
Users Manual - English
Page 35
... details, refer to "Replacing the presser foot" (page 34). k For details on changing the presser foot, refer to step a through the g needle bar thread guide, manually thread the right needle. X Two lines of "Upper threading" (page 23). h • For details on starting to sew, refer to "Starting to "Adjusting the stitch...
... details, refer to "Replacing the presser foot" (page 34). k For details on changing the presser foot, refer to step a through the g needle bar thread guide, manually thread the right needle. X Two lines of "Upper threading" (page 23). h • For details on starting to sew, refer to "Starting to "Adjusting the stitch...
Users Manual - English
Page 39
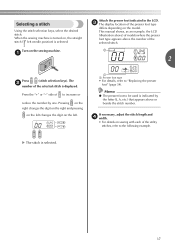
... the right and pressing on the left changes the digit on the model. Selecting a stitch Using the stitch selection keys, select the desired stitch. This manual shows, as an example, the LCD (illustration above) of the presser foot type differs depending on the left needle position) is indicated by one.
... the right and pressing on the left changes the digit on the model. Selecting a stitch Using the stitch selection keys, select the desired stitch. This manual shows, as an example, the LCD (illustration above) of the presser foot type differs depending on the left needle position) is indicated by one.

Users Manual - English
Page 47
... to join together seams and finish them in one operation. a Select a stitch. Stitch Width Stitch Length [mm (inch.)] [mm (inch.)] Stitch Name Application Auto Auto Manual Manual 3 Zigzag stitch J 04 04 04 04 04 04 04 Overcasting and attaching appliqués 3.5 (1/8) 0.0-7.0 (0-1/4) 1.4 (1/16) 0.0-4.0 (0-3/16) ** Yes ( J ) * Yes Rev. 3-point zigzag stitch J 05 05 05...
... to join together seams and finish them in one operation. a Select a stitch. Stitch Width Stitch Length [mm (inch.)] [mm (inch.)] Stitch Name Application Auto Auto Manual Manual 3 Zigzag stitch J 04 04 04 04 04 04 04 Overcasting and attaching appliqués 3.5 (1/8) 0.0-7.0 (0-1/4) 1.4 (1/16) 0.0-4.0 (0-3/16) ** Yes ( J ) * Yes Rev. 3-point zigzag stitch J 05 05 05...

Users Manual - English
Page 49
... presser foot. a Stitch width b Stitch width adjustment key c Left needle position d Right needle position 47 Application Stitch Width Stitch Length [mm (inch.)] [mm (inch.)] Auto Manual Auto Manual Left J 00 00 00 00 00 00 00 Basic stitching, sewing gathers or pintucks, etc. 0.0 (0) 0.0-7.0 (0-1/4) 2.5 (3/32) 0.2-5.0 (1/64-3/16) ** Yes ( J ) * Yes Rev. J 02 02 02...
... presser foot. a Stitch width b Stitch width adjustment key c Left needle position d Right needle position 47 Application Stitch Width Stitch Length [mm (inch.)] [mm (inch.)] Auto Manual Auto Manual Left J 00 00 00 00 00 00 00 Basic stitching, sewing gathers or pintucks, etc. 0.0 (0) 0.0-7.0 (0-1/4) 2.5 (3/32) 0.2-5.0 (1/64-3/16) ** Yes ( J ) * Yes Rev. J 02 02 02...

Users Manual - English
Page 50
... or (start/stop button) is too short, the fabric will be achieved. Stitch Width Stitch Length [mm (inch.)] [mm (inch.)] Stitch Name Application Auto Manual Auto Manual Blind hem stitch R 10 10 10 09 09 09 09 Blind hem stitching on medium weight fabrics R 11 11 11 10 10 10 10 Blind...
... or (start/stop button) is too short, the fabric will be achieved. Stitch Width Stitch Length [mm (inch.)] [mm (inch.)] Stitch Name Application Auto Manual Auto Manual Blind hem stitch R 10 10 10 09 09 09 09 Blind hem stitching on medium weight fabrics R 11 11 11 10 10 10 10 Blind...

Users Manual - English
Page 53
... medium weight fabrics 5.0 (3/16) 0.5 (1/32) 3.0-5.0 0.2-1.0 No No (1/8-3/16) (1/64-1/16) * Auto Rfc. Stitch Name Application Stitch Width Stitch Length [mm (inch.)] [mm (inch.)] Auto Manual Auto Manual Horizontal buttonholes A 34 34 34 29 29 29 25 on . Keyhole buttonholes for quilting) Appliqué quilting, free- 3.5 (1/8) 1.4 (1/16) J 46 46 46 40 40 - - Keyhole...
... medium weight fabrics 5.0 (3/16) 0.5 (1/32) 3.0-5.0 0.2-1.0 No No (1/8-3/16) (1/64-1/16) * Auto Rfc. Stitch Name Application Stitch Width Stitch Length [mm (inch.)] [mm (inch.)] Auto Manual Auto Manual Horizontal buttonholes A 34 34 34 29 29 29 25 on . Keyhole buttonholes for quilting) Appliqué quilting, free- 3.5 (1/8) 1.4 (1/16) J 46 46 46 40 40 - - Keyhole...
Users Manual - English
Page 59
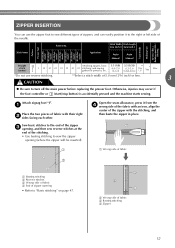
Stitch Width Stitch Length [mm (inch.)] [mm (inch.)] Stitch Name Application Auto Manual Auto Manual Straight stitch (center) I Attaching zippers, basic 01 01 01 01 01 01 01 stitching, and sewing gathers or pintucks, etc. 3.5 (1/8) 0.0-7.0 (0-1/4) 2.5 (3/32) 0.2-5.0 (1/64-3/16) ** Yes ( J ) * Yes ...
Stitch Width Stitch Length [mm (inch.)] [mm (inch.)] Stitch Name Application Auto Manual Auto Manual Straight stitch (center) I Attaching zippers, basic 01 01 01 01 01 01 01 stitching, and sewing gathers or pintucks, etc. 3.5 (1/8) 0.0-7.0 (0-1/4) 2.5 (3/32) 0.2-5.0 (1/64-3/16) ** Yes ( J ) * Yes ...

Users Manual - English
Page 61
... elastic tape to turn off the main power before replacing the presser foot. Stitch Name Application Stitch Width Stitch Length [mm (inch.)] [mm (inch.)] Auto Manual Auto Manual Stretch stitch J 03 03 03 03 03 03 03 Sewing stretch fabrics and decorative stitching 1.0 (1/16) 1.0-3.0 (1/16-1/8) 2.5 (3/32) 1.0-4.0 (1/16-3/16) Yes ( J ) No Rfc. 3-point...
... elastic tape to turn off the main power before replacing the presser foot. Stitch Name Application Stitch Width Stitch Length [mm (inch.)] [mm (inch.)] Auto Manual Auto Manual Stretch stitch J 03 03 03 03 03 03 03 Sewing stretch fabrics and decorative stitching 1.0 (1/16) 1.0-3.0 (1/16-1/8) 2.5 (3/32) 1.0-4.0 (1/16-3/16) Yes ( J ) No Rfc. 3-point...

Users Manual - English
Page 63
... or (start/stop button) is accidentally pressed and the machine starts sewing. 61 Stitch Width Stitch Length [mm (inch.)] [mm (inch.)] Stitch Name Application Auto Manual Auto Manual Zigzag stitch J 04 04 04 04 04 04 04 Overcasting and attaching appliqués 3.5 (1/8) 0.0-7.0 (0-1/4) 1.4 (1/16) 0.0-4.0 (0-3/16) ** Yes ( J ) * Yes Rev. J 44 44 44 38 38...
... or (start/stop button) is accidentally pressed and the machine starts sewing. 61 Stitch Width Stitch Length [mm (inch.)] [mm (inch.)] Stitch Name Application Auto Manual Auto Manual Zigzag stitch J 04 04 04 04 04 04 04 Overcasting and attaching appliqués 3.5 (1/8) 0.0-7.0 (0-1/4) 1.4 (1/16) 0.0-4.0 (0-3/16) ** Yes ( J ) * Yes Rev. J 44 44 44 38 38...

Users Manual - English
Page 68
... the markings on the presser foot scale is accidentally pressed and the machine starts sewing. Application Stitch Width Stitch Length [mm (inch.)] [mm (inch.)] Auto Manual Auto Manual Triple stretch stitch J Attaching sleeves, sew- 02 02 02 02 02 02 02 ing inseams, sewing stretch fabrics and deco- a Determine the desired length...
... the markings on the presser foot scale is accidentally pressed and the machine starts sewing. Application Stitch Width Stitch Length [mm (inch.)] [mm (inch.)] Auto Manual Auto Manual Triple stretch stitch J Attaching sleeves, sew- 02 02 02 02 02 02 02 ing inseams, sewing stretch fabrics and deco- a Determine the desired length...

Users Manual - English
Page 70
Stitch Name Application Stitch Width Stitch Length [mm (inch.)] [mm (inch.)] Auto Manual Auto Manual Fagoting stitch J 19 19 19 17 17 17 17 Fagoting, smocking and decorative stitching 5.0 (3/16) 2.5 (3/32) * 0.0-7.0 1.0-4.0 Yes No (0-1/4) (1/16-3/16) ( J ) Rfc. J 16 16 16 15 ...
Stitch Name Application Stitch Width Stitch Length [mm (inch.)] [mm (inch.)] Auto Manual Auto Manual Fagoting stitch J 19 19 19 17 17 17 17 Fagoting, smocking and decorative stitching 5.0 (3/16) 2.5 (3/32) * 0.0-7.0 1.0-4.0 Yes No (0-1/4) (1/16-3/16) ( J ) Rfc. J 16 16 16 15 ...

Users Manual - English
Page 71
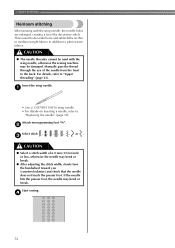
.... 3 1 2 a Thin paper or water soluble stabilizer b Basting stitching c 4 mm (3/16 inch) Attach zigzag foot "J". Application Stitch Width Stitch Length [mm (inch.)] [mm (inch.)] Auto Manual Auto Manual Decorative stitch N 31 31 31 28 28 28 - loom stitching, etc. (1/16-1/4) (1/16-3/16) CAUTION 3 ● Be sure to "Selecting a stitch" (page 37). This stitch...
.... 3 1 2 a Thin paper or water soluble stabilizer b Basting stitching c 4 mm (3/16 inch) Attach zigzag foot "J". Application Stitch Width Stitch Length [mm (inch.)] [mm (inch.)] Auto Manual Auto Manual Decorative stitch N 31 31 31 28 28 28 - loom stitching, etc. (1/16-1/4) (1/16-3/16) CAUTION 3 ● Be sure to "Selecting a stitch" (page 37). This stitch...
Users Manual - English
Page 74
... the wing needle, otherwise the sewing machine may be used to decorate hems and tablecloths on inserting a needle, refer to "Replacing the needle" (page 30). Manually pass the thread through the eye of 6.0 mm (15/64 inch) or less, otherwise the needle may bend or break. Start sewing.
... the wing needle, otherwise the sewing machine may be used to decorate hems and tablecloths on inserting a needle, refer to "Replacing the needle" (page 30). Manually pass the thread through the eye of 6.0 mm (15/64 inch) or less, otherwise the needle may bend or break. Start sewing.


