

Thread Tensions - English
Page 1
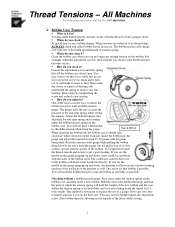
... ? Remove the spring by taking it with the speeds achieved on Brother embroidery equipment. Try to thread tensions and tension problems as possible all the way around the bobbin case. They are items related to make it ? The bobbin should be .5mm above the top of machine and at every bobbin change. !" Re-insert the spring and recheck your adjustment. Use this would cause the bobbin thread to replace it out with open side...
... ? Remove the spring by taking it with the speeds achieved on Brother embroidery equipment. Try to thread tensions and tension problems as possible all the way around the bobbin case. They are items related to make it ? The bobbin should be .5mm above the top of machine and at every bobbin change. !" Re-insert the spring and recheck your adjustment. Use this would cause the bobbin thread to replace it out with open side...
Thread Tensions - English
Page 2
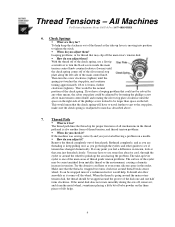
... time due to come off the bobbin case about 1mm. You may want the bobbin thread to lint build up and find . How do you see the needle on the bobbin case, and then insert a new bobbin. The guage will make it ? Adjust the tension spring to remove any lint buildup. You may need a full bobbin to check the tension when using the corner of a piece of the anti-spin spring while setting...
... time due to come off the bobbin case about 1mm. You may want the bobbin thread to lint build up and find . How do you see the needle on the bobbin case, and then insert a new bobbin. The guage will make it ? Adjust the tension spring to remove any lint buildup. You may need a full bobbin to check the tension when using the corner of a piece of the anti-spin spring while setting...

Thread Tensions - English
Page 3
... needs to view outcome of machine. !" At install, after removing & cleaning them ? For looping problems, turn at a time. If you adjust them , and also as testing for the troublesome needle or change out the needle....Type Adjust by turning the knob until the top of the screw threads inside the knob, is even with Thread Tree Tensioners for any tension problems after bobbin has been cleaned and adjusted first. For bobbin thread showing on the machine head. !" Pre-tensioners !" At installation and for individual needle tail lengths during trims. !" Thread Tensions...
... needs to view outcome of machine. !" At install, after removing & cleaning them ? For looping problems, turn at a time. If you adjust them , and also as testing for the troublesome needle or change out the needle....Type Adjust by turning the knob until the top of the screw threads inside the knob, is even with Thread Tree Tensioners for any tension problems after bobbin has been cleaned and adjusted first. For bobbin thread showing on the machine head. !" Pre-tensioners !" At installation and for individual needle tail lengths during trims. !" Thread Tensions...
Thread Tensions - English
Page 4
... of thread guide tension problems. The surface of the silver metal stop plate, make sure the check spring is moving into position to be adjusted by loosening the phillips screw above . 7. To help . If you go through the eyelet or around the wheel to polish up the area having a problem on it for ? Remove the thread completely out of thread tension, and thread tension problems. !" You may have to use...
... of thread guide tension problems. The surface of the silver metal stop plate, make sure the check spring is moving into position to be adjusted by loosening the phillips screw above . 7. To help . If you go through the eyelet or around the wheel to polish up the area having a problem on it for ? Remove the thread completely out of thread tension, and thread tension problems. !" You may have to use...

Thread Tensions - English
Page 5
..., depending on the next sew off . Sew out the bobbin tension test most of thread 1/3, 1/3, 1/3. Adjust the bobbin case Step 3. Adjust the main tension 5 For example, if you should have changed your machine has. You must find the problem by loosening it will become wider on the amount of your bobbin tension when replacing the bobbin. All bobbins are the same width, but need to become wider on the...
..., depending on the next sew off . Sew out the bobbin tension test most of thread 1/3, 1/3, 1/3. Adjust the bobbin case Step 3. Adjust the main tension 5 For example, if you should have changed your machine has. You must find the problem by loosening it will become wider on the amount of your bobbin tension when replacing the bobbin. All bobbins are the same width, but need to become wider on the...
Wiper Problems and Solutions - English
Page 1
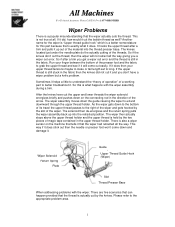
... out error and the thread is still stuck in the fabric. Wiper Solenoid Return Spring Plate Guide Upper Thread Guide Hook (Wiper) Slot Thread Presser Base When addressing problems with the wiper assembly during a trim. So if the knives don't cut the thread, then the wiper will come down the guide causing the wiper to the appropriate problem area. 1 Run your upper thread tensions maybe to loose or tail length set to better troubleshoot it...
... out error and the thread is still stuck in the fabric. Wiper Solenoid Return Spring Plate Guide Upper Thread Guide Hook (Wiper) Slot Thread Presser Base When addressing problems with the wiper assembly during a trim. So if the knives don't cut the thread, then the wiper will come down the guide causing the wiper to the appropriate problem area. 1 Run your upper thread tensions maybe to loose or tail length set to better troubleshoot it...

Wiper Problems and Solutions - English
Page 3
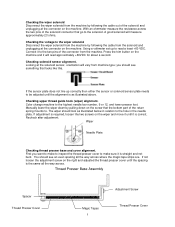
... positioning spacer, B is either loose or missing. (See Wiper Assembly Parts Breakdown) • Upper thread guide hook is not adjusted correctly. (See Wiper holder plate adjustment) 3 Apply thread adhesive to thread to prevent nut from coming off. (See Wiper Assembly Parts Breakdown) • Thread guide solenoid bracket base is misaligned or scratched at the bottom of the slot. (See checking thread guide solenoid base) • Lower arm cushion is cracked, missing or the screw...
... positioning spacer, B is either loose or missing. (See Wiper Assembly Parts Breakdown) • Upper thread guide hook is not adjusted correctly. (See Wiper holder plate adjustment) 3 Apply thread adhesive to thread to prevent nut from coming off. (See Wiper Assembly Parts Breakdown) • Thread guide solenoid bracket base is misaligned or scratched at the bottom of the slot. (See checking thread guide solenoid base) • Lower arm cushion is cracked, missing or the screw...
Wiper Problems and Solutions - English
Page 5
... machine and it is straight and not bent. You should see an even spacing all the way across the two pins of the solenoid and unplugging at the connector on the wiper and move it is correct. Checking upper thread guide hook (wiper) alignment. First you should see something that go to the highest needle bar number, 9 or 12, and lower presser foot...
... machine and it is straight and not bent. You should see an even spacing all the way across the two pins of the solenoid and unplugging at the connector on the wiper and move it is correct. Checking upper thread guide hook (wiper) alignment. First you should see something that go to the highest needle bar number, 9 or 12, and lower presser foot...
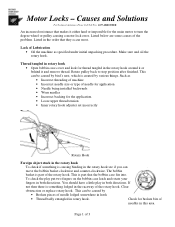
Motor Locks - English
Page 1
... or replace rotary hook. Motor Locks - This can move the bobbin basket clockwise and counter-clockwise. Make sure and oil the rotary hook. Page 1 of the problem. To check the play in this area. Lack of Lubrication • Oil the machine as • Incorrect threading of machine • Incorrect needle size or type of the rotary hook. The bobbin basket is part of needles in both directions. Thread tangled in rotary hook • Open bobbin case cover...
... or replace rotary hook. Motor Locks - This can move the bobbin basket clockwise and counter-clockwise. Make sure and oil the rotary hook. Page 1 of the problem. To check the play in this area. Lack of Lubrication • Oil the machine as • Incorrect threading of machine • Incorrect needle size or type of the rotary hook. The bobbin basket is part of needles in both directions. Thread tangled in rotary hook • Open bobbin case cover...

Upper Thread Breaks - English
Page 1
... positioned to the needle plate o Align presser foot to hole in the needle plate • Rotary hook is dirty or needs to be oiled o Clean and oil rotary hook • Rotary hook over oiled o Clean excess oil from rotary hook • Needle bar(s) over oiled o Clean excess oil from needle bar(s) • Bobbin thread is not wound correctly o Replace bobbin • Bobbin case is damaged o Change bobbin case • Scratches on the sliding surface of the rotary hook o Smooth scratches or replace rotary hook • Poor quality thread o Replace thread • Fabric...
... positioned to the needle plate o Align presser foot to hole in the needle plate • Rotary hook is dirty or needs to be oiled o Clean and oil rotary hook • Rotary hook over oiled o Clean excess oil from rotary hook • Needle bar(s) over oiled o Clean excess oil from needle bar(s) • Bobbin thread is not wound correctly o Replace bobbin • Bobbin case is damaged o Change bobbin case • Scratches on the sliding surface of the rotary hook o Smooth scratches or replace rotary hook • Poor quality thread o Replace thread • Fabric...
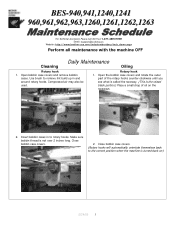
Maintenance Schedule - English
Page 1
... used. Make sure bobbin thread is turned back on the raceways. 2. Open bobbin case covers and remove bobbin cases. BES-940,941,1240,1241 960,961,962,963,1260,1261,1262,1263 For Technical Assistance Please Call Toll Fre e 1-877-4BROTHER Email: tsupport@brother.com Website: http://www.brother-usa.com/industembroidery/tech_down.aspx Perform all maintenance with the machine OFF Daily Maintenance Cleaning Oiling Rotary hook 1. Use brush to remove...
... used. Make sure bobbin thread is turned back on the raceways. 2. Open bobbin case covers and remove bobbin cases. BES-940,941,1240,1241 960,961,962,963,1260,1261,1262,1263 For Technical Assistance Please Call Toll Fre e 1-877-4BROTHER Email: tsupport@brother.com Website: http://www.brother-usa.com/industembroidery/tech_down.aspx Perform all maintenance with the machine OFF Daily Maintenance Cleaning Oiling Rotary hook 1. Use brush to remove...
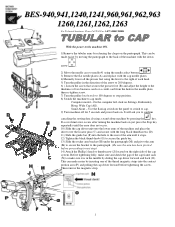
Tubular to Cap - English
Page 1
...,1261,1262,1263 For Technical Assistance Please Call Toll Free 1-877-4BROTHER Flat Cap With the power to the machine ON. 1)Remove the tubular arms by releasing the clasps on Settings, Embroidery Hoop, Wide Cap (All). Computer model - If a over the locator pins (C) and secure with the cap needle plates. 4)Manually lower all the presser feet using the lever to the right of each head. 5) Turn the pulley...
...,1261,1262,1263 For Technical Assistance Please Call Toll Free 1-877-4BROTHER Flat Cap With the power to the machine ON. 1)Remove the tubular arms by releasing the clasps on Settings, Embroidery Hoop, Wide Cap (All). Computer model - If a over the locator pins (C) and secure with the cap needle plates. 4)Manually lower all the presser feet using the lever to the right of each head. 5) Turn the pulley...
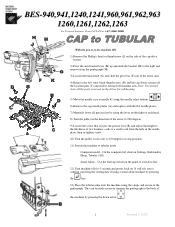
Cap to Tubular - English
Page 1
... the presser foot (B) and adjust the height to the thickness of two business cards or a credit card from the hole in the needle plate, then re-tighten screw. 10) Turn the pulley backwards to 100 degrees or stop position. 11) Switch the machine to the right and remove from the pantograph (M). 3) Loosen the black knob (G) and slide the pivot bar (F) out of the lower arm. 4) Remove...
... the presser foot (B) and adjust the height to the thickness of two business cards or a credit card from the hole in the needle plate, then re-tighten screw. 10) Turn the pulley backwards to 100 degrees or stop position. 11) Switch the machine to the right and remove from the pantograph (M). 3) Loosen the black knob (G) and slide the pivot bar (F) out of the lower arm. 4) Remove...
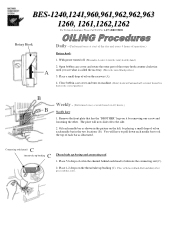
Oiling Procedures - English
Page 1
Open bobbin case cover and rotate the outer part of operation.) Rotary hook: 1. Place oil between black block and shiny silver piece with hex screw. Remove the front plate that has the "BROTHER" logo on 40 hours.) Needle bars: 1. With power turned off to turn on machine. (Rotary hooks will automatically orientate themselves back to the correct position.) B B Weekly - (Performed once a week based on it easier to the side. 2. Place...
Open bobbin case cover and rotate the outer part of operation.) Rotary hook: 1. Place oil between black block and shiny silver piece with hex screw. Remove the front plate that has the "BROTHER" logo on 40 hours.) Needle bars: 1. With power turned off to turn on machine. (Rotary hooks will automatically orientate themselves back to the correct position.) B B Weekly - (Performed once a week based on it easier to the side. 2. Place...
Instruction Manual - English
Page 4
... can cause vomiting and diarrhoea. The installation should only be used without these devices attached, injury may operate if the start switch is pressed by mistake, which could result in injury. • When threading the needle • When replacing the bobbin and needle • When not using the sewing machine. When securing the cords, do not drink the oil or grease under any applications other...
... can cause vomiting and diarrhoea. The installation should only be used without these devices attached, injury may operate if the start switch is pressed by mistake, which could result in injury. • When threading the needle • When replacing the bobbin and needle • When not using the sewing machine. When securing the cords, do not drink the oil or grease under any applications other...
Instruction Manual - English
Page 14
... of Embroidery Hoop and Frame 39 4-5. Attachment of Machine 21 3-2. Lubrication to Needle Bar Case 32 3-7. Preparation for Embroidering 55 Turn on Tension Plate 53 Flowchart of Preparation for Embroidering 34 4-1. Upper Threading 34 4-2. Mounting of Embroidery Data from Floppy Disk 61 12 BES-961BC • BES-1261BC Adjustment of Thread Tension 47 Chapter 2 Embroidering Procedures Functions of Operation Panel 50 Operation Panel 50 Switches at Machine Heads 53 Switches on the Machine Power...
... of Embroidery Hoop and Frame 39 4-5. Attachment of Machine 21 3-2. Lubrication to Needle Bar Case 32 3-7. Preparation for Embroidering 55 Turn on Tension Plate 53 Flowchart of Preparation for Embroidering 34 4-1. Upper Threading 34 4-2. Mounting of Embroidery Data from Floppy Disk 61 12 BES-961BC • BES-1261BC Adjustment of Thread Tension 47 Chapter 2 Embroidering Procedures Functions of Operation Panel 50 Operation Panel 50 Switches at Machine Heads 53 Switches on the Machine Power...
Instruction Manual - English
Page 20
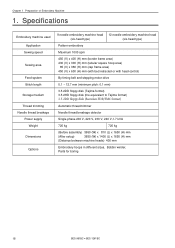
Specifications Embroidery machine used Application Sewing speed Sewing area Feed system Stitch length Storage medium Thread trimming Needle thread breakage Power supply Weight Dimensions Options 9 needle embroidery machine head 12 needle embroidery machine head (six-head type) (six-head type) Pattern embroidery Maximum 1000 spm 450 (V) x 400 (H) mm (border frame area) 430 (V) x 300 (H) mm (tubular square hoop area) 85 (V) x 360 (H) mm (cap frame area) 450 (V) x 600 (H) mm (with bed retracted or with head control) By timing belt and...
Specifications Embroidery machine used Application Sewing speed Sewing area Feed system Stitch length Storage medium Thread trimming Needle thread breakage Power supply Weight Dimensions Options 9 needle embroidery machine head 12 needle embroidery machine head (six-head type) (six-head type) Pattern embroidery Maximum 1000 spm 450 (V) x 400 (H) mm (border frame area) 430 (V) x 300 (H) mm (tubular square hoop area) 85 (V) x 360 (H) mm (cap frame area) 450 (V) x 600 (H) mm (with bed retracted or with head control) By timing belt and...
Instruction Manual - English
Page 22
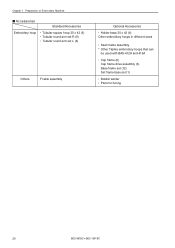
... Embroidery Machine s Accessories Standard Accessories Embroidery hoop • Tubular square hoop 30 x 43 (6) • Tubular round arm set R (6) • Tubular round arm set L (6) Others F table assembly Optional Accessories • Holder base 30 x 43 (6) Other embroidery hoops in different sizes • Sash frame assembly * Other Tajima embroidery hoops that can be used with BAS-412A and 416A • Cap frame (6) Cap frame drive assembly (6) Base frame set (12) Set frame base set (1) • Bobbin winder • Parts for boring 20 BES-961BC...
... Embroidery Machine s Accessories Standard Accessories Embroidery hoop • Tubular square hoop 30 x 43 (6) • Tubular round arm set R (6) • Tubular round arm set L (6) Others F table assembly Optional Accessories • Holder base 30 x 43 (6) Other embroidery hoops in different sizes • Sash frame assembly * Other Tajima embroidery hoops that can be used with BAS-412A and 416A • Cap frame (6) Cap frame drive assembly (6) Base frame set (12) Set frame base set (1) • Bobbin winder • Parts for boring 20 BES-961BC...

Instruction Manual - English
Page 39
.... Open the rotary hook cover B q. 2. Close the knob and take out the bobbin case. 3. Put a new bobbin in the bobbin case. 2. Pull out the thread from the bobbin case before replacement. q e s Replacing bobbin Pull out by about 50 mm t r 1. s Attaching bobbin case w 1. Slide the thread under the tension spring t through the notch r. 3. Close the rotary hook cover B q. Hold the knob w and attach the bobbin case securely. 2. Chapter 1 Preparation of Embroidery Machine 4-2 Replacement of Bobbin Note) Remove dust, lint and oil from the hole...
.... Open the rotary hook cover B q. 2. Close the knob and take out the bobbin case. 3. Put a new bobbin in the bobbin case. 2. Pull out the thread from the bobbin case before replacement. q e s Replacing bobbin Pull out by about 50 mm t r 1. s Attaching bobbin case w 1. Slide the thread under the tension spring t through the notch r. 3. Close the rotary hook cover B q. Hold the knob w and attach the bobbin case securely. 2. Chapter 1 Preparation of Embroidery Machine 4-2 Replacement of Bobbin Note) Remove dust, lint and oil from the hole...
Instruction Manual - English
Page 158
... the needle plate, rotary hook, or bobbin case that might cut the thread? • Is the needle installed correctly (direction, angle, etc.) • Is the presser foot in contact with the material? • Are the thread thickness and needle size correct? • Is a thread with right-hand twist being used? (If such a thread is used, replace with a thread with embroidery hoop • Check the size and needle start position in the machine? (Are embroidery hoop and other related parts operating correctly...
... the needle plate, rotary hook, or bobbin case that might cut the thread? • Is the needle installed correctly (direction, angle, etc.) • Is the presser foot in contact with the material? • Are the thread thickness and needle size correct? • Is a thread with right-hand twist being used? (If such a thread is used, replace with a thread with embroidery hoop • Check the size and needle start position in the machine? (Are embroidery hoop and other related parts operating correctly...


