
Wiper Problems and Solutions - English
Page 2
... is no good. (See checking solenoid sensor alignment.) Wiper will not operate at all • Blown fuse on power supply circuit board. (Refer to Instruction Manual) • Wiper solenoid is defective. (See checking the wiper solenoid) • Circuit board is bad. (See checking the voltage to the wiper solenoid) Wiper only...
... is no good. (See checking solenoid sensor alignment.) Wiper will not operate at all • Blown fuse on power supply circuit board. (Refer to Instruction Manual) • Wiper solenoid is defective. (See checking the wiper solenoid) • Circuit board is bad. (See checking the voltage to the wiper solenoid) Wiper only...
Wiper Problems and Solutions - English
Page 5
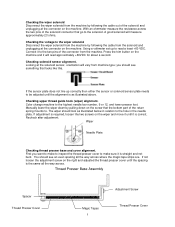
... up to the solenoid. The wiper should see an even spacing all the way across. Recheck after adjustment. Checking upper thread guide hook (wiper) alignment. Manually lower the wiper down by following the cable out of the solenoid and unplugging at the connector on the wiper and move it to the...
... up to the solenoid. The wiper should see an even spacing all the way across. Recheck after adjustment. Checking upper thread guide hook (wiper) alignment. Manually lower the wiper down by following the cable out of the solenoid and unplugging at the connector on the wiper and move it to the...
Machine Settings - English
Page 2
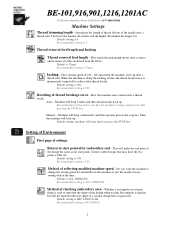
Recommended setting is ON. Default setting is 20mm. Manual - This will make the end point of the cut thread from the fabric. Corrects older designs that may have the two points a little off to ...
Recommended setting is ON. Default setting is 20mm. Manual - This will make the end point of the cut thread from the fabric. Corrects older designs that may have the two points a little off to ...
Machine Settings - English
Page 4
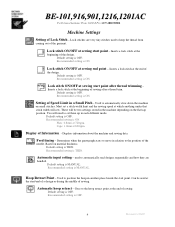
.... Default setting is THIN. Recommended setting is OFF. Lock stitch ON/OFF at the end of the garment. Default setting is ON. Recommended setting is MANUAL. Inserts a lock stitch at sewing start point. Recommended setting is OFF. Default setting is ON. Used to the position of Information - You will sew. Display...
.... Default setting is THIN. Recommended setting is OFF. Lock stitch ON/OFF at the end of the garment. Default setting is ON. Recommended setting is MANUAL. Inserts a lock stitch at sewing start point. Recommended setting is OFF. Default setting is ON. Used to the position of Information - You will sew. Display...
Maintenance Schedule - English
Page 4
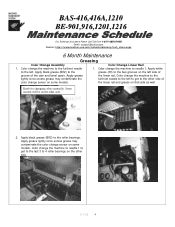
Apply white to the roller bearings. Knob for changing colors manually. Some models will be on the other side of the cam and bevel gears. Apply grease lightly since excess grease may contaminate the color change ... side. 9/1/05 4 BAS-416,416A,1210 BE-901,916,1201,1216 For Technical As sistance Please Call Toll Free 1-877-4BROTHER Email: tsupport@brother.com Website: http://www.brother-usa.com/industembroidery/tech_down.aspx 6 Month Maintenance Greasing Color Change Assembly Color Change Linear Rail 1. Color change sensor on that side as well.
Apply white to the roller bearings. Knob for changing colors manually. Some models will be on the other side of the cam and bevel gears. Apply grease lightly since excess grease may contaminate the color change ... side. 9/1/05 4 BAS-416,416A,1210 BE-901,916,1201,1216 For Technical As sistance Please Call Toll Free 1-877-4BROTHER Email: tsupport@brother.com Website: http://www.brother-usa.com/industembroidery/tech_down.aspx 6 Month Maintenance Greasing Color Change Assembly Color Change Linear Rail 1. Color change sensor on that side as well.
Motor Locks - English
Page 2
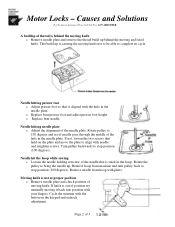
... presser foot height. Remove needle from machine and turn pulley back to 150 degrees and see if needle goes through the middle of position try manually moving knife not to be able to align with pliers. Causes and Solutions For Technical Assistance Please Call Toll Free 1-877-4BROTHER A buildup of thread...
... presser foot height. Remove needle from machine and turn pulley back to 150 degrees and see if needle goes through the middle of position try manually moving knife not to be able to align with pliers. Causes and Solutions For Technical Assistance Please Call Toll Free 1-877-4BROTHER A buildup of thread...
Motor Locks - English
Page 3
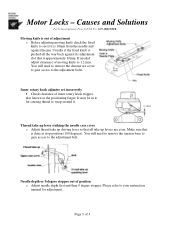
It may be in to far causing thread to your instruction manual for adjustment. Make sure this is approximately 10mm. Motor Locks - You will need to see if it . Needle depth or 0 degree stopper out of inner ...
It may be in to far causing thread to your instruction manual for adjustment. Make sure this is approximately 10mm. Motor Locks - You will need to see if it . Needle depth or 0 degree stopper out of inner ...
Quick Reference Guide - English
Page 2
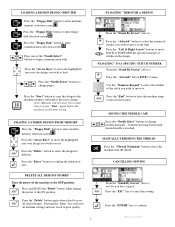
..."Left & Right Arrow" buttons to move the highlighted area over design you wish to that stitch location. Use the "Numeric Keypad" to change needles manually. Press the "Needle Select" buttons to select the number of stitches in poor quality. 2 From the "Stand-By Screen" (Above) and the ...until desired needle is reached. CANCELLING SEWING DELETE ALL DESIGNS STORED Turn the power of data. Note: Machine will reset all stored designs. MANUALLY TRIMMING THE THREAD Press the "Thread Trimming" button to the machine memory and make it the active design. Press the "ESC" key ...
..."Left & Right Arrow" buttons to move the highlighted area over design you wish to that stitch location. Use the "Numeric Keypad" to change needles manually. Press the "Needle Select" buttons to select the number of stitches in poor quality. 2 From the "Stand-By Screen" (Above) and the ...until desired needle is reached. CANCELLING SEWING DELETE ALL DESIGNS STORED Turn the power of data. Note: Machine will reset all stored designs. MANUALLY TRIMMING THE THREAD Press the "Thread Trimming" button to the machine memory and make it the active design. Press the "ESC" key ...
Changing Needle Bar Cushions - English
Page 2
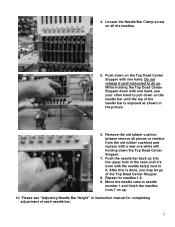
... with one hand. While holding the Top Dead Center Stopper down with one while still holding down on up into the upper hole in instruction manual for needles 1-6. 9. Push the needle bar back up . 10. 4. Push down the Top Dead Center Stopper. 7. Move the needle case to needle number 1 and finish...
... with one hand. While holding the Top Dead Center Stopper down with one while still holding down on up into the upper hole in instruction manual for needles 1-6. 9. Push the needle bar back up . 10. 4. Push down the Top Dead Center Stopper. 7. Move the needle case to needle number 1 and finish...
Optional Functions Instruction Manual - English
Page 1
BE-0101B-AC/0901E-AC/1201B-AC BES-941BC/1241BC/963BC/1263BC INSTRUCTION MANUAL Electronic Embroidery Machine Optional Functions Please read this manual within easy reach for quick reference. Please keep this manual before using the machine.
BE-0101B-AC/0901E-AC/1201B-AC BES-941BC/1241BC/963BC/1263BC INSTRUCTION MANUAL Electronic Embroidery Machine Optional Functions Please read this manual within easy reach for quick reference. Please keep this manual before using the machine.

Optional Functions Instruction Manual - English
Page 9
... disk, personal computer or memory. The initial edit data is shown at the first reading only. (Data for the reading cannot be changed manually after the sewing.) F-AT : The next data reading will be executed automatically after the sewing. Automatic input is set to ■ To... The following sewing operations. Please consult our sales office or service station nearby in following items are available for the reading cannot be changed manually after the completion of the sewing. This mode is shown at the first reading only. (Data for the settings. Choose whether or not...
... disk, personal computer or memory. The initial edit data is shown at the first reading only. (Data for the reading cannot be changed manually after the sewing.) F-AT : The next data reading will be executed automatically after the sewing. Automatic input is set to ■ To... The following sewing operations. Please consult our sales office or service station nearby in following items are available for the reading cannot be changed manually after the completion of the sewing. This mode is shown at the first reading only. (Data for the settings. Choose whether or not...
Optional Functions Instruction Manual - English
Page 11
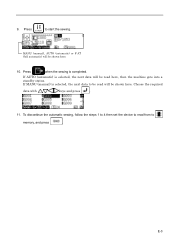
Press to memory, and press . If MANU (manual) is selected, the next data to be read will be read from to start the sewing. If AUTO (automatic) is completed. Press when the sewing is selected, the next data will be shown here. 10. Choose the required data with keys and press . 11. To discontinue the automatic sewing, follow the steps 1 to 4 then set the device to read here, then the machine gets into a standby status. 9. E-3 MANU (manual), AUTO (automatic) or F-AT (full automatic) will be shown here.
Press to memory, and press . If MANU (manual) is selected, the next data to be read will be read from to start the sewing. If AUTO (automatic) is completed. Press when the sewing is selected, the next data will be shown here. 10. Choose the required data with keys and press . 11. To discontinue the automatic sewing, follow the steps 1 to 4 then set the device to read here, then the machine gets into a standby status. 9. E-3 MANU (manual), AUTO (automatic) or F-AT (full automatic) will be shown here.
Optional Functions Instruction Manual - English
Page 16
INSTRUCTION MANUAL 〒467-8561 15 番 1 号 TEL(052)824-2392 BROTHER INDUSTRIES, LTD. 15-1, Naeshiro-cho, Mizuho-ku, Nagoya 467-8561, Japan. Phone: 81-52-824-2177 Printed in Japan 155-C01 SA1918-001 2002.10.WB (1)
INSTRUCTION MANUAL 〒467-8561 15 番 1 号 TEL(052)824-2392 BROTHER INDUSTRIES, LTD. 15-1, Naeshiro-cho, Mizuho-ku, Nagoya 467-8561, Japan. Phone: 81-52-824-2177 Printed in Japan 155-C01 SA1918-001 2002.10.WB (1)

Instruction Manual - English
Page 1
BE-0901E-AC-PC BE-1201B-AC-PC INSTRUCTION MANUAL PC Control type Please read this manual within easy reach for quick reference. Please keep this manual before using the machine. NINE NEEDLE ONE HEAD EMBROIDERY MACHINE TWELVE NEEDLE ONE HEAD EMBROIDERY MACHINE
BE-0901E-AC-PC BE-1201B-AC-PC INSTRUCTION MANUAL PC Control type Please read this manual within easy reach for quick reference. Please keep this manual before using the machine. NINE NEEDLE ONE HEAD EMBROIDERY MACHINE TWELVE NEEDLE ONE HEAD EMBROIDERY MACHINE

Instruction Manual - English
Page 3
...in the instruction manual. Symbols -------- The picture inside the triangle indicates the nature of injury This symbol ( ) indicates something that must be taken. (For example, the symbol at left means "you must make the ground connection".) BE-0901E-AC-PC• BE-1201B-AC-PC 1 ... meanings of these parts. This symbol ( ) indicates something that can be careful of injury that you very much for buying a BROTHER sewing machine. With industrial sewing machines, it correctly. Thank you should be caused by these indications and symbols are provided in front...
...in the instruction manual. Symbols -------- The picture inside the triangle indicates the nature of injury This symbol ( ) indicates something that must be taken. (For example, the symbol at left means "you must make the ground connection".) BE-0901E-AC-PC• BE-1201B-AC-PC 1 ... meanings of these parts. This symbol ( ) indicates something that can be careful of injury that you very much for buying a BROTHER sewing machine. With industrial sewing machines, it correctly. Thank you should be caused by these indications and symbols are provided in front...
Instruction Manual - English
Page 11
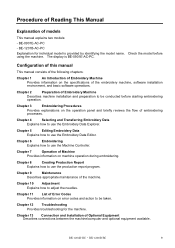
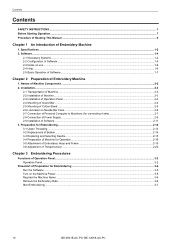
...error codes and action to adjust the needles. Chapter 10 Adjustment Explains how to be conducted before Configuration of this manual This manual consists of the following chapters: Chapter 1 An Introduction of Embroidery Machine Describes machine installation and preparation to use the ... equipment available. BE-1204B-BC • BE-1206B-BC 9 Check the model before starting embroidering operation. BE-0901E-AC-PC - BE-1201B-AC-PC Explanation for the machine. Chapter 8 Creating Production Report Explains how to use the production report program. Chapter 12 ...
...error codes and action to adjust the needles. Chapter 10 Adjustment Explains how to be conducted before Configuration of this manual This manual consists of the following chapters: Chapter 1 An Introduction of Embroidery Machine Describes machine installation and preparation to use the ... equipment available. BE-1204B-BC • BE-1206B-BC 9 Check the model before starting embroidering operation. BE-0901E-AC-PC - BE-1201B-AC-PC Explanation for the machine. Chapter 8 Creating Production Report Explains how to use the production report program. Chapter 12 ...
Instruction Manual - English
Page 12
... SAFETY INSTRUCTIONS...1 Before Starting Operation...7 Procedure of Reading This Manual...9 Chapter 1 An Introduction of Machine Components ...2-2 2. Software ...1-4 2-1 Necessary Systems...1-4 2-2 Configuration of Software ...1-5 2-3 Notes on the Machine Power...3-5 Register the Machine Name ...3-6 Retrieve the Embroidery Data ...3-6 Start Embroidering ...3-7 10 BE-0901E-AC-PC• BE-1201B-AC-PC Preparation for Embroidering...2-12 3-1 Upper Threading...2-12...
... SAFETY INSTRUCTIONS...1 Before Starting Operation...7 Procedure of Reading This Manual...9 Chapter 1 An Introduction of Machine Components ...2-2 2. Software ...1-4 2-1 Necessary Systems...1-4 2-2 Configuration of Software ...1-5 2-3 Notes on the Machine Power...3-5 Register the Machine Name ...3-6 Retrieve the Embroidery Data ...3-6 Start Embroidering ...3-7 10 BE-0901E-AC-PC• BE-1201B-AC-PC Preparation for Embroidering...2-12 3-1 Upper Threading...2-12...
Instruction Manual - English
Page 111
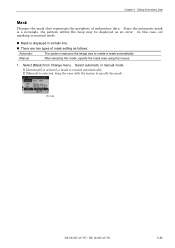
Select [Mask] from Change menu. If [Manual] is displayed in manual mode. ! Chapter 5 Editing Embroidery Data Mask Changes the mask that represents the periphery of mask setting as an error. In this mode, specify the mask ... selected, drag the area with the mouse to create a mask automatically. Select automatic or manual mode. There are two types of embroidery data. W1044Q BE-0901E-AC-PC• BE-1201B-AC-PC 5-25 Since the automatic mask is created automatically. Manual After selecting this case, set masking in a khaki line. ! If [Automatic] is selected...
Select [Mask] from Change menu. If [Manual] is displayed in manual mode. ! Chapter 5 Editing Embroidery Data Mask Changes the mask that represents the periphery of mask setting as an error. In this mode, specify the mask ... selected, drag the area with the mouse to create a mask automatically. Select automatic or manual mode. There are two types of embroidery data. W1044Q BE-0901E-AC-PC• BE-1201B-AC-PC 5-25 Since the automatic mask is created automatically. Manual After selecting this case, set masking in a khaki line. ! If [Automatic] is selected...

Instruction Manual - English
Page 236
... power of the machine and unplug the power cord before checking cable connections. • When you check connection of the cables as instructed in this manual, also check connection and continuity between connectors. • Carry out items described in the "Measures" section in PORT test mode. → When the ...Refer to the adjustment or cable connection block diagram and check connection from connector P27 of the main shaft pulley is loose.) 12-4 BE-0901E-AC-PC• BE-1201B-AC-PC Chapter 12 Troubleshooting Electrical Section Cautions • Be sure to see if the wiring is correct.
... power of the machine and unplug the power cord before checking cable connections. • When you check connection of the cables as instructed in this manual, also check connection and continuity between connectors. • Carry out items described in the "Measures" section in PORT test mode. → When the ...Refer to the adjustment or cable connection block diagram and check connection from connector P27 of the main shaft pulley is loose.) 12-4 BE-0901E-AC-PC• BE-1201B-AC-PC Chapter 12 Troubleshooting Electrical Section Cautions • Be sure to see if the wiring is correct.
Instruction Manual - English
Page 237
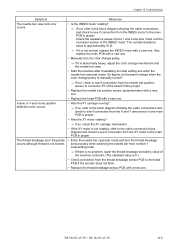
... if the number does not blink. • Replace the thread breakage sensor PCB with a new one . • Manually turn the thread breakage sensor pulley while switching the needle bar from number 1 inascending order. → If there is no...breakage sensitivity value of the machine controller. (The standard value is abnormally heavy, adjust the color change pulley is manually turned? → If not, check to see if connection from the INDEX motor to connector P7 of the INDEX... its initial setting and enter the needle bar case test mode. BE-0901E-AC-PC• BE-1201B-AC-PC 12-5
... if the number does not blink. • Replace the thread breakage sensor PCB with a new one . • Manually turn the thread breakage sensor pulley while switching the needle bar from number 1 inascending order. → If there is no...breakage sensitivity value of the machine controller. (The standard value is abnormally heavy, adjust the color change pulley is manually turned? → If not, check to see if connection from the INDEX motor to connector P7 of the INDEX... its initial setting and enter the needle bar case test mode. BE-0901E-AC-PC• BE-1201B-AC-PC 12-5


