

Thread Tensions - English
Page 1
...bobbin when in the Brother bobbin case assembly p/n#S35584001. !" You may need to repeat this form only as found on a table. Use this procedure a few times until it is strongly recommend when replacing one, to replace it out with the speeds achieved on embroidery machines, but they most ...have a serration on the flat surface of the groove in properly one may say they do make a difference and are not required on Brother embroidery machines today, they are needed in the order that the spring will only go back in the bobbin causing a very loose tension as illustrated...
...bobbin when in the Brother bobbin case assembly p/n#S35584001. !" You may need to repeat this form only as found on a table. Use this procedure a few times until it is strongly recommend when replacing one, to replace it out with the speeds achieved on embroidery machines, but they most ...have a serration on the flat surface of the groove in properly one may say they do make a difference and are not required on Brother embroidery machines today, they are needed in the order that the spring will only go back in the bobbin causing a very loose tension as illustrated...

Parts Manual - English
Page 1
http://partsbook.brother.co.jp/partsnavi_em/eng/index.html BE-0901EAC, 1201BAC BROTHER EMBROIDERY SYSTEMS PARTS BOOK 9 If 1 A: MR 12 $-F 1 RAMON 9 NEEDLE 1 HEAD EMBROIDERY MACHINE 12 NEEDLE 1 HEAD EMBROIDERY MACHINE brother® soonatti It Parts Navigation http://partsbook.brother.co.jp/partsnavi/jpn/index.html The latest parts information, refer to the Parts Navigation.
http://partsbook.brother.co.jp/partsnavi_em/eng/index.html BE-0901EAC, 1201BAC BROTHER EMBROIDERY SYSTEMS PARTS BOOK 9 If 1 A: MR 12 $-F 1 RAMON 9 NEEDLE 1 HEAD EMBROIDERY MACHINE 12 NEEDLE 1 HEAD EMBROIDERY MACHINE brother® soonatti It Parts Navigation http://partsbook.brother.co.jp/partsnavi/jpn/index.html The latest parts information, refer to the Parts Navigation.

Instruction Manual - English
Page 1
BE-0901E-AC-PC BE-1201B-AC-PC INSTRUCTION MANUAL PC Control type Please read this manual within easy reach for quick reference. NINE NEEDLE ONE HEAD EMBROIDERY MACHINE TWELVE NEEDLE ONE HEAD EMBROIDERY MACHINE Please keep this manual before using the machine.
BE-0901E-AC-PC BE-1201B-AC-PC INSTRUCTION MANUAL PC Control type Please read this manual within easy reach for quick reference. NINE NEEDLE ONE HEAD EMBROIDERY MACHINE TWELVE NEEDLE ONE HEAD EMBROIDERY MACHINE Please keep this manual before using the machine.
Instruction Manual - English
Page 11
... Connection and Installation of the embroidery machine, software installation environment, and basic software operations. Chapter 2 Preparation of Machine Provides information on the specifications of Optional Equipment Describes connections between the machine/computer and optional equipment available. Chapter 7 Operation of Embroidery Machine Describes machine installation and preparation to use the Machine Controller. BE-0901E-AC-PC - Chapter 12 Troubleshooting Provides troubleshooting...
... Connection and Installation of the embroidery machine, software installation environment, and basic software operations. Chapter 2 Preparation of Machine Provides information on the specifications of Optional Equipment Describes connections between the machine/computer and optional equipment available. Chapter 7 Operation of Embroidery Machine Describes machine installation and preparation to use the Machine Controller. BE-0901E-AC-PC - Chapter 12 Troubleshooting Provides troubleshooting...
Instruction Manual - English
Page 12
......3-2 Flowchart of Preparation for connecting 4 sets 2-7 2-8 Connection of Power Supply ...2-9 2-9 Installation of Software ...1-5 2-3 Notes on the Machine Power...3-5 Register the Machine Name ...3-6 Retrieve the Embroidery Data ...3-6 Start Embroidering ...3-7 10 BE-0901E-AC-PC• BE-1201B-AC-PC Names of Embroidery Machine 1. Contents Contents SAFETY INSTRUCTIONS...1 Before Starting Operation...7 Procedure of Reading This Manual...9 Chapter 1 An Introduction of...
......3-2 Flowchart of Preparation for connecting 4 sets 2-7 2-8 Connection of Power Supply ...2-9 2-9 Installation of Software ...1-5 2-3 Notes on the Machine Power...3-5 Register the Machine Name ...3-6 Retrieve the Embroidery Data ...3-6 Start Embroidering ...3-7 10 BE-0901E-AC-PC• BE-1201B-AC-PC Names of Embroidery Machine 1. Contents Contents SAFETY INSTRUCTIONS...1 Before Starting Operation...7 Procedure of Reading This Manual...9 Chapter 1 An Introduction of...

Instruction Manual - English
Page 19
Chapter 1 An Introduction of Embroidery Machine
Chapter 1 An Introduction of Embroidery Machine
Instruction Manual - English
Page 20
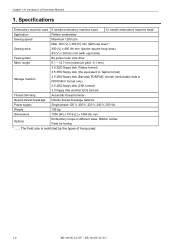
... of Embroidery Machine 1. Chapter 1 An Introduction of hoop used 9 needle embroidery machine head 12 needle embroidery machine head Application Pattern embroidery Sewing ...brother ECS format) Thread trimming Automatic thread trimmer Needle thread breakage Needle thread breakage detector Power supply Single phase 120 V, 200 V, 220 V, 240 V, 500 VA Weight 195 kg Dimensions 1050 (W) x 1016 (L) x 1484 (H) mm Options Embroidery hoops in different sizes, Bobbin winder, Parts for boring * ...... Specifications Embroidery machine used . 1-2 BE-0901E-AC-PC• BE-1201B-AC-PC...
... of Embroidery Machine 1. Chapter 1 An Introduction of hoop used 9 needle embroidery machine head 12 needle embroidery machine head Application Pattern embroidery Sewing ...brother ECS format) Thread trimming Automatic thread trimmer Needle thread breakage Needle thread breakage detector Power supply Single phase 120 V, 200 V, 220 V, 240 V, 500 VA Weight 195 kg Dimensions 1050 (W) x 1016 (L) x 1484 (H) mm Options Embroidery hoops in different sizes, Bobbin winder, Parts for boring * ...... Specifications Embroidery machine used . 1-2 BE-0901E-AC-PC• BE-1201B-AC-PC...

Instruction Manual - English
Page 21
Chapter 1 An Introduction of Embroidery Machine BE-0901E-AC-PC• BE-1201B-AC-PC 1-3
Chapter 1 An Introduction of Embroidery Machine BE-0901E-AC-PC• BE-1201B-AC-PC 1-3
Instruction Manual - English
Page 22
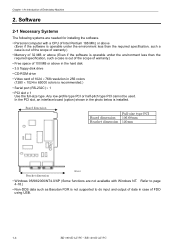
...-DOS data such as Barudan FDR is not supported to do input and output of data in case of Embroidery Machine 2. Chapter 1 An Introduction of FDD using USB. 1-4 BE-0901E-AC-PC• BE-1201B-AC-PC In the PCI slot, an interface board (option) shown in 65000 colors is installed. Board dimension Full-size...
...-DOS data such as Barudan FDR is not supported to do input and output of data in case of Embroidery Machine 2. Chapter 1 An Introduction of FDD using USB. 1-4 BE-0901E-AC-PC• BE-1201B-AC-PC In the PCI slot, an interface board (option) shown in 65000 colors is installed. Board dimension Full-size...
Instruction Manual - English
Page 23
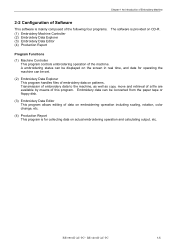
... programs. (1) Embroidery Machine Controller (2) Embroidery Data Explorer (3) Embroidery Data Editor (4) Production Report The software is for operating the machine can be set. (2) Embroidery Data Explorer This program handles files of embroidery data on patterns. Transmission of embroidery data to the machine, as well as copy, move and retrieval of a file are available by means of the machine. BE-0901E-AC-PC•...
... programs. (1) Embroidery Machine Controller (2) Embroidery Data Explorer (3) Embroidery Data Editor (4) Production Report The software is for operating the machine can be set. (2) Embroidery Data Explorer This program handles files of embroidery data on patterns. Transmission of embroidery data to the machine, as well as copy, move and retrieval of a file are available by means of the machine. BE-0901E-AC-PC•...
Instruction Manual - English
Page 24
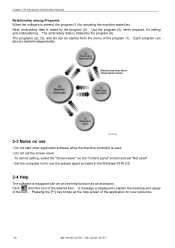
... is equipped with an on use • Do not start other application software while the machine controller is used. • Do not set the screen saver. Chapter 1 An Introduction of Embroidery Machine Relationship among Programs When the software is started from the menu of the program (1). Pressing ...• Set the computer not to explain the meaning and usage of the application for your reference. 1-6 BE-0901E-AC-PC• BE-1201B-AC-PC Each program can be started independently. Click , then the icon of the desired item. Next, embroidery data is called by the program (4).
... is equipped with an on use • Do not start other application software while the machine controller is used. • Do not set the screen saver. Chapter 1 An Introduction of Embroidery Machine Relationship among Programs When the software is started from the menu of the program (1). Pressing ...• Set the computer not to explain the meaning and usage of the application for your reference. 1-6 BE-0901E-AC-PC• BE-1201B-AC-PC Each program can be started independently. Click , then the icon of the desired item. Next, embroidery data is called by the program (4).
Instruction Manual - English
Page 25
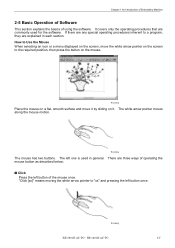
... the mouse button as described below: ! The left one is used for the software. Click Press the left button once. W1360Q BE-0901E-AC-PC• BE-1201B-AC-PC 1-7 The white arrow pointer moves along the mouse motion. There are explained in general. It covers only the operating procedures that are commonly... Use the Mouse When selecting an icon or a menu displayed on the screen, move it . W1359Q The mouse has two buttons. Chapter 1 An Introduction of Embroidery Machine 2-5 Basic Operation of Software This section explains the basics of the mouse once.
... the mouse button as described below: ! The left one is used for the software. Click Press the left button once. W1360Q BE-0901E-AC-PC• BE-1201B-AC-PC 1-7 The white arrow pointer moves along the mouse motion. There are explained in general. It covers only the operating procedures that are commonly... Use the Mouse When selecting an icon or a menu displayed on the screen, move it . W1359Q The mouse has two buttons. Chapter 1 An Introduction of Embroidery Machine 2-5 Basic Operation of Software This section explains the basics of the mouse once.
Instruction Manual - English
Page 26
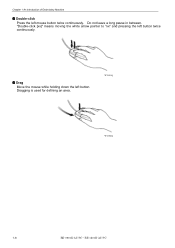
Chapter 1 An Introduction of Embroidery Machine ! Do not leave a long pause in between. Drag Move the mouse while holding down the left button twice continuously. ! Dragging is used for defining an area. "Double-click [xx]" means moving the white arrow pointer to "xx" and pressing the left button. W1361Q W1362Q 1-8 BE-0901E-AC-PC• BE-1201B-AC-PC Double-click Press the left mouse button twice continuously.
Chapter 1 An Introduction of Embroidery Machine ! Do not leave a long pause in between. Drag Move the mouse while holding down the left button twice continuously. ! Dragging is used for defining an area. "Double-click [xx]" means moving the white arrow pointer to "xx" and pressing the left button. W1361Q W1362Q 1-8 BE-0901E-AC-PC• BE-1201B-AC-PC Double-click Press the left mouse button twice continuously.
Instruction Manual - English
Page 27
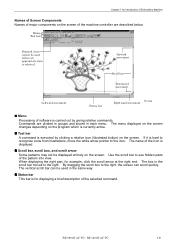
... When displaying the right part, for displaying a brief description of the pattern into view. The box in each menu. BE-0901E-AC-PC• BE-1201B-AC-PC 1-9 Tool bar A command is selected. Use the scroll bar to see hidden parts of the selected command. Commands are described ... bar This bar is displayed. ! If it is currently active. ! Chapter 1 An Introduction of Embroidery Machine Names of Screen Components Names of major components on the screen of the machine controller are divided in groups and stored in the scroll bar moves to the right. Menu Processing of...
... When displaying the right part, for displaying a brief description of the pattern into view. The box in each menu. BE-0901E-AC-PC• BE-1201B-AC-PC 1-9 Tool bar A command is selected. Use the scroll bar to see hidden parts of the selected command. Commands are described ... bar This bar is displayed. ! If it is currently active. ! Chapter 1 An Introduction of Embroidery Machine Names of Screen Components Names of major components on the screen of the machine controller are divided in groups and stored in the scroll bar moves to the right. Menu Processing of...
Instruction Manual - English
Page 28
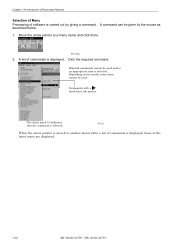
Chapter 1 An Introduction of Embroidery Machine Selection of Menu Processing of commands is displayed. W1364Q 2. A list of software is selected. Move the arrow pointer to another menu while a list of commands ... by the mouse as described below: 1. The check mark (√) indicates that the command is displayed, those of the latter menu are displayed. 1-10 BE-0901E-AC-PC• BE-1201B-AC-PC Depending on the model, some items cannot be given by giving a command.
Chapter 1 An Introduction of Embroidery Machine Selection of Menu Processing of commands is displayed. W1364Q 2. A list of software is selected. Move the arrow pointer to another menu while a list of commands ... by the mouse as described below: 1. The check mark (√) indicates that the command is displayed, those of the latter menu are displayed. 1-10 BE-0901E-AC-PC• BE-1201B-AC-PC Depending on the model, some items cannot be given by giving a command.

Instruction Manual - English
Page 29
Chapter 2 Preparation of Embroidery Machine
Chapter 2 Preparation of Embroidery Machine
Instruction Manual - English
Page 30
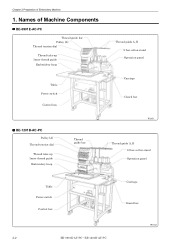
Chapter 2 Preparation of Machine Components ! BE-0901E-AC-PC Thread guide bar Pulley (A) Thread tension dial Thread take -up Inner thread guide Embroidery hoop Table Power switch Control box ! BE-1201B-AC-PC Pulley (A) Thread tension dial Thread take -up Inner thread guide Embroidery hoop Thread guide bar Thread guide A, B 9-bar cotton stand Operation panel Carriage Guard bar W1651 Thread guide A, B 12-bar cotton stand Operation panel Table Power switch Control box Carriage Guard bar W1652 2-2 BE-0901E-AC-PC• BE-1201B-AC-PC Names of Embroidery Machine 1.
Chapter 2 Preparation of Machine Components ! BE-0901E-AC-PC Thread guide bar Pulley (A) Thread tension dial Thread take -up Inner thread guide Embroidery hoop Table Power switch Control box ! BE-1201B-AC-PC Pulley (A) Thread tension dial Thread take -up Inner thread guide Embroidery hoop Thread guide bar Thread guide A, B 9-bar cotton stand Operation panel Carriage Guard bar W1651 Thread guide A, B 12-bar cotton stand Operation panel Table Power switch Control box Carriage Guard bar W1652 2-2 BE-0901E-AC-PC• BE-1201B-AC-PC Names of Embroidery Machine 1.
Instruction Manual - English
Page 31
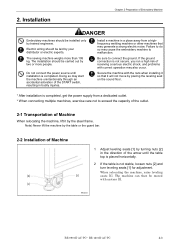
...electric noise. Be sure to malfunction. When relocating the machine, raise leveling [3] seats [1]. W1565 BE-0901E-AC-PC• BE-1201B-AC-PC 2-3 Note) Never lift the machine by the table or the guard bar. 2-2 Installation of Machine [2] [1] 1 Adjust leveling seats [1] by turning nuts... installation is completed, get the power supply from a highfrequency welding machine or other machines that it so that may also occur. Installation Chapter 2 Preparation of Embroidery Machine DANGER Embroidery machines should be moved with the nuts when installing it will not move...
...electric noise. Be sure to malfunction. When relocating the machine, raise leveling [3] seats [1]. W1565 BE-0901E-AC-PC• BE-1201B-AC-PC 2-3 Note) Never lift the machine by the table or the guard bar. 2-2 Installation of Machine [2] [1] 1 Adjust leveling seats [1] by turning nuts... installation is completed, get the power supply from a highfrequency welding machine or other machines that it so that may also occur. Installation Chapter 2 Preparation of Embroidery Machine DANGER Embroidery machines should be moved with the nuts when installing it will not move...
Instruction Manual - English
Page 32
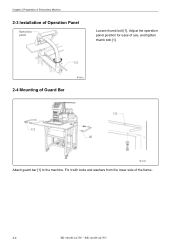
Adjust the operation panel position for ease of use, and tighten thumb bolt [1]. [1] W1653 2-4 Mounting of the frame. 2-4 BE-0901E-AC-PC• BE-1201B-AC-PC Fix it with bolts and washers from the lower side of Guard Bar [1] [1] [1] W1751 Attach guard bar [1] to the machine. Chapter 2 Preparation of Embroidery Machine 2-3 Installation of Operation Panel Operation panel Loosen thumb bolt [1].
Adjust the operation panel position for ease of use, and tighten thumb bolt [1]. [1] W1653 2-4 Mounting of the frame. 2-4 BE-0901E-AC-PC• BE-1201B-AC-PC Fix it with bolts and washers from the lower side of Guard Bar [1] [1] [1] W1751 Attach guard bar [1] to the machine. Chapter 2 Preparation of Embroidery Machine 2-3 Installation of Operation Panel Operation panel Loosen thumb bolt [1].

Instruction Manual - English
Page 33
... [2] using the two screws [4]. 3. BE-1201B-AC-PC [2] [1] W1568 [4] [3] 1. For safety reason, attach vinyl tubes to the end of Embroidery Machine 1. 2-5 Mounting of the thread guide assembly [3]. [1] W1569 BE-0901E-AC-PC• BE-1201B-AC-PC 2-5 Mount the thread guide assembly [3] on the thread ...stand assembly [1], while fitting into the two holes. 2. For safety reason, attach vinyl tubes to the end of Cotton Stand ! BE-0901E-AC-PC [4] [3] [2] Chapter 2 Preparation of the thread guide assembly [3]. ! Attach two thread guide support bars [2] to the cotton stand assembly...
... [2] using the two screws [4]. 3. BE-1201B-AC-PC [2] [1] W1568 [4] [3] 1. For safety reason, attach vinyl tubes to the end of Embroidery Machine 1. 2-5 Mounting of the thread guide assembly [3]. [1] W1569 BE-0901E-AC-PC• BE-1201B-AC-PC 2-5 Mount the thread guide assembly [3] on the thread ...stand assembly [1], while fitting into the two holes. 2. For safety reason, attach vinyl tubes to the end of Cotton Stand ! BE-0901E-AC-PC [4] [3] [2] Chapter 2 Preparation of the thread guide assembly [3]. ! Attach two thread guide support bars [2] to the cotton stand assembly...


