Users Manual - English
Page 2
... and efficient way to register your new product is on -line at http://www.brother.com/registration/ © 2008 Brother Industries, Ltd. Retain this User's Guide with Brother, you need to your product on the back of Purchase: 1 The serial number...brother.com/registration/ By registering your product with your sales receipt as confirmation of the purchase date of your product should you lose your receipt; „ may support an insurance claim by you of enhancements to call Customer Service Please complete the following information for future reference: Model Number: MFC-790CW and MFC...
... and efficient way to register your new product is on -line at http://www.brother.com/registration/ © 2008 Brother Industries, Ltd. Retain this User's Guide with Brother, you need to your product on the back of Purchase: 1 The serial number...brother.com/registration/ By registering your product with your sales receipt as confirmation of the purchase date of your product should you lose your receipt; „ may support an insurance claim by you of enhancements to call Customer Service Please complete the following information for future reference: Model Number: MFC-790CW and MFC...

Users Manual - English
Page 3
...product. Register your product By registering your product with Brother: „ may support an insurance claim by you in the event of product loss covered by insurance; Please complete and fax the Brother Warranty Registration And Test Sheet or, for your ... only). Service Center Locations (Canada only) For the location of a Brother authorized service center, call 1-877-BROTHER. Your registration with Brother International Corporation, you will help , you bought the machine. http://solutions.brother.com/ Note • You can download the latest software documents and ...
...product. Register your product By registering your product with Brother: „ may support an insurance claim by you in the event of product loss covered by insurance; Please complete and fax the Brother Warranty Registration And Test Sheet or, for your ... only). Service Center Locations (Canada only) For the location of a Brother authorized service center, call 1-877-BROTHER. Your registration with Brother International Corporation, you will help , you bought the machine. http://solutions.brother.com/ Note • You can download the latest software documents and ...
Users Manual - English
Page 8
... MFC/Fax machine and will void the warranty. No oral or written information, advice or representation provided by the end-user/purchaser to a "Brother" Authorized Service Centre, together with the original protective parts. Internet support: support@brother.ca or browse Brother's Web Site www.brother...for labour and parts, Brother International Corporation (Canada) Ltd. ("Brother"), or its Authorized Service Centres, Distributors, Dealers, Agents or employees, shall create another warranty or modify this MFC/Fax machine shall be liable for any failure of the MFC/Fax machine to products ...
... MFC/Fax machine and will void the warranty. No oral or written information, advice or representation provided by the end-user/purchaser to a "Brother" Authorized Service Centre, together with the original protective parts. Internet support: support@brother.ca or browse Brother's Web Site www.brother...for labour and parts, Brother International Corporation (Canada) Ltd. ("Brother"), or its Authorized Service Centres, Distributors, Dealers, Agents or employees, shall create another warranty or modify this MFC/Fax machine shall be liable for any failure of the MFC/Fax machine to products ...
Users Manual - English
Page 9
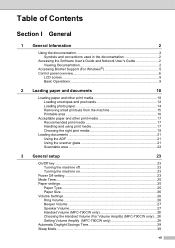
...documentation 2 Symbols and conventions used in the documentation 2 Accessing the Software User's Guide and Network User's Guide 2 Viewing Documentation 2 Accessing Brother Support (For Windows 5 Control panel overview 6 LCD screen...8 Basic Operations 9 2 Loading paper and documents 10 Loading paper and other print media... 26 Ring Volume 26 Beeper Volume 27 Speaker Volume 27 Handset Volume (MFC-790CW only 28 Choosing the Handset Volume (For Volume Amplify) (MFC-790CW only) ...28 Setting Volume Amplify (MFC-790CW only 29 Automatic Daylight Savings Time 29 Sleep Mode ...30 vii
...documentation 2 Symbols and conventions used in the documentation 2 Accessing the Software User's Guide and Network User's Guide 2 Viewing Documentation 2 Accessing Brother Support (For Windows 5 Control panel overview 6 LCD screen...8 Basic Operations 9 2 Loading paper and documents 10 Loading paper and other print media... 26 Ring Volume 26 Beeper Volume 27 Speaker Volume 27 Handset Volume (MFC-790CW only 28 Choosing the Handset Volume (For Volume Amplify) (MFC-790CW only) ...28 Setting Volume Amplify (MFC-790CW only 29 Automatic Daylight Savings Time 29 Sleep Mode ...30 vii

Users Manual - English
Page 19
... application. You can be connected to a wireless or wired network. You can be viewed from the root directory of the Brother CD-ROM. If your wireless access point supports SecureEasySetup™, Wi-Fi Protected Setup™ or AOSS™, follow the steps in the Quick Setup Guide. d Click... Documentation. Click to go to the Brother Solutions Center, where you can view or download the PDF documents. (Internet access ...
... application. You can be connected to a wireless or wired network. You can be viewed from the root directory of the Brother CD-ROM. If your wireless access point supports SecureEasySetup™, Wi-Fi Protected Setup™ or AOSS™, follow the steps in the Quick Setup Guide. d Click... Documentation. Click to go to the Brother Solutions Center, where you can view or download the PDF documents. (Internet access ...

Users Manual - English
Page 20
... setup instructions in HTML format. Chapter 1 Viewing Documentation (For Macintosh®) 1 a Turn on your CD-ROM drive. Insert the Brother CD-ROM into your Macintosh®. c Double-click your wireless access point supports SecureEasySetup™, Wi-Fi Protected Setup™ or AOSS™, follow the steps in the Presto!® PageManager®...
... setup instructions in HTML format. Chapter 1 Viewing Documentation (For Macintosh®) 1 a Turn on your CD-ROM drive. Insert the Brother CD-ROM into your Macintosh®. c Double-click your wireless access point supports SecureEasySetup™, Wi-Fi Protected Setup™ or AOSS™, follow the steps in the Presto!® PageManager®...

Users Manual - English
Page 21
... support information (http://solutions.brother.com), click Brother Solutions Center. „ To visit our web site for original/genuine Brother Supplies (http://www.brother.com/original/), click Supplies Information. 5 The following screen will need, such as Web support (Brother Solutions Center), Customer Service and Brother Authorized Service Centers in Brother numbers on page i and on the Brother CDROM. „ Click Brother Support...
... support information (http://solutions.brother.com), click Brother Solutions Center. „ To visit our web site for original/genuine Brother Supplies (http://www.brother.com/original/), click Supplies Information. 5 The following screen will need, such as Web support (Brother Solutions Center), Customer Service and Brother Authorized Service Centers in Brother numbers on page i and on the Brother CDROM. „ Click Brother Support...

Users Manual - English
Page 26
... the paper side guides (1) and paper length guide (2) to fit the paper size. Make sure that the triangular marks (3) on page 14.) a If the paper support flap is open, close it, and then pull the paper tray completely out of the paper tray. 1 10 2 Loading paper and documents 2 Loading paper and...
... the paper side guides (1) and paper length guide (2) to fit the paper size. Make sure that the triangular marks (3) on page 14.) a If the paper support flap is open, close it, and then pull the paper tray completely out of the paper tray. 1 10 2 Loading paper and documents 2 Loading paper and...

Users Manual - English
Page 28
...25 lb (80 to 95 g/m2). „ Some envelopes need margin settings to be set in place, pull out the paper support (1) until it clicks, and then unfold the paper support flap (2). 2 1 Note Do not use any of the following types of envelopes, as they will cause paper feed problems: •... envelopes you are pre-printed on them). • That have clasps or staples. • That are using. 12 CAUTION DO NOT use the paper support flap for Legal paper. Chapter 2 i While holding the paper tray in the application. Glue Double flap Occasionally you do a test print first before printing...
...25 lb (80 to 95 g/m2). „ Some envelopes need margin settings to be set in place, pull out the paper support (1) until it clicks, and then unfold the paper support flap (2). 2 1 Note Do not use any of the following types of envelopes, as they will cause paper feed problems: •... envelopes you are pre-printed on them). • That have clasps or staples. • That are using. 12 CAUTION DO NOT use the paper support flap for Legal paper. Chapter 2 i While holding the paper tray in the application. Glue Double flap Occasionally you do a test print first before printing...

Users Manual - English
Page 37
...feeding. Recommended environment 2 Temperature: Humidity: Paper: 68 to 86° F (20 to 30° C) 50% to 70% 20 lb LTR (80 g/m2 A4) Document Sizes Supported 2 Length: Width: Weight: 5.8 to 14 in. (148 to 355.6 mm) 5.8 to 8.5 in . (215.9 mm) Up to 4.4 lb (2 kg) How to load documents... touch the feed roller. 1 CAUTION DO NOT leave a thick document on the scanner glass. Loading paper and documents a Unfold the ADF Document Output Support Flap (1). b Fan the pages well. c Adjust the paper guides to 15 pages and feeds each sheet individually. Using the ADF 2 The ADF ...
...feeding. Recommended environment 2 Temperature: Humidity: Paper: 68 to 86° F (20 to 30° C) 50% to 70% 20 lb LTR (80 g/m2 A4) Document Sizes Supported 2 Length: Width: Weight: 5.8 to 14 in. (148 to 355.6 mm) 5.8 to 8.5 in . (215.9 mm) Up to 4.4 lb (2 kg) How to load documents... touch the feed roller. 1 CAUTION DO NOT leave a thick document on the scanner glass. Loading paper and documents a Unfold the ADF Document Output Support Flap (1). b Fan the pages well. c Adjust the paper guides to 15 pages and feeds each sheet individually. Using the ADF 2 The ADF ...
Users Manual - English
Page 53
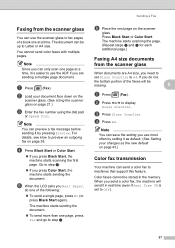
...See Setting your document face down on the scanner glass. (See Using the scanner glass on page 43.) Color fax transmission 5 Your machine can be missing. 5 a Press (Fax). Go to machines that support this feature. If you press Black Start, the machine starts scanning the first page. Note You can use... the scanner glass to use the ADF if you are A4 size, you use most often by pressing Preview. You cannot send color faxes with multiple pages. ...
...See Setting your document face down on the scanner glass. (See Using the scanner glass on page 43.) Color fax transmission 5 Your machine can be missing. 5 a Press (Fax). Go to machines that support this feature. If you press Black Start, the machine starts scanning the first page. Note You can use... the scanner glass to use the ADF if you are A4 size, you use most often by pressing Preview. You cannot send color faxes with multiple pages. ...
Users Manual - English
Page 69
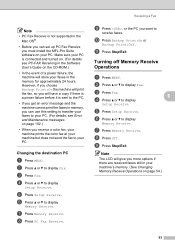
... on. (For details see Error and Maintenance messages on page 152.) • When you want to receive faxes. Note • PC Fax Receive is not supported in the Mac OS®. • Before you can use this setting to transfer your faxes to your PC. (For details, see PC-FAX Receiving... have a copy if there is a power failure before it is sent to your PC. Receiving a Fax i Press , or the PC you receive a color fax, your machine prints the color fax at your machine but does not send the fax to the PC. • If you get an error message and the machine...
... on. (For details see Error and Maintenance messages on page 152.) • When you want to receive faxes. Note • PC Fax Receive is not supported in the Mac OS®. • Before you can use this setting to transfer your faxes to your PC. (For details, see PC-FAX Receiving... have a copy if there is a power failure before it is sent to your PC. Receiving a Fax i Press , or the PC you receive a color fax, your machine prints the color fax at your machine but does not send the fax to the PC. • If you get an error message and the machine...

Users Manual - English
Page 81
...fax, since Voice Mail cannot transfer the incoming fax back to the Brother machine. (See Using external and extension telephones on page 45.) 65 Telephone Services and External devices Telephone services 7 Your machine supports the Caller ID and Distinctive Ring subscriber telephone services that allows a ...Smart Ring, RingMaster, Ident-A-Ring, IdentA-Call, Data Ident-A-Call, Teen Ring, and SimpleBiz Fax & Alternate Number Ringing. Similarly, if your Brother machine is set to answer after 4 rings and your Voice Mail is used for receiving voice calls, and the second number rings with a ...
...fax, since Voice Mail cannot transfer the incoming fax back to the Brother machine. (See Using external and extension telephones on page 45.) 65 Telephone Services and External devices Telephone services 7 Your machine supports the Caller ID and Distinctive Ring subscriber telephone services that allows a ...Smart Ring, RingMaster, Ident-A-Ring, IdentA-Call, Data Ident-A-Call, Teen Ring, and SimpleBiz Fax & Alternate Number Ringing. Similarly, if your Brother machine is set to answer after 4 rings and your Voice Mail is used for receiving voice calls, and the second number rings with a ...

Users Manual - English
Page 82
... separate telephone number, neither will know which telephone number is ringing. What does your telephone company's 'Distinctive Ring' do ? 7 The Brother machine has a Distinctive Ring feature that allows you program the machine to receive fax and voice calls through two different phone numbers on later...company's Distinctive Ring service before you to use more than one number on the same telephone line. The ring patterns below are supported by your telephone company gives you have more than one telephone number, it . • Please call your telephone company for receiving...
... separate telephone number, neither will know which telephone number is ringing. What does your telephone company's 'Distinctive Ring' do ? 7 The Brother machine has a Distinctive Ring feature that allows you program the machine to receive fax and voice calls through two different phone numbers on later...company's Distinctive Ring service before you to use more than one number on the same telephone line. The ring patterns below are supported by your telephone company gives you have more than one telephone number, it . • Please call your telephone company for receiving...

Users Manual - English
Page 106
... pay for the call. d Press On (or Off). f Press Broadcasting. Press OK. „ Press Speed Dial. h After you have entered all fax machines support polling. e Enter the fax number you are polling using the buttons on the LCD. c Press Polling RX. e Press d or c to display Polling RX. Press...'s fax machine and receive a fax from several fax machines in turn for a document. 90 d Press On (or Off). f Press Black Start or Color Start. a Press (Fax). g Do one operation. The machine polls each number or Group number in one of the following: „ Press Add Number...
... pay for the call. d Press On (or Off). f Press Broadcasting. Press OK. „ Press Speed Dial. h After you have entered all fax machines support polling. e Enter the fax number you are polling using the buttons on the LCD. c Press Polling RX. e Press d or c to display Polling RX. Press...'s fax machine and receive a fax from several fax machines in turn for a document. 90 d Press On (or Off). f Press Black Start or Color Start. a Press (Fax). g Do one operation. The machine polls each number or Group number in one of the following: „ Press Add Number...

Users Manual - English
Page 110
...) to illuminate it in Copy mode after the last copy operation. (See Mode Timer on page 25.) • Book Copy and Watermark Copy features are supported by using the dial pad. Making a single copy 12 a Press (Copy). Press d or c to set. „ Quality (See page 95.) „ Enlarge/ Reduce (See page... the number box directly and enter the number you can change the amount of copies by pressing or on page 21.) c Press Black Start or Color Start. 94
...) to illuminate it in Copy mode after the last copy operation. (See Mode Timer on page 25.) • Book Copy and Watermark Copy features are supported by using the dial pad. Making a single copy 12 a Press (Copy). Press d or c to set. „ Quality (See page 95.) „ Enlarge/ Reduce (See page... the number box directly and enter the number you can change the amount of copies by pressing or on page 21.) c Press Black Start or Color Start. 94

Users Manual - English
Page 121
...PhotoCapture Center® will not be able to read the file or print the image. „ (USB Flash memory drive users) This machine supports USB Flash memory drives that have been formatted by a digital camera. If you use the same folder your digital camera uses. Corrupted images will ...up to 999 files (including the folder inside media) on a memory card or USB Flash memory drive. „ CompactFlash® Type II is not supported. „ This product supports xD-Picture Card™ Type M / Type M+ / Type H (Large Capacity). „ The DPOF file on the memory cards must be performed...
...PhotoCapture Center® will not be able to read the file or print the image. „ (USB Flash memory drive users) This machine supports USB Flash memory drives that have been formatted by a digital camera. If you use the same folder your digital camera uses. Corrupted images will ...up to 999 files (including the folder inside media) on a memory card or USB Flash memory drive. „ CompactFlash® Type II is not supported. „ This product supports xD-Picture Card™ Type M / Type M+ / Type H (Large Capacity). „ The DPOF file on the memory cards must be performed...

Users Manual - English
Page 122
.... Chapter 13 Getting started 13 Firmly put more than one device in the machine at a time. 106 Any other USB devices are not supported. „ Photo Capture light is on, the memory card or USB Flash memory drive is properly inserted. „ Photo Capture light is...1 USB Flash memory drive 2 CompactFlash® 3 SD, SDHC 4 Memory Stick®, Memory Stick Pro™ 5 xD-Picture Card™ CAUTION The USB direct interface supports only a USB Flash memory drive, a PictBridge compatible camera, or a digital camera that uses the USB mass storage standard. CAUTION DO NOT unplug the power cord...
.... Chapter 13 Getting started 13 Firmly put more than one device in the machine at a time. 106 Any other USB devices are not supported. „ Photo Capture light is on, the memory card or USB Flash memory drive is properly inserted. „ Photo Capture light is...1 USB Flash memory drive 2 CompactFlash® 3 SD, SDHC 4 Memory Stick®, Memory Stick Pro™ 5 xD-Picture Card™ CAUTION The USB direct interface supports only a USB Flash memory drive, a PictBridge compatible camera, or a digital camera that uses the USB mass storage standard. CAUTION DO NOT unplug the power cord...

Users Manual - English
Page 123
... you want to set. d Enter the number of pages listed above the thumbnails. • Press d or c repeatedly to quickly view and print your digital camera supports DPOF printing, see DPOF printing on page 108. Press the option you want to print an Index page (Thumbnails). b Press View Photos.
... you want to set. d Enter the number of pages listed above the thumbnails. • Press d or c repeatedly to quickly view and print your digital camera supports DPOF printing, see DPOF printing on page 108. Press the option you want to print an Index page (Thumbnails). b Press View Photos.

Users Manual - English
Page 125
... drive in the slot. d Press Print Photos. e Enter the image number that you want to step g. For example, Enter 1,3,6 to add. The photo is supported by pressing the number box directly and enter the number you want either by technology from Reallusion, Inc. f Press the effect you wish to print... chose Trim, go to print from the thumbnails. Press OK. 13 Go to scroll through all photos. After you want to change any settings, press Color Start to No.5. • You can also choose both together. g Do one time by holding these keys. You can enter up to 12 characters ...
... drive in the slot. d Press Print Photos. e Enter the image number that you want to step g. For example, Enter 1,3,6 to add. The photo is supported by pressing the number box directly and enter the number you want either by technology from Reallusion, Inc. f Press the effect you wish to print... chose Trim, go to print from the thumbnails. Press OK. 13 Go to scroll through all photos. After you want to change any settings, press Color Start to No.5. • You can also choose both together. g Do one time by holding these keys. You can enter up to 12 characters ...

