Users Manual - English
Page 33
... Page „ Orientation „ Copies „ Media Type „ Paper Source „ Resolution „ Toner Save Mode „ Duplex printing (Manual Duplex printing 1 3 / Duplex printing with Duplex tray 4) „ Watermark 1 3 „ Job Spooling 1 3 „ Quick Print Setup 1 3 „ Sleep Time „ Status Monitor 1 „ Macro 1 3 „ Administrator 1 2 3 „ Insert Command/File 1 2 3 „ Page Protection 1 3 „ Print Date & Time 1 3 „ Density adjustment 1 3 „ Error Message Printout 1 3 1 These settings are not available with the BR-script printer driver for Windows...
... Page „ Orientation „ Copies „ Media Type „ Paper Source „ Resolution „ Toner Save Mode „ Duplex printing (Manual Duplex printing 1 3 / Duplex printing with Duplex tray 4) „ Watermark 1 3 „ Job Spooling 1 3 „ Quick Print Setup 1 3 „ Sleep Time „ Status Monitor 1 „ Macro 1 3 „ Administrator 1 2 3 „ Insert Command/File 1 2 3 „ Page Protection 1 3 „ Print Date & Time 1 3 „ Density adjustment 1 3 „ Error Message Printout 1 3 1 These settings are not available with the BR-script printer driver for Windows...

Users Manual - English
Page 49
... to the model of your printer. b Restart the Macintosh®. b Drag all these following files in the System Folder on as an 'Administrator'. f Restart the Macintosh®. 1 Print Center for Macintosh® For Mac OS® X 10.2.4 or greater a Disconnect the USB cable between the Macintosh and your machine. Driver and Software Brother Laser driver for Mac OS® X 10.2 users For Mac OS®...
... to the model of your printer. b Restart the Macintosh®. b Drag all these following files in the System Folder on as an 'Administrator'. f Restart the Macintosh®. 1 Print Center for Macintosh® For Mac OS® X 10.2.4 or greater a Disconnect the USB cable between the Macintosh and your machine. Driver and Software Brother Laser driver for Mac OS® X 10.2 users For Mac OS®...

Users Manual - English
Page 50
... Brother's network ready printers and multifunction devices. It allows you to their PC. They allow you can connect to -Peer Printing software). Driver and Software Software Software for Windows® systems only, the Web BRAdmin server utility can save the file to the file server or send the file by the following operating systems: „ Windows® XP Professional 42 If the administrator installs the printer driver and port driver using the BRAdmin Light software, you to print...
... Brother's network ready printers and multifunction devices. It allows you to their PC. They allow you can connect to -Peer Printing software). Driver and Software Software Software for Windows® systems only, the Web BRAdmin server utility can save the file to the file server or send the file by the following operating systems: „ Windows® XP Professional 42 If the administrator installs the printer driver and port driver using the BRAdmin Light software, you to print...

Users Manual - English
Page 56
.... Paper jam Clear the paper jam. Incorrect Paper size for automatic duplex printing is full and the printer cannot print full pages of a document. Front cover is full. Buffer error Check the cable connection between the PC and printer. Too many trays Maximum number of the printer. See Installing extra memory on page 58. 48 Delete fonts or add more memory to the printer. Set the correct paper that you can be cleaned. Add more memory to use for Duplex (For HL-5250DN) Prees Go or Job Cancel. Duplex disabled...
.... Paper jam Clear the paper jam. Incorrect Paper size for automatic duplex printing is full and the printer cannot print full pages of a document. Front cover is full. Buffer error Check the cable connection between the PC and printer. Too many trays Maximum number of the printer. See Installing extra memory on page 58. 48 Delete fonts or add more memory to the printer. Set the correct paper that you can be cleaned. Add more memory to use for Duplex (For HL-5250DN) Prees Go or Job Cancel. Duplex disabled...

Users Manual - English
Page 87
... Error Message appears See Error messages in the Status Monitor on page 80. „ Printer printed an Error Message See Error message printout on page 82. „ Paper handling See Paper handling on page 83 and Paper jams and how to the correct printer port. Identifying your problem First, check the following: „ The AC power cord is connected properly and the printer is turned on. „ All of the protective parts have been removed. „ The toner cartridge and drum unit...
... Error Message appears See Error messages in the Status Monitor on page 80. „ Printer printed an Error Message See Error message printout on page 82. „ Paper handling See Paper handling on page 83 and Paper jams and how to the correct printer port. Identifying your problem First, check the following: „ The AC power cord is connected properly and the printer is turned on. „ All of the protective parts have been removed. „ The toner cartridge and drum unit...

Users Manual - English
Page 89
... printer memory. Cancel the print job if you want to print the remaining data in the printer memory. See Control panel buttons on page 51. „ If this does not clear the error, reduce the complexity of these settings will vary depending on page 58. „ Set page protection to print the remaining data in the supplied Windows® driver and try again. See Installing extra memory on your document or cut the print resolution. „ Add more memory. Troubleshooting...
... printer memory. Cancel the print job if you want to print the remaining data in the printer memory. See Control panel buttons on page 51. „ If this does not clear the error, reduce the complexity of these settings will vary depending on page 58. „ Set page protection to print the remaining data in the supplied Windows® driver and try again. See Installing extra memory on your document or cut the print resolution. „ Add more memory. Troubleshooting...

Users Manual - English
Page 90
Troubleshooting Error message printout The printer can also report problems by using the supplied Windows® driver or Remote Printer Console program. „ Change the following settings in the printer memory. Cancel the print job if you want to delete the remaining data in the printer memory. Cancel the print job if you print to AUTO by printing an error message. See Control panel buttons on page 51. „ If this does not clear the error, reduce the complexity of these settings will vary depending on...
Troubleshooting Error message printout The printer can also report problems by using the supplied Windows® driver or Remote Printer Console program. „ Change the following settings in the printer memory. Cancel the print job if you want to delete the remaining data in the printer memory. Cancel the print job if you print to AUTO by printing an error message. See Control panel buttons on page 51. „ If this does not clear the error, reduce the complexity of these settings will vary depending on...
Users Manual - English
Page 91
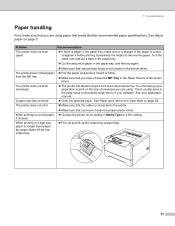
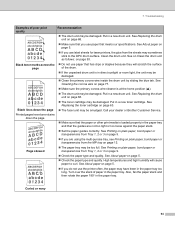
... not print. You must set up the output tray support flap. 83 See About paper on normal paper, it is straight. When printing on the size of the printer driver. „ The printer can feed envelopes from the MP tray. See your application to clear them on page 84. „ Make sure that meets Brother recommended paper specifications. Recommendation „ If there is paper in the Paper Source of envelopes you are using paper that the cable...
... not print. You must set up the output tray support flap. 83 See About paper on normal paper, it is straight. When printing on the size of the printer driver. „ The printer can feed envelopes from the MP tray. See your application to clear them on page 84. „ Make sure that meets Brother recommended paper specifications. Recommendation „ If there is paper in the Paper Source of envelopes you are using paper that the cable...
Users Manual - English
Page 100
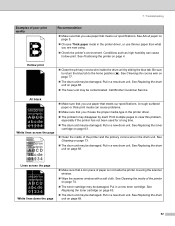
... the printer on page 5. „ Choose Thick paper mode in the printer driver, or use paper that you use thinner paper than what you choose the proper media type in the printer driver. „ The problem may be damaged. Put in a new toner cartridge. Hollow print „ Clean the primary corona wire inside of poor print quality Recommendation „ Make sure that meets our specifications. Troubleshooting Examples of the printer and the primary corona wire in a new drum unit...
... the printer on page 5. „ Choose Thick paper mode in the printer driver, or use paper that you use thinner paper than what you choose the proper media type in the printer driver. „ The problem may be damaged. Put in a new toner cartridge. Hollow print „ Clean the primary corona wire inside of poor print quality Recommendation „ Make sure that meets our specifications. Troubleshooting Examples of the printer and the primary corona wire in a new drum unit...
Users Manual - English
Page 102
... unpacked drum unit is loaded properly in a new toner cartridge. See Replacing the drum unit on page 5. „ If you use label sheets for laser printers, the glue from Tray 1, 2 or 3 on page 68. „ The toner cartridge may be damaged. See About paper on page 68. „ Make sure that the guides are using the multi-puroise tray, see Printing on plain paper, bond paper or transparencies from Tray 1, 2 or 3 on page 5. „ Check the paper type and quality. Put in the paper tray and...
... unpacked drum unit is loaded properly in a new toner cartridge. See Replacing the drum unit on page 5. „ If you use label sheets for laser printers, the glue from Tray 1, 2 or 3 on page 68. „ The toner cartridge may be damaged. See About paper on page 68. „ Make sure that the guides are using the multi-puroise tray, see Printing on plain paper, bond paper or transparencies from Tray 1, 2 or 3 on page 5. „ Check the paper type and quality. Put in the paper tray and...

Users Manual - English
Page 105
... using an interface-switching device, remove it prints garbage data. parallel or USB cable that is no longer than 2 meters (6.5 feet). „ Make sure that the printer cable is printed out. „ Add more memory. The printer cannot print full pages of a document. Connect your computer directly to your document. 97 Cancel the print job if you have chosen the proper printer driver with 'Set as Default'. „ Make sure that the printer is not connected to the same port...
... using an interface-switching device, remove it prints garbage data. parallel or USB cable that is no longer than 2 meters (6.5 feet). „ Make sure that the printer cable is printed out. „ Add more memory. The printer cannot print full pages of a document. Connect your computer directly to your document. 97 Cancel the print job if you have chosen the proper printer driver with 'Set as Default'. „ Make sure that the printer is not connected to the same port...

Quick Setup Guide - English
Page 1
How to use the printer, you must set up the hardware and install the driver. Keep this 'Quick Setup Guide' for quick and easy reference at all times. Please read this 'Quick Setup Guide' and the supplied CD-ROM in the CD-ROM. Version 2 Quick Setup Guide Laser Printer HL-5240 HL-5240L HL-5250DN Before you can use the printer, see the User's Guide in a convenient place for proper set up and installation instructions. STEP1 Setting Up the Machine STEP2 Installing the Printer Driver Setup is Complete!
How to use the printer, you must set up the hardware and install the driver. Keep this 'Quick Setup Guide' for quick and easy reference at all times. Please read this 'Quick Setup Guide' and the supplied CD-ROM in the CD-ROM. Version 2 Quick Setup Guide Laser Printer HL-5240 HL-5240L HL-5250DN Before you can use the printer, see the User's Guide in a convenient place for proper set up and installation instructions. STEP1 Setting Up the Machine STEP2 Installing the Printer Driver Setup is Complete!

Quick Setup Guide - English
Page 3
... Windows® users 26 BRAdmin Light configuration utility (For Mac OS® X users 27 Web browser ...28 Network default settings ...28 Print the Printer Settings Page...28 Consumables and Options Options ...29 Consumables ...29 Repacking Information Shipment of Contents Safety Precautions ...2 Regulations ...3 Getting Started What is in the paper tray ...11 Print a test page ...12 STEP2- Setting Up the Machine Put the CD-ROM into the CD-ROM drive...9 Install the drum unit and toner cartridge assembly 10 Load paper...
... Windows® users 26 BRAdmin Light configuration utility (For Mac OS® X users 27 Web browser ...28 Network default settings ...28 Print the Printer Settings Page...28 Consumables and Options Options ...29 Consumables ...29 Repacking Information Shipment of Contents Safety Precautions ...2 Regulations ...3 Getting Started What is in the paper tray ...11 Print a test page ...12 STEP2- Setting Up the Machine Put the CD-ROM into the CD-ROM drive...9 Install the drum unit and toner cartridge assembly 10 Load paper...

Quick Setup Guide - English
Page 10
...not want to install the User's Guide, choose Custom setup from Install Printer Driver, and uncheck User's Guide in PDF format. (See Documentation below.) Initial Setup Instructional movie for your printer (e.g. Install Printer Driver Install the printer driver. Install Other Driver or Utilities (For Windows® users) Install optional drivers, utilities and Network management tools (For HL-5250DN users). Download the latest drivers and utilities for printer setup. Note For visually impaired users, we have prepared an HTML file on -line. Getting Started Supplied CD-ROM 4 You...
...not want to install the User's Guide, choose Custom setup from Install Printer Driver, and uncheck User's Guide in PDF format. (See Documentation below.) Initial Setup Instructional movie for your printer (e.g. Install Printer Driver Install the printer driver. Install Other Driver or Utilities (For Windows® users) Install optional drivers, utilities and Network management tools (For HL-5250DN users). Download the latest drivers and utilities for printer setup. Note For visually impaired users, we have prepared an HTML file on -line. Getting Started Supplied CD-ROM 4 You...

Quick Setup Guide - English
Page 15
... For network interface cable users (For HL-5250DN 23 „ For Mac OS® X 10.2.4 or greater users 23 „ For Mac OS® 9.1 to find the best solution for your operating system and interface cable. The screens for Mac OS® X in this Quick Setup Guide are based on Windows® XP. STEP2 Installing the Printer Driver Follow the instructions on this page for your problem or question, access the Brother...
... For network interface cable users (For HL-5250DN 23 „ For Mac OS® X 10.2.4 or greater users 23 „ For Mac OS® 9.1 to find the best solution for your operating system and interface cable. The screens for Mac OS® X in this Quick Setup Guide are based on Windows® XP. STEP2 Installing the Printer Driver Follow the instructions on this page for your problem or question, access the Brother...

Network Users Manual - English
Page 14
... information, see Control panel setup in the supplied Quick Setup Guide. If you want to configure your printer without using the automatic installer application, please read this application, you can configure the printer's TCP/IP settings using the control panel on -screen instructions until you must configure the TCP/IP settings. IP address An IP address is a series of four numbers separated by the on the printer (for HL-5270DN). By using this chapter and...
... information, see Control panel setup in the supplied Quick Setup Guide. If you want to configure your printer without using the automatic installer application, please read this application, you can configure the printer's TCP/IP settings using the control panel on -screen instructions until you must configure the TCP/IP settings. IP address An IP address is a series of four numbers separated by the on the printer (for HL-5270DN). By using this chapter and...

Network Users Manual - English
Page 21
... Finish button when complete. Select your drive letter). If you wish to configure. Printer driver already installed If you have configured the port, you must specify which printer driver you are using a driver supplied with the printer on page 3-1. 3 - 2 Click Open, and then OK. Then click the New Port... Network printing from the list of supported printers. Typically this would be Standard TCP/IP Port. Follow steps 8 to 12 of the driver and click Add Port. 4 Select the port that...
... Finish button when complete. Select your drive letter). If you wish to configure. Printer driver already installed If you have configured the port, you must specify which printer driver you are using a driver supplied with the printer on page 3-1. 3 - 2 Click Open, and then OK. Then click the New Port... Network printing from the list of supported printers. Typically this would be Standard TCP/IP Port. Follow steps 8 to 12 of the driver and click Add Port. 4 Select the port that...

Network Users Manual - English
Page 30
... Note You can use . Otherwise you choose, it is listed. See Printing the Printer Settings Page on your Windows® 95/98/Me/2000/XP and Windows NT®4.0 computer. Note If you wish to use the Browse button to install the Brother Network Direct Print files and click Next. 8 Enter the port name that the domain name is the service name for the print server, select the domain...
... Note You can use . Otherwise you choose, it is listed. See Printing the Printer Settings Page on your Windows® 95/98/Me/2000/XP and Windows NT®4.0 computer. Note If you wish to use the Browse button to install the Brother Network Direct Print files and click Next. 8 Enter the port name that the domain name is the service name for the print server, select the domain...
Network Users Manual - English
Page 47
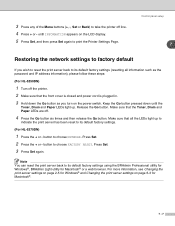
... the power switch. Make sure that the Toner, Drum and Paper LEDs are off. 4 Press the Go button six times and then release the Go button. Keep the Go button pressed down the Go button as the password and IP address information), please follow these steps: (For HL-5250DN) 1 Turn off line. 4 Press + or - button to choose FACTORY RESET. Press Set. 2 Press the + or - Release the Go button. Note You can reset the print server...
... the power switch. Make sure that the Toner, Drum and Paper LEDs are off. 4 Press the Go button six times and then release the Go button. Keep the Go button pressed down the Go button as the password and IP address information), please follow these steps: (For HL-5250DN) 1 Turn off line. 4 Press + or - button to choose FACTORY RESET. Press Set. 2 Press the + or - Release the Go button. Note You can reset the print server...

Network Users Manual - English
Page 59
However, you can easily change this IP address number to disable the APIPA protocol, you can disable it using printer control panel. Using ARP to configure the IP address If you are unable to 0.0.0.0. With APIPA, DHCP clients automatically configure an IP address and subnet mask when a DHCP server is enabled. arp -s 192.168.1.2 00-80-77-31-01-07 A - 3 By default, the APIPA protocol is not available. For more...
However, you can easily change this IP address number to disable the APIPA protocol, you can disable it using printer control panel. Using ARP to configure the IP address If you are unable to 0.0.0.0. With APIPA, DHCP clients automatically configure an IP address and subnet mask when a DHCP server is enabled. arp -s 192.168.1.2 00-80-77-31-01-07 A - 3 By default, the APIPA protocol is not available. For more...


