Users Manual - English
Page 87
... LEDs will start warming up . Keep the button pressed down until the green Status LED comes on . All the LEDs will light up . When the Toner LED comes on, release the Go button. 4 Hold down the Go button and keep it pressed down until the... the power switch. The print server has been reset to its default factory settings (resetting all the LEDs light up again, the printer will light up. Disabling the APIPA protocol (For HL-5170DN) If you turn on APIPA, see the Network User's Guide or visit http://solutions.brother.com ■ You can also disable the...
... LEDs will start warming up . Keep the button pressed down until the green Status LED comes on . All the LEDs will light up . When the Toner LED comes on, release the Go button. 4 Hold down the Go button and keep it pressed down until the... the power switch. The print server has been reset to its default factory settings (resetting all the LEDs light up again, the printer will light up. Disabling the APIPA protocol (For HL-5170DN) If you turn on APIPA, see the Network User's Guide or visit http://solutions.brother.com ■ You can also disable the...
Users Manual - English
Page 103
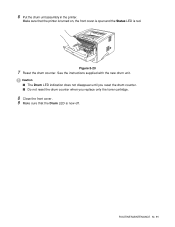
Make sure that the Drum LED is red. Caution ■ The Drum LED indication does not disappear until you reset the drum counter. ■ Do not reset the drum counter when you replace only the toner cartridge. 8 Close the front cover. 9 Make sure that the printer is turned on, the front cover is open and the Status LED is now off. See the instructions supplied with the new drum unit. ROUTINE MAINTENANCE 5 - 11 6 Put the drum unit assembly in the printer. Figure 5-20 7 Reset the drum counter.
Make sure that the Drum LED is red. Caution ■ The Drum LED indication does not disappear until you reset the drum counter. ■ Do not reset the drum counter when you replace only the toner cartridge. 8 Close the front cover. 9 Make sure that the printer is turned on, the front cover is open and the Status LED is now off. See the instructions supplied with the new drum unit. ROUTINE MAINTENANCE 5 - 11 6 Put the drum unit assembly in the printer. Figure 5-20 7 Reset the drum counter.


